Monday, January 18, 2016

DIY: Parachute Cord Dog Collar

I made Sarge a new "necklace" out of two colors of parachute cord and added a length of chain to it to jazz it up. I'm calling it a necklace instead of a collar because I don't trust the plastic clasp on this to hold him with the way he pulls on the leash so hard, I use a thick slip-over-his-neck collar when we walk - so this is just for decoration :) If I had a nice gentle dog that doesn't pull like a madman then I would be ok with using it as his collar. You can attach a D-ring if you want to have someplace to clip the leash to.


Search online for the instructions for how to make these, parachute cord projects are everywhere - you can make bracelets, etc. too with the same directions. I had the soccer girls make keychains using this technique (click here to see that post), it isn't hard but I'm not going to try to explain making the knots when other people have already figured out how to teach it haha! One useful tip I have is to clip the top of the piece to cardboard or something, and then clip the middle two strands that are stationary (you make the knots over the two middle strands using the two outer strands) at the bottom of the cardboard - it helps to not have them moving all over when you are knotting.


-Measure your dogs neck, or the length you want a bracelet or whatever to be.
-The directions I was following online said to cut the cords one foot for every inch you will be knotting but that wasn't correct for me. I made Sarge a 14.5" collar so cut 16' of cord and had a ton left over. I used approximately 9 feet of cord (each color).
-Put both of the cords thru one end of the clasp, pull them thru the length you want your project to be plus a couple of inches. In my case I pulled about 18 inches thru. The short cords are the 2 middle strands and clip them to the bottom of a piece of cardboard. The long strands are what you will knot over the short strands.


-Make knots until you get a couple inches from where you want to end, thread the other end of the clasp on (make sure the clasp is facing the same way as the other end, they bow slightly) and fold the short ends back on themselves. Continue making knots over the short ends to weave them in.
-Get as close to the clasp as you can, then tie off. Clip the short ends off that are now sticking out of the collar.


-Trim off the excess long strands, I left long tails on Sarge's cuz I think it's cute to have them hanging down. Using a lighter or match, carefully melt the end tips of the cord (wherever you decide to cut them off. If you don't want tails, clip the cords close to the collar and melt them there) so the cord doesn't fray.


I decided he needed to be a little fancy and attached a chain to both clips so it sits next to the collar.


Sunday, January 17, 2016

Best Meatballs Ever!

Pretty nervy to title something the 'best' right? But really, these are the best I've ever had! 


They are SO so good...I really hope you'll try them and love them as much as we all do. I followed this recipe from Fabio (a cute Italian chef on Top Chef a few seasons back) I saw in a magazine, and I'm super glad I did!  I made a couple changes - I had one pound each of beef, lamb, and pork on hand because I thought I was going to make meatloaf last week; I used that instead of all beef and added an extra egg since I was using a half pound more than the recipe. One other change is that the recipe calls for grand Padano cheese (another one I had to look up, it's a hard italian cheese like parmesan), I just used parm instead. I can't say if they will be the "best ever" if you follow the recipe exactly but I'm thinkin' they'll still be delish.

Friends came over a few nights ago to watch football and I made these into sliders along with broccoli slaw as our side. I formed the meatballs using a large cookie scoop (I'd say it holds at least a quarter cup), 3 pounds of meat mixture made 29 large meatballs - the recipe calls for making them normal sized and says the yield is 65. I baked them for 25 minutes and then put them in a large pan on the stove in marinara sauce to finish.


We then put them on hawaiian rolls with a small piece of provolone cheese and a romaine lettuce leaf, top with more sauce if you like (I like, so I ate mine with a fork instead of trying to pick it up!).


A couple nights later I warmed up the leftovers and put them over "zoodles" - have you had those yet? Zucchini put thru a vegetable spiralizer thing and it makes long noodle shaped strands...so they're "zoodles"- less calories and carbs then if you use actual noodles. And after eating all those sliders we needed a night of lower calorie zoodles haha! You can get the spiralizer thing lots of places now, I found this small hand held one at a cooking store. I just warm up the zucchini in a large saucepan for a few minutes, don't over cook them or it gets quite watery. You can also microwave them for a couple minutes instead.


This version came from BHG magazine.

Saturday, January 16, 2016

Fresh Whiskey Sours

I have always liked sweet-tart flavors and this is no exception - a whiskey sour hits just the right balance of a little sweet and a little tart for me.  I've never made one myself though so when I saw this recipe from Barefoot Contessa I decided I'd give it a whirl.


Very easy recipe:

3/4 cup whiskey
1/2 cup freshly squeezed lemon juice (3 lemons)
1/2 cup freshly squeezed lime juice (4 limes)
2/3 cup sugar syrup (see below)
maraschino cherries for garnish

Combine the whiskey, lemon juice, lime juice and syrup. Fill a cocktail shaker halfway with ice and fill two-thirds full with the cocktail mixture. Shake for 30 seconds and pour into glasses. Add a maraschino cherry and serve ice cold.

Sugar syrup:
put 1 cup sugar and 1 cup water in a small saucepan and cook over medium heat until the sugar dissolves. Chill before using.

Note: I used bottled lemon and lime juices and it still tastes great :)

*
I googled "how to make a virgin whiskey sour" expecting the computer to laugh at me, but on Kraft's website they suggest replacing the whiskey with apple juice. I didn't test that but at least it's an option if you want to try this without alcohol.

Friday, January 15, 2016

Dipped Shortbread Cookies

We had friends over to watch football and even though everyone said they didn't want dessert I knew I better have a little sumthin' sumthin' on hand just in case. I was busy making meatballs (the best meatballs I've ever made! Will post that later I promise - I'm still thinking about them and how great they were) so didn't have time to do anything too time consuming...I usually have a box or two of girl scout cookies in the freezer and I had chocolate candy melt stuff leftover from making dipped pretzels so I made just about the easiest "after meatball sliders we don't want dessert" dessert ever.


1. melt the chocolate:


2. dip one edge of a shortbread cookie in the melted chocolate and shake it a little to remove some of the excess: 
                                                                 

3. lightly sprinkle with coarse salt, put on parchment paper until set, doesn't take long at all.


Oh, and for the record - maybe no one "wanted" dessert but these were devoured in like 3 minutes.

Thursday, January 14, 2016

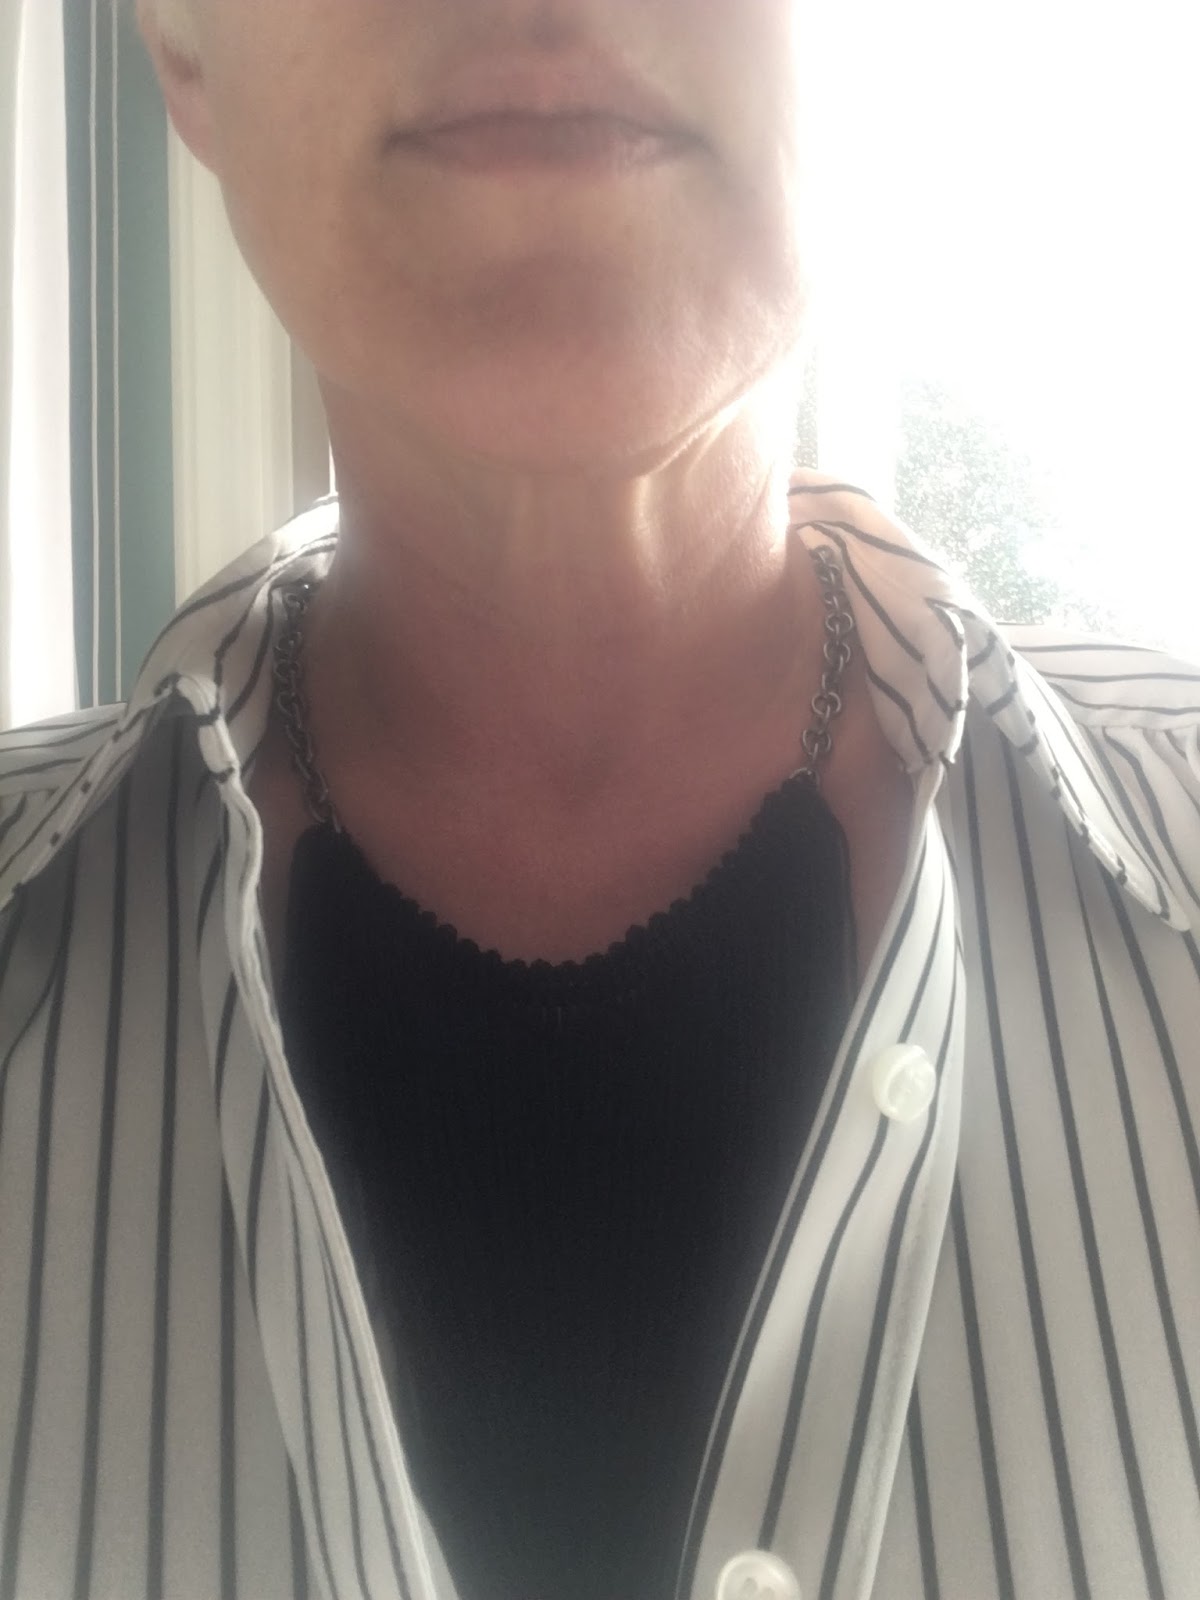
Make a Fringe Necklace

This has been in my idea folder since 2011 and I finally got around to making one. Wasn't hard to make at all, and it turned out really cute - I'm going to wear this a lot!

The directions weren't exactly right, they said to sew 6" fringe to 8" of chain and then slip over your head. Simple, right? Except I don't have a very large head and there's no way a 14" necklace that isn't stretchy is going to fit over my head! I measured and the necklace would need to be more like 22" for that to happen. I modified the original directions a bit to make it work for me. If you have a 14" head then the original directions will be fine for you :)

1. I used a 14" length of chain, pull about an inch of fringe thru one end of chain.
2. fold the fringe back on itself and sew in place.
3. repeat on the other side of the chain.
fringe comes with string on the bottom to keep it together,
 just pull the strings off to release the bottom of the fringe. 
4. I then took out the middle link from chain so there is about 6.5" on each side.
5. using about 20" of thin black ribbon put it thru both ends of the chain, put the necklace over your  head and then tie the ribbon closed (I'll double knot it to make sure it stays on). 


here it is under a blouse...
and over a t-shirt. Play with it to see how you like it!


This idea came from InStyle Magazine, Feb. 2011

Wednesday, January 13, 2016

Covering Side Tables

We have 2 big mirrored dressers next to each side of the bed we use as nightstands - they have big drawers which is nice for storage and a large top for the lamps, etc. All well and good except the mirrored top drives me crazy with dust and fingerprints! Argh! I can clean them every day and still see dust...hate that. So with the leftover contact paper from Sarge's dog house (click here for that post) I covered up the table tops - yes I get the dust is still there but at least I don't have to see it every day! A quick simple solution :)


Tuesday, January 12, 2016

Closet Organizing

I cleaned out and organized a closet we have under our stairs - I found an over the door shoe rack in there and put it to use to organize miscellaneous things. I didn't want the over the door holder part though so I took that off and attached it to the door with 3 command hooks. Now it's holding all kinds of things like extension cords, lightbulbs, emergency candles, and vacuum attachments among lots of other stuff.


I also put a wire shelf thing in the back of the closet to hold little things like frames, candles, plant holders, etc.. There is another one to the left where the closet makes an "L" under the stairs - back there I have extra throw pillows and rugs, and a few framed wall pictures. When I want to change decorations around in the house I go into the closet and swap out things from the shelves - I call it "shopping in my own house". 

Monday, January 11, 2016

Make a Wrapped Wire Ring

I bought a wrapped wire ring the other day, and after really looking at it I thought "well I can make that"...and with my friend Janis's help we tried to recreate it. I might need to file this under "bloopers" or something though - what seemed like a super simple project ended up taking us a couple hours and we never really did figure it out. We used 20 gauge copper wire, wrapped it around a ring sizer a few times, threaded the end of the wire up thru the whole thing and twisted it around to finished it. Sounds easy right? We wound and unwound the wire a bunch of times and just couldn't get it to look like the "real" one - I decided I had enough of trying to make it work and will play with it some more in the future. In the meantime, here's a look at what we did and if you decide to try it let me know if you have better luck with the finished product!
and back.
front of the original ring I bought...


wrap wire around a few times


thread ends of wire thru the stack


twist to hold in place


the finished product - back and front

Sunday, January 10, 2016

French Bean and Vegetable Soup

I got this recipe and photo from a friend, she got it from a "Best of Fine Cooking" magazine. True story and a good tip for the future - she was flying home from a trip at Christmas and couldn't fit all of the gifts she received in her suitcase. So she had the idea to buy a magazine at an airport store and asked them to put it in a very large bag - that way she had a bag to put her excess belongings in to carry onto the plane. I guess they don't count the gift shop bag as another carry on bag - at least she says they haven't stopped her so far. While I would have bought HGTV or fashion/gossip type magazine, she picked up a Fine Cooking and wanted to try this soup recipe. 


She gave me enough soup to have 2 meals (I had it both times for breakfast - yep I eat weird stuff for breakfast, especially if it's delicious leftovers!) and I liked it so much I asked if I could put it on the blog for you guys to try. Even though I didn't make it myself,  I know what a great cook she is and did get to taste it (that counts for something, right?)... I will definitely make this in the future.      

She made a couple changes - the recipe calls for dried flageolets (I had to look that up, it's a small french bean) soaked for hours, she used canned great northern beans instead so skipped the whole soaking part. Because of that she didn't have any reserved water from the beans so replaced it with white wine. She said "figured that couldn't hurt" haha. She also didn't add sherry vinegar and used less of the sausage. Since I haven't made it yet I don't know if I would make any additional changes, but looking at the recipe I can suggest that if you don't have whole cloves of garlic, fresh thyme, or fresh chives I bet it would be fine with dried herbs. I might sprinkle in garlic powder or salt if I felt like it. You could also use a different sausage than andouille, I thought it was crumbled Italian sausage when I ate it - or you could make this vegetarian and leave the meat out entirely. This is a yummy bean and veggie soup with little bits of sausage. Don't be overwhelmed at the long ingredient lists - it's pretty much things you probably have on hand and if not just throw in what you do have! The beauty of making soup...

1 1/4 cups (8oz) dried flageolets, sorted and rinsed
1 medium clove garlic, smashed and peeled
1 bay leaf
kosher salt
2 T. extra virgin olive oil or unsalted butter
1/4 lb. andouille sausage, cut into 1/2 inch pieces
3/4 cup chopped leek, cleaned
3/4 cup chopped shallot
freshly ground black pepper
1 T. tomato paste
1 1/2 t. minced fresh garlic
1 1/2 t. chopped fresh thyme
3/4 t. dried herbs de Provence
1 cup sliced carrots (1/4" thick half-moons)
1 cup canned, drained, diced tomatoes (reserve the juice)
1 cup coarsely chopped swiss chard
5 to 6 cups chicken broth
1 to 2 t. sherry vinegar
1/3 cup thinly sliced fresh chives

Put the beans in a large bowl, add enough cold water to cover by 3 inches, and soak for 4 to 12 hours.

Drain and rinse the beans and transfer them to a 3 or 4 quart saucepan. Add the smashed garlic, bay leaf, and 6 cups cold water. Partially cover and simmer gently, stirring occasionally and adding 3/4 t. salt after 30 minutes, until the beans are tender, 45 minutes to 1 hour total. If at any time the liquid doesn't cover the beans, add 1 cup water. Drain the beans, reserving the liquid. Discard the bay leaf (the garlic clove can stay).

Heat the olive oil or butter in a 4 to 5 quart soup pot or dutch oven over medium heat. Add the sausage and cook stirring often, until beginning to brown, 5 to 8 minutes. Pour the sausage and fat into a small strainer set over a bowl, and set it aside. Spoon 2 T. of the fat back into the pot and return it to medium heat. Add the leek and shallot and season with a pinch of salt and pepper. Cook stirring frequently, until the begin to soften, 4 to 6 minutes.

Add the tomato paste, minced garlic, thyme, and herbs de Provence, and cook until fragrant, 1 minute more.

Add the carrots, tomatoes, and swiss chard, stirring to incorporate with the seasonings. Add 2 cups of the broth, partially cover, and simmer until the vegetables are just barely tender, 10 to 15 minutes.

In a large measuring cup, combine the reserved juice from the canned tomatoes, 1 cup of the reserved bean cooking liquid, and enough broth to bring the amount of liquid to 4 cups.

Add the liquid, beans, and andouille to the pot and simmer, partially covered, for 10 minutes to meld the flavors.

Season to taste with vinegar, salt, and pepper. Serve garnished with the chives.

This warm and comforting soup is perfect for a chilly evening. Serve it with crusty bread drizzled with extra-virgin olive oil. Serves 6.


Saturday, January 9, 2016

Bloody Mary

I used to hate tomato juice so a Bloody Mary was never my thing - but then I had a really good one with a friend at a little bar in Ludington, Michigan and it changed my thinking...it was a little spicy but not too much, celery salt around the glass edge, and I can't remember what else. I just remember that I loved it so I've been experimenting with making them at home. My favorite brand for the mix is  Zing Zang - I doctor it a little bit of course and it's good with or without alcohol. I add sliced olives with some juice, a pickle spear if I have them (especially a spicy pickle spear - yum), a splash of lemon juice, and coarse pepper - if you want to spike it you can add vodka or whatever but my new favorite thing is to add a splash of Fireball Whiskey. I looked online and found a recipe for Fireball Bloody Mary - they renamed it a "Bloody Ball" which just doesn't sound good and I'm sticking with "Bloody Mary with Fireball in it" haha. I'm not sure why but the addition of a little cinnamon flavor is so good - it doesn't take much though to get the taste, not sure if I would like it with a full shot added. Try it (either virgin or spiked) and see what you think.

I drank mine before I remembered to take a picture haha - but really, it just looks like a glass of tomato juice with olives floating in it!

2019 update: I had a bloody mary at Uncle John's Cider Mill in St. Johns, MI that included pickled mushrooms, pickled dilly beans, and pickled asparagus along with olives and a spicy pickle and it was bloody fantastic.