Monday, October 31, 2022

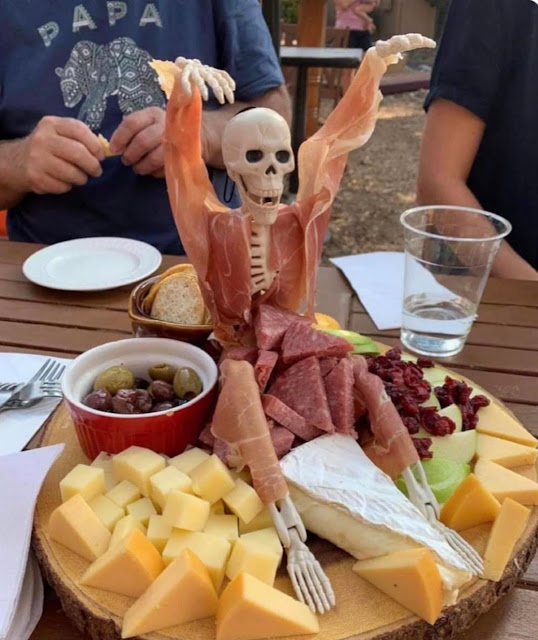
Jen’s Char”spook”erie Board

I blogged the idea for a Halloween themed charcuterie board earlier so you could have the idea in time - here’s a last minute follow up picture of a couple different ones my sis put together.

This is one she made for a work function today - meat, cheeses, crackers, veggies, dips, grapes, candy corn, pretzel mummies, ping pong eyeballs, and the bowl in the center is cream cheese dip covered with red jam (I think it’s strawberry rhubarb, you could also use red pepper jelly) with a hatchet shaped cheese knife - it’s supposed to be a “brain”. Cute, right?


This one is a little different, she switched out the cream cheese dip for a Mediterranean dip, didn’t add the mummy pretzels but included pretzel twists instead:

Here’s another one her co-worker made and called it “char-boo-Teri” (going out on a limb here but I’m assuming her coworkers name is Teri haha): 

She mixed light cream cheese, light sour cream, shredded mozzarella cheese together to make the dip - she said once they started scooping it out it became what looked like a “bloody blob”

10.31.21: 🔥 week 44


10.31.19: succulent garden


10.31.2017: Cathy's pumpkin seeds 


10.31.15: witch hat cupcakes

Sunday, October 30, 2022

🔥 Around the Campfire (week 44)

Dear Campers ~

Here’s a quick recap in case you missed anything at camp last week:

Posts ~

10/23: 🔥 week 43

10/24: Jen’s bottle display cabinet

10/25: Dijon fig sauce

10/26: painted rock snake

10/27: pasta chicken broccoli bake

10/28: root vegetable pasties 

10/29: mummy pretzel rods

What’s Cooking ~

That’s it for this week, bye!

Sincerely~

Jill
camp counselor 

Saturday, October 29, 2022

Mummy Pretzel Rods

Stole this cute last minute idea from the Pioneer Woman, didn’t change a thing and I love how they turned out! Super quick and easy to boot. 

Melt white candy melts according to package directions. Dip about half a rod into the melted candy and shake off excess. Lay on a wire rack sprayed with non-stick spray and let the candy harden. Put the rest of the melted candy costing into a ziplock bag and snip the corner, drizzle over the pretzel then immediate stick in some candy eyes. Let the coating harden and you’re done. I’m going to stand them up in a Halloween glass I have, but you also just arrange them on a tray to serve. If gifting these I’d wrap individually in clear cellophane and tie with a ribbon. 


I had a little left over coating in the ziplock bag so I just drizzled it over some leftover pretzels, not pretty but tastes good! 


10.29.20: witch hat cupcakes


10.29.18: bloodshot eyeball appetizer


10.29.17: Jen's easy spider cookies


10.29.16: brain hemorrhage drink

10.29.15: skeleton pretzels


    Friday, October 28, 2022

    Root Vegetable Pasties (and Meat Pasties too!)

    Dave asked the other day if there is a season for pasties (do you know what a pastie is? Basically a handheld meat pie) and I said I didn’t think so, I think they’re year round. Then a couple days later Mark sent me a recipe for pasties hoping I’d make them haha. You might remember that I already made and posted a recipe for Michigan Pasties, I’m going to repost that one and then give you the recipe Mark sent so you have variations if you want to make them. 

    Here’s the original post from May ‘20:

    Talking with my mom and she told me about having pasties when she was little and loving them - can't remember why we were talking about pasties hahahah, kind of a random topic. Anyway...she found this recipe online and I said I'd give it a try. I've eaten my fair share of them but have never made them - not gonna lie, they took longer to make than I anticipated, but it just so happens I have lots of time since we are still 'staying home' and turns out it was well worth the time and energy. These are great! I shared some with my sister, who is going to review them later and I'll update when she does, but spoiler alert - I already know she also loved them. (Click here for her review)


    Mom emailed me the recipe and had this to say about them: 

    We had a neighbor Mrs Christie who lived in the farmhouse across the street (I think she was English) who always brought us over “pasties” that I still remember being the best thing ever. She was very old with a bun and always had a long apron on, I got in trouble for crossing the street to go visit her. Thanks for helping me find a good memory from childhood!


    UPPER PENINSULA PASTIES

    Ingredients:

    crust ~
    • 2 cups shortening
    • 2 cups boiling water
    • 5 to 5 1/2 cups all-purpose flour
    • 2 teaspoons salt
    filling ~
    • 6 medium potatoes (about 3 pounds), peeled, chopped into 1/4" cubes
    • 1 large rutabaga (about 1 1/2 pounds), peeled, chopped into 1/4" cubes
    • 1 pound ground beef
    • 1/2 pound ground turkey
    • 1 small onion, finely chopped
    • 1 carrot, chopped into 1/4" cubes
    • 2 teaspoons salt
    • 1 teaspoon coarse salt, plus more to finish
    • 2 teaspoons pepper, plus more to finish
    • 2 teaspoons garlic powder
    • 1/4 cup butter
    • 1 egg, lightly beaten
    Directions:
    1. In a large bowl, stir shortening and boiling water until shortening is melted. Gradually stir in flour and salt until a very soft dough is formed; cover and refrigerate for 1 1/2 hours.
    2. Combine ground beef and turkey, break into small crumbles. In a large bowl, combine potatoes, rutabagas, onion, meats, and seasonings.
    3. Divide dough into 12 equal portions. On a floured surface, roll out 1 portion at a time into an 8" circle. Mound 1 generous cup of filling on half of each circle; dot with 1 teaspoon butter. Moisten edges with water; carefully fold dough over filling and press edges with a fork to seal.
    4. Place on uncreased baking sheets. Cut several slits in top of pasties. Brush the tops with beaten egg, sprinkle tops with coarse salt and pepper. Bake at 350' until golden brown, about 1 hour. Cool on wire racks. Serve hot or cold. Store in the refrigerator. 
    my notes: In the comments section people were complaining that 'traditional' recipes don't use ground meat but for whatever reason once baked these didn't seem like hamburger to me. I questioned the recipe when I realized the meat didn't get cooked first, it goes raw in the filling and then baked for an hour - thought to myself 'why doesn't the grease from the ground meat seep out?', but it didn't. Also, this makes 12 very large pasties - so big I didn't even eat a whole one for dinner. The recipe states 1 1/2 to 2 cups of filling in each one, but I found a generous 1 cup was perfect. The first one I made I rolled out too thin and used more filling, it was hard to move to the baking sheet, and wasn't pretty - I got better after that. Only roll to an 8" circle, I use a measuring tape to keep them the right size. 

    I adapted the recipe a bit and am sharing what I did, click the source below for the original recipe if you want.

    recipe found at tasteofhome.com

    I took lots of photos to walk you thru the steps:

    1. cut the veggies into a small dice, crumble up the raw meat as best you can. you need a very large bowl for this step. 
     
    2. I weighed the dough and then figured out how big each portioned piece should be. Each of the 12 pieces was just a touch over 4 ounces


    3. roll out the dough to an 8" circle, put a generous 1 cup of filling on one half, moisten the edges of the dough to help it seal. I do this by dipping my fingers in a cup of water and running my fingertips along the edge.  
     
     
     4. fold the dough over the filling, press the edges together then crimp with the tines of a fork. put on a baking sheet, cut a few slits in the top, brush with beaten egg, sprinkle with coarse salt and pepper.

     
    5. I wasn't sure how to reheat these, the crust won't be crispy if microwaved - so we did an experiment. Jen did oven at 300' for half hour, I did 350' for 20 minutes, and Cathy did 400' for 10 minutes. All 3 worked! 
    see what I mean about size? It's bigger than the dinner plate!


     I wrapped them individually, put in freezer bags and popped into the freezer for another time. Can't say how they'll hold up doing it that way but since this recipe made so many and they're so big, we can't eat them all at once hahahah!

    Now for the recipe Mark found at MyNorth.com for Root Vegetable Pasties - I have not made them yet but they sound great! I’m just copy and pasting right from their site:

    Root Vegetable Pasty Recipe

    Makes 8 supper-sized pasties

    • 4 cups all-purpose flour, plus additional for rolling out the dough
    • 1 teaspoon salt, divided
    • 2 sticks cold unsalted butter, diced
    • 1 small rutabaga, peeled and diced
    • 1 pound any other mixed root vegetables—carrots, turnips, beets, parsnips, sweet potatoes, waxy potatoes or radishes— peeled and diced
    • 1 green Granny Smith apple, peeled, cored and diced
    • 1 cup diced red onion, about half an onion
    • 3 Tablespoons olive oil
    • 1 large, 10.5-ounce log goat cheese, crumbled
    • Leaves from 8 thyme sprigs
    • freshly ground black pepper
    • 1 egg, gently beaten with a fork

    Root Vegetable Pasty Directions

    1. In a large bowl, combine flour and 1⁄2 teaspoon salt. Place pieces of cold butter in the bowl and work it into the flour mixture with a pastry blender until well incorporated. If any pearl-sized pieces of butter remain, pinch them between your fingers until they break down and disappear into the flour, working quickly so the mixture doesn’t warm.

    2. Place a few ice cubes into a liquid measuring cup and fill it with cold water to the 1-cup line. Add small amounts of cold water to the flour mixture, kneading it with your hands as you go. Add more water just until the dough sticks together to form one ball, knowing you may not need the entire cup. Working on a lightly floured surface, knead the dough with the palms of your hands briefly, just until the dough is one cohesive unit.

    3. Break the dough into 8 equal-sized pieces and form into individual balls. Press down on each ball with the palm of your hand to form a disk the size of a hamburger patty.
    Wrap each disk with plastic wrap, place the wrapped disks in a sealable plastic bag or container and set them in the refrigerator for at least an hour and up to 3 days.

    4. Meanwhile, peel and dice the rutabaga, root vegetables, apple and onion and add them to a large bowl. Drizzle with the olive oil, season with the remaining 1⁄2 teaspoon of salt and toss with your hands to evenly coat.

    5. Preheat oven to 375 degrees, line two baking sheets with parchment paper and remove the dough disks from the refrigerator. Working over a lightly floured surface, roll each ball out until it is 8 inches in diameter, about the size of a salad plate. Divide the root vegetable mixture evenly among each circle of dough, placing about 1 cup onto one half of each disk. Distribute the goat cheese and thyme leaves evenly among all 8 pasties and top each heap of vegetables with a few twists of freshly ground black pepper.

    6. Carefully fold the empty half of the dough over the top of the filling, tugging it gently to get it to stretch over your colorful pile of root vegetables and meet the other edge. Press the two edges together with your fingers to seal. Working with your thumb and forefinger, press overlapping folds of dough along the edge of each pasty and place the pasties on the parchment-lined baking sheets. Using a pastry brush, paint both the top and crimped edge of each pasty with the beaten egg, and place the baking trays in the oven. Bake for 50 minutes, swapping the location of the two baking sheets halfway through baking, until pasties are a deep golden brown. Allow the pasties to rest until they have cooled enough to handle, hand them out as you fly out the door and eat on the run.

    ADVANCED PREPARATION: Dough can be made in advance and kept refrigerated for 2 to 3 days. Assembled pasties can be individually wrapped in plastic wrap and frozen until you are ready to bake them


    10.28.21: Mr. Bones and double dips

    10.28.20: zombie brain cheese ball

    10.28.19: spa day pumpkin

    10.28.18: ðŸ”¥

    10.28.17: devils food cupcakes with orange swirled frosting

    10.28.16: pumpkin spice soap

    10.28.15: tissue paper flowers

    Thursday, October 27, 2022

    Pasta, Chicken, Broccoli Bake

    I intended to make this for a ‘my sis is hungry’ post but she was gone over the weekend and it sounded so good I made it for Dave and I instead! So we don’t get to hear her review but I’m pretty certain it would go something like this:

    “Oh my gosh we loved this so much. My sister is an amazing cook and this dish is a winner. I love her so much, she’s so talented, thoughtful, beautiful, funny, wonderful, and precious to me - what ever would I do without her. We give this a 10+”

    Ok, ok, maybe that’s not what her review would have sounded like LOL but this dish really is very good! We don’t need her review to tell us that we are definitely going to put this into a recurring recipe! It looks like a long list of ingredients but truthfully I omitted the onion, red pepper, garlic, and pecans and it’s still great! It’s basically a cream gravy over cooked chicken, store-bought ravioli, and broccoli with a butter and cracker topping. Not hard! I’ll write the recipe how I made it, click the link to see the original recipe and make it how you want. Note the original recipe is poorly written and I took it upon myself to clean it up hahah!

    • 1/2 cup butter
    • 1/2 cup flour
    • 3 cups chicken broth
    • 1 1/2 cups half-and-half
    • 1/2 cup white wine
    • 1 1/2 cup grated Parmesan, divided
    • 1/2 teaspoon garlic salt
    • Pinch of coarse salt
    • 1/4 teaspoon ground red pepper
    • 1 (20 oz) package refrigerated mixed cheese tortellini
    • 4 cups chopped fresh broccoli
    • 4 cups shredded cooked chicken
    • 1 sleeve (approx 15) ritz crackers, crushed 
    • 3 tablespoons butter, melted
    1. Preheat oven to 350. Spray a 13x9” baking dish with non-stick cooking spray.

    2. Melt 1/2 cup butter in a saucepan over medium heat, add flour stirring until smooth. Cook stirring constantly for a minute. Slowly whisk in broth, adding a little at a time whisking constantly until absorbed before adding a little more - if you do it slowly you shouldn’t have any lumps. The whisk in half-and-half and wine; continue to cook, stirring constantly p, 6 to 8 minutes or until thickened and bubbly.

    3. Remove from heat; add 1 cup Parmesan, garlic salt, salt and pepper, stirring until the cheese melts. Stir in tortellini, broccoli, and chicken until combined. Adjust seasoning as desired (I added more salt and pepper to taste). Spoon into prepared pan.

    4. In a small bowl combine 1/2 cup Parmesan and crushed ritz, add melted butter and stir to combine. Sprinkle over casserole. Bake at 350’ for 40-45 minutes or until bubbly.


    recipe found here

    10.27.21: Butterscotch bundt cake

    10.27.20: TT: storing seeds
    10.27.19: ðŸ”¥week 43


    10.27.16: deer/trophy wife costume


    10.27.15: mummy meatballs


    Wednesday, October 26, 2022

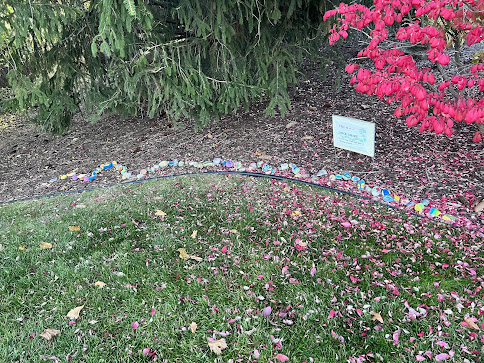
    Painted Rock Snake

    Walking the neighborhood yesterday and came across this fun community idea, I am so going to paint a rock and add it to the “snake”!


    Tuesday, October 25, 2022

    Dijon-Fig Sauce

    Normally I’d share a tip for this ‘tip-sy tuesday” but instead I’m doing a follow up on a previous post. I included the recipe for Dijon-fig sauce in the post ‘pork chops with zucchini and stuffing’ but realize that when I want to find the sauce recipe I’m never going to remember that it’s in a different post - and it’s so easy and good I want it to have its own post so I’ll know where to look!

    Stir together 1/4 cup Dijon, 2 T. Fig jam, 1 T. Water (or however much it takes to get the consistency you want for sauce), and a pinch of salt. You can change the amounts of mustard and fig to suit your taste.

    This is great on pork, and I’m betting it’d also be good with chicken. Sort of a tip, right? Haha. 

    10.25.21: fall owl wreath

    10.25.19: mummy calzone


    10.25.18: bat treat holder


    10.25.17: Sarge's bat halloween costume

    10.25.16: paper covered candle

    10.25.15: cinnamon chicken with pumpkin polenta

    Monday, October 24, 2022

    Bottle display cabinet by Jenny

     So. My friends got a beautiful new bar- I love it so much. (What’s not to love about a bar in your house?). Anyway- they have a shelf along the back to display cool liquor bottles- love that. Then the next weekend I went to someone’s house that had a lower kitchen area with 2 cupboards and glass shelves in between that they had liquor bottles displayed on them.  I loved this too! That got my talking to the husband- our lower level has a small kitchenette with older style kitchen cabinets. If we took out the middle one and hung shelves.. hmmmm… this got me thinking even more- shelves cost money (and someone with the ability to hang) and I have lovely cabinets. So that prompted me to go with the DIY route. Removed the doors, put the liquor there and BAM. I’m with the cool kids. (Until I drink it all and I’m left with empty shelves. I’ll cross that bridge when I come to it.) 😂


    10.24.21: 🔥 week 43

    Sunday, October 23, 2022

    🔥 Around the Campfire (week 43)

    Dear Campers ~
    I missed last weeks recap and will go back at some point to fill it in, here’s this weeks in case you missed anything:

    Posts ~

    10/17: 10.17.22

    10/18: fried green tomatoes 

    10/19: bacon jam 

    10/20: cast iron skillet pizza 

    10/21: leaf window wreath 

    10/22: char-spookerie

    What’s Cooking ~

    That’s it for now - stop back often to see more recipes, crafts, tips…whatever I can think of to make at camp! Bye!

    Sincerely ~

    Jill
    Camp counselor 

    PS still don’t have my computer! Ugh what the heck. 

    10.23.15: pumpkins on a bench 


    Saturday, October 22, 2022

    Char-spook-erie


    My sis sent me this idea for a different kind of charcuterie board, perfect for Halloween… it’s a char-SPOOKerie board! Too funny, had to share  :)

    I searched for char-spookerie online and got lots and lots of pictures if you want to see other ideas. 


    10.22.21: pumpkin vase


    Friday, October 21, 2022

    Leaf Window Wreath

    Tesha sent me pictures of this window hanging she made using leaves and wax paper and I asked if I could share, love this idea. The leaves are fantastic right now so make sure you go collect some while they are still pretty - she picked up these leaves while out on her walks, I always notice the leaves on the ground but rarely pick them up, but now I’m on the hunt for nice ones to copy this idea.

    She’s pressed individual leaves before with her grandkids, it’s a great kid craft (although they’ll need help with the ironing part) and they can hang them up wherever; this time she had the idea to press them in the shape of a wreath. 

    To make it - first collect leaves and put them in a big book or under something flat and heavy to flatten the leaves out. Once you’re ready to assemble the wreath, lay out big sheets of wax paper to form a rectangle roughly the size you want the wreath (or whatever shape you decide to make), overlapping as necessary to have a solid layer of wax paper. Arrange the leaves in a circle/wreath shape, top with another layer of wax paper, completely covering the leaves. Cover with a thin cloth and iron until the wax paper sticks together encompassing the leaves. Trim away the excess wax paper from around the outside of the leaves, and remove the middle section creating the wreath shape. Hole punch the top, add ribbon or twine, tape to a window.


    Thursday, October 20, 2022

    Cast Iron Skillet Pizza (rerun)

    Since I’ve done a couple rerun posts on previous things my mom told me about, I guess I’ll do another one today - because her buying me a cast iron skillet and my discovery of pizza made in the skillet being so darn delicious is worth revisiting. Oh man is pizza great done this way! 

    Originally posted 11/20:

    My mom bought me a 12" cast iron pan for my birthday, nice right? Except cast iron pans have always intimidated me and I've never wanted one hahaha!! But between my sister gushing about how fantastic her cast iron blackened salmon is, and my mom gushing about how her cast iron pizza tastes just like take-out pizza, I slowly warmed to the idea of owning a scary pan. (Although still secretly wondering if I could find a place to store said scary pan when I never use it LOL.) Cue this first attempt at making pizza and call me a convert!


    I can't remember exactly how mom said she makes her pizza, but I do remember her wise advise to 'just google it, there's tons of recipes' so that's what I did. And read quite a few different ways to go about it, so I then did what I tend to do - yep, I winged it.

    Preheat oven super hot - recipes say 500-550' but that scared me so I chickened out and turned it to 475'. 

    Have the dough shaped and ready to go (I used store-bought, mom makes her own dough), I used the kind in the tube which makes a rectangle shaped crust so I just stretched it into a rough circle. Also have whatever toppings you are going to use on standby - I did pizza sauce, pepperoni, canned (drained) mushrooms, and mozzarella cheese. 

    Put the skillet on the stovetop over medium heat for a couple minutes, then add some canola oil and let it heat up. Turn off the burner and carefully add the crust, pat it down and press out the best you can without burning yourself (use a spoon if you want). Add the toppings. The heat of the cast iron should get a good crust on the bottom, lift it up a bit to check and if it's still doughy on the bottom turn on the burner for just a minute or two to get it a little golden brown. 

    Transfer skillet to oven and bake pizza until crust is golden brown around the edges and cheese is browned and bubbling, about 10-14 minutes. Carefully remove from oven (remember the handle will be hot too!). 


    I didn't take lots of pictures since I didn't really know what I was doing, but you guys - this is fantastic and I hope you'll get that intimidating cast iron pan out of the basement and give this a try! Thanks again mom for the pan (I've made blackened salmon twice now and we love it too, so at least I have 2 great things to make with this pan!).