Saturday, July 31, 2021

Al's Baked Beans (re-run)

I love these baked beans so much! This is a re-run from 2016, they are so good I hope you have been making them since then hahah! 

Originally posted 7/31/16:

Every time Al makes these beans I remember how much I love them and ask for the recipe! They are SO good. He actually gave me the recipe a while ago but I completely forgot about it until looking thru my folder of recipes the other day looking for something to take to my sisters for a cookout. I have a recipe book that all of my tried/true/standby/loved recipes are in, and I also keep a manilla folder full of ripped out magazine recipes, etc. for ideas I'd like to try (if it makes the cut and I know we'll want it again then I move it into my recipe book) - not sure why Al's recipe isn't in the book because I know it's a keeper and will now make them often!


I asked him the other day if it's ok with him for me to share the recipe - he said "it isn't a secret family recipe or anything" (which made me laugh cuz it's basically doctored up Bush's baked beans - I think their commercial is that Bush's is a secret family recipe? Maybe? Now I'm questioning that...whatever...I still laughed at him).

not the "prettiest" picture, but here they
are in the crock pot using a liner which
helps so much with cleanup!


Ingredients:

55 oz Bush's "original" baked beans
1/2 lb bacon, diced and browned
1/2 cup diced onion
1/4 cup diced green pepper
3 tablespoons tomato paste
1 tablespoon yellow mustard
1/4 cup brown sugar

Directions:

sauté bacon until browned, remove from grease.
sauté onion and green pepper in bacon grease until tender.
put beans, bacon, onions, green pepper and bacon grease and all other remaining ingredients into a casserole dish, stir to combine.
bake 350' for 45 min- 1 hour until bubbly and browned on top.

Al's Notes:
"all ingredients above with the exception of the beans are estimates. I don't measure any more. All can be adjusted to taste. If you want to reduce calories you can reduce the amount of bacon grease you add to the beans - I wouldn't eliminate it all though, it does add a lot of flavor."

My Notes:
I made these in a crock pot (started on high heat for a couple hours, then reduce to low heat until ready to serve. I ended up cooking for approx 6 hours and they were delicious!) so we didn't have to heat up the oven and help keep the kitchen cool - side note, I use a crock pot liner when I can and in this case it was such a help not having to scrub the baked on beans! Whoever came up with crock pot liners is a genius. Just sayin...


Friday, July 30, 2021

Harvey Wallbanger (re-run)

Reading this old post reminded me of what a great time we had on this trip! Here's some rambling about the day and my first Harvey Wallbanger. Originally posted 7/30/16:


While roaming Prague we walked by a little bar that had a porch, and on the porch were gliders with a table hooked between them - so you're rocking back and forth while drinking and eating. It was so cute that we totally had to sit out there, never considering if rocking back and forth while drinking and eating is a good idea...


...after a few minutes of rocking, swaying back and forth,  we realized that eating would not be a wise choice - so we just had a drink. It was the middle of the day and nothing really sounded good to me, but then I saw a "harvey wallbanger" on the menu and decided I needed to try one. I've heard of it but didn't know what was in it, but I ordered it anyway - I thought it was going to be a manly cocktail in a short glass, but it came out in a tall pina colada glass with fruit sticking out. Does "harvey wallbanger" make you think of a fruity foofoo drink? It sounds manly to me haha. Anyway, I don't love fruity foofoo drinks and won't be putting this into the "drinks I order often" category - but it was fine and we were rocking, that's good enough. 

And I bet I'll always remember where I had my first harvey wallbanger - in Prague, sitting in a glider on the porch of a bar.

I found a recipe here if you want to try one - it's just vodka, oj, and Galliano.

Thursday, July 29, 2021

How to Make a Tie Blanket by Brooke (re-run)

Another oldie but goodie from 2016, Brooke made a tie blanket in record time hahaha. Originally posted 7/29/16:

Brooke wanted to make a tie blanket so I offered to take her to the fabric store to get the material - I warned her that it was going to be difficult to pick 2 patterns out of the hundreds the store carries and I gave us plenty of time knowing how long this was going to take...after her initial shock (seriously, have you seen how many different fleece patterns there are now?) and excitement she actually picked out 2 coordinating ones fairly quickly - and she picked pretty classy and simple ones, I figured she'd go for the crazy tie-dye or wild patterns!


At the cutting counter the lady helped her figure how big she wanted her blanket and she decided that 2 yards of each fabric would be big enough to cover her up and she'll be able to fold it on the end of her bed when she isn't using it.


At home I put the 2 fabrics together and trimmed off the salvage edges and squared them up to be exactly the same size. Then she did the rest. Using a 6" square of cardboard as a guide she cut out a 6" square of fabric from each of the 4 corners, that notch lets you be able to tie the edges of the corners together. She didn't have time to keep working on it at my house so I described how she needed to cut 6" fringe about 1" wide all the way around (cut thru both layers at the same time, that way the fringe is the same size and in the same place when you tie it), then tie the whole thing together.


She left my house with only the four corners cut out, I told her this is sort of a time consuming project and to just work on it a little at a time (it isn't hard, just takes time) - well 3 hours later I got a text that she had finished it and she sent pictures. And she says no one helped her - I've never finished one that fast! So I was wrong about how long it would take her to choose patterns and wrong about her being able to finish it so quickly - good for her!


Wednesday, July 28, 2021

Framed Quote (re-run)

Continuing with my week of reposts from this week in 2016, here's an easy gift you can whip out in no time - originally posted 7/28/16:


My niece is moving soon and planning how she wants to decorate her new house - she's been sending me tons of Pinterest ideas of things she'd like us to make together but now time is running out before she goes so I thought I'd make this for her as a surprise. I'm feeling a little guilty about how easy and quick this came together, not really very creative of me haha - but she likes it and it turned out really cute so I'll share it with you :)

All I did was type out the words I wanted, played with fonts, colors and sizes, then printed it out onto white cardstock. Using a standard hole punch, I punched out some gold dots from paper I had left over from making decorations for Paige's graduation station (click here for that post) and glued them on using glue dots. Do you have glue dots? If not you should try them, they are super handy and worked really good on this project. You could also freehand write your words, or use stencils or alphabet stickers, and glue on the dots using plain old elmers if that's what you want - I really took the easy shortcut way by printing from my computer and using the glue dots. This whole project took maybe 15 minutes, and it took that long because I couldn't decide on which font I wanted! Put the completed paper in a cute frame and you're done.

I played around with adding glitter or paint to the gold "good day" but decided it didn't need it.


I stuck the gold punched out dots right onto the glue dots, then peeled them off and stuck to my paper.


I didn't think to measure the frame opening and the paper to see if they were the
 same size, so I had to trim the paper to fit. Fortunately I had left enough 
space all around the edges that it wasn't a problem to trim a little off. 


Tuesday, July 27, 2021

Travel Medication Tip (re-run)

Next up in re-visiting posts from this week in 2016 - a travel tip that I still do!

Originally posted 7/27/16:

Quick easy travel tip for packing medications or other things that are on cards in boxes or blister packs to save room but still know what they are - Cathy takes them out of their boxes and makes a label for the back of each card or package of pills with the instructions. So smart! I do something similar but not nearly as neat and organized - I just write on the back of the packaging with a sharpie. I do love my label maker though and will start doing Cathy's trick in the future!


Monday, July 26, 2021

Apple Strudel (re-run)

I know I just did a week of re-runs but guys I'm swamped over here and need to do another week of re-posts! Hope you don't mind revisiting what was posted this week from 2016! I'll be back with fresh stuff asap, promise.

Originally posted 7/26/16:

The family came over last night for Sunday Supper - and since we just got back from the river cruise and I've been talking so much about all the delicious food I wanted to experiment on them :)

I made stroganoff over rice like we had in Prague - googled a bunch of recipes and thought I'd found one that seemed similar but turned out it wasn't nearly as good as it should have been...so I'm not even sharing that recipe and will keep working on it. For dessert I made the apple strudel recipe that I posted about here, it also wasn't as good as it was at the demo where I watched them make it (Dave actually asked "did you follow the recipe they gave you on the ship?" like I used a completely different recipe haha! Yes, I followed exactly!) but only Dave and I knew it wasn't like the kind we had in Europe - everyone else at dinner enjoyed it so I decided to go ahead and post this anyway. It tastes really good, but I'm calling it a "fail" because it is not what we had while on vacation, since everyone else gave it a thumbs up I want you to make it and decide for yourself.

Note 7/26/22: there used to be a video here of my making the strudel but for some reason, and no - not my fault this time, it's gone...hmmm...

A couple changes I would suggest: it needs more sugar in the filling. Maybe when I figured out how much brown sugar I needed by weighing it versus the recipe calling for 1 3/4 oz I did the calculation wrong? Whatever, add a little more than 1/4 cup for sure. The dough seemed a little tough to me, maybe I didn't roll it out thin enough - get it super thin. I think it would also be nice to sprinkle with cinnamon sugar before baking, the top of the crust was a little dry.

I just made a copy of the actual recipe when I posted it before, it's in metric and ounces so I weighed everything to help make it easier for you to make this - hopefully I calculated it all correctly! I'm retyping it again with my amounts:

Ingredients

dough:
 12 1/4 oz flour (about 2 3/4 cup)
1 T. oil
1 T. melted butter
3 1/2 oz (100ml) lukewarm water (I used a glass measuring cup that has ml's on the side to measure)
pinch of salt

filling:
1 1/4 lb tart apples, peeled cored and sliced (about 5 or 6 apples, I used granny smith)
3 1/2 oz melted butter (one stick)
3 1/2 oz biscuit breadcrumbs (I used graham cracker crumbs, just shy of 1 cup)
1 3/4 oz light brown sugar (1/4 cup packed)
raisins, cinnamon, chopped nuts, lemon juice, rum (all optional)

Directions:

Peel apples and cut into thin slices. Gently brown the biscuit crumbs in butter. Combine all ingredients for the filling together.

Mix flour, salt, oil and lukewarm water and knead together with the kneading hook on the mixer for approx. 10 minutes until the dough as become smooth and elastic. Roll the dough into a ball and brush with butter. Using a sharp knife, cut a cross at the top of the ball of dough and then leave to rest at room temp for 2 hours, wrapped in cling film.

Sprinkle a table cloth evenly with flour. Roll the dough out as thinly as possible on the cloth. Place your hands, stretched out flat, under the dough and draw the dough over the back of your hand so that it becomes thinner and thinner. You will know the dough is ready when the pattern on the table cloth is recognizable through the dough, or when you can ready newspaper print through it.

Fill and roll the strudel together, being sure to use the table cloth to help you, by raising the end with the filled dough just enough that the strudel begins to roll on its own accord. Grease the apple strudel with melted butter and bake in preheated oven at 400' for 30 minutes, or until golden brown.

Makes 6 servings

resting dough

I can read my note thru the dough so I thought it was thin enough,
after baking it though I think it needed to be rolled out even more.

before baking the strudel


Sunday, July 25, 2021

🔥 Around the Campfire (week 30)

Dear Campers ~

Here's a quick recap of what happened at camp last week in case you missed anything:

Posts:

7/18: 🔥week 29

7/19: perler bead fruit coasters by Brooke

7/20: tip-sy tuesday: silpat vs parchment

7/21: double chocolate s'more cookies

7/22: mini fruit pies by Brooke

7/23: baked spicy shrimp

7/24: Cathy's peach cobbler 

What's Cooking ~

  • pork tenderloin, green broccoli gratin (recipe soon!), kale salad
  • grilled tuna, greek salad (tomato, cuke, feta in oil and vinegar), roasted garbanzo beans
  • coconut curry chicken (Costco), basmati rice, roasted broccoli
  • steak, smashed baby potatoes, caesar salad
  • grilled pizza, green salad
Miscellaneous stuff keeping me busy ~
  • I mentioned before that I have many projects going that I can't blog until the event that I'm making it all for is over - and it's happening next weekend so I'll be able to share soon! There's a bunch of things hahahah!! In the meantime, I haven't had time for anything other than preparing for next weekend. 
  • I did manage to squeeze in books 1-5 of J.D. Robb's 'Death Series'. J.D. Robb is Nora Roberts, I'm sure she has a good reason for writing under a second name but I don't know what it is - maybe that she's typically a romance author and these are a series of a female homicide lieutenant in the future dealing with ugly murders, with random sex scenes thrown in hahahah. 
That's it for this week - stop back often for more projects, crafts, recipes, whatever I can think of to make at camp! Bye!

Sincerely ~


Jill
camp counselor


Saturday, July 24, 2021

Cathy's Peach Cobbler

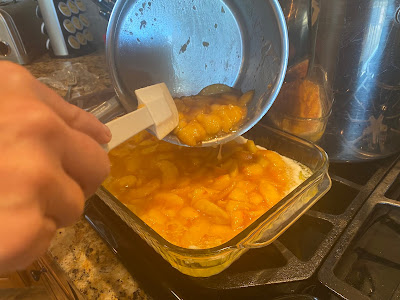
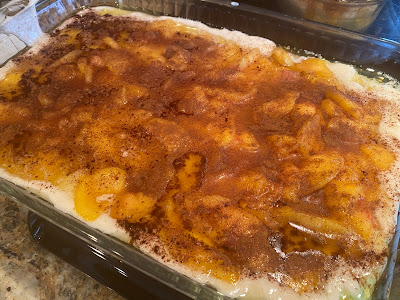
Cathy and Al waited in line to pick up Georgia peaches (in Michigan!) and then she was nice enough to make this cobbler for us - it was SO good! Of course the peaches made it fantastic, but also the different technique she followed - melted butter, then added the batter, topped with warm peaches and baked it. It's almost like pineapple upside down cake, the batter puffs up over the peaches. YUM. Seriously delicious. 

INGREDIENTS:

For the peaches:

  • 5 peaches, peeled, cored and sliced (about 4 cups)
  • 3/4 cup white sugar
  • 1/4 t. salt
For the batter:
  • 6 T. butter
  • 1 cup flour
  • 1 cup granulated sugar
  • 2 t. baking powder
  • 1/4 t. salt
  • 3/4 cup milk
  • ground cinnamon
DIRECTIONS:
  1. Put the peaches, sugar, and salt in a saucepan and stir to combine. 
  2. Cook on medium heat for just a few minutes, until the sugar is dissolved and the juices are starting to come out of the peaches. Remove from heat and set aside. 
  3. Preheat oven to 350'. Slice the butter into pieces and place in a 13x9 baking dish. Place the dish in the oven while it is preheating. Once melted, remove from the oven. 
  4. In a large bowl, mix together the flour, sugar, baking powder and salt. Stir in the milk just until combined. Pour the batter over the melted butter and smooth into an even layer. 
  5. Spoon the peaches and juice over the batter. Sprinkle cinnamon generously over the top. 
  6. Bake at 350' for 38-40 minutes until the top is golden brown and baked thru. Serve warm with a scoop of vanilla ice cream if desired (yes it is desired if you ask me LOL). 


7.24.20: tuna cauliflower salad
7.24.18: Candy's shrimp dip
7.24.17: paper gift pouches
7.24.16: Nuremberg


Friday, July 23, 2021

Baked Spicy Shrimp

This recipe came out of an old recipe book I used to have, don't remember the name of it but it was something about recipes from Michigan. In the book this is called 'Steve's Spicy Shrimp' - I don't know why I don't have the book anymore or who Steve is, but he nailed this recipe and I'm still making it years later.

Ingredients:
  • 20 shrimp, peeled and deveined
  • 3 oz. Old Bay seasoning
  • 1 cup cracker meal
Mix together the old bay and cracker meal in a ziplock baggie (or in a shallow plate). Rinse the shrimp to moisten, add to the bag a few at a time; shake until coated. Saute in a little olive oil until cooked thru; remove from pan and dry on paper towel to remove some of the oil. Serve with cocktail sauce, tartar sauce, or my cheater take on 'remoulade' which is mixing ketchup, horseradish, and sour cream or Greek yogurt together. 

Note: over the years I've changed the cooking method to baking the breaded shrimp in a 350' oven for a few minutes until cooked through. I've also substituted panko crumbs or seasoned Ritz cracker crumbs for the cracker meal - all good!


Thursday, July 22, 2021

Mini Fruit Pies by Brooke

Hey guys!! today i made mini pies! they are soooo delicious! first thing i did was take a pie crust and rolled it out. i took a wine glass and cut circles in it. (it took me 3 different wine glasses to find one that fit good in the tray lol) after i cut the crust i put it all in the tins and pushed together the sides to make it a little more pie like. then i put canned filling in it. we got filling that says more fruit and did mostly fruit in each pie. we put filling up to the top of each little crust leaving a tiny bit of space. then we cooked them at 400°F for about 10 minutes!! its so easy even a teenage can do it! can you?


7.22.20: kid craft - grass seed jars

7.22.19: man-day Monday

7.22.18: summer squash spiral gratins


7.22.17: pitcher mojitos

7.22.16: passau, germany

Wednesday, July 21, 2021

Double Chocolate S'more Cookies

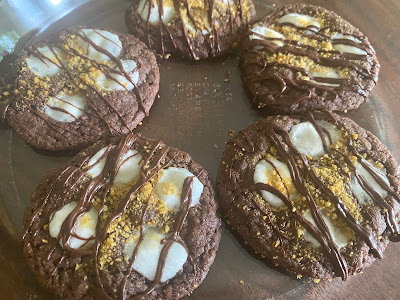
I saw a recipe for double chocolate s'more cookies and thought I'd make them for Dave's ukulele group last weekend - so went to the store for the ingredients and saw a bag of double chocolate chunk cookie mix and had the 'genius' idea of merging the mix with the s'more topping I saw in the original recipe. And came up with a super easy cookie hack recipe that everyone loves! It's a little embarrassing to have people rave over a doctored up mix but what the hay - they taste good, and are quick and easy to make so I'm getting over the fact that I didn't make them from scratch and learning to live with it hahahah! 


The cookie base is Betty Crocker double chocolate chunk cookie mix; mix according to the package directions. Scoop dough onto parchment paper lined cookie sheets (I used a medium cookie scoop); bake at 350' for 8 minutes, remove from oven and quickly press 4 mini marshmallows into the top and sprinkle with graham cracker crumbs. Return to the oven and bake for an additional 3 minutes until done, don’t over bake or the marshmallows melt away. (they still taste good if that happens, but they aren't as pretty) Cool. Melt semisweet chocolate chips in the microwave and drizzle over the cookies (I use a fork and shake it back and forth to add the drizzle).  

Using my medium cookie scoop I get 24 cookies out of the mix. 


7.21.20: tip-sy tuesday: cilantro

7.21.19: 🔥week 29

7.21.18: organizing the motorhome

7.21.17: everything cheeseball

7.21.16: austria to passau


Tuesday, July 20, 2021

Tip-sy Tuesday: silpat vs. parchment

Quick little thing I just discovered after all these years of baking - I tend to bake cookies on parchment paper and occasionally use a silpat (silicone non-stick baking mat); they both make for easy cleanup and I don't have to grease any cookie sheets using either of them. Well today I did half a batch using a piece of parchment and the other half using a silpat - all other factors being the same (same oven, same scoop, same temperature, same batter) - the cookies on the silpat spread out way more than the parchment for some reason. They taste the same, but if you're going for a certain look of cookie you might want to think about which liner you will bake them on. I didn't realize they baked different size cookies! 

left baked on parchment, right baked on a Silpat mat

I'll post the recipe for these yummy cookies tomorrow - promise! :) 

Monday, July 19, 2021

Perler Bead Fruit Coasters by Brooke

hey guys! today i made these super cute fruit coasters! they are made out of perler beads. when i was younger my aunt jill and i would do crafts with perler beads all the time. and this past week i found them and decided to make coasters! i used the circle shape we have and put the beads in the shape of the fruit i wanted them and ironed it into place -  I made watermelon, kiwi, lemon, and grapefruit! thats it! super easy and turned out so cute!!


Jill here - she's right, we were obsessed with perler beads when she was younger (and it was a craft she would sit for hours and work on, so that made 'babysitting' for Aunt Jill a little easier some days LOL). 

click here for another couple perler bead projects. 


7.19.20: 🔥week 29

7.19.19: fabric transfer t-shirt

7.19.18: baked artichoke dip

7.19.17: grilled artichokes

7.19.16: chicken salad endive cups


Sunday, July 18, 2021

🔥 Around the Campfire (week 29)

Dear Campers ~

Hope you enjoyed the re-run week of my sis blogging from 2016! Here's a quick recap in case you missed anything the second time around:

Posts ~

7/11: 🔥week 28

7/12: circuits

7/13: centerpieces

7/14: linen closet organizing

7/15: clutter

7/16: gift for friends 

7/17: deviled eggs

Oops - I just realize that I started this recap that was meant to be posted 7/18 and completely forgot to finish it! I'm posting late and incomplete just so to have my weeks complete. Have I mentioned that it's a little crazy here right now?!! HA. 

Sincerely ~


Jill

lame camp counselor

Saturday, July 17, 2021

Jen's Deviled Eggs (re-run)

Wrapping up the week of re-runs is my sis's delicious deviled eggs - here's how she makes them (originally posted on this day in 2016): 


Hi- me again.
 
Well I don’t cook much but I do like to party.  When my sister is gone I am forced to make my own dish to pass.  I hate that (and the friends I am bringing my dish to hate that also). That said, one of the things I can make and that taste pretty decent is deviled eggs.  It’s a fairly standard deviled egg recipe what makes them better (and gets me compliments) I’m pretty sure is the “secret” ingredient of spicy mustard.

I add light miracle whip (might as well save the fat where I can) until it looks creamy, a few squeezes of regular mustard until bright yellow (I like mine mustardy) then a few squeezes of the spicy mustard depending how tangy you like it.  like I said, everywhere I take them people rave that they are delish.  

Hey I’m no Jill but I gotta do what I can.

7.17.17: Deanna's pretty garden dish flowers

Friday, July 16, 2021

Fun Friend Gift by Jen (re-run)

 Hope you're enjoying a few repeats this week - here's another one from my sis originally posted 7/16/16:


Looking for a really great gift idea for a friend? Some friends and I all recreated a birthday card one of us gave. We named the people on the card our names (in pen on the card) then we recreated it. I then made copies of both the picture and the card and framed them as gifts for each of my ladies. Didn't cost much but they all loved it.


7.16.19: frosting tip

Thursday, July 15, 2021

Organizing Clutter by Jen (re-run)

Continuing with the week of re-runs, this one by my sis is frankly ridiculous if you ask me - I do not make all my crap look better with a tray. I might use trays to contain items but it's definitely not crap LOL. Ok, maybe it is - whatever. Here's the shortest post ever, originally posted 7/15/16: 


One of the few tips from my sister that I actually took:  make all your CRAP look better with a tray. No matter how much junk you have and how unorganized you are, put it in a tray. In this case I think she is right! (Shhhh no one tell her I said that)..


7.15.19: felt flowers

Wednesday, July 14, 2021

Linen Closet by Jen (re-run)

My sis took over the blog for this week in 2016, here's what she posted on 7/14/16: 


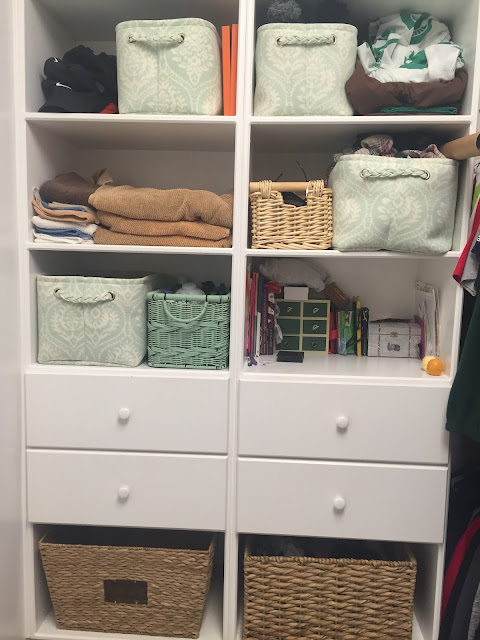
No money or space for a linen closet? I turned these extra shelves into one using cheap baskets. The bottom baskets hold laundry, the upper ones hold toilet paper, sheets, towels, and other toiletries. Making the most of the space I had and making it cute with very little expense.


7.14.20: tip-sy tuesday: dryer sponge fail

7.14.19: 🔥 week 28

7.14.18: champagne cage party trick


7.14.17: paper umbrellas


Tuesday, July 13, 2021

Centerpiece by Jen (re-run)

 from my sis - originally posted 7/13/16:


Hey... Sister here again.  So we have established I am the non crafter.  My sister Jill’s table always has some kind of crafty thing on it.  Once for her birthday she asked for me to go to the woods and find her a big giant stick and give it as my gift.  Her plan was to paint it a bright color and lay it there.  I absolutely refused by the way- I wanted no part of that). 


 Anyway, I do still want something cute on my table.  So what I did was I spent a little money and got this one big giant glass bowl.  It looks similar to a giant daiquiri  glass.. hey future idea.. mixing drink in giant daiquiri glass with a huge straw.. has merit.  Anyway, what I do with the giant glass for now is that I put a colored candle with something seasonal around it.  At Easter I use Easter grass and some cheap plastic eggs from the dollar store, in the late fall I use pine cones that I picked up outside, at Christmas I use colored ornaments, etc.. you get the idea.  None of the filler costs any real money but still looks festive and seasonal.  And you never get tired of it because it is ever changing.  No, its not my sisters table but hey.. at least I’m not painting sticks. 


7.13.20: zucchini chimichangas

7.13.19: Cathy's banana pudding

7.13.18: kid craft - Sydney makes slime

7.13.17: beachy scene in a wood box