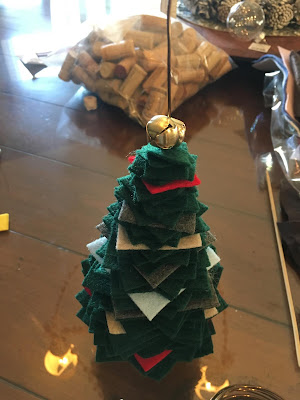
Our trees are about 10" tall - the tree itself is about 7" and the wine cork stand is 1 3/4" tall, plus the wire star on top. What actually took us the longest was trying to decide how to top them; we liked adding bells on the top, wood stars, felt balls, or even just plain - all of it was good! If you're making more than one you can do different toppers, we only made one each so committing to just one top was hard!
If you want taller or shorter trees just make the largest felt squares you'll be stacking bigger or smaller (depending on the scale of your tree) - for our trees we used 6 of each size square starting with 3" as the largest square for the base of the tree, then went down in increments of 1/4" all the way down to 3/4" at the top of the tree.
So for us that meant cutting (we used a rotary cutter which saved time and spared our hands from having to use scissors hahaha, but cutting by hand would obviously work just fine!) the felt squares:
6 - 3"
6 - 2.75"
6 - 2.50"
6 - 2.25"
6 - 2"
6 - 1.75"
6 - 1.50"
6 - 1.25"
6 - 1"
6 - 3/4"
In addition, we started building the tree with 2 - 1 1/2" squares of thick brown felt but you don't really notice it so could skip, and one little 1/2"square for the tip top just to finish.
Supplies:
- Regular felt in your choice of colors. Note: I bought really thick felt online thinking that would make a nice tree but it didn't look as good as regular felt - the thinner felt just hangs better, thick felt was too solid and stiff looking. We made ours mostly green with a different color square in between each size change (for example: 6 - 3" green, 1 - 3" red, 6 - 2.75" green, 1 - 2.75" light brown, etc.).
- Wire that is a thick enough gauge to hold all the squares, but pliable enough to wrap around the base and form the star at the top. We used copper color, there are other colors available. We used approx. 2 feet, you'll need more or less depending on the size of your tree.
- 3 wine corks for the base, hot glue to hold them together.
- scissors or rotary cutter.
Directions:
First, make the base by hot gluing 3 corks together and wrap them tightly 2 or 3 times with the wire, then feed the long end of the wire up thru the middle of the corks so it is standing straight up off the base.
Starting with either the 2 smaller brown squares if you're using, or the largest of the tree squares, skewer each square of felt onto the wire and push down to the base. We found it was easier to poke a hole in the middle of each square first with a thick pin but you can just push the felt onto the wire if the wire is strong enough. Continue adding the squares largest to smallest until you like how the tree looks.
We were left with about 8" of wire at the top that we bent into a star shape - I had a little bit of a tail leftover so curled it around a wooden skewer to make a little curly-q to finish.
Other ideas - you could skip the base altogether and add a little string or twine to the top for hanging the trees or adding to the top of a package; you can think of something else for the base if you don't want the wine corks; multiple colors of felt would make for a fun whimsical tree - you could coordinate with your decorating scheme if you have one, or with your wrapping paper, or customize for the gift recipient if you know they have a favorite color.
 |
| playing with different toppers - jingle bells are cute... but so was felt balls...and wood stars...so many choices! |


No comments:
Post a Comment