Thursday, November 15, 2018

Pinecone Birds

Don't be sick of my pinecone projects yet please - I was on a roll and they are so much fun to make I couldn't stop hahaha. Today it's these little birds...quite truthfully I'm not loving the red one, his feathers are great but I don't know - the red head is not my favorite. I love the whole brown one tho, he's a sweet little bird that makes me happy to look at :) You can obviously make your any color combination you want!

I saw quite a few different examples of pinecone birds online that inspired me to come up with this version. All you need is a small wood ball (they come in a package at the craft store, there are different sizes to choose from - match up the size you need based on how it looks with your pinecones), glue a couple black beads on for eyes and a small black cardstock triangle for the beak. Glue the head to the pinecone - you might need to snip out a bit of the pinecone so the ball has a solid place to rest against - you can glue the head to the top of the pinecone, or to the underside, I did one of each and they both look good. Aren't these cute?!


For the legs - cut a length of lightweight wire, shape 3 toes in the center of wire, bring the two ends up and twist together creating the legs (see the pictures, that should help explain what I'm trying to say). Stick them into the pinecone and hot glue in place.


 I attached some craft feathers for the bird tail - stick them in the pinecone and then glue in place.


Wednesday, November 14, 2018

Pinecone Owls

Following up on yesterday's pinecone turkeys with these cute owls (just wait, tomorrow is a different bird - plus I have a couple other pinecone crafts coming up...perhaps I went a little crazy with gathering pinecones and had to keep finding projects to use them?!)


These are just as easy as the turkeys, and came from the same site (click here for the original source) - once again I looked at a picture and then just cut out some pieces of felt to make these cuties.


I made my owls stand up by attaching a piece of cardboard to the underside and then wrapped some fluffy scrap yarn around the base, it reminds me of a nest. You could attach a string or cord to the top and make them into hanging ornaments, that'd be really cute...or decorate packages with them...whatever. Once again, good kid craft and very easy to make. Cut out larger pieces to glue on the sides for wings, the little dots are felt that I punched out with a standard handheld hole punch and glued on. You can't see the feet very good because of the yarn I wrapped around the base, but it's 2 small pieces of brown pipe cleaners twisted together and inserted in the bottom of the pinecone. The white part of the eyes are large sequins and the black circle is a piece of cardstock I punched out with my hole punch - it's hard to cut a small circle using scissors!


Tuesday, November 13, 2018

Pinecone Turkeys

These are silly but I had fun making them - wouldn't they be cute at everyone's place setting, holding a name/place card, or as part of a centerpiece? Very easy and simple, good kid craft other than I used hot glue (white glue would take longer to hold but might work so the littles could make them).

I saw the inspiration for these here, it's a site that you have to pay to join - I just looked at the picture and then winged them (get it? "winged" them heehee) - no pattern but really, it's just a few pieces of felt glued on to look like a turkey...you can do it!

You need 3 pieces of different colored felt for the tail feathers. I just cut them freehand, it reminds me a little of when we would trace our hand to make a turkey as kids (did you do that? I'm sure you did...), you want 4 or 5 "fingers" but the bottom of each piece is straight across, that's where you'll glue them to the pinecone.

Cut 2 legs with toes out of yellow felt, stick into the underside of the pinecone and glue in place. The head is a round piece of felt with a skinny long neck attached; add a couple googly eyes, an orange felt triangle, and a little piece of felt shaped like a fat comma over the beak (I looked it up, that thing is called a 'snood' - now you have an interesting fact to share at the dinner table, you're welcome). Stick the neck piece into the pine cone and have the head bend over the front of the pinecone, glue in place.


Monday, November 12, 2018

Herb Bubble Bread

This is a super easy recipe for pull apart rolls - perfect for Thanksgiving (or anytime really, it's so easy don't just make it for special occasions!). Yes it starts with frozen bread dough but who cares - I definitely don't think you always have to make things from scratch, especially when it's going to be doctored up like this Bubble Bread. And you're making it "homemade" by rolling dough balls in butter, herbs, and cheese - for what it's worth, these taste, smell, and look great!  A keeper recipe for sure :)

I took these to Al and Cathy's in a simple fabric bread basket I whipped up in just a few minutes, I'll show you that later...


Ingredients:
  • 1 pound loaf white or honey wheat frozen bread dough, thawed
  • 1/3 cup melted butter
  • 1/2 teaspoon garlic powder
  • 1/2 teaspoon thyme
  • 1/2 teaspoon crushed rosemary
  • 1/2 teaspoon celery seeds
  • 1/4 teaspoon sage
  • 1 teaspoon dill
  • 1/3 to 1/2 cup grated Parmesan cheese
Preheat oven to 375'

Use scissors to cut loaf into 20 pieces. Combine melted butter with seasonings i small bowl. Place cheese in shallow dish. Shape dough pieces into balls. Dip in butter mixture and roll in cheese. Arrange balls in greased 8x4-inch loaf pan. Cover with clean, dry towel and let rise in warm place until doubled in bulk. Bake until golden brown. Cool 10 minutes and invert from pan.

source: What Should I Bring/Alison Boteler 1992


11.12.2017: stuffed spaghetti squash
11.12.2016: caramel apple shots
11.12.2015: pumpkin roll

Sunday, November 11, 2018

Around the Campfire (week 45)

Dear Campers ~

Here's a recap of what happened around camp this week:

Posts you might have missed ~

11/4: around the campfire (week 44)
11/5: crockpot beef stew
11/6: green tomato soup
11/7: green tomato pasta sauce
11/8: green tomato muffins
11/9: green tomato jam
11/10: fried green tomatoes

What's cooking ~ we had a hectic week and ate out a couple nights ~
  • baked salt and pepper shrimp, cauliflower rice with mixed veggies
  • spice rubbed pork tenderloin, sweet kale salad, roasted asparagus
  • apple cherry chicken sausage, zucchini noodles with red pasta sauce, salad
  • leftover lasagna, caesar salad
  • grilled chicken, butternut squash risotto, steamed spinach
Miscellaneous stuff keeping me busy but not blog-post worthy ~
  • it's that time of year - getting ready to make like a snowbird and flee the snow. Busy, busy packing and getting things done before we head out. I keep thinking of "just one more" craft I want to make before we go so my craft room looks like a bomb went off in there! I did take time to put everything away, which leads to organizing (ahem, procrastinating) of course:

  • read "The High Season" by Judy Blundell - loved it.
  • fit in just about every personal well-being appointment possible - I'm talking 2 doctor appts and annual physical, mammogram, dentist, bloodwork...I wait till the last minute every year and have to cram everything in back-to-back! Oh well, at least it's all done! Oh, and Sarge went to the vet and the groomer this week too!! 
  • wrapped Christmas presents to leave for family so I don't have to ship.
Hope you have a great week - I have a few pinecone crafts to show you that are SO cute, check back to get some ideas! Keep warm people - yikes, it's so cold all of the sudden... time to dig out the winter gear! 

Sincerely ~ 


Jill, your camp counselor


Saturday, November 10, 2018

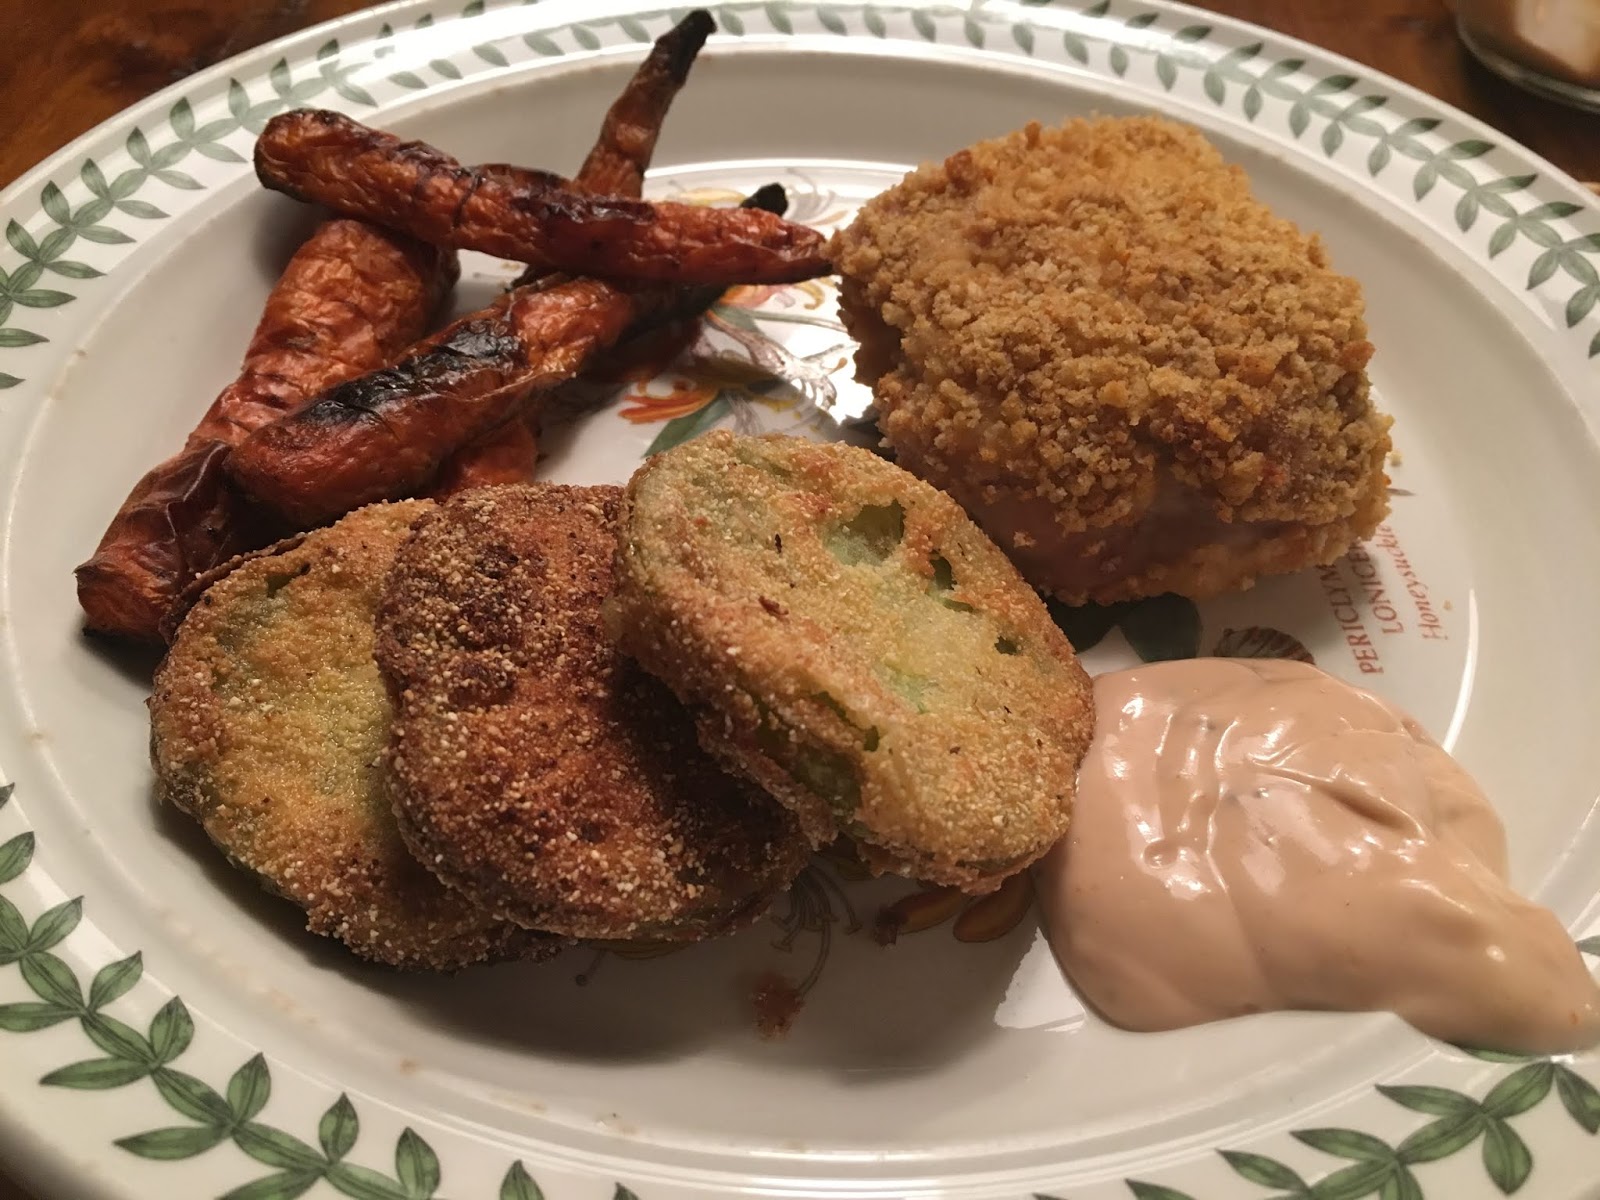
Fried Green Tomatoes

I have never had fried green tomatoes, let alone made fried green tomatoes - quite frankly I wasn't really interested in trying them 'cuz (a) I try to not eat fried foods, (b) we live in Michigan and it's not really a thing, and (3) I've never had an abundance of big green tomatoes that I was trying to use up before! Well, as you've seen this past week (green tomato soup, muffins, jam) I had lots to spare and thought I'd give frying them a try. Know what? They are SO SO good, I'm a believer now and this will be a repeat for sure. Yes they are fried and I don't do that often, but these are not greasy at all and it still seemed like I was eating a vegetable - I love fried green beans but really, they don't taste like beans, they taste like fried batter! These aren't like that, promise. If you see green tomatoes at the grocery store or farmers market you really really want to buy a couple and make this recipe - you won't regret it!


I read a bunch of recipes before it occurred to me that my mom lives in the south and is a great cook, so I bet she knows how to make them (side thought: why is this a southern thing? why don't we eat them in the north? not like we don't get - obviously - green tomatoes here!) -  why wasn't I just asking her instead of googling random recipes? Sure enough, she gave me lots of tips that I hadn't read about, and the proof is in the pudding (or in the tomatoes) that she knew what she was talking about :) Thanks mom!

A big key is that you want the tomatoes dry...really dry...so they don't fry up mushy. Slice the tomatoes into about 1/4" round slices (slice sideways thru the tomato, not top down - that's obvious, right?) and lay them out on paper towels. Sprinkle with salt to draw out some of the juices and let them set 30 minutes (you can go longer if you have time).  Blot really, really well so they are as dry as you can get them. Set up 3 plates (I use old pie tins) for your dipping assembly line;  in the first one put 1/2 cup flour seasoned with salt, pepper, and cayenne pepper; second one whisk an egg or two with a little milk; third one mix together 1/2 cup cornmeal with a couple tablespoons of flour, season with salt and pepper and red pepper flakes.


When you are ready to fry them - note: you want to make these right before eating them, they aren't going to hold very good - put oil (I used canola) in a large frypan, I did about 1/2" deep, and heat over medium-high. Once the oil is hot but not smoking, dredge each slice into the flour, shake lightly to remove the excess flour, then the egg mixture, then lastly in the cornmeal. For each step make sure you are coating both sides and the edges. Carefully place a few slices in the hot oil - don't crowd the slices in the pan - and fry for 2-3 minutes until golden brown, flip and cook for another couple minutes until the other side is golden brown. Don't leave them in the oil longer than necessary, soggy mushy slices are not going to taste as good! Remove from the pan with a slotted spatula, transfer to dry paper towels to blot the oil a bit, repeat with remaining slices.


Mom likes these with bacon jam (click here for a recipe) but I didn't have that so made a quick sauce out of mayo, ketchup, lemon juice, and pepper.

I'm telling ya' - these are fantastic!!! Light, flaky crust and the tomatoes are still firm and flavorful - oh man, I wish I had more green tomatoes so I could make this again right now!!!


Friday, November 9, 2018

Green Tomato Jam


Still using up all those green tomatoes left over from my garden - hope you're still with me? Couple more to finish out the week and we'll move on!!

This recipe for green tomato jam is the same one I used back in September with red tomatoes and I must say, I think it's even better than the summer one - and the summer one is delicious! I did everything the same except this time I needed to put it in the food processor to break up the big pieces...I love it!! This is very easy to do, I hope you'll try it?!

Click here for the recipe.


Thursday, November 8, 2018

Green Tomato Muffins

Yep, you read that title right - green tomato muffins! I used my zucchini bread recipe (which is slightly different but really similar to the zucchini cake/bread recipe I posted here) and substituted 2 cups of chopped green tomatoes for the zucchini and guess what - these look and taste almost exactly like zucchini muffins. Seriously I bet if you didn't know it's green tomato you'd say it's zucchini. Soooo, why not just make zucchini you ask? Fair question - but if you've been following my green tomato posts this week then you'll know why...'cuz I've got about 10 pounds of green tomatoes to find ways to use up!

If you don't have my green tomato problem of course go ahead and use zucchini and they'll be just as delicious. The cinnamon and nutmeg give lots of flavor, and they're fluffy and moist - note I usually leave out the nuts so Dave can eat them, and I'm not a big raisin lover so I tend to omit those too...and the muffins are still great.

Abundance of green tomatoes? Give this a try and let me know what you think!

Zucchini (or Green Tomato) Bread

Ingredients

3 eggs
1 cup vegetable oil
2 cups sugar
2 cups grated zucchini (or chopped green tomatoes - I pulsed them in my food processor)
2 teaspoons vanilla
1/2 cup walnuts (optional)
1 cup raisins (optional)
3 cups flour
3 teaspoons cinnamon
1 teaspoon nutmeg
1 teaspoon baking soda
1 teaspoon salt
1/2 teaspoon baking powder

Directions:
Preheat oven 325'. Grease and flour 2 bread loaf pans (or spray with non-stick baking spray).
Beat eggs, mix in oil and sugar until smooth. Add zucchini (or green tomatoes) and vanilla until incorporated.
In a separate bowl combine all the dry ingredients. Stir into egg mixture until just combined.

Bake 60-65 minutes until lightly brown on top and toothpick inserted in the middle comes out with a few crumbs.

note: for muffins I used paper liners and lightly sprayed them with non-stick baking spray. This recipe made 32 muffins and took about 20 minutes to bake.


Wednesday, November 7, 2018

Green Tomato Pasta Sauce

This isn't an actual recipe, and I've sort of posted this technique a few times now because I'm obsessed with roasting tomatoes...but this one I did using predominately green end-of-season tomatoes and it turned out so good I thought I'd share.

Put halved cherry tomatoes in a baking pan, drizzle with olive oil, sprinkle with salt, pepper, and italian seasoning. Slow roast for at least an hour in a 350' oven until the tomatoes have really cooked down and carmelized. After they cool scrape all of it (get all the little cooked on bits and seeds, that's the best part) into a freezer bag, squeeze out all of the air and pop in the freezer - you'll have the yummiest, simplest, pasta sauce in the middle of winter :) Or just put it over pasta right away if you can't wait!


 PS: save a little of the hot water after you drain the pasta you are going to put this sauce over - add as needed to the tomato sauce if it isn't liquid enough (you could also drizzle a little more olive oil if it needs it).

Tuesday, November 6, 2018

Green Tomato Soup

It's obviously too late here in Michigan to be waiting for green tomatoes to ripen (!) so I pulled them all off before putting the garden away for the year. I had so many of them that I didn't want to throw them out, and set about finding some different ways to use them. There are lots of recipes online; I picked a few to try and first up is this green tomato soup. I love tomato soup, and this turned out really good...my only problem with it is that my mind couldn't get past the "green" part! It has a thick chunky texture and with every bite I took my brain thought it should be split pea. And it's totally not split pea. Maybe if I would have strained this so it's smoother I wouldn't have confused myself so much - I used mostly green cherry tomatoes so there are lots of skins - once again, it tastes really good though so I'm definitely sharing this recipe and will make it again next year! Oh, and this is even good cold so will make it in the hot days of summer too.

Ingredients:

  • 1 T. olive oil
  • small onion, chopped
  • 1 garlic clove, minced
  • 2 pounds chopped green tomatoes
  • 1 cups chicken broth
  • 2 cups water
  • 1/2 teaspoon salt
  • 1/4 teaspoon pepper
  • pinch red pepper flakes
  • 1 bay leaf
Directions:
Heat the oil in a pot over medium heat, add the onion and garlic and cook until wilted and translucent (watch it, it burns quickly). Add the remaining ingredients, simmer until the tomatoes are tender - about 20 minutes. Discard the bay leaf. In a food processor (or using one of those immersion blender things) puree the soup until as smooth as you want. Or just leave chunky in the broth if you prefer.

Note: I was heavy handed with the red pepper flakes and it was a little spicier than I like - a spoonful of sour cream helped cool down the heat (and made it taste even better!).