Showing posts with label cork trivet. make my day camp. Show all posts

Monday, November 2, 2020

Flamingo Donut Cake by Brooke

Hey guys! The other day was my aunts birthday. she does not like cake.. but she does like donuts! So I made her this flamingo donut cake and flamingo donut holes!


 I just bought a case of a dozen glazed donuts and donut holes. And the flamingo decorations (which were also candy btw) were from Michaels! I put 4 donuts in a square 2x2 then put 4 more on top of those. Then I took the last 4 donuts and put pink sprinkles on top of them and put them on top of the cake. Then I took the flamingo head and put it in between the two donuts on top. And then I used frosting on the bottom of the plate to stick the wings down to the plate and leaned them against the donuts. Then the donut holes I just put on a plate and stuck the flamingo pieces in the top of them! I thought this was super cute and the donuts were delicious!!


Jill here: can I just say how much I love this kid? She knows me so well - and I could not have asked for a more perfect birthday 'cake'!! Funny thing happened when I wanted to save the flamingo head and wings for future use - when I washed them off they started to melt!! I didn't realize they are candy (I knew the little flamingo picks were edible but didn't know about the big pieces!); so after some frantic jumping around yelling 'they're melting, they're melting' we blotted them off quickly and set out overnight on waxed paper and they are still usable for next time - crisis averted LOL!!! Thanks again for this amazing 'cake' B! ❤️

Wednesday, October 14, 2020

Chewy Granola Bars

Kyle and Mickey were road-tripping back home and I thought they needed something to munch on - I'm sure I'm not the only person who gets in the car and immediately says "I'm hungry", right? These bars are no-bake which is great, and apparently traveled well because Kyle said later that he was still really enjoying them and asked for the recipe - sounds like a keeper granola bar recipe!


I based these on a recipe found here, I'll give you that and then see all my changes below.
  • 3/4 cup peanut butter
  • 1/2 cup honey
  • 2 T. coconut oil
  • 1 t. vanilla
  • 1/2 t. sea salt
  • 2 1/4 cups old-fashioned oats
  • 1 cup chopped almonds
  • optional: 1/2 cup mini semisweet chocolate chips
My notes: 
-I used 1/2 cup peanut butter and 1/4 cup mixed nut butter
-I sort of cleaned out the pantry when I made these so added chopped chocolate covered almonds instead of plain, added dried berries, cherries and chopped dried apricots, used coarse salt, and added some chocolate chips and butterscotch chips to the top. You can really vary your add-ins with this one. 

Instructions:
  1. Line an 8x8" or 9x9" baking pan with parchment paper. Set aside.
  2. Stir the peanut butter, honey and coconut oil together in a medium saucepan. Cook over medium heat, stirring occasionally, until the mixture reaches a simmer. Continue to simmer for 1 minute, stirring often so that the bottom of the mixtures doesn't burn. Remove from heat.
  3. Add the vanilla and salt, stir until combined. Add the oats and almonds, stir until completely combined. Stir in whatever other ingredients you are adding.
  4. Press the granola firmly and evenly into the bottom of the prepared pan. (it helps to use the bottom of a glass or measuring cup to press it down so it's nice and flat). Sprinkle a few chocolate chips on top if you like. Then cover and refrigerate the granola bars for about an hour  or so, until they are chilled.
  5. Use the parchment paper to lift the bars out of the pan and transfer them to a cutting board. Cut into bars.
store in sealed container for up to 5 days, or freeze for up to 3 months. 


Saturday, October 3, 2020

Parmesan Bubble Bread

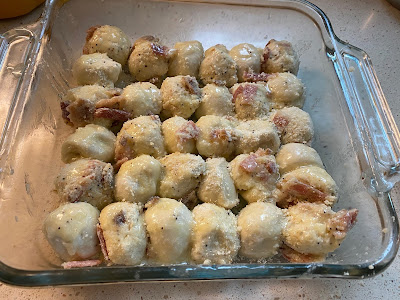
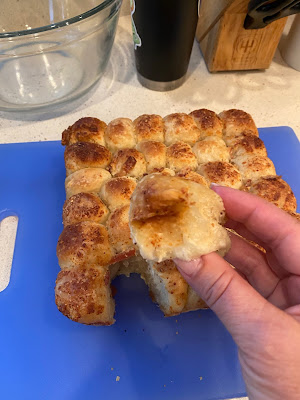
Here's the recipe for the bread my sis reviewed along with the Italian meatball soup a couple days ago (click for that post). I found half a bag of unbaked frozen rolls while cleaning out the freezer and wondered how to use them up besides just baking Dave and I a batch of random rolls hahaha. Bubble bread came to mind, I've made pull-apart monkey bread in the past but this one is a little different - I didn't really follow a recipe so all amounts are just to your taste or what you have on hand. 

Let the frozen rolls thaw enough to shape them but the dough is still cold. Cut in half and roll in smaller balls. Roll each ball first in melted butter, and then in grated parmesan mixed with chopped cooked bacon, garlic powder, and a little pepper. Place in a baking dish, cover with a kitchen towel; let rise in a warm place until doubled, about an hour. Preheat oven to 350', bake rolls until golden brown about 20-25 minutes. 


Here's her review in case you missed it the other day:

the bread she sent was fantastic.  I could just eat it .. and eat it.. and eat it. 

Whatever is sprinkled on the top was GREAT.  My only negative comment is that they were in tiny little circles (all stuck together) so I had to break off a piece to eat it. That made me feel bad when I scarfed the first one and took a second.  Like I was eating a second roll.  In my defense the first one was tiny… 

Anyway.. the rolls were yum. 

Thursday, December 3, 2015

Wine Cork Trivet

Looking for a quick/cute/fun/practical gift for a wine lover or cook (or wine loving cook) on your Christmas list? I made this cork trivet today and it turned out great - you should make one!


I was walking thru Home Depot with a friend and spotted this 4" duct clamp -  I remembered seeing a wine cork trivet in a catalog somewhere made with one of these and thought I'd give it a try. The clamp cost less than 2 bucks so figured I wasn't out much if it didn't work...I just so happen to have a bag or two of wine corks on hand (ok, ok, I have like 5 bags of wine corks - whatever...ha!) - if you don't have any you can buy them at a craft store (or maybe a kitchen store?), hit up a friend who collects corks, or ask a restaurant if they have any to give you. 


I cut out two circles, one from cardstock paper (as the base of the trivet under the corks) and one from felt (just so the bottom looked more finished) the same dimension as the clamp.

Arrange wine corks in the clamp, fitting in as many as possible. 


After you have the clamp filled, tighten the screw on the side of the clamp until the corks are very tightly wedged together and don't fall out when you pick the trivet up.


 Turn the corks over and glue first the cardstock and then the felt to the bottom.

There you go - cute wine cork trivet! Easy :)