Sunday, April 30, 2023

🔥 Around the Campfire (week 18)

Dear Campers ~

Here's a quick recap in case you missed anything at camp last week:

Posts ~

4/23: 🔥 week 17 

4/24: crab dip

4/25: TT medication chart

4/26: bland dog diet

4/27: Macey's chicken parmesan

4/28: MSTI jalapeno popper grilled cheese

4/29: words

What's Cooking ~

We are just getting back to MI from last week's road trip so I haven't cooked much. I did make up a few meals ahead of our trip so I didn't have to cook in the rental RV:

  • pork tenderloin, yellow rice, green beans 
  • meatloaf, mashed potatoes, salad
  • grilled chicken, orzo salad, asparagus
  • pasta with marinara, salad
That's it for now - hope everyone had a good week and you'll stop back often to see more projects, crafts, recipes, whatever else I can think to make at camp (or get someone else to make for me hahaha). Bye!

Sincerely ~

Jill
camp counselor

oh PS: thanks to Miss Lori for asking how Sarge is doing - today was the first morning I didn't mix bland with his kibble and he's doing really good. I'm optimistic that he's better now! 


Friday, April 28, 2023

My Sister Tried It: Jalapeno Popper Grilled Cheese

Every time these crazy “recipe’s” come up on facebook I bookmark them and hope my sister will make them for me.  This one I decided she would NEVER make because it wouldn’t be something she herself would eat.  It also wouldn’t transport well.  So I decided since this one was just basically a grilled cheese it was within my skill range so I’d give it a try. 

So the recipe calls for fresh jalapeño’s - I used canned.  I also used turkey bacon, light cream cheese and “skinny” bread.  Hey if I’m going to slather cream cheese on bread I might as well do any little thing I can do to lighten it up. Haha.  

I will attach the “real” recipe but in a nutshell, I put cream cheese, jalapeños, Garlic Salt, and Onion Salt in a bowl - mixed it together and put on the bread.  I then topped it with turkey bacon that I had cooked in the air fryer and a little cheddar cheese.  Honestly it was fantastic.  I mean what’s not to like about this (if you like jalepeno poppers)?  Next time I think I will go a little less on the cream cheese mixture and up the cheddar cheese instead.  The cream cheese was a little overpowering - and messy so definitely will try with less next time. But all in all delicious!  In the meantime I’ll keep saving recipe’s that I can hopefully get my sis to make! 

  • 4 medium jalapeños, stems removed, sliced in half, and seeded
  • 1 tablespoon olive oil
  • 4 ounces cream cheese, room temperature
  • ½ teaspoon garlic salt
  • ¼ teaspoon black pepper
  • ½ teaspoon onion powder
  • 1 cup (113 g) mild cheddar cheese, shredded, divided
  • 6 strips bacon, cooked, divided
  • 4 slices Texas toast (Or your bread of choice)
  • 4 tablespoons unsalted butter, divided
  • Preheat oven to 425°F. Line a baking sheet with parchment paper.
  • Brush the jalapeños with the olive oil on all sides and place on the prepared baking sheet.
  • Roast for about 15 minutes, or until the skin of the jalapeños begins to char slightly.
  • Remove from oven and set aside to to cool slightly.
  • To a medium mixing bowl, add cream cheese, garlic salt, pepper, and onion powder. Mix until creamy.
  • Once the jalapenos are cool enough to handle, roughly chop them and fold them into to the cream cheese mixture.
  • Butter one side of one slice of bread. On the opposite side, spread half of the cream cheese mixture. Top the cream cheese mixture with 3 slices of bacon and ½ cup of cheddar cheese. Top with another slice of bread and butter the outside. Repeat these steps with the remaining bread.
  • Add the buttered sandwich to a skillet and cook both sides over medium heat until the bread is toasted and the cheese is completely melted (3-5 minutes per side). Serve immediately.


4.28.22: MSIH cheesy chicken and rice

4.28.21: tortilla pizza


Thursday, April 27, 2023

Chicken Parmesan by Macey

CHICKEN PARMESAN: 

Chicken breasts

Almond Flour (GF Friendly) salt, and pepper. Eggs, for the egg wash and panko crumbs (GF Friendly) and parmesan for the crust

Marinara Sauce (Raos is my favorite if I’m shopping at a traditional grocery store, but there’s an awesome Italian store nearby called Gulliano’s that offers homemade marina sauce; I highly suggest branching out to an authentic italian store if you have one nearby!) 

Shredded Mozzarella

Parsley or basil to garnish! I normally use fresh Basil which is what I had on hand for today’s meal… but if for some reason I’ve killed the basil plant (which does happen lol) then I’ll do parsley. (Idk why but parsley seems to have a stronger taste than dried basil). 


So begin by mixing egg in a bowl. Put panko crumbs with seasonings (salt pepper etc) into a second bowl. 

Wash chicken breasts and then lather with egg mixture then coat the entire breast with panko crumbs. 

I cook the panko crusted chicken in the same dish that I will later on add the sauce to. 

350 degrees, roughly 10 mins on both sides (but watch it as every oven seems way diff!!) 

Then add the sauce directly in the pan and continue baking for 2 mins on broil. 


The sauce contains the following: 

Begin by carmelizing onions (chopped small) and near the end of the onion being carmelized, I add in minced garlic and some red wine. Once the wine burns itself off, I’ll then add a little chicken stock, cayenne pepper, more salt and pallet and oregano. 

Lastly, dump your jar of marinara sauce (preferred Raos or the authentic kind which is called “Italian gravy” :)). 

Once it’s all stirred together, I then scrape the sauce into the pan with the chicken and cover the top with mozzarella cheese. Broil for 2 minutes before removing the cast iron pan from oven. 

You can serve this chicken by itself with a veggie/carb on the side, or over top of a bed of pasta, etc. For this meal, I made up gluten free pasta (spaghetti) and served on top. 

For some reason, I always find that waiting to add the cheese until the very end is best, but If you’d like a hardier cheese topping then sprinkle right before you broil for 2 mins. (The outside edges will get crispy). 

I am trying to incorporate more greens into my diet, so for this meal I also made a small side salad that I ate while cooking 🧑‍🍳 😉 the salad was delicious (even without cheese!) I decided not to cheese, since there’s so much mozzarella cheese in the main dish. 

Ingredients in the side salad: 

Romaine Lettuce

Diced Roma Tomatoes

Artichokes (2) 

Black olive 

Italian Dressing 

Salt and Pepper as desired.


4.27.21: TT stovetop splatter tip

4.27.20: t-shirt face mask

4.27.19: Brooke made a bubble maker 

4.27.18: Mickey's beersbee 

4.27.17: accessories closet 

4.27.16: decadent chocolate cake 


Wednesday, April 26, 2023

Blah, Blah, Beige and Bland Diet for Sarge

Following up yesterday's post of the medication chart I made to track Sarge's meds is some info about bland dog diets. There's lots of info out there, I sort of combined a few different sources and came up with what to feed Sarge until his digestive issues calmed down. I found good info online at VCA Animal Hospital which I'm sharing below; the vet we saw suggested 4 parts brown rice to 1 part boiled chicken breast; Larissa's mom has 2 dogs that have had recurring colitis and swears by adding a spoonful of greek yogurt to their food - she also gave me a good tip to add raw ground chicken to uncooked white rice, and while the rice steams and cooks the chicken cooks as well and flavors the rice; and I read that pumpkin (100% pumpkin, not pie filling) is also good for them. So that's what I've been doing the past couple weeks - steamed white rice and ground chicken, with a spoonful each of greek yogurt and pumpkin. No treats, kibble, or anything extra other than a little egg white for a 'treat' when he needs one. 

Here's the info I found online:

Not the exciting topic of TV cooking shows, bland diets have boring ingredients. They consist of foods that are low in fat and fiber and are easy to digest. Effective bland diets usually have a single protein source (no surf and turf) and a simple carbohydrate. Sometimes, bland diets include ingredients that will help the formation of solid stool. Bon appétit!

Bland diets are also boring to prepare. No grilling or pan searing here! The meat source is usually boiled (yuk). Boil boneless, skinless pieces of chicken or turkey in non-salted or lightly-salted water until done. Drain the boiled meat and allow it to cool to room temperature before dicing into small pieces. Even with these very lean protein sources, there will be a little fat produced with boiling, so skim the broth to remove the fat floating on top. Save the skimmed broth to add moisture to the food which may improve palatability. Bland is not appetizing. Bland AND dry….even less so!

As an alternative to boiling meat, you may pan fry lean ground beef or turkey. Drain thoroughly to remove as much fat as possible. Unseasoned scrambled eggs are another good protein source for tummies in turmoil. Protein rich poached fish might appeal to the feline diners. You can also use commercially prepared turkey or chicken baby food or cottage cheese as a protein source, but be aware of the sodium content.

The source of starch in a bland diet can be rice or sweet potato. Steam or boil white or brown rice until tender. Bake the sweet potato, peel it, and cut it into small cubes. Canned sweet potatoes may be used if not too high in sodium. Alternative starches also include cooked oatmeal or pasta.

Regardless of what’s on your menu, combine ingredients in a 2:1 ratio of starch to meat (e.g., 2 cups rice to 1 cup meat). Cooked diets may be refrigerated for several days or frozen for long term storage.

Pets with diarrhea only, often respond to a bland diet that includes pureed pumpkin or bananas. The fiber in pumpkin and bananas is very soluble so it doesn’t overtax the GI tract. Both are good sources of potassium, absorb water, and slow down peristalsis which helps decrease bowel movements. While they may not be a fan of bananas, cats and dogs will usually eat pumpkin quite readily. Just make sure you buy regular canned pumpkin….not pie filling. It’s not dessert time!

The goal is to rest the GI tract, so reintroduce bland food gradually. Several small meals per day are better than one or two large ones. Start by offering a very small amount, 1-2 tablespoons of food every 2-3 hours. If your pet tolerates this, you may gradually increase the amount and decrease the frequency of food, (offer ¼ to ½ cup every 4 hours).

It’s usually good to keep the pet on a bland diet for 2-3 days after the vomiting has stopped and the stool has returned to normal. When things stabilize, you can start mixing the bland diet with your pet’s normal food. Start by mixing ½ regular food and ½ bland diet. If tolerated, you can gradually increase the regular food and phase out the bland diet. Total transition time from bland diet to regular diet after upset tummy signs are gone takes about 5 days.

info found here at VCA animal hospital

4.26.22: TT front or back 

4.26.21: crockpot golden mushroom pork chops

4.26.20: 🔥week 17

4.26.19: how to design a spring planter

Tuesday, April 25, 2023

Tip-sy Tuesday: Medication Chart

Sarge had to make a trip to Urgent Care a couple weeks ago for a bout of colitis or something (he was so sick that he didn't even stalk me in the kitchen when I was cooking, that's never happened before!). They gave him a bunch of meds, prescribed a bland diet, and sent him home with 4 different prescriptions - 2 of them he takes every 12 hours but not at the same time (antibiotic and probiotic would cancel each other out, I have to wait 4-6 hours between), 1 is once every 24 hours, and the other is 3 times a day. 

Like I'm going to remember which I did and when, I know I'd second guess whether I gave one or not and be recounting the pills trying to figure out if I did...

When this happens I make myself a chart of some sort, something I can check off showing that I did it. Sometimes I write it on my desk calendar, this time I make a chart using a lined piece of paper. It's a simple thing but it helps me so much!

He was stinky after being sick so unfortunately he had to have a bath, his face was so 'I already don't feel good and then you go and do this to me'! LOL


Monday, April 24, 2023

Creamy Crab Dip

I made this easy dip for an appetizer the other night before Jiji taught us how to make authentic Beef and Broccoli (click here for that post).  I omitted the onion but otherwise followed the recipe, don't worry about the addition of Tabasco - it wasn't spicy at all with a few shakes added. I added more Worcestershire than called for to make up for the lack of onion flavoring.


  •  8 oz. package cream cheese (light works), softened
  • 1/2 cup mayo
  • 1/2 cup sour cream (light works)
  • 1 cup shredded sharp cheddar cheese
  • 1 T. grated onion
  • 2 (6 oz.) cans lump crab meat, drained 
  • 1 t. seasoned salt (like Lawry's)
  • 1/2 t. Worcestershire sauce
  • 1/2 lemon, juiced
  • 2 T. finely chopped Italian parsley
  • a few shakes of Tabasco, to taste
  • black pepper, to taste

Oven Directions (I baked mine):
    Preheat oven to 350'. Mix the cream cheese, mayo and sour cream in a bowl until creamy. Add the remaining ingredients and stir to combine. Transfer to a small baking dish and bake for 25-30 minutes until browned and bubbly.  Serve with crackers, baguette, or tortilla chips.


Slow Cooker Instructions:
    Add the ingredients to a small (3-4qt) slow cooker, stir to combine, and cook on LOW for 2 hours until the cream cheese melts completely. Stir the dip and then let it cook for an additional 15 to 20 minutes. 

    It should keep well for up to an hour on the WARM setting. Be sure to stir it occasionally to prevent it from burning or separating.

recipe found here

Sunday, April 23, 2023

🔥 Around the Campfire (week 17)

Dear Campers ~

Here's a quick recap in case you missed anything at camp last week:

Posts ~

4/16: 🔥 week 16 

4/17: memorial pet blanket

4/18: TT (fail) mixer spatter guard 

4/19: beef and broccoli, chinese green beans

4/20: honey glazed salmon by Macey

4/21: MSTI: 12-3-30

4/22: words

What's Cooking ~

Sorry guys, it's been a crazy week getting ready to make our spring migration east - so not much time for recipe planning this week. If you need one great dinner idea tho, check out the beef and broccoli post above - I didn't try Macey's salmon but that sounds good too! 

That's it for this week, I have read a couple good books but don't have the time to tell you about them right now - I'll make up for it in next Sunday's recap! Hope you had a great week, see you later with more recipes, crafts, projects, whatever else I can think of to make (or talk someone else into making for me hahaha). Bye!

Sincerely ~

Jill

camp counselor


Friday, April 21, 2023

My Sister Tried It: 12-3-30

So today I tried something a little different.  Another viral Tik Tok/Social media trend. This one is exercise related. The 12-3-30 Fad.  I say “Fad” because it’s definitely a fad thing that people are doing right now and raving about.  If you haven’t heard of it it’s an incline of 12 on the treadmill, at a speed of 3, for 30 minutes.  To be honest I have tried variations of this a couple times- but have never just started at that 12 and 3 and kept it for the entire 30 minutes. Once I did a “ladder” type variation where I did minute one at a one include, two at a two incline etc. working my way up to 12 and then back down.  Not quite 30 minutes and really kind of “cheating”.  Today though I decided in my next entry for the “sister tried it” series I would do it the way its written for the entire 30 minutes.  So that I did. 

The first 10 minutes I would definitely classify as “easy”.  I’m used to running, playing soccer, and doing boot camp type workouts.  All things that have left me repeatedly sore.  At my age walking is what I should be moving to.  Anyway- first 10 minutes were great.  Going into the second 10 minutes were as I expected, quite a bit more challenging.  That is where I covered my treadmill screen with a towel so I wasn’t just watching the screen in pain.  What I would guess to be the last 10 were purely a test of will.  I struggled at that point to not hold the hand rails (they say not to) and to not Lean too far forward (as one would do while walking up a steep hill).  I had horrible visions of stopping walking and the treadmill shooting me backwards- but luckily that didn’t happen either. 
 
I was able to successfully finish the 30 minutes- and as you can see the calorie counter on the treadmill gives me an insane amount of calories burned.  Yes, I know those aren’t completely accurate however comparing to my usual 30 minute treadmill run this was actually quite a lot more!  Which surprises me for “just” walking! 

I can definitely see how people are losing weight on this- and even if it maybe isn’t good for me without a sufficient warm up walk, stretching etc. it was way better on my poor old knee’s than a run.  I am definitely planning to work this into my workout schedule! Maybe though will go back to a more gentle ladder type of thing though.. I’ll at least keep it up until the next fad comes along!


Thursday, April 20, 2023

Honey-Glazed Smoked Salmon by Macey

 Honey glazed smoked salmon and side salad with capers & balsamic!! 

Regarding the smoked salmon, I cheat and buy the package salmon from Whole Foods. That is already pre-cooked/smoked. 

Honey glaze: 

I whisk sesame oil with honey, brown sugar, and a tablespoon of bbq sauce. 

I paint on the glaze to the salmon before putting it into the oven. But before I do so, I like to use the pan with the sear lines and just quick sear both sides so it looks fancy :) I do this on a skillet pan , sorry idk the proper name. 

Then I take it off heat, paint on the glaze, and cook in the oven for 15 minutes (or until temperature is right… I use a probe and just keep checking every 4-5 mins) 

On the side, is a salad with sliced radish, lemon, cherry tomatoes, asparagus tips,balsamic, and capers ! 

(Asparagus tips were left over from a different night, I usually just cook asparagus with olive oil and sea salt in a baking pan — 350 degrees for 10 mins. (Again, every oven is different, so just keep an eye out for the asparagus, I like mine to be a little bit more country so I typically take it out between 8and 10 minutes). 

SO SO GOOD!!


Wednesday, April 19, 2023

Beef and Broccoli Cooking Lesson

My friend Jiji was nice enough to give us a lesson in authentic Chinese cooking - I told her I want to learn it all hahah but she said we'd start easy and make beef and broccoli. I wasn't expecting a two-fer lesson when she showed up with everything to make the beef and broccoli - and also Chinese green beans (better than I've ever had at a restaurant by the way!). This dinner was terrific, and she made it look easy. Thanks again for sharing, Jiji! 

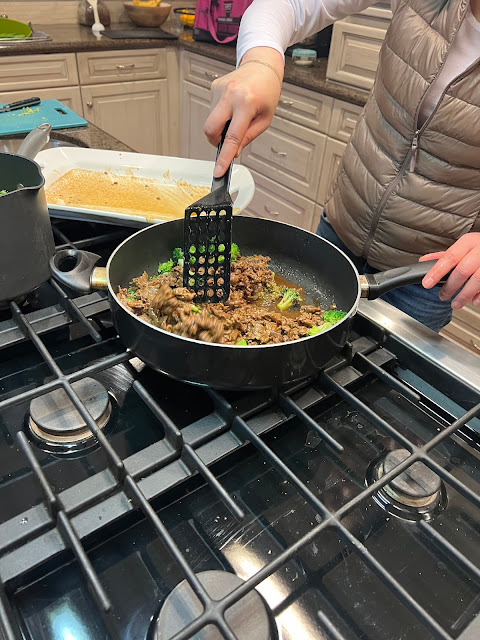
I took tons of photos but the process is quite easy. Chop up steak (note: you don't want too lean of a cut for this dish, she used flank steak), marinade in wine and soy sauce, coat with cornstarch and cook until done - all the while adding different sauces and flavorings and taste, taste, taste the whole time. I've learned that it's not really about using a set quantity of ingredients, she just added a little of this and a little of that until it tasted right to her. So I didn't give measurements for most of the ingredients, you really do just drizzle some in, taste and adjust. 

Once you make this you'll see what I mean and will be able to comfortably wing it in the future!

I took photos of all the sauce bottles, these are the brands she prefers but if you can't find the exact ones you'll at least have an idea of what you're looking for. 

  • 1 lb. flank steak
  • cooking wine or other wine - Jiji says it doesn't matter what kind
  • dark soy sauce
  • soy sauce
  • salt and pepper
  • cornstarch
  • broccoli florets, cut into bite-sized pieces
  • vegetable oil
  • raw cane sugar
  • oyster sauce
  • sesame oil
  • sesame seeds
  • 2 bulbs garlic, smashed and chopped
  • green beans
  • steamed white rice
Freeze steak for about an hour, it's easier to slice that way. Chop into small bite-sized pieces and marinate in a large ziplock bag along with wine, dark soy sauce, regular soy sauce, salt and pepper. Before cooking,  add some cornstarch to the meat and massage the bag to evenly coat the meat. Chop broccoli into bite-size pieces, boil for just a minute then remove from hot water but save the pan of water keeping it hot. Note: if you cook the broccoli while raw it needs too much time and will burn over the high heat. Set broccoli aside. 

In a large flat pan heat 1/4 cup veg oil over high heat; add meat with it's marinade and stir, turn heat down, stir and separate pieces. Once the steak is cooked thru, transfer it and some of the pan juices to a bowl/serving dish. Set aside. 

Add broccoli to the hot pan, fry in any juices that remain in the pan, until done and coated with any of the juice. While broccoli is cooking, put green beans in the hot water from the broccoli for a couple minutes, remove so they don't overcook and set aside. Add meat and juices back to the hot pan with the broccoli, sprinkle with raw cane sugar and salt. Taste and adjust. Add oyster sauce, taste and adjust. Cook for a couple minutes reducing the sauce. Add dark soy to deepen color. Put all on serving dish. Drizzle with sesame oil, sprinkle with sesame seeds. Wipe the pan clean. 

Smash and chop garlic cloves, set aside. Heat more veg oil in the pan over high heat. Swirl oil around, add beans into hot pan (oil will splatter so be careful), cover a couple minutes. Add garlic and salt, stir; add dark soy, oyster sauce, and raw cane sugar all to taste. Saute until beans are coated and cooked thru, stirring constantly. Serve with beef and broccoli, and steamed rice. 


I might do a separate post just for the green beans, they are killer! One of my new favorite things. And don't skimp on the garlic, 2 bulbs sounds like a lot but with a big bag of beans it was perfect. I ate them for breakfast the next morning, including all the garlic bits. Sorry to anyone I encountered the rest of that day LOL but it's totally worth garlic breath. 


4.19.21: how to make a ribbon flower

4.19.20: 🔥week 16

4.19.19: sports team paddle

4.19.18: book challenge


4.19.16: car trash cup


Tuesday, April 18, 2023

Tip-sy Tuesday: DIY Mixer Spatter Guard

I saw what seems like a good tip someplace online - how to make a spatter guard for your standing mixer. 

Side note: I wasn't sure 'spatter' was a word so I googled and yep, it is: Many people use the words spatter and splatter interchangeably. If you’d like to be precise, use spatter for small particles of liquid. Reserve the use of splatter for large messes. However, there’s no need to get out the tape measure! After all, one dictionary defines splatter as “to spatter.” 

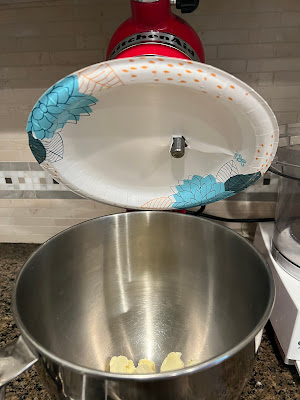
Back to the tip - the directions are to remove the blade or beaters from your standing mixer, and perforate a paper plate on the top portion of the beater. Secure it back in place, and you've got yourself an instant spatter guard for your next recipe. Simple idea and it makes sense. So I tried it and took the following pics:


I started writing today's post as a 'fail', because it clearly didn't work, but as I'm writing it I realize I didn't do it right, anyone else notice that the directions say to put the plate on the beater and I put the paper plate on the mixer! Duh. So next time I used the mixer I tried it the 'right' way:


Nope. Still a fail. 

Don't know if I'm just doing it wrong, or my mixer is different or what. It didn't work for me so you're prob wondering why I'm sharing hahahahaha - I'm just being transparent so you don't think everything always works for me LOL