Monday, August 31, 2020

Crochet Band for Face Masks

As you know, I've made a few fabric masks - some in the beginning had elastic ear loops before all the elastic was gone from stores and online, once that happened I started making masks with binding fabric straps to tie around the back of your head (or tie over the ears, both ways work) but there is a lot of material that way, they take way longer to make, and it isn't quite as convenient as just hooking the elastic over your ears. Although I do like the one with straps because you can pull it down without removing it which is handy if you need to put your mask on and off frequently, and you can customize the fit easier. Enter this crochet band that lets you wear the mask like if it had straps, with the ease of ear loops.

I saw this easy crochet band at Michaels.com - you hook the mask ear loops onto the buttons and it takes the pressure off wearing the mask behind your ears; I also like it because you don't have to take the mask off or let it dangle from one ear, you can just pull it down and wear it around your neck if you're popping in and out of places.


This only took minutes to make, hardest part was sorting thru my big stash of buttons to find the right size and color!


I copied the instructions from Michaels, and didn't change a thing:
STEP 1
FINISHED MEASUREMENT: 1"W x 9”"L
BANDCh 26.
Rnd 1 In ch next to hook, sc. Sc in next 24 ch. In last chain, sc 3 times. Sc down the other side of the ch. Sl st with first sc and fasten off.
Rnd 2 Attach second color with sl st. Sc around. At the ends, sc three times to make the curve. Sl st in first sc and fasten off. Tuck in ends.
STEP 2
Sew a button at each curved end.

ABBREVIATIONS:Chain = Chain
Rnd = Round
Sc = Single Crochet
Sl St(s) = Slip Stitch(es)
St(s) = Stitch(es)

Sunday, August 30, 2020

Around the Campfire 🔥 (week 35)

Dear Campers ~

A quick recap in case you missed anything at camp last week:

Posts ~

8/23: 🔥week 34
8/24: part 2 of amish friendship bread
8/25: tip-sy tuesday: celsius to fahrenheit
8/26: oven baked steak fries
8/27: comeback sauce
8/28: homemade jeopardy
8/29: old world sauerkraut supper

What's Cooking ~
  • grilled steak, mushrooms, oven fries and that delish comeback sauce
  • grilled chicken sausages, penne with marinara, steamed broccoli
  • ahi tuna, sticky rice, caesar asparagus 
  • lasagna, make-your-own salad bar


Miscellaneous stuff keeping me busy ~
  • read "The Innocent" by David Baldacci (#1 in Will Robie series). It's about an assassin for a US agency, a hit that goes wrong, a revenge plot, and a teenage girl. I liked it, would have liked it more if it wasn't so long (it dragged a bit) and I didn't love the reason most of the 'thriller' stuff happened but I still recommend it ⭐️⭐️⭐️1/2
  • my iPad crashed and that's where I've been reading all my library books, so I can't remember what else I read this week. Pitiful that I can't remember what happened in the past 7 days LOL. 
  • made more masks - I finally found some elastic for ear pieces, they come together so much faster now. I started following a new pattern that has a place to insert a filter, these don't have to have the binding and straps like my old ones so they are much lighter to wear and easier to pop on and off. I also made a couple that have a clear vinyl front but I don't have pictures yet to share with you. Oh, and I also made a crochet thing that helps with the wearing of masks with ear loops that I'll share soon!
That's it for this week! See you next week with more fun projects, recipes, and whatever else I can think of to make at camp!

Sincerely ~


Jill
your camp counselor 

Saturday, August 29, 2020

Old World Sauerkraut Supper

LeDonna made us this sauerkraut dish for dinner and we loved it SO much there were no leftovers - which made me sad since I would have had it for breakfast the next morning, but that should tell you how good it is! I used to hate sauerkraut until I found a recipe with pork chops, brown sugar and caraway seeds that made it palatable, since then I've learned to love it. This recipe reminds me a little of the one I make, I don't think I've ever shared it with you... if I remember I'll find it and post - then you'll have 2 delish sauerkraut recipes!

  • 1 jar sauerkraut
  • 2 potatoes, cubed
  • 2 apples, cubed
  • 3 T. brown sugar
  • 1 1/2 t. caraway seeds
  • polish kielbasa (or whatever sausage you want), cut in pieces
  • 1/2 cup water
Cook in crockpot on low 7-9 hours or on high 3-4 hours until the potatoes are fork tender. 


Friday, August 28, 2020

Homemade Jeopardy Game

Even though we are still kind of 'covid cooped up', August is full of family birthdays so we've had some small get togethers to celebrate (with lots of precautions and hand sanitizer of course!). My sister gave me this party idea and it's so much fun I thought I'd share. Yes things are on the down low right now, but we can still have fun - in this case it's playing homemade Jeopardy! Both of these examples are birthday editions of the game, but you can make up whatever categories you want - and you can either play in teams or individually, with the person who comes up with the questions/answers being the host ('cuz they'll know all the answers obviously!) and reading the questions.


For a birthday themed game write 5 or 6 categories across the top of a big piece of poster board (or cardboard would work just fine). A couple of the categories can be personal (in which case the birthday boy/girl can't answer the questions, duh!) and then the rest of the categories can be whatever you like. In the first example the personal categories are 'all about Taco' and 'Taco's favs' and the question/answers are things like what's his favorite song or candy, or the year his team won the state championship in HS, etc. The other categories kept up the 'Taco' theme with 'all about Mexico', '55', and 'who's yo daddy' - for example the category '55' had questions/answers built around something 55, etc.  You don't have to make all the categories themed of course, in the second example for Ronda's birthday Jen made her personal categories 'Ronda's relatives' and 'Ronda 101' and the other categories are "quotable women', 'rhyme time', 'potent potables', and 'fellow 45's'.

Then think of 5 questions/answers for each category, you want some easy and some harder just like in regular Jeopardy. These 2 example photos are set up differently - first one is pieces of paper printed on one side with dollar amounts ($100 thru $500) and the back side is the question that the host read. The second example has the questions printed on the board and then note paper covering them - both ways work. I probably don't need to say it, but easy questions get the lower dollar amounts and hard questions get the higher amounts!


To play the game - either divide up in teams if there's enough people, or play individually. Decide who is going first, they choose a category and which dollar amount they are playing for. Read
the question and give a few seconds for them to answer. If they guess wrong, the next team gets a shot. Continue going around the teams one at a time until someone gets it right, whoever answers it correctly gets to keep the card with the dollar amount on it (that's how you'll keep track of who has the most money). In 'real' Jeopardy you continue choosing amounts and categories if you won the previous one, but we play that once a team took a turn choosing it moves to the next team to pick. It's more fun that way since every team will get a chance to choose a category and dollar amount.

Once all the questions have been answered tally up each teams winnings. The two teams who earned the most get to play in final Jeopardy. Have a final question and answer ready - tell them the category (just like regular Jeopardy) and then have them write down how much they are willing to bet from the money they won playing the game. Read the question and they write down the answer without letting anyone see it. Then read the answer out loud, the two teams hold up what they guessed and how much they bet. Winner is whoever answered correctly and bet enough to outscore the other team, or if they answered wrong but didn't bet much they could still win if they ended with more money than the other team.

The winner got a big prize (candy bars) and bragging rights :) Guys, this is so much fun! And very easy other than coming up with the categories and questions hahaha - oh, you can ask the birthday boy/girl for help with questions and answers in the 2 personal categories since they can't answer those questions anyway. Enjoy!


Thursday, August 27, 2020

Comeback Sauce

Did you see yesterday's steak fries post and my teaser about the dipping sauce?  It's called 'comeback sauce' for a reason - you can guess why, right? Oh yeah, you'll be coming back for more for sure!


Mix together:
  • 1/2 cup mayonnaise
  • 2 T. ketchup
  • 1/2 T. Worcestershire sauce
  • 1/2 t. Dijon mustard 
  • 1/8 t. hot sauce (optional)
  • 1/4 t. smoked paprika (I used regular paprika)
  • 1/8 t. garlic powder
  • 1/8 t. black pepper


recipe found here

Wednesday, August 26, 2020

Baked Steak Fries

I love potatoes. Any kind of potatoes - to date, the only preparation I don't care for is German potato salad (can't say why because I also love vinegary flavors, but it just doesn't do it for me) - and I've never met a french fry that I could resist hahaha. Obviously eating too many french fries is not healthy (every thing in moderation, right? Yeah, I have no moderation when it comes to fries!) but sometimes you I crave them. Enter oven baked steak fries. We eat these often, they are easy to make and fill my desire for french fries - especially when served with this yummy sauce, I'll share more on that later :)

Scrub potatoes thoroughly, I leave the skins on but I'm sure you can peel if you want. Slice potatoes in half lengthwise, then cut each half into 6 wedges (if your potatoes are small then maybe you'll get less wedges, use your judgement). Put in a bowl and drizzle with olive oil, toss well to coat. Season with coarse salt and pepper, toss again. Feel free to change up the seasoning - I've done Italian spice blend, steak seasoning, Lawry's seasoned salt...it's all delicious. But plain old salt and pepper is great. 

Spray a baking sheet with non-stick cooking spray (or line the baking sheet with parchment paper). Arrange the potato wedges so they aren't touching; bake in a 425' oven for about 20 minutes, then flip each wedge over and continue cooking until golden brown, about 35 minutes total. 


The delicious sauce to dip our fries (I'm a ranch dip-dip fan but this sauce made me forget all about reaching for the ranch) is quick and easy - come back tomorrow for the recipe! That's quite the teaser isn't it?! HA! Can you guess what the name of the sauce is? 

update: click here for the come-back sauce recipe

Tuesday, August 25, 2020

Tip-sy Tuesday: Celsius to Fahrenheit

Do you know the quick little trick for converting celsius to fahrenheit? Granted here in the US we don't use celsius often, but it's still a fun party trick to know and it's simple - multiply by 2 and add 30 to get the estimated temperature.

For instance - 20' celsius, double the number (40) and add 30 = 70' fahrenheit (the actual number when I googled it is 68 - see, pretty close!)


Reverse the formula to go from fahrenheit to celsius - 70' fahrenheit, subtract 30 (=40), divide in half = 20 celsius.

You know you're going to amaze people when you can quickly convert the temp, who knew how smart you are?!! :)


Monday, August 24, 2020

Amish Friendship Bread Part 2 (a little trick)

Let's say you want to make the amish friendship bread that I posted Saturday (click here), but after a couple go 'rounds you are out of friends, neighbors, acquaintances, and enemies to give a starter to - but you want to make the bread one last time and then break the cycle. What to do - throw out the 4 starters? Or what if there's a way to make the bread without wasting any batter? Here's where my experimenting comes in - I have a solution!!

For the record, I have no idea why I did it this way and why it still worked. But I did, and it did.

When I poured the bag into a non-metal bowl as in instruction #1 there is 3 cups of starter. Instruction #2 says to add 1 1/2 cups each of flour, sugar, and milk and then separate out 4 starters. Well if I did that step I'd end up with approximately 7 1/2 cups batter. Here's where my logic might have been a little wonky - If I have 7 1/2 cups batter and took out the 4 cups for the starters I'd be left with 3ish cups of batter. Which is what I had before doing step 2. So I just skipped step 2 and 3 and continued on with the recipe.

And the result is 2 loaves of fantastic bread that we devoured.

Plus side - we got 2 loaves of fantastic bread that we devoured.
Negative side - no more starters means no more fantastic bread. It's a loss I'm ok with for now. Someday I'll wish I could have more of this bread but for now I'm done babysitting batter and can move on to other things.

Click here for the original post and recipe for Amish Friendship Bread.

Sunday, August 23, 2020

Around the Campfire 🔥 (week 34)

Dear Campers ~

Here's a a quick recap in case you missed anything at MMDC last week:

Posts ~
8/16: 🔥week 33
8/17: painted letters and a party cake
8/18: tip-sy tuesday: sticky stuff
8/19: gingersnaps
8/20: sushi towers
8/21: cricut onesies
8/22: amish friendship bread

What's Cooking ~
  • lamb chops, orzo, roasted asparagus
  • sautéed veggies with penne
  • sauerkraut supper (recipe to follow)
  • grilled steak, caesar salad, stuffed mushrooms
  • marinated pork tenderloin, gnocchi with parmesan, chopped kale salad
Miscellaneous stuff keeping me busy ~

after taking about 7 years to finish my last cross-stitch project (March 2015, 6 months before I started this blog so you never got to see it - I'll find a pic), I swore I'd never cross-stitch again...but then I saw this little kit that seems easy and (hopefully) quick, so I bit the bullet and started another project. Here's a sample - any guesses what this is going to say hahahahah?


finished 3/15 - it's now framed and hanging in my gallery wall at the condo

That's all for this week - my garden is producing lots of tomatoes so I'm busy tending to that right now; come back next week for lots more crafts, recipes, and who knows what else!

Sincerely ~


Jill
camp counselor and glutton-for-punishment-cross-stitcher. 

Saturday, August 22, 2020

Amish Friendship Bread

LeDonna brought me this recipe and a baggie of starter and said "I'm sorry to burden you with this - if you don't want to do it you don't have to". I thought "hmmm, why is it a burden to make this?"

Silly, naive me. Sigh. 

Amish Friendship Bread. Let's start with the positive -  It's delicious. Absolutely delicious. The pan gets dusted with cinnamon sugar before adding the batter and that makes the bottom and sides, which are usually nothing and I eat it first saving the best part (top of the bread) for last, taste amazing. I'm loving this technique for any sweet bread from now on - it'll make zucchini bread even better. 


Here's the downside: the recipe makes 4 starters in addition to 2 loaves of bread. And trust me, you'll want to make the bread - it's great. But then you need to find 3 friends to give a starter to (if you're keeping one for yourself, if not then you give out 4 starters).

I'm not exaggerating when I say 'good luck finding friends to take the freakin' starters off your hands'. 

Did I mention that you have to babysit the starter for 10 days before baking? And that after you finally get to bake it you'll once again have 4 starters to give away? And the friends you gave them to now have to find their own 4 friends to give their starters to so they don't want any of your starters. And the people you thought were your friends will suddenly be hiding from you, avoiding your eyes, and not taking your calls? And that even random campground people you're sure you can pawn the starters off on start laughing when you say 'hey, would you like a starter' and immediately shut you down?

NO. ONE. WANTS. THE. STARTERS. They do however want the bread. 🤦‍♀️

It's a dilemma. 


AMISH FRIENDSHIP BREAD (a better title might be 'Amish Enemy Bread') has quite a few rules and long list of instructions:

- Do not use any type of metal spoon or bowl for mixing
- Do not refrigerate
- It is normal for batter to rise, bubble, and ferment

Day 1     Do Nothing (day 1 is the date on the bag)
Day 2     Mush the bag (for real, that's the official wording)
Day 3     Mush the bag
Day 4     Mush the bag
Day 5     Mush the bag
Day 6     Add to bag: 1 cup flour, 1 cup sugar, 1 cup milk
Day 7     Mush the bag
Day 8     Mush the bag
Day 9     Mush the bag
Day 10   Follow the instructions below:

1. Pour the entire contents of bag into a NON-METAL bowl
2. Add 1 1/2 cup each of flour, sugar, and milk and mix well
3. Measure out 4 separate batters of 1 cup each into 4 (1)gallon bags and put date on the bag. Keep a starter for yourself and give the others away with a copy of these notes.
4. Preheat oven to 325'
5. To the remaining batter in the bowl, add:

  • 3 eggs
  • 1 cup oil
  • 1/2 cup milk
  • 2/3 cup sugar
  • 2 t. cinnamon
  • 1/2 t. vanilla
  • 1 t. baking powder
  • 1 t. baking soda
  • 1 t. salt
  • 2 cups flour
  • 1 large (5.1) box instant vanilla pudding
In separate bowl mix additional 1/2 cup sugar and 1 1/2 t. cinnamon and set aside.

Grease 2 large loaf pans.
Dust the pans each with 1/2 of the cinnamon/sugar mixture.
Pour batter evenly into the 2 loaf pans, sprinkle the remaining cinnamon/sugar mixture over top.
Bake 45 minutes or until done. (note: mine was done sooner, check it at about 35 mins.)
Cool until bread loosens from pan easily, about 10 mins. Transfer bread to a wire rack or plate to finish cooling,


*don't worry if your bag blows up like a balloon during all the 'mush' bags before baking it - it's ok! You can open the bag and release the air, then seal back up.


I'm not sure if you're still reading, and if you are - why are you after I sold this bread as a nightmare? Hmmmm? Well if you've stuck with it I have good news - I have a trick to share that doesn't require you to make never ending bread. But this is just a little tease, you'll have to come back Monday to find out what it is! :) (click here for the tip)

Friday, August 21, 2020

Cricut Onesies

Look at how stinkin' cute these onesies are that Mickey made for a friend's baby! She designed and printed the words using another friends' cricut machine (there's lots of models, it's a die-cut machine among other things) onto fabric transfer paper, then ironed them on generic white baby onesies. I love these!


left to right: 'training for taco tuesday', 'ohh...aunt Mickey you're so fine', 'love' in the outline of north carolina, and 'can't touch this. no really six feet'. So fun. What a great gift.

Of course if you don't have a Cricut you could still print them onto transfer paper using your computer and then cut them out by hand.

Oh, FYI because I didn't know and Googled it - you pronounce it 'cricket' and not 'cry-cut' like I've always done!

Thursday, August 20, 2020

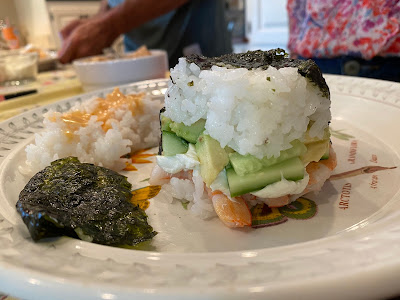
Sushi Tower

Mickey sent me a picture of the sushi towers she and Kyle made and I couldn't wait to try this idea.

Of course I then forgot about the idea and never made it.


So when P requested sushi for her birthday dinner last weekend I was super excited when 'sushi towers' were suggested and she agreed. So I finally got to make them and am so happy to have a new favorite dinner party idea! Everyone loved this, and the best part is that you just have to chop some ingredients and everyone makes their own - it's a fun sushi bar sort of thing.


Change the ingredients to whatever you like - Kyle said they like salmon but I went with imitation crab and lobster, and cooked small shrimp.

Note: unfortunately P had to return to NC before getting to eat her birthday dinner, but I already bought all the ingredients so we had a non-birthday dinner without her. Missed you P, but loved your dinner ;)


  • chopped cucumbers
  • carrot matchsticks
  • diced or sliced avocado
  • cubed cream cheese
  • sesame seeds
  • nori (seaweed) snacks, I found them in the Asian aisle at the grocery store (or you could use regular nori cut in smaller pieces)
  • imitation crab sticks, chopped
  • imitation lobster chunks
  • cooked shrimp, peeled and remove the tails
  • sushi rice (Mickey and Kyle use regular white rice, I made sticky rice)

To make sushi rice: cook 2 cups of medium grain rice with 2 1/2 cups of water (I use my rice cooker). In a small bowl stir together 2 T. rice vinegar, 2 T. sugar, and 1 t. salt; microwave for 45 seconds and stir until the sugar is dissolved. Once the rice is done stir in the vinegar mixture until the rice is evenly coated.

To make the towers: using a small plastic solo cup (I assume it'd work with other cups but we used leftover short plastic clear party glasses) layer the sushi ingredients to your liking, pressing them firmly into the glass. Once the glass is full turn over and invert onto a plate. Top with sesame seeds, nori snack pieces, and/or drizzle with your choice of sauces. We had varieties to choose from including soy, teriyaki, oyster, yum yum, and sweet Thai chili. Note if you put the sticky rice in the bottom of the cup first, it sticks (hence the name 'sticky rice' hahaha) and you won't get a nice tower - it'll still taste great but you lose the presentation. If you put in a non-sticky (shellfish, nori snacks, etc.) thing first they inverted without a problem. 


I should mention that the first pass thru the line everyone was excited to build and show off their towers, but the second helpers ended up just putting the ingredients straight on their plate - more like 'sushi bowls' then sushi towers hahahah. I had leftovers the next day doing the same thing, tastes exactly the same of course but not as 'impressive' - yum, either way this is a fantastic dish.

I made chicken teriyaki and bought an 'asian chopped salad kit' for side dishes. Not necessary at all (but tasted good). 

Wednesday, August 19, 2020

Gingersnaps

I posted Cathy's mom's molasses sugar cookies last month (remember Cathy asked me for the recipe and I told her no, it's a secret? 😂) and they are delicious. Everyone loved them. I wanted to make some cookies for Dave's ukulele meeting (they meet outside, sit in ball chairs, and are respectfully distant!) and he said I should make the molasses ones again, but hello - I don't usually repeat so I have new things to post (if I'm going to bake I might as well make new things, right?). So I looked in my 'favorites binder' and found this recipe for "Stubb's Gingersnaps" that I cut out of the LA Times 100 years ago  when we still got an actual newspaper - I have no idea who "Stubb" is, but these cookies are so good they've been in my favorites for a long, long time and I decided to make them for Dave's meeting.


So, here's the thing. While making them I asked Dave if he knew the difference between molasses cookies and gingersnaps? Nope, and neither did I. I didn't compare the two recipes until sitting down to write up this post and I was going to google the difference and let you know (cuz I'm helpful like that) - well guess what? The two recipes are almost exactly the same!! Whaaat??  Two minor differences - the molasses recipe calls for shortening and the gingersnaps use oil, and the gingersnaps call for twice the amount of cloves and ginger. They have the exact same amounts and ingredients other than that - so much for wanting to make something different!

I'll go ahead and post the gingersnap recipe - or you can just look back and check out the molasses hahahhaha!! Good grief.

STUBB'S GINGERSNAPS
  • 3/4 cup oil
  • 1 cup sugar, plus extra for rolling
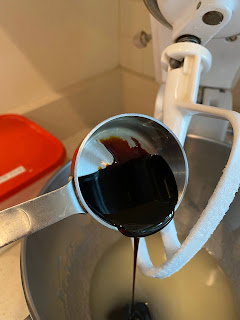
  • 1/4 cup molasses (click here for an easy measuring tip)
  • 1 egg
  • 2 cups flour
  • 1/4 t. salt
  • 2 t. baking soda
  • 1 t. cinnamon
  • 1 t. cloves
  • 1 t. ginger
Beat oil and sugar in bowl until creamy. Add molasses and egg, and beat well. Sift together flour, salt, baking soda, cinnamon, cloves and ginger. Add to sugar mixture and mix well.

Roll into teaspoon-size balls. Roll in sugar to coat, and place 2 inches apart on greased baking sheet. Bake at 375' until cracked and lightly browned, 12 to 15 minutes.

makes 4 dozen. 

Note: recipe says to roll into teaspoon-size balls - I use my small cookie scoop to make normal size cookies, or divide the small scoop in half for mini cookies; for the scoop size I bake about 10 minutes, for the 1/2 scoop size I bake about 6 minutes and watch carefully, they get over browned easily. This photo shows the full size on the right, small on the left. 


check out an easy tip for measuring sticky ingredients here

Tuesday, August 18, 2020

Tip-sy Tuesday: Measuring Sticky Ingredients


Quick little tip in case you don't know it - spray the inside of your measuring cup with non-stick spray before measuring out a sticky ingredient like molasses (above), corn syrup, honey, etc. and it will slide right out. No waste and cleanup is easy.

You'll want to use this tip when making Cathy's moms molasses sugar cookies, or the gingersnaps I'm posting tomorrow!

Monday, August 17, 2020

Painted Letters (and an engagement cake!)


Kyle and Mickey got engaged last weekend! She didn't know it was happening but everyone else did so we threw a surprise engagement party for them - as far as I could tell no one slipped up and tipped her off (I can't tell you how hard that was for me - we had 3 birthday parties, an all-day memorial event, and the engagement party all in a few days. Every time I tried to talk about the events I had to pause and think if what I was about to say was to the right person LOL, it was confusing. My mouth works faster than my brain so I was worried I'd say something wrong!).

I made a simple layer cake for the dessert table, mostly so I had something to stand this cute cake topper in! It says 'future mr & mrs' in gold glitter, so I decorated the cake with white buttercream frosting and heaped on a sprinkle mix I found online that is crazy chock full of different shapes in gold/silver/teal/white.


Question - the sprinkle mix is full of those hard little ball decorations like the silver dragees at Christmas and are super hard. They are meant to be consumed, right? I never know what to do with them because they are potentially tooth-breaking! 

For the dessert table (and as a engagement gift) we had a photo blown up on 16x20" canvas (shutterfly) and I found these tall wood letters that I painted and glittered. Looked great all together on the table!


This was so simple and easy to do - hardest part was deciding when to stop adding glitter :) I painted the letters using 'peacock teal' craft paint applied with a foam brush. It dried super fast so I was able to apply 3 coats in a matter of minutes. I only did the top of the letter leaving the sides and back natural. 

still a work in progress - I rubbed some of the thick gold glitter off before
adding silver glitter, and I also applied a little glitter along the opposite edge
(that was a Macey suggestion and it worked!) 

After the paint was dry I lightly brushed on elmers glue where I wanted the glitter to go, went light at first and kept applying until it looked right. Initially I only did gold chunky glitter but after sending a picture to Macey for her opinion I added some silver chunky glitter in with the gold, and I also made the glitter cover more of the letter. The store didn't have an & sign and I didn't know how I was going to come up with one, but then I found a tiny cross/plus sign in the bottom of the letter bin and thought it looked great with the big letters. Decided I liked it in it's natural brown stain so left it alone. 


The party was a blast - they were so happy and we loved celebrating this exciting time with them! 

Sunday, August 16, 2020

Around the Campfire 🔥 (week 33)

Dear Campers ~

Here's a quick recap of what happened at camp last week in case you missed anything:

Posts ~
8/9: 🔥 week 32
8/10: hello doormat
8/11: tip-sy tuesday: brownie liners
8/12: mini cream pies
8/13: notebook paper frame
8/14: mason jar 'lunchables'
8/15: mini succulent shadowbox

What's Cooking' ~
  • sushi tower, chicken teriyaki (will post both recipes soon), roasted broccoli
  • marinated thin chicken breast, potato salad, roasted asparagus
  • bbq ribs, chopped kale salad
  • take-out tacos
  • chicken sausages, penne with roasted cherry tomatoes (from my garden), caesar salad
Miscellaneous stuff keeping me busy ~
  • read 'The Silent Patient" by Alex Michaelides. I borrowed it from Mickey before she read it, when she asked if I liked it I answered 'it's fine'. She's like 'well that's not a rave review, should I bother reading it?'. Ummm, I guess if you're bored and have nothing else to read I'd say yes read it, but if you're looking for the psychological thriller it says it's supposed to be then I'd say no, don't bother. It wasn't much of a thriller - it does have a twist or two but not until too close to the end to make it suspenseful. ⭐️⭐️
  • read "Before I let You Go" by Kelly Rimmer. Got good reviews but I just didn't love it. It's a sad depressing story about 2 sisters (one a doctor, the other a heroin addict), a boring boyfriend, a mother who joined a religious cult, and a baby. I bet that summary really makes you want to read it hahahahaha? ⭐️⭐️
Hope you enjoyed the week of re-runs and didn't mind me taking a much needed break to get caught up on life! Come back next week for fresh posts - recipes, projects, and whatever else I can think of to make (or what my friends/family make!).

Sincerely ~


Jill
rested camp counselor 

Saturday, August 15, 2020

Mini Succulent Shadowbox (rerun)

originally posted 9/1/16:

I love how this little shadow box turned out and it was another simple, quick, fun project - my favorite kind!


Supplies:

  • small paper maché rectangle box 2" x 3.25", without the lid
  • small matted frame 3.5"x 4.5"overall with 2"x 3" opening, remove the glass and back
  • small artificial succulent
  • craft paint and brush
  • hot glue, clear craft glue

Paint the inside of the paper maché box, I did 2 coats, let dry. Hot glue the small succulent to a bottom corner of the box. Using clear craft glue, attach the mat to the front edges of the box creating the shadowbox effect, then glue the mat to the frame. Easy!

I just squeezed some paint into the box
and brushed it around using a small foam
paintbrush - a little lazy, yes :)


Got the idea for this project here


Friday, August 14, 2020

Mason Jar Lunchable (rerun)

originally posted 8/9/16:

My niece Macey just sent me this video by Little Things that she saw on Facebook and I have to say - it's genius! Click here to watch the video and see the idea in action - the premise is to use a mason jar with a lid and screw ring, and a clean empty single serving applesauce cup to keep your foods separate until ready to eat.  I haven't tried it myself yet but I totally will be doing this - the first idea on the video of keeping the cereal and milk apart seems like it might be hard to eat out of a mason jar but the other ideas are awesome: hummus and veggies, crackers with ham and cheese, yogurt with berries and granola, salad and dressing...love this! Thanks for sharing Macey :)


I googled this idea online and there are lots of people doing it - why haven't I seen this before haha? I found the above picture from another site (smart school house) so you get an idea what it looks like.

The applesauce cup keeps the foods separated - if it's a dry ingredient going in the cup (like in the above example - meat and cheese are in the mason jar, and crackers are in the applesauce cup) you can put the cup upside down on the lid of the mason jar then screw the ring over top and it holds the applesauce cup in place; if a liquid is going in the cup put the cup inside and then put the lid and screw ring on (for example, salad in the mason jar and dressing in the cup rests on top of the salad).

Thursday, August 13, 2020

Notebook Paper Frame (rerun)

originally posted 8/25/16:

I love back to school time of year - I think that's one of those either love it or hate it things. Dave hates it, this many years later he is still traumatized about going to school hahaha, but it makes me excited! I was shopping with Brooke the other day looking at school supplies (see here for her jazzing up her composition notebooks) and I couldn't resist getting myself notebooks, folders and new markers! Pitiful I know...but I love this stuff. So when I saw this idea I immediately knew I'd be making it.


I saw this frame idea on the Michaels website, I didn't follow their instructions exactly but that's what an inspiration idea is for! See an idea, change it if you want to, and make it your own...


This is super simple - paint a plain wood frame white; after it dries make lines using a blue fine point sharpie every 3/8" inch horizontally on the frame. Then make 2 vertical red lines on the left side - looks like notebook paper! So cute, what a great teacher gift (or a gift for someone like me who is slightly obsessed with notebook paper)!

I wasn't patient enough to paint one side and
let it dry before painting the flip side!


To make the picture to put in the frame, I played around with some free circle flower templates I found online (click here for the site I used) and added the 'make my day camp' text.