


9.30.22: trailer trash
9.30.21: ham butter/ham salad
Continuing on the theme of “sis tried it” I saw another recipe on social media. This one was on Instagram and looked so good! It’s a little similar to the one I tried before with the tortilla pizza’s (yum) but this one the toppings went directly in the pan first. Including cheese. SO. MANY. QUESTIONS. How does the cheese not stick? How am I flipping this without making a mess? Who is cleaning the pan when I’m done? Haha.


9.29.21: oatmeal chocolate chip cookies
9.29.20: TT - accessory organizing
9.29.19: 🔥 week 39
9.29.18: rhubarb pudding
9.29.17: cool clipboards by Brooke
9.29.16: chalkboard doors
9.29.15: rhubarb bbq sauce
Yesterday I showed you the mermaid scale cake I made for L's birthday and mentioned that I had a leftover layer. Well I also had quite a bit of frosting left as well and I remembered seeing a 'shag cake' somewhere and thought I'd practice the technique with the extra cake and frosting.

Fit the decorator bag with a grass tip and fill with your choice of colored frosting - squeeze the bag and pipe out the 'grass' frosting in different areas on the top of the cake.


Change colors and add more areas, repeat with different colors until it's all filled in. It reminds me of making a camouflage pattern - irregular areas of frosting touching each other totally filling in the top of the cake.
 |
| the grid marks are from my cooling rack |

9.28.22: ice cream cookie bites
9.28.21: TT- make a paper plate bowl
Tesha asked if I'd make a cake for L's "Little Mermaid" birthday party - I googled for inspiration ideas and hadn't settled on what exactly I wanted to do...maybe rubber figures, or bubbles, ombre...and then I saw mermaid scales and loved it. Most of the inspo pics used fondant for the scales but I'm not a fondant fan - it's how cake decorators get the super professional look (you color the fondant, roll it out and cut shapes or form it into 3D shapes) but it just doesn't taste good. I saw a couple that did it with buttercream frosting which doesn't look as sharp but I knew would taste better - so I went with not as professional but pretty enough, and tastes good too!

For the cake: I baked 2 boxes of white cake mix in (4) 8" pans. I did doctor the mix like I usually do - add a teaspoon of vanilla, a pinch of coarse salt, an extra egg, a box of dry vanilla pudding, substituted melted butter for oil, and this time I replaced most of the water with pina colada mix. Bake according to package directions. Cool completely. Note: I used 3 of the 4 layers for this cake because I wanted the cake tall enough to have more rows of scales. I'll show you tomorrow what I did with the extra layer :)
 |
| looks like a turquoise 'naked cake'! |


9.27.22: pumpkin bread review
9.27.21: Kyle's charcuterie board/centerpiece
9.27.20: 🔥 week 39
9.27.19: how to make a flip book
9.27.18: morse code and other bracelets
9.27.17: hawaiian cake
9.27.16: organizing socks
I have posted a lot of cakes and frosting in 8 years - a lot, a lot. And I've shared how I make my standard buttercream recipe a bunch of times but always in a post about the cake, it doesn't have its own post. So I'm fixing that and you won't have to search cake posts for it!
9.26.21: 🔥week 39
9.26.20: anniversary drawing
9.26.19: alfredo and pink sauces
9.26.18: german chocolate cheesecake
9.26.17: paper sunflowers
9.26.16: wood display box
9.26.15: how to use a hulk sized zucchini
We had a fun surprise birthday party for LeDonna last weekend, she loves The Little Mermaid so we made that our theme (side note: when I was decorating the banquet room at the restaurant I kept getting asked how old the birthday girl is - I hung up banners and balloons, etc. that I found on Amazon - and when I replied 60 they all laughed and said they expected me to say 6 LOL). Anyway, we said to dress in a character if you chose (and L was made up to be Ariel of course), so in support of her having to walk into the restaurant in full-on Halloween costume Ariel I decided I'd do a somewhat toned-down Ursula.
 |
| I made invites using a free template found here |
Found a t-shirt that has Ursula on it, black mermaid-y looking pants, and a gold shell necklace all on Amazon. I put the shell on a black silk cord and made her earrings from 2 shells I had on hand that I painted purple and wrapped wire around them to attach to ear wires. I tried to do Ursula makeup by layering blue and purple eyeshadow, drew on dark eyebrows shaped into her mean looking sea witch brows, red lipstick, and added a black mole. I bought white hair paint but decided not to use it and just stuck my hair up with got2be glued hair spiking glue which is really strong - your hair will not be soft once you apply this stuff, it's stiff and crunchy hahaha, but it works.
I took a couple pics but they aren't great, if you decide to be Ursula for Halloween (or your friends birthday party) just Google for images of her face and hair, there are lots.
character.png)
Funny story - when LeDonna's great-niece saw me she said to her mom ''Mom! I told you Uncle Jill should be Ursula because of her hair!!! And she is!!'' LOL. Oh, and yes, she calls me Uncle Jill :) Another funny story...

 |
| this is at the end of the night so my makeup is a little faded. I have purple under my brows, bright blue on the lids, black liner and mascara. I used black powder eyeshadow on my brows but liquid liner would have been more dramatic! |

9.25.21: chocolate sandwich cookie
9.25.20: broccoli casserole
9.25.19: banana poppy seed muffins
9.25.18: framed photo collage
9.25.17: wine and design fall tabletop
9.25.16: veggie and white bean bake
Dear Campers ~
Here's a quick recap in case you missed anything at camp last week:
Posts ~
9/17: 🔥 week 38
9/18: and the winner is...
9/19: TT front loading washer
9/20: chocolate chip cookie pie
9/21: butterkin squash
9/22: MSTI TikTok egg sandwich
9/23: words
What's Cooking ~
Miscellaneous Stuff Keeping Me Busy ~
See you next week with more projects, crafts, recipes, tips, whatever I think of to make at camp! Bye :)
Sincerely ~
9.24.22: thru the years
9.24.21: sprinkle sandwich cookies
9.24.19: TT: power outage
9.24.18: jute wrapped candle
9.24.17: 2 cheese balls
9.24.16: ice cream carton tip
9.24.15: crochet bracelets


9.23.21: necktie pillow
9.23.20: mounds cake
9.23.19: driftwood art
9.23.18: 🔥 week 38
9.23.16: painting pottery
9.23.15: candy coated marshmallows
I understand the kids get their recipe’s from Tik Tok.. I get it.. but as an adult is it weird if I do the same? I saw this super interesting video of someone making an egg sandwich- but like French toast? Ok, hear me out.
First, they made it look super easy. They rolled the eggs around, laid the bread on top, cooked for a minute, flipped it over and cooked another minute. Put the toppings inside, flipped it over and voila! Egg sandwich. I’m making it sound more complicated than it was. Let me break it down and add some tik tok pictures (that I don’t own so no one sue me..)


Ingredients:
So.. again, sounds more complicated than it is. One issue with step 3. How do I flip the ENTIRE thing eggs/bread over all together? Couldn’t. Had to flip in halfs. But whatever. Still worked. This was oddly delicious. I know an egg sandwich isn’t complicated- I get it- but this one was super different and interesting. The bread had egg on the outside as well as inside, had to eat it with a fork but was quite tasty! Give it a try!


9.22.21: crockpot London broil stroganoff
9.22.20: TT- baby washcloths
9.22.19: ugh computer problems
9.22.18: Cassie’s flower arrangement
9.22.17: chocolate covered banana by Brooke
9.22.16: corn husk wreaths
9.22.15: decorate your outlet covers
When you see hard squashes appear at the store do you look at the pile and think "ahhh, it's Fall"? I do!
I saw this Butterkin squash at the grocery store and don't think I've ever seen it before...so I googled what is it? I found that it's a new variety of butternut squash that blends butternut and pumpkin squash together. It has a sweet, smooth texture - I think it tastes more like butternut than pumpkin but you try it and see for yourself!


9.21:22: thru the years
9.21.21: TT - microwaving couscous
9.21.20: face mask with clear front
9.21.19: antipasto pasta
9.21.18: rhubarb bbq sauce
9.21.16: sprinkles no-bake cheesecake
9.21.15: german chocolate cupcakes
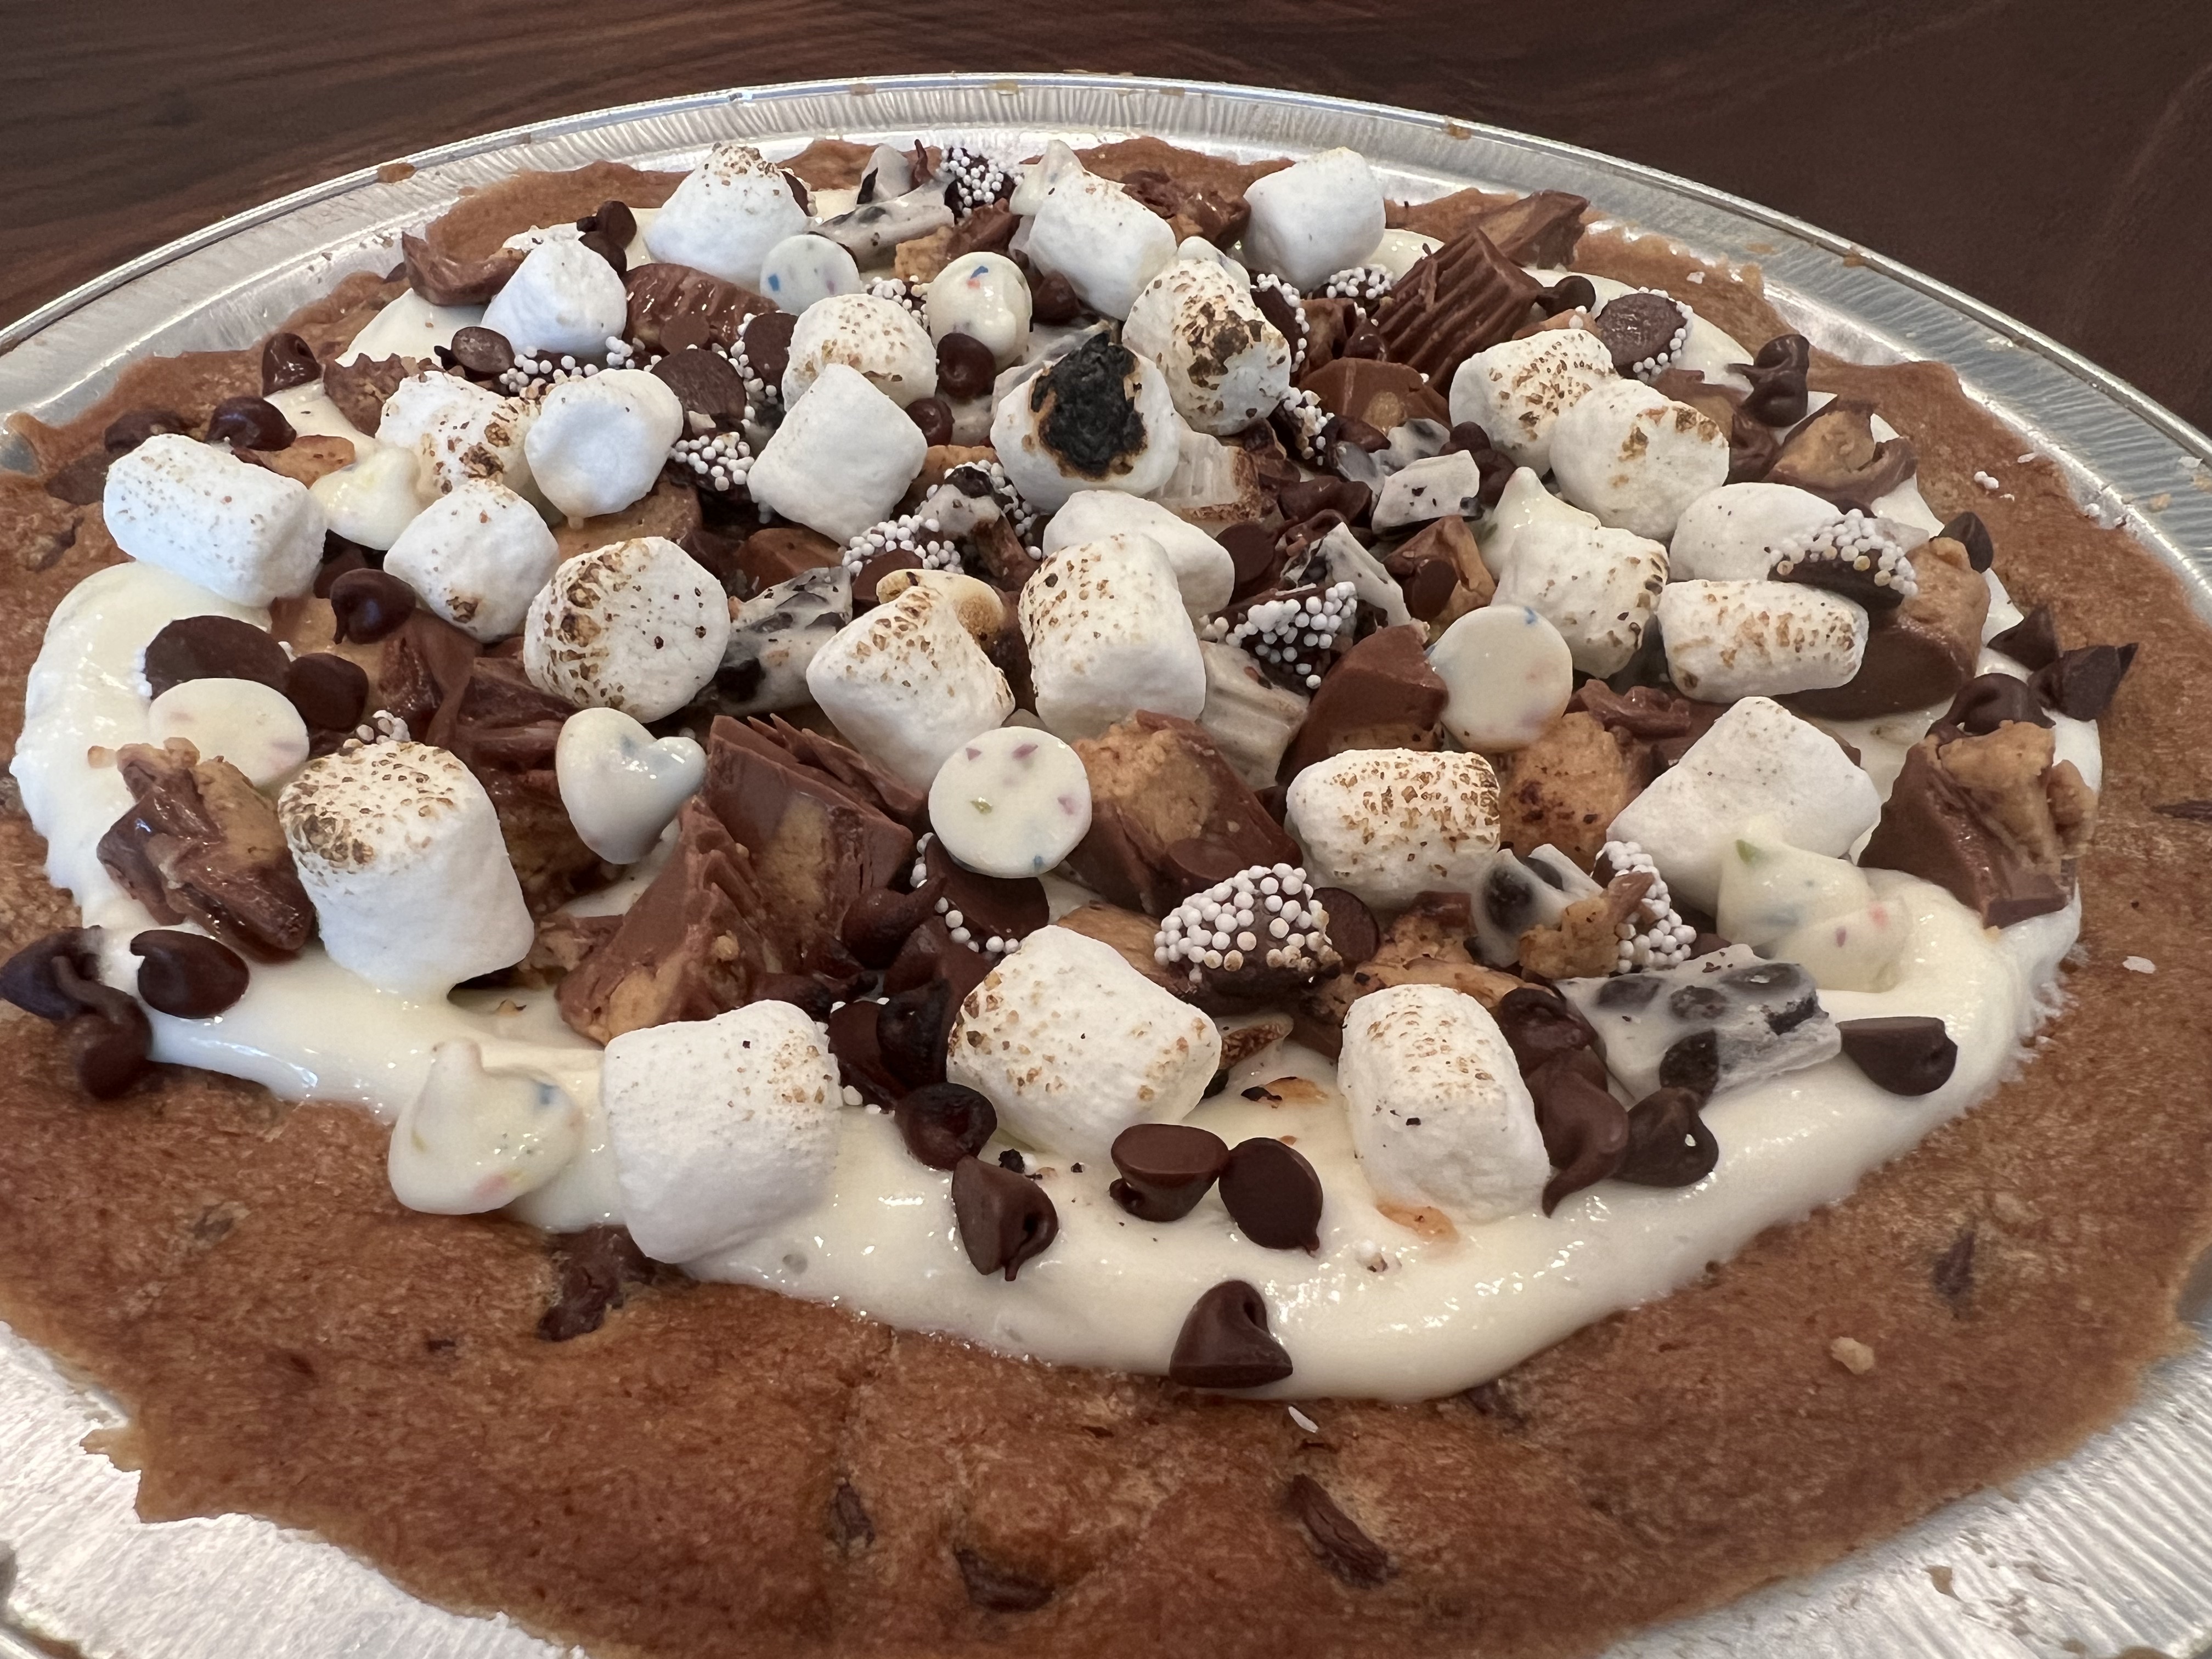
Hmmm, how's that for a name? I don't know what to call it - it's a pie made out of cookie dough!

Spray a pie plate with non-stick spray. Press the cookie dough into the plate and bake until done. Note: I tried pressing the middle down a little lower than the edges to create an indent for the toppings before baking it, but it puffed up equal to the edges. So when it came out of the oven I pressed the center down a little bit using the bottom of a glass. Cool completely.
Once cool, top with the cream cheese mixture, add toppings as desired. 2nd note: I chopped the reese's and candy bar into smaller pieces.


9.20.22: thru the years
9.20.21: 30 minute tomato sauce
9.20.19: hairy pretzels
9.20.17: funfetti cake dough brownie layer cake
9.20.16: finish what you start
LeDonna came up with this tip and if you have a front loader washing machine you're going to like it (ok, well at least I find it very helpful and hopefully you will too!). I really like the practicality of a front loading washer but there is one big problem - if you shut the door moisture builds up and mold forms on the rubber seal. And it's gross. And really hard to clean. But if you leave the door open it's in the way. Enter L's solution - she stuck a small suction cup hook on the front of the washer, and another on the dryer next to it, then attached a small bungie to the hooks to keep the washer door slightly ajar; now it's out of the way but open enough to allow air to enter. Problem solved!


9.19.21: 🔥 week 38
9.19.20: meaty minestrone
9.19.19: card stock gift box
9.19.18: strawberry swirl cheesecake
9.19.17: paper mugs
9.19.16: Steve's mac and cheese
9.19.15: dog crate cover
Thanks to everyone who entered to win the 8 year blogiversary drawing! I put everyones name on pieces of paper, threw them down on my desk and picked one - congrats goes to...
Drumroll please.........
NATALIE ELKINS!!! Woohoo for you!!

9.18.21: Crocheted Afghan for Brook
9.18.20: kid craft: painted mason jars
9.18.19: German chocolate poke cake
9.18.18: plant hanger
9.18.16: Steve’s Mac and cheese
9.18.15: laundry room tip