Tuesday, August 31, 2021

Tip-sy Tuesday: how I make cake layers

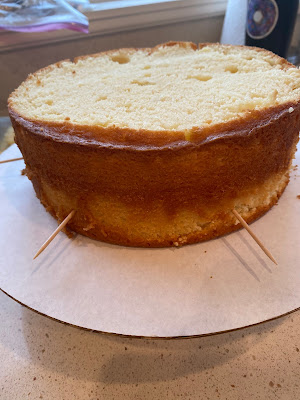
 There are tools you can buy to cut cakes into even layers, a common one is a wire that you pull across the entire cake cutting it in two...however, I can't make that thing work and have come up with my own way.

First I measure up from the counter to the top of the cake that needs to be trimmed off if it's domed or too brown, place toothpicks all around the top of the cake at the same distance. Using a serrated knife and the toothpicks as guides, trim off the top. Then measure from the counter to where you want the bottom layer and repeat sticking toothpicks all around at the same distance up from the counter (for example, measure 1" up and toothpick it, then repeat all around at 1" up). Don't cut it yet tho - repeat that same step for where you want the second layer cut (if you are doing 3 layers total). After you mark all the layers you want to cut, go ahead and carefully slice into even layers using the toothpicks as your guide.

So those directions are when I make a cake in my 8"x3" pan and cut it into 3 layers. If you make 2 regular sized cake layers and want to cut them each in half to make a 4 layer cake, obviously only measure where half of the layer is and cut there. Make sense? Check out the pictures below for a visual:


Monday, August 30, 2021

Layered Birthday Cake

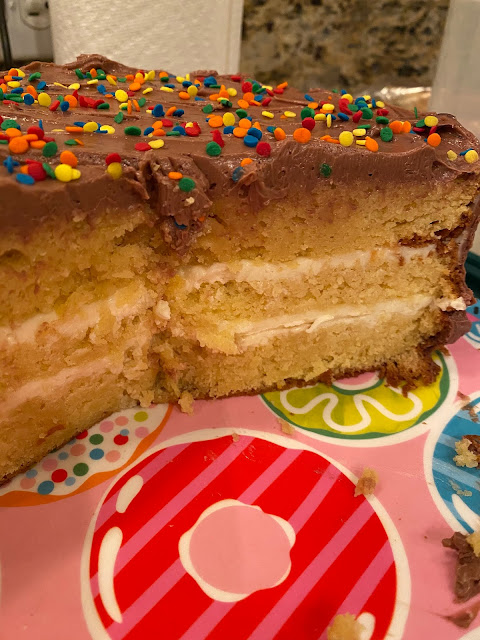
Brooke turns 18 this week and has requested plain cheesecake and apple crisp for her birthday desserts - I'll add sprinkles to the cheesecake to jazz it up but not much I can do to make apple crisp 'festive' hahaha. One of the favorite desserts she asked for in the past is this 3 layer turquoise cake (which is definitely a happy party cake!). I don't think I've posted it before, but it's too pretty not to share haha.  The first picture is the inspiration photo, and I didn't take a picture after slicing the cake I made but you get the idea. This year's dessert might not be this celebratory but she's over asking for cake for her birthday! 


Sunday, August 29, 2021

🔥 Around the Campfire (week 35)

Dear Campers ~

A quick recap in case you missed anything at camp last week - and for the first time in a long time I missed blogging for a couple days due to my computer being in the shop. At first they thought it was damaged from liquid but I knew it wasn't that (it wouldn't power on, but there wasn't any liquid around), turns out it was caused by friction from sliding it into my backpack without shutting it off first! I've never heard of that - that info should probably have been a 'Tip-sy Tuesday' post hahaha!! Anyway, it's too hard to blog on my iPad so I had to miss a couple days. 

Posts ~

8/22: 🔥week 34

8/23: columbia 1905 salad

8/24: tip-sy tuesday: air travel water bottle

8/25: s'more brownie pie

8/26: roasted grape and goat cheese spread

What's Cooking ~

  • grilled chicken breast, tomato pie, green salad
  • grilled lamb chops, potato salad, steamed spinach
  • pasta with alfredo sauce, sautéed veggies (mushrooms, onion, zucchini)
  • grilled bbq salmon, cole slaw (doctored store bought with fresh shredded cabbage)
That's it for this week - hope you'll stop back often to see more crafts, recipes, projects, whatever else I can think of to make at camp! Bye!

Sincerely ~


Jill
camp counselor

Thursday, August 26, 2021

Marinated Goat Cheese with Roasted Grapes

Here's another winning dish that Al made for us that we absolutely loved, I've never had roasted grapes before and mixed with the marinaded goat cheese they are great - he changed a couple things and I'll share his notes after the recipe.

Ingredients:

  • 8 oz. goat cheese, cut into 1/4" pieces
  • 2 cups seedless red grapes
  • 4 sprigs fresh thyme leaves
  • 3 bay leaves
  • 3 garlic cloves
  • 1/2 t. coriander seeds
  • 1 star anise pod
  • 1 strip of orange zest
  • 1/2 cup olive oil (orange flavored if you have it)
Instructions:

Step 1:
  • Preheat oven to 350'
  • Arrange grapes on a baking sheet and toss with 2 T. olive oil, a pinch of salt and pepper.
  • Roast for 45 minutes until the skins are wrinkled. Let cool.
Step 2:
  • make the marinade by placing the thyme, bay, garlic, coriander, star anise, and olive oil in a saucepan and cook for 15 minutes on low heat. Let cool. 
Step 3:
  • combine the cheese and grapes with the marinade in a glass bowl; cover and let marinade overnight at room temperature. 
To serve, arrange on a plate or platter and serve with sliced baguette. 

Al's changes: he used 3 cups of grapes, left out the star anise, and used ground coriander instead of seeds. He also mixed it all together and served in a bowl instead of a platter. 

original recipe found here


Wednesday, August 25, 2021

S'more Brownie Pie

Here is the 3rd pie I made for my sis's birthday. I'd already made the banana cream and chocolate peanut butter pies when she asked if I hadn't made any dessert for her yet would I please make her something s'mores flavors. Well, how could I not make her another dessert when she specifically asked for something? I've had this s'more brownie recipe in my file for a couple years and thought they seemed easy and most likely delish. I pretty much followed the recipe except I started with a store-bought graham cracker crust. Things were going along smoothly until I got to the part where you broil the marshmallows for 2-3 minutes (note: I don't have a culinary torch but am getting one now, read on to see why). 


I put the marshmallow topped brownies in the oven to broil, walked over to the microwave to start heating the hot fudge, walked back to the oven and - can you see where this story is headed? - the entire top of the brownies was on fire. ON FIRE!!! I'm talking flames shooting off the top and black smoke poured out of the oven when I opened the door! And even after I shut the door flames were flickering out the top! YIKES!!! Oh my gosh that has never happened to me and I've been baking a loooooong time. I slammed the door shut, turned off the oven, ran around opening windows and doors (no problem, it was only like 95' that day), turned on the exhaust fan, ran to get 2 floor fans and proceeded to blow out as much smoke as possible before the smoke alarm went off. I then got myself together and thought about what else I could do as I'm watching the pie still ON FIRE, but did know enough to not open the door again and give it more air. It slowly put itself out. Whew. As a side note: Dave brought the leaf blower in from the garage and we had the genius idea that I could open the door to remove burning pie and he'd blow the smoke out the window but common sense ruled and we left the door closed LOL!!! 

Next chapter is my friend Teri walked in and asked what smelled so good? HAHAHAHA. I said, it probably smells like a campfire in here LOL. When the oven cooled off I pulled the pie out and it looks like I threw the whole thing into a fire - I wasn't going to take it to my sisters obviously, but then I thought 'what the heck - some people like burned marshmallows so I'm taking it'. If nothing else I'd get some laughs. Sure enough - it was the hit of the pies, everyone wanted to try it and said it was perfect. The burned top made it taste exactly like a s'more and for some reason the ashes (while super ugly) gave it the perfect flavor!

This is a very long post but I wanted to share my struggle and ultimate success with you. Moral of the story - sometimes what looks like a nasty campfire disaster actually tastes delicious  ;) 

Here's the exact recipe I followed, found here at bronners.com, with my photos following:

S’MORE BROWNIES

Serves 12
Ingredients:
Graham Cracker Crust
– 10 graham crackers, crushed finely
–  1 stick of melted unsalted butter
–  Parchment Paper
Brownies
– 1 box of brownie mix (choose whichever brand you prefer)
Р1 cup marshmallow cr̬me
– 1 jar of hot fudge
– 3 Tbsp water
– 2 cups miniature marshmallows
Instructions:1. Preheat oven to 350 F. Line a 9×9 square baking dish with parchment paper.
2. Mix together crushed graham crackers and melted butter until well combined. Press into bottom of baking dish. Place dish in the freezer for 10 minutes to set.
3. Mix brownies as directed on the box.
4. Take the baking dish out of the freezer and pour brownie batter on top of crust. Bake in oven as directed on the box.
5. Once brownies are done, let cool for 30 minutes.
6. Use a wooden dowel to poke holes into brownies about 1-2 inches apart. You can go all the way down until you hit the crust.
7. Microwave marshmallow crème uncovered on high for 30-45 seconds or until soft in a microwavable bowl. Add water, stir until smooth and pourable. You might need to add more water to get the smooth consistancy.
8. Pour marshmallow crème over brownies and let sit for another 15-20 minutes.
9. Top brownies with miniature marshmallows. Before setting your oven to broil, make sure you have your oven rack about 4-6 inches from heat. Set oven to broil.
10. Broil the brownies with marshmallows 2-3 minutes; keep an eye on them! Depending on your oven, it might take less time for the marshmallows to lightly brown. (In the video, we use a culinary hand torch; you can do this as well instead of broiling).
11. When marshmallows are lightly browned, remove from oven and top with hot fudge.


Tuesday, August 24, 2021

Tip-sy Tuesday: air travel water bottle

Super quick - we are just back from a long weekend in Spokane and I thought I'd share a little travel tip; you might already know this but it's an easy good one so I'll share in case you haven't thought of it. You aren't allowed to take water from the outside into an airport but then once you're thru and want water for the rest of your journey you have to buy a bottle of water...and I'm a little frugal for that so I bring along an empty water bottle and once thru security I fill it up at a water fountain. Lots of airports now have a specific fountain for filling bottles which is great, just set your bottle under it, push the button and it fills it without having to hold the bottle under the part where you'd normally get a drink (which is pretty germy if you think about it too much!). Do you already do this? Good to know, right?

Don't have a picture of an empty water bottle in the outside pocket of my backpack but I think you can imagine it hahahaha. 

Monday, August 23, 2021

Columbia 1905 Salad

I have no idea why this salad is named 'Columbia 1905' - I do, however,  know that it's delicious. It's even good cold the next morning for breakfast - I know that because Al made this for dinner one night and forgot to serve it, so I went home with a bowl of leftover hahahah. I did pick out some of the iceberg that got a little wilty, but the rest of it was great. I forgot to take a picture - it looks like an antipasto salad with the chopped meat and cheeses. So good!

Dressing ingredients:

  • 1/2 cup extra virgin olive oil
  • 2 T. white wine vinegar
  • 3 garlic cloves, minced
  • 2 t. dried oregano
  • 1/2 t. salt
  • 1/4 t. pepper
Salad ingredients:
  • 1/2 to a full head of iceberg lettuce, chopped (about 5 cups)
  • 1 ripe tomato, cut into eighths
  • 1 cup baked ham, cut into 2" x 1/8" strips
  • 1 cup swiss cheese, cut into 2" x 1/8" strips
  • 1/2 cup pimento stuffed green olives
  • 1/2 cup parmesan, grated
  • 2 T. Worcestershire sauce
  • juice from 1 lemon
Directions:

1. Whisk together dressing ingredients and set aside.

2. In a large salad bowl, toss together lettuce, tomato, ham, swiss cheese, and olives. 

3. When ready to serve, add in the salad dressing, grated parmesan, worcestershire, and lemon juice. Toss well to combine before serving. 


Sunday, August 22, 2021

🔥Around the Campfire (week 34)

Dear Campers ~

Here's a quick recap in case you missed anything at camp last week:

Posts ~

8/15: 🔥week 33

8/16: personalized drink cups

8/17: tip-sy tuesday: filled crescent rolls

8/18: oreo rice krispie treats

8/19: personalized glasses (I just realize I did 2 personalized glasses this week!)

8/20: banana cream pie

8/21: chocolate peanut butter pie

Once again I don't have good menu ideas for you - we were camping most of the week and couldn't use the stove so ended up eating super simple grilled meat and salads. Then we left for a long weekend in Spokane (side note: I haven't been on a plane since 2/20 pre-covid and I'm a little worried, not gonna lie. Wish me luck) so no cooking the rest of the week. 

That's it for this week - stop back often for more recipes (2 more pies for sure next week), crafts, projects, whatever else I can think to make at camp! Bye!

Sincerely ~


Jill

camp counselor 


Saturday, August 21, 2021

Chocolate Peanut Butter Layered Pie

Here's the second of the pies I made for my sis's birthday - come back Monday for the 3rd and a couple stories about why there are 3 and how the last pie turned into quite the experience that I'm still not over.... 

For this chocolate peanut butter layered pie:

Start with a pre-made chocolate crust. Mix together 1 box vanilla pudding with 1 cup milk. Pour into chocolate crust. For the next layer cream 1 cup peanut butter and 1 box softened cream cheese together until smooth. Beat in 1 cup confectioners sugar. Fold in 1/2 of a small tub of cool whip and a big handful of chopped reese's peanut butter cups. Chill 4 hours or overnight. When ready to serve, top with the rest of the cool whip and garnish with lots more chopped reese's. Yum. 

Ingredients:
  • chocolate cookie crumb crust
  • 1 box vanilla pudding
  • 1 cup milk
  • 1 cup peanut butter
  • 1 (8oz) box cream cheese, softened
  • 1 cup confectioners sugar
  • 1 small tub cool whip, divided
  • reese's peanut butter cups (as many as you feel necessary hahaha! I used a lot!)
First pie I posted is banana cream pudding pie
Third pie is s'more brownie pie

Friday, August 20, 2021

Banana Cream Pudding Pie

I made 3 pies for my sis's birthday last week - I almost shared them all on one post but then realized that's a little much and if you're searching for a pie recipe you'd have to look thru this entire post to find the right one...plus I might as well get 3 posts out of one event LOL. First up - banana cream with a couple twists. 

I bought a pre-made shortbread crust and drizzled the bottom with caramel ice cream topping. Chop a couple bananas and put on top of the caramel. Mix together 1 box vanilla pudding and 1 box banana pudding with 2 cups milk, let set for a couple minutes and then fold in 1 cup cool whip. Spread on top of the bananas and chill for 4 hours or overnight. When ready to serve top with another cup of cool whip. You could decorate with more bananas on top but if you don't eat the entire pie then the bananas turn brown and ugly (in my opinion). I also thought I'd drizzle with caramel but forgot to take it to my sisters house - so no caramel drizzle!

Ingredients:

  • shortbread or graham cracker crust
  • caramel ice cream topping
  • 2 bananas
  • 1 small box instant vanilla pudding
  • 1 small box instant banana pudding
  • 2 cups milk
  • 2 cups cool whip 

Thursday, August 19, 2021

Personalized Mimosa Glasses

Mickey ordered these champagne flutes for wedding morning mimosas and asked if I'd personalize them - yep, of course!

Actually I don't want to tell her how easy these were to crank out - matter of minutes. I did them on the Cricut Joy using SignPainter font, cut them on blue permanent vinyl, then stuck them on (I didn't even do my usual measuring and leveling to make sure the names are on straight - I just eyeballed it and they're perfect). Soooooo easy! And cute, right? 


Wednesday, August 18, 2021

Oreo Rice Krispie Treats

I was trying to think of a different treat to make for Dave's ukulele group meeting and found this recipe for Oreo Rice Krispie treats and I liked that it has a couple different things than the classic recipe. She browns the butter, which only takes a few minutes longer than the usual melting; adds more marshmallows; and adds a pinch of coarse salt. These turned out great and everyone loved - to serve, I cut into small squares and wrapped in plastic wrap to keep them germ-free (and fresh, I made them 3 days before the event). Yum. 

I read a review that shared what seemed like a good tip - melt the marshmallows in a large glass bowl in the microwave...yeah, that didn't work very good (!) so I ended up transferring them to a large pan and finished melting them that way. 


  • 1/2 cup (1 stick) butter, softened
  • 20 oz. marshmallows
  • 1 t. vanilla
  • pinch of coarse salt
  • 7 cups (7 oz.) rice krispies cereal
  • 20-24 Oreo cookies, coarsely chopped or crushed
Directions:

1. Butter the bottom and sides of a 13x9" pan. Set aside.

2. Melt the butter in a large saucepan on low heat and let it cook until the solids start to turn golden brown and it smells caramelly, 3 to 4 minutes.

3.  Add the marshmallows and cook on low, stirring constantly until mostly melted (a few small lumps here and there are ok). Add the vanilla and salt, stir to combine.

4. Place the rice krispies and oreos in a large bowl, Pour the melted marshmallow mixture overtop and stir until evenly combined. Scoop the mixture into the prepared pan and press the mixture into the pan with lightly greased hands - smashing them down too hard will result in firm rice krispie treats, so use a gentle hand if you want them chewy. Let cool before slicing into squares.

Notes: 

  • you don't have to brown the butter but it does add great flavor. 
  • 20 ounces of marshmallows is more than the usual 16 ounces (it's about 10 cups of mini marshmallows or 75 large marshmallows) which gives them a more gooey texture. 
  • to crush the oreos, I put them in a large baggie and whack them with a rolling pin. 

    crush the oreos

    brown the butter


    melt the marshmallows

    pour over the cereal and cookies


    recipe found here

    Tuesday, August 17, 2021

    Tip-sy Tuesday: Fruit Filled Crescent Rolls

    I guess this isn't a 'tip' so much as a shortcut...I bought a kit the other day for filled crescent rolls, I haven't had them in forever and after opening the box I realized you do not need to buy a kit! All you need is a tube of crescent rolls, pie filling, and confectioners sugar drizzle (make from thinning out the sugar with a little water, milk, or lemon juice). Bake for 8 or o9 minutes. Less expensive then buying the kit, and you can customize the flavors to whatever you want or have on hand. Simple!


    Monday, August 16, 2021

    Personalized Drink Cups

    I think this is the last thing to show you from the bachelorette weekend - I found these plain white cups at the dollar store and cut out words using my Cricut. On the front they say "Oh Mickey you're so fine" (are you singing that in your head right now?) and the back has their name so they'd know which cup is theirs to use for the weekend; Mickey the bride-to-be says "I'm Mickey and I'm so fine" hahahha. Made us laugh. Super easy but a fun little extra detail that people seemed to like!


    8.16.20: 🔥week 33

    8.16.19: tuna avocado egg salad

    8.16.18: sloppy joes

    8.16.17: s'more pie

    8.16.16: mashed cauliflower

    Sunday, August 15, 2021

    🔥 Around the Campfire (week 33)

     Dear Campers ~

    Here's a quick recap in case you missed anything at camp last week:

    Posts ~

    8/8: 🔥week 32

    8/9: texas caviar

    8/10: tip-sy tuesday: less messy way to drizzle chocolate 

    8/11: baked breakfast frittata

    8/12: room assignments 

    8/13: taco cake

    8/14: buffalo dip

    I still don't have any menu ideas to share with you, life's been too hectic to be creative with meal planning!

    Super quick recap today - August is such a busy month for us and I gotta keep moving. Hope you had a great week, stop back often to see more projects, crafts, recipes, whatever I think of (and have time for) to make at camp :) Bye!

    Sincerely ~


    Jill

    camp counselor

    8.15.20: mini succulent shadowbox

    8.15.19: cheeseburger shepherds pie

    8.15.18: zucchini bread or cake

    Saturday, August 14, 2021

    Buffalo Dip

    My sis makes a great buffalo dip in the crock pot that everyone loves, she gets asked to make it all the time and I finally asked her for the recipe. Funny tho, Mickey and I are kind of spicy-weenies so Jen scoops out some of the dip for us before adding Franks Red Hot sauce, so if you're afraid of it being too hot you can definitely leave out the Franks, or adjust the amount to suit yourself. I'm giving you the recipe how I ended up making it, hers is a little different in that she uses 2 cans of chicken and Franks hot sauce instead of mild buffalo.


    Oh, and just so you know - she said she doesn't follow a recipe and will change it up depending on what she has on hand; you can add more or less of anything, if you don't like ranch then add more sour cream, omit the sour cream, change the type of cheese as long as it melts good, leave out the spinach or add more. Very adaptable!

    1 large can chicken chunks, drained (note Jen adds 2 cans)
    2 packages cream cheese (I used light), room temperature
    1 cup Ranch dressing (I used light)
    1 cup shredded mozzarella
    1/2 cup sour cream (I used light, are you sensing a pattern here?)
    1/2 cup mild buffalo sauce, or to taste (note Jen does 1 cup Franks)
    big handful of chopped fresh spinach

    Mix everything together in a crockpot.
    You have options how to cook it: (1) about 2 hours before serving, turn on low heat, stir occasionally or (2) if you have a removable crock you can put it in the microwave for a few minutes to get it started and then put back in crock pot on low. You don't want to heat this too far ahead of time, it gets a little crusty after a while.

    I had some leftover dip so am experimenting with other ways to eat it - so far I've stirred it into white rice (add a little water to loosen it up), and this morning I made cheesy scrambled eggs with it. Both are yum - dip, it's not just for parties :)


    Friday, August 13, 2021

    Taco Cake

    For Jeff's (aka 'Taco') birthday I made him a taco shaped cake! Corny and silly, but look how cute it turned out. This wasn't hard to do at all, you do not need cake decorating skills to make this one. 

    Chances are you don't have a brother-in-law who goes by 'Taco', but how fun for Cinco de Mayo, or any fiesta themed party!

    • Bake 2 cake layers - I made a yellow cake and put 1/2 the batter in one 9" pan, then added cocoa powder to the remaining batter to make it chocolate. Bake according to package directions. Cool completely.
    • Make a batch of buttercream frosting (or used canned); leave a spoonful white, color some yellowish like a taco shell, and add cocoa powder to some to make chocolate. 
    • I used oreo crumbs to resemble ground burger. Mix the crumbs with some chocolate frosting so you'll be able to stick the 'burger' onto the cake. 
    • Put just a few very finely ground crumbs into the yellow frosting to create a more 'authentic' looking shell.
    • Cut up red candy (I used twizzlers) for tomatoes, green fruit rollups for lettuce, add yellow food color to shredded coconut for the cheese. 


    Cut the layers in half, you need 2 yellow cake halves but only one of the chocolate halves. The yellow halves are the 'taco shell' and the chocolate layer is the 'meat' filling. Frost the entire chocolate half with chocolate frosting, spread frosting on one side of each yellow halve; stand them up and push together forming a 'taco'. 

    Frost the 2 yellow halves with the taco shell yellow frosting. Press the oreo crumbs into the chocolate cake so it looks like burger inside the taco shell. Add the tomato, lettuce, and cheese on the top; then add a big scoop of white frosting on the top resembling sour cream. 

    Wait - I just realize looking at the photos that I forgot to add the 'sour cream'! Oops! Oh well, still cute. 


    Thursday, August 12, 2021

    Room Assignments

    Here's a quick easy little thing we did for the bachelorette airbnb house we rented - I made these cards with everyone's name on them and we taped them to the doors of the rooms each person was assigned. Saved everyone from having to figure out where they were going, and saved us from having to walk everyone around pointing at rooms hahah. Time saver, and it's a cute little extra touch. 

    I punched out squares of black cardboard with a decorative edge using my Bigshot die cut thing (you could just cut out by hand and use edging scissors - or just leave in squares!), then cut out names in decorative paper on my Cricut. Glue the names to the squares. That's it, but they turned out so cute!


    Wednesday, August 11, 2021

    Baked Breakfast Frittata

    I posted this recipe from Janis in 2016 - I don't know why I've never made this myself until last week for the bachelorette weekend! And now that I know how easy it is to make it will finally definitely be in rotation. I didn't realize until starting to make it that the original recipe isn't very exact - so I questioned how I know if it's 24 or 30 eggs, and also that amount seems like a ton of eggs to only feed 10-12; she verified that she doesn't use that many, and that there are so many ingredients it really doesn't matter - it's very forgiving. So I'll post the original recipe, and then my notes below - read thru to the end before making this for yourself.

    By the way - this was a big hit for our brunch! I baked 2 casseroles ahead of time and froze them, thawed ahead of time and reheated in the oven for about 30 minutes. I sliced it and kept warm in a chafing dish, it holds up really well and even tastes good at room temperature. We had no leftovers if that tells you how good it is hahaha. 


    Oh geez, I just realize I didn’t take a picture after it baked! 🤦‍♀️

    Serves 10-12

    2 large potatoes (baked or microwaved until firm and not overcooked)
    1 large tomato
    1 large red bell pepper
    1 large bunch cilantro
    1 bunch basil
    2 bunches green onion
    3 different cheeses (Havarti will dill, a smoked cheese, cheddar or any other cheese)
    White pepper to taste
    24-30 eggs
    2 cups milk
    Parmesan cheese


    Preheat oven to 350 degrees.  Butter a large lasagna pan or similar dish.  Dice cooked potatoes and leave some skin if desired.  Dice tomato, bell pepper, cilantro basil and green onions.  Shred cheeses.  Layer all ingredients in pan.  Beat eggs and milk and pour over ingredients.  Sprinkle top with Parmesan cheese.  Bake at 350 degrees for 50 minutes.  If not done, cover with foil and cook until egg is firm.

    Most ingredients can be substituted.

    Jill's notes: I made a couple changes to the above recipe - you really can change the ingredients to what you like! Here's what I did:

    • 1 bag diced potatoes (I used 'simply potatoes' 20 oz bag in the refrigerator section of store)
    • handful of cherry tomatoes, halved
    • 1 orange bell pepper
    • big handful of chopped spinach (remove thick stems)
    • chopped cilantro leaves (I didn't measure, just a handful)
    • chopped basil leaves (same as above)
    • 2 bunches chopped green onion (white and light green parts)
    • 1/2 cup shredded havarti cheese with dill
    • 1/2 cup shredded colby jack
    • 1 cup shredded cheese blend (mozzarella and provolone mix)
    • 12 eggs
    • 1 1/2 cups milk
    • 1/2 cup half and half
    • parmesan cheese
    • salt and pepper to taste

    Tuesday, August 10, 2021

    Tip-say Tuesday: drizzling chocolate tip

    I stumbled on this idea when drizzling the s’more cookies the other day - I put the cooling rack with the cookies on it in my big sink and drizzled melted chocolate over them…clean up was so easy! Just rinsed out the sink instead of scrubbing the counter like I’ve done my entire drizzling life. If you have a single sink large enough to hold a cooling rack, give it a try - you’re gonna love this!


    Monday, August 9, 2021

    Texas Caviar

    I posted this recipe back in 2018 but after making it for the bachelorette party - and so many people loved it and asked for the recipe - I thought I’d post it again! 

     TESHA’S TEXAS CAVIAR DIP


    Mix together in a big bowl:
    1 can pinto beans w/jalapeno (if can’t find add 1 T. chopped jalapeño)
    1 can black eyed peas
           *drain and rinse all beans very well. 
    1 can white corn      
    1 small jar pimento, chopped
    1 cup green pepper, chopped
    1 small onion, chopped
    1 cup celery, chopped

    Bring to a boil then cool completely:
    1 t. salt
    1/2 t. pepper
    1 T. water
    3/4 cup cider vinegar
    1/2 cup salad oil
    1 cup sugar


    Pour over bean mixture, marinate 24 hours before serving. Drain to serve but save marinade. Serve with big scoop corn chips. Keeps for 2 months in fridge (you can add more beans, etc. to marinade and keep it going).