Saturday, February 29, 2020

Homemade Bloody Mary Mix

Last week I shared how to make bacon flavored vodka, which of course made me want a bloody mary, which then led to my trying to make my own bloody mary mix.  I like bloody mary mix all on it's own (without alcohol, that's my go-to drink on an airplane), when I drink the mix at home I doctor it with olives and olive juice, a spicy pickle spear, a dash of lemon juice and some pepper - so when I saw this recipe that has olives and lemon juice in it I thought I'd give it a whirl. The flavor is really good although the texture was a little odd, maybe I didn't blend it enough, it was a little thick and coarse. Still worth making but next time I'll let it process longer. I did make a couple changes -  removed the cuke seeds, added more olives and a splash of spicy pickle juice, I used bottled lemon and lime juice, and left out the garlic. Play around with adding more of any ingredient to get it just right for you. And if you want to add bacon flavored vodka I wouldn't try to talk you out of it ;)


  • 2 cups chopped peeled English cucumber (from 1 large cucumber)
  • 1/2 cup fresh lemon juice (about 4 lemons)
  • 1/2 cup fresh lime juice (about 4 limes)
  • 10 Spanish Queen olives with pimientos
  • 1/3 cup jarred Spanish Queen olive brine
  • 3 garlic cloves, smashed
  • 3 T. Worcestershire sauce
  • 2 t. Old Bay seasoning
  • 1/2 t. celery salt
  • 1/2 t. black pepper
  • 1/4 t. kosher salt
  • 1/4 t. smoked paprika
  • 1 (64 oz) bottle tomato juice, divided (8 cups total)

Pulse all ingredients with 4 cups of the tomato juice in a blender until smooth. Transfer mixture to a large pitcher; add remaining tomato juice and stir to combine. Cover and chill until ready to use.

saw this at Coastal Living Magazine


Happy Leap Year! there's only been one other 2/29 since I started the blog:

2.29.16 Oscar party games and decorations

Friday, February 28, 2020

Dryer Sponges

I saw this idea on the Doterra website to make reusable dryer sponges instead of using store-bought dryer sheets. I figured what the heck, I'll try it - and it works (not sure why I made them if I was doubting it would work haha!). Our clothes are soft, static free, and smell good - can't ask for more than that from a dryer sponge. The original instructions say to keep the sponges in a glass container, I didn't have a glass container on hand (and didn't want to buy one in case this was a fail!) so I put mine in a rubbermaid container and so far it's working just fine - eventually maybe I'll upgrade to glass but for now the plastic holder is good. I didn't measure the essential oil drops and I only have 2 sponges (from the dollar store so this is a very inexpensive project), not sure why I'd need 5-10?

Ingredients:

  • 1 cup hot water
  • 1/2 cup white vinegar
  • 1/2 cup baking soda
  • 5-10 drops lavender oil
  • 5-10 sponges
Instructions:
1. Combine baking soda and hot water in a glass container with a lid and stir.
2. Add vinegar and mix, then ad lavender oil and stir again until all ingredients are combined. 
3. Fill container with sponge3s, trimming to fit if needed, and place lid on container.
4. To use, shake up container, remove one sponge, wring out slightly, and place in dryer with wet clothes.
5. After dryer cycle is done, place sponge back oil container and reseal with lid for future use. 


I'm not really sure why I thought I needed to show you the sponge in the dryer - so you'd believe I actually use the sponges? LOL!


Thursday, February 27, 2020

A New Old Cookbook and Goldenrod

My mom gave me a bunch of recipe booklets that my grandmother got in home ec back in either junior or high school; they were published as a series by Procter and Gamble copyright 1935. Just like my first new/old cookbook that I've been sharing some 'throw-back' recipes with you, these manuals are a gem and I can't wait to read thru and find what I'm sure will be unusual recipes and 'helpful' tips and hints! I'm very happy to have a second source of old recipes, and what I especially love is that my grandma has written her name in pencil on the front of each one - how great to have a piece of her history. I have no idea if she actually used these booklets or if they were just something she had to have for home ec, but she saved them so I'm assuming she used them. I'm totally going to try some of these recipes and will share my findings and any fun nuggets of info.


Mom found 10 of the booklets for me and is looking for others - for now I have:

  • Perfect Pies and how to make them (first paragraph says " 'home-made pie' is a phrase which causes the mouth to water in anticipation of future joys...")
  • A Manual of Cakes
  • Quick Breads Quickly Made
  • Desserts 
  • Soups and Sauces
  • Candies and Confections
  • Cheese and Eggs
  • Yeast Breads
  • Vegetable Cookery 
  • School Lunches 
  • Table Serve and Accessories 
Flipping thru the recipes I'm seeing a few unusual (to me anyway) ones - like Prunella cake, Cotton Tops, Snow Peaks with Marshmallow sauce, Eggs Creamed with Sardines (have no fear, we will NOT be making that one!), Boiled Cucumbers with Egg Sauce, and Peanut Butter Bread. 

Here's one recipe that caught my eye because Dave has told the story for years about his mom making "Goldenrod", which I'd never heard of.  It's a take on what we did eat often tho - good old "chipped beef on toast" which I found out as an adult is commonly known as, pardon my french haha, 'SOS' (shit on a shingle). My mother did not call it that, just fyi 😂 He makes it sound like his mom made this recipe up because they were too poor for chipped beef and she improvised with eggs, but here it is in black and white and is an actual recipe. I'm not going to share this info with him, he's told the story too many times and would be bummed hahahaha. I haven't made this so don't have a picture to include, but it's just cream sauce on toast and if you've never had it or don't know what it is - which means you are clearly not from the Midwest - just picture what cream sauce on toast would look like and it looks exactly like that LOL.
  • 6 hard-cooked eggs
  • 2 cups milk
  • 4 T. Crisco (shortening, the book is sponsored by Crisco - I'd probably substitute butter)
  • 4 T. flour
  • 1/2 t. salt
  • 1/4 t. pepper
  • 8 slices toast
Remove yolks and put them through a sieve or potato ricer. Chop or slice whites. Make a white sauce by blending flour with melted Crisco, adding hot milk, and cooking until thickened. Stir in salt, pepper, and egg whites. Pour over toast. Sprinkle with grated yolks. Garnish with parsley. Serve hot. 
Serves 4-6


Wednesday, February 26, 2020

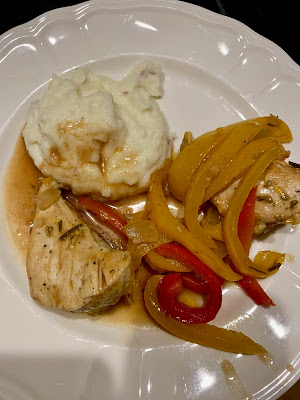
My Sis is Hungry: Chicken with Balsamic Peppers


The title of this threw me a little. Balsamic chicken and peppers something or other.  I love Balsamic and I love peppers.  Sounds promising.

Oh and some kind of delicious mashed potatoes.  Can't go wrong with mashed potatoes in any form.

So lets start with those.  Yum.  Better than I can buy pre-made in the fridge section at Kroger!! Yep. that’s a compliment.  They were amazing.  Didn’t need butter, sour cream, anything.  So great. I did try it with some of the juice from the chicken and peppers just for fun and that was also great!

So onto the chicken and peppers.  First of all she clearly knows the husband likes “sauce”.  There was a lot of juice in the bottom of this.  Not sure if that’s what kept it so moist (yes I said moist).  Balsamic in the title made me think it would have a distinct balsamic flavor.  It really didn’t -  it was a pretty “basic” chicken as that goes.  I know that doesn’t sound like a compliment but it is.  Nothing over powering or distinctly flavoring this dish.  Just a solid, good chicken meal.  The peppers were more of a “side dish” I felt.  They were in slices on top of the chicken so really it became more of a vegetable side dish, if that makes sense.  They were also delicious and flavorful. 

All in all this was a safe chicken dish that seemed within my abilities to make (unless that sauce was complicated?).  The star of this meal was definitely the potatoes. 
Time for breakfast- I hope there is some of those leftover. 


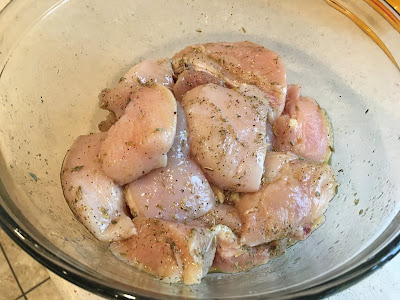
Jill here - I can't believe I forgot to post this 'my sis is hungry' from November! Oops! I pretty much followed the recipe, although I chopped the chicken breasts into big pieces, and put it in a big bowl along with the oil and seasoning and tossed it around before putting it on the prepared baking sheet. Before I got my mortal and pestle, I crushed spices using a small glass bowl and a shot glass! I doubled the chicken and broth - I kept some of the chicken but not the pepper mixture which is why she had so much sauce, and added a sliced orange bell pepper because I had it on hand. And I hate to break it to my sis but the potatoes were store bought because I was in a hurry to get this dish to her LOL. Shhhhhhh....;)


  • 3/4 teaspoon salt, divided
  • 3/4 t. fennel seeds, crushed
  • 1/2 t. pepper
  • 1/4 t. dried oregano
  • 1/4 t. garlic powder
  • 2 T. olive oil
  • 4 (6 oz.) skinless, boneless chicken breasts
  • cooking spray
  • 2 cups thinly sliced red bell pepper
  • 2 cups thinly sliced yellow bell pepper
  • 1/2 cup thinly sliced shallots (about 1 large)
  • 1 1/2 t. chopped fresh rosemary
  • 1 cup fat-free, less-sodium chicken broth
  • 1 T. balsamic vinegar
1. Preheat oven to 450'.

2. Heat a large skillet over medium-high heat. combine 1/2 teaspoon salt, fennel seeds, 1/4 t. pepper, garlic powder, and oregano. Brush chicken with 1 1/2 t. oil; sprinkle spice rub over chicken. Add 1 1/2 t. oil to pan. Add chicken; cook 3 minutes or until browned. Turn chicken over; cook 1 minute. Arrange chicken in an 11x7" baking dish coated with cooking spray. Bake at 4540' for 10 minutes or until done.
3. Heat remaining olive oil over medium-high heat. Add bell peppers, shallots, and rosemary; saute 3 minutes. Stir in broth, scraping pan to loosen browned bits. Reduce heat; simmer 5 minutes. Increase heat to medium-high. Stir in vinegar, 1/4 t. salt, and 1/4 teaspoon pepper; cook 3 minutes, stirring frequently. Serve bell pepper mixture over chicken. 
     
Click here for original source. From 1/12 Cooking Light


Tuesday, February 25, 2020

Tip-sy Tuesday: Organizing Curly Ribbon

This caught my eye in one of Miss Lori's pictures from her floral arrangement last week (click here for that post). I told her I loved the flowers but could we talk about the curly ribbon situation for a second? Hahaha, I've met another ribbon lover - and look what a great solution she came up with! Had to share. Here's what she said about it - thanks for the great tip Miss Lori!


For the curly ribbon-when we moved into our house there was this recessed square in what was to be my craft/sewing room so I figured to best utilize this unusual space I would add some tension rods and my curly ribbon-they have been up there for 20+ years now!  Everyone knows my gifts because they will always have plenty of colorful curls!

Monday, February 24, 2020

St. Patrick's Day Flower Wreath

Not gonna lie and pretend this is something more or harder to make than it is - it's a Dollar Store craft and just about the easiest thing to make (once I figured out which glue to use that is!). No crafting skills needed at all!

I got everything from the dollar store other than the actual glue gun - they have glue sticks, the foam wreath, and lots of fake flowers that are mostly ugly on their own hahaha but pull the flowers off the stems and pack them around the wreath and they look so pretty! For this wreath I used 3 bunches of white carnations, 4 bunches of green gerbera daisies, and 2 bunches of green hydrangeas. Start by pulling all the flowers off their stems then decide your pattern. I did an outer ring of gerbera daisies, and an inside row of the white carnations, then filled in the center ring with hydrangeas and more white carnations until the foam base was completely covered.


To keep the flowers from falling out of the foam (true story - I started by dipping the ends into white glue and sticking them into the foam, after I did that all the way around and lifted the wreath up all the flowers fell out! Oops) so change of plan. What you want to do is poke the flower into the wreath, remove the flower and add a dab of hot glue in the hole you just made and reinsert the flower. No flowers fell out by doing it that way - there, I just saved you some time hahahah and now it truly is a very fast craft! Continue around until it's nice and full. I wrapped a pipe cleaner around the back so I can hang it.


I was going to stop there but it didn't say "St. Patty's Day" enough so I added a glitter foam shamrock hooked to green wire bent into a shamrock shape that I poked thru the foam. That way I can remove the shamrock and just have a pretty spring wreath after March 17th. You could just glue a decorative doodad thingy on the front, or hang it from a decorative ribbon - doesn't have to be exactly like I did it!


2.24.19: 🔥


Sunday, February 23, 2020

Around the Campfire 🔥(week 8)

Dear Campers ~

Here's a quick recap in case you missed anything at MMDC last week:

Posts ~
2/16: 🔥week 7
2/17: how to make a 2" x 4" paper box
2/18: Tip-sy Tuesday: how to change a sewing machine needle
2/19: double chocolate mousse torte
2/20: tbt: french dressing
2/21: Miss Lori's floral arrangement
2/22: bacon infused vodka

What's Cooking ~
  • Grilled pork loin filet, chopped salad kit, 
  • Chicken sausages, orzo salad (tomatoes, feta, parsley, olive oil), roasted green beans
  • bbq ribs, mixed veggies, chopped salad kit
  • steak, caesar salad with homemade croutons, baked mushrooms
  • grilled tuna steaks, sticky rice, roasted broccoli
  • grilled chicken breasts, pierogi tossed with tomatoes and olive oil, green beans
Miscellaneous stuff keeping me busy ~
  • I only read one book this week, and it was a long boring one - 'The Goldfinch' by Donna Tartt. Lots of people are reading it right now, and there is a movie out based on it...maybe it's just me but goodness this bored me! ⭐️ I told Dave I was slugging my way thru just to be able to say I finished it, I almost watched it on the plane last week but I have it from the library so thought I should read it - and he goes "I heard the movie was boring too..." wish I would have known that before I spent all week trying to get into it!
  • Did a major cleaning out the closet, it took 6.5 hours and I got rid of lots - and my closet isn't even that big! Feels good to be able to easily put things away instead of trying to jam stuff in - saved a few things to give to family, rest went immediately to Goodwill before I changed my mind hahaha! 
That's it - hope you had a great week! Stop by often to see more fun crafts, recipes, whatever else I think of to make at camp. Bye!

Sincerely ~


Jill
camp counselor and closet organizing fool

Saturday, February 22, 2020

Bacon-Infused Vodka

Hmmm...wonder what caught my eye and made me want to make bacon flavored vodka? Was it the thrill of bacon? Was it the alcohol? Ha! I don't know, but I saw it and wanted it, soooo... here ya go!

note: I only made 1/2 of the recipe because I'm not having a party any time soon requiring 2 cups of bacon flavored vodka - also, what if it's gross and I wasted perfectly good non-bacon flavored vodka?

Heat 2 T. bacon drippings in a deep saucepan over medium heat until melted. Remove from heat; slowly stir in 2 cups vodka until drippings are evenly incorporated. Cool completely, about 30 minutes.

Pour mixture into a wide-mouth jar or glass measuring cup; cover and chill 8 hours or overnight.

Skim fat from surface of vodka; discard fat. Line a fine wire-mesh strainer with 2 layers of cheesecloth. Pour vodka through prepared strainer into a clean glass jar; discard solids. Repeat process until vodka is clear of any particles. Cover and store in fridge up to 2 weeks.

Perfect for bloody mary's!

second note: when it cooled in the pan the bacon fat congealed on the top of the vodka (see picture below), so I just poured the whole thing into a wire-mesh strainer and collected the fat along with any solids in one go.


Coastal Living magazine 5/17


Friday, February 21, 2020

Miss Lori's Flower Arrangement

Got an email from Miss Lori sharing this beautiful flower arrangement she made, along with painting the vase - I love the idea of painting it and would not have thought to sand it first, doesn't it look great with the colors of her flowers? Good job Miss Lori! Sorry the weather wasn't great the day you made this, but I'm happy you turned it into craft day :) Thanks for sharing! Here's what she did in her words:


Wanted to share my latest project - every time we get snow or freezing cold weather my Mom gets something new!  This time I went to Michaels to gather some flowers, most 70% off!  Grabbed a vase from Ollie’s that was pink and white polka dot, sanded and painted it and voila - a new addition for a spot that needed something pretty in Mom’s living room!


For the vase, it is sanded all over with a fine sandpaper and used a spray paint.  (Spray painting takes place in Jon’s barn, not in my craft room!)


Since the arrangement was going to be tall and top heavy I put 4 bags of dollar store glass gems in the bottom of the vase, then put several foam pieces in the vase to give the flowers more stability.  The small foam circle in the photo is resting on some taller foam pieces to give an eventual place for the Spanish moss to be, for the finishing touch.


Since some of the flowers were longer and heavier, I had to stabilize them with a few floral pins.


Thursday, February 20, 2020

TBT: French Dressing

According to my new/old cookbook, the source for this week's throw-back recipe, "there are three kinds of salad dressing which are the foundation for practically all others used: French dressing, mayonnaise dressing, and boiled dressing".


I mentioned a couple weeks ago when I made the 'Alligator Pear Salad' (click to see that post) that it called for French dressing which is nothing like what we call French today (which is a creamy ketchupy based dressing); here's what the cookbook has to say:

"French dressing, made from oil and acid, is the most widely used dressing. Vinegar is the acid generally used with the oil in vegetable and meat salads, while in fruit salads the juice of lemons, grapefruit, or oranges is used. The choice of oils to be used in dressing is an individual matter. Olive oil has the most distinct flavor. With cottonseed or corn oil the amount of condiments used may be slightly increased if desired. Serve French dressing with chicken, fish, meat, vegetable and fruit salads."

So way-back-when, French dressing is basically oil and vinegar dressing (or vinaigrette). The base recipe is below, the book lists lots of variations such as changing the vinegar to tarragon; omitting mustard, sugar and paprika; use 1/4 cup each of lemon or lime and orange juice in place of half the vinegar; add chopped mint; add 4 Tablespoons grated parmesan, among many other variations.

  • 1 clove garlic (optional)
  • 1 cup vinegar
  • 2 teaspoons dry mustard
  • 1 Tablespoon sugar
  • 1 Tabelspoon salt
  • 1 teaspoon paprika
  • 1/2 teaspoon pepper
  • 2 cups salad oil
If using garlic, soak it in vinegar 1/2 hour before mixing the dressing. Mix dry ingredients together and place in a covered jar or bottle. Remove garlic from vinegar and add vinegar to dry ingredients. Pour in the oil slowly. Place in refrigerator until ready for use. Just before serving, shake vigorously for 2 minutes. Makes 3 cups dressing. (my notes: I omitted the garlic, used olive oil and white vinegar, and cut the recipe in half - good ol' basic vinaigrette.)

A couple other recipes are included as well as the variations given above:

Lemon French Dressing
  • 1/2 cup lemon juice
  • 1/2 cup salad oil
  • 1 teaspoon salt
  • 1 teaspoon paprika
  • 2 Tablespoons sugar or honey.
Combine ingredients, shake well. If a clear dressing is desired, omit paprika and substitute a dash of pepper.

Hawaii French Dressing (for use with mixed fruit salads)
  • 1/4 cup pineapple juice
  • 2 Tablespoons lemon juice
  • 1/2 cup salad oil
  • 1 teaspoon sugar
  • 1/2 teaspoon salt
  • 1/2 teaspoon paprika
Combine ingredients, chill. Shake before serving. 

Wednesday, February 19, 2020

Double Chocolate Mousse Torte

You guys!!  This mousse torte thing is amazing! I saw the recipe at melskitchencafe.com and didn't change a thing - and after making it I'm not sure there's even anything that you'd want to change, it's kinda perfect. I made it for our "Pal-entine's" dinner thinking it'd be safe because I don't like chocolate therefore I wouldn't be tempted - but after trying a tiny little sliver I might be changing my mind about chocolate hahahah. I have a little leftover in the fridge and it took all my willpower to not eat it for breakfast. You want to make this, I promise.


DOUBLE CHOCOLATE MOUSSE TORTE

CAKE:

  •  8 ounces bittersweet or semisweet chocolate, chopped (see note)
  •  1 cup (8 ounces, 2 sticks) butter
  •  1 cup (7.5 ounces) granulated sugar
  •  5 large eggs
  •  1 tablespoon vanilla extract
  •  1/4 teaspoon salt
  •  1/4 cup (1.25 ounces) all-purpose flour

MOUSSE:

  •  2 tablespoons unsweetened natural or Dutch-process cocoa powder
  •  5 tablespoons hot water
  •  8 ounces bittersweet or semisweet chocolate , chopped fine
  •  1 tablespoon butter
  •  1 1/2 cups cold heavy cream
  •  1 to 4 tablespoons granulated sugar, depending on desired sweetness
  •  1/2 teaspoon vanilla extract
  •  pinch of table salt

WHIPPED CREAM TOPPING:

  •  3/4 cup cold heavy cream
  •  2 tablespoons powdered sugar
  •  Grated chocolate, for garnish (optional)
  •  2 cups fresh raspberries (or other fresh fruit)

INSTRUCTIONS

  1. For the cake: preheat the oven to 325°F.
  2. Lightly grease a 9- or 10-inch springform pan; dust with sugar (optional).
  3. Combine the chocolate and butter in a saucepan or in a microwave-safe bowl. Melt over low heat (on the stovetop) or on 50% power in the microwave at 1-minute increments, stirring in between.
  4. Cool the mixture to lukewarm. Whisk in the sugar to combine.
  5. Add the eggs one at a time, blending well after each addition. Mix in the vanilla and salt. Add the flour and mix until just combined.
  6. Pour the batter into the springform pan. Bake until the cake just rises in center (a tester inserted into center will not come out clean) and springs back lightly to the touch, 30-35 minutes.
  7. Cool completely in the pan (the center of the cake may fall slightly). Cover and chill while making mousse.

  1. For the mousse: whisk together the cocoa powder and hot water in a small bowl; set aside.
  2. Melt the chocolate and butter together in a microwave-safe bowl on 50% power, stirring often, until smooth (don't overheat!). Whisk the cocoa/water mixture into the melted chocolate until smooth (if there are little lumps, you can press the mixture through a fine mesh strainer into a clean bowl). Let it cool to room temperature (just slightly lukewarm is fine, too, as long as it isn't warm or hot).
  3. In a medium bowl with an electric mixer, whip the cream, granulated sugar, vanilla, and salt at medium speed until the mixture begins to thicken, about 30 seconds. Increase the speed to high and whip until soft peaks form when beaters are lifted (I often use my Blendtec blender to whip cream - only takes a few seconds).
  4. Using a rubber spatula, fold 1/3 of the whipped cream into chocolate mixture to lighten. Fold in the remaining whipped cream until no white streaks remain.
  5. Spoon the mousse over the cooled cake. Cover and refrigerate for at least 6 hours or up to 1 day.
  6. Run a sharp knife around the edge of the pan to loosen the torte if it hasn't pulled away from the sides of the pan while cooling.
  7. Release the springform pan sides. Transfer the torte to a platter, if desired (often, I just leave it on the base of the springform pan).

  1. For the whipped cream topping, using an electric mixer, beat the cream and powdered sugar in a medium bowl until soft peaks form. Spread the whipped cream over the torte. Dust with grated chocolate, if desired.
  2. Top with raspberries. Chill for up to an hour or serve immediately.

click here for original source

2.19.19: tt: deviled egg cover 
2.19.18: macrame wall hanging (and Sarge "helping me")
2.19.16: kid craft - decorate notebooks

Tuesday, February 18, 2020

Tip-sy Tuesday: How To Change a Sewing Machine Needle

Oops, I tried to sew thru something thick and my needle wasn't up to the task and broke off in the machine. If this happens to you, don't fret - it's a very easy fix (well it's easy if you have the extra needles that probably came with your machine - if not, you'll need to get yourself some new needles before continuing!). It's also helpful to know (and a reminder to myself) that they make assorted sized needles for different tasks - follow the instructions below to change to the appropriate needle that works for the material you are sewing on...or don't, and risk breaking one like me! 


First you need to remove the broken needle: loosen the screw that's right above the needle, either with a small screwdriver if there's a slot or turn it by hand - I have two machines and one turns with a screwdriver and the other by hand - until the needle is loose enough to pull out; then slide the new needle up into place - most likely the head of the needle is flat on the backside and curved on the front, make sure you put it in so it fits correctly in the space (curved side facing you and the eye of the needle in front), then tighten the screw back up. Done. 


Note on needles: my case indicates which needle is used based on the weight and texture of the fabric - this case includes needles for thick jeans, stretchy material, a wing needle used for hemstitching, and universal 'all-purpose' needles used for most fabrics. 


All the sewing machines I've ever had work like this, sorry if yours is different and this is no help to you at all!


Monday, February 17, 2020

Make a Paper Gift Box

I saw Ronda Wade live on FB the other day making these little paper boxes and I immediately went to my craft room and made 7 of them to give for Valentine's day filled with pretzel hugs. Obviously they aren't only good for Valentine's day - change the colors to give as holiday, birthday, or seasonal gifts. Very easy to make since Ronda worked out all the kinks before sharing how to make them... she had a helpful video, I just took lots of pictures and hope you can follow along - don't be alarmed at all my words and photos,  promise these are quick and easy to make!


Start with an 8.5" square piece of cardstock.

Score one side at 2", 6", and 8"

Rotate and score the other side at 2", 4", 6", and 8"


Fold along all the score lines.


Turn over so your square matches the picture below. Cut along the score lines 2" up to where the 2"x4" rectangles are, see arrows. Leave the center 8.5"x 4" part intact. Those cuts make the top and bottom flaps of the box. Also remove the 2" x 1/2" flaps, leaving the 2" x 4" flap in the center, see arrows.


Look at the picture below to make sure you are removing the correct bits in this next part; Cut out the top left 2" square, cut off the 1/2" flap from squares #2 and #4, leaving square #3 intact with it's flap still attached. 


To decorate the front of the box before assembling it, you'll need 4 pieces of decorative paper 3 3/4" x 1 3/4" (one for each side of the box). Glue them on each of the 4 rectangles, making sure to put them in the right direction depending on the pattern - the top of the box is the side that has 3 squares and one flap.


Assemble the box: put a strip of tear away tape (or another kind of adhesive like glue stick) on the 1/2" flap that is on the right in the above picture. Shape the 4 rectangles into a box shape. Remove the paper from the tape and attach the flap to the inside of the last rectangle creating the box.
Turn the box upside down, fold in 3 squares, attach tear away tape or glue stick the 3rd square before folding down the last square - that makes the bottom of the box.


Lastly, trim a little wedge off each side of the top flap; fold in the two side squares and the last square with the flap will easily tuck into the top of the box.


2.17.19: 🔥
2.17.18: nail art
2.17.17: coincidentally, it's how to do ombre nail art!
2.17.16: making paper crowns