Showing posts with label make my day camp. Show all posts

Wednesday, February 19, 2020

Double Chocolate Mousse Torte

You guys!!  This mousse torte thing is amazing! I saw the recipe at melskitchencafe.com and didn't change a thing - and after making it I'm not sure there's even anything that you'd want to change, it's kinda perfect. I made it for our "Pal-entine's" dinner thinking it'd be safe because I don't like chocolate therefore I wouldn't be tempted - but after trying a tiny little sliver I might be changing my mind about chocolate hahahah. I have a little leftover in the fridge and it took all my willpower to not eat it for breakfast. You want to make this, I promise.


DOUBLE CHOCOLATE MOUSSE TORTE

CAKE:

  •  8 ounces bittersweet or semisweet chocolate, chopped (see note)
  •  1 cup (8 ounces, 2 sticks) butter
  •  1 cup (7.5 ounces) granulated sugar
  •  5 large eggs
  •  1 tablespoon vanilla extract
  •  1/4 teaspoon salt
  •  1/4 cup (1.25 ounces) all-purpose flour

MOUSSE:

  •  2 tablespoons unsweetened natural or Dutch-process cocoa powder
  •  5 tablespoons hot water
  •  8 ounces bittersweet or semisweet chocolate , chopped fine
  •  1 tablespoon butter
  •  1 1/2 cups cold heavy cream
  •  1 to 4 tablespoons granulated sugar, depending on desired sweetness
  •  1/2 teaspoon vanilla extract
  •  pinch of table salt

WHIPPED CREAM TOPPING:

  •  3/4 cup cold heavy cream
  •  2 tablespoons powdered sugar
  •  Grated chocolate, for garnish (optional)
  •  2 cups fresh raspberries (or other fresh fruit)

INSTRUCTIONS

  1. For the cake: preheat the oven to 325°F.
  2. Lightly grease a 9- or 10-inch springform pan; dust with sugar (optional).
  3. Combine the chocolate and butter in a saucepan or in a microwave-safe bowl. Melt over low heat (on the stovetop) or on 50% power in the microwave at 1-minute increments, stirring in between.
  4. Cool the mixture to lukewarm. Whisk in the sugar to combine.
  5. Add the eggs one at a time, blending well after each addition. Mix in the vanilla and salt. Add the flour and mix until just combined.
  6. Pour the batter into the springform pan. Bake until the cake just rises in center (a tester inserted into center will not come out clean) and springs back lightly to the touch, 30-35 minutes.
  7. Cool completely in the pan (the center of the cake may fall slightly). Cover and chill while making mousse.

  1. For the mousse: whisk together the cocoa powder and hot water in a small bowl; set aside.
  2. Melt the chocolate and butter together in a microwave-safe bowl on 50% power, stirring often, until smooth (don't overheat!). Whisk the cocoa/water mixture into the melted chocolate until smooth (if there are little lumps, you can press the mixture through a fine mesh strainer into a clean bowl). Let it cool to room temperature (just slightly lukewarm is fine, too, as long as it isn't warm or hot).
  3. In a medium bowl with an electric mixer, whip the cream, granulated sugar, vanilla, and salt at medium speed until the mixture begins to thicken, about 30 seconds. Increase the speed to high and whip until soft peaks form when beaters are lifted (I often use my Blendtec blender to whip cream - only takes a few seconds).
  4. Using a rubber spatula, fold 1/3 of the whipped cream into chocolate mixture to lighten. Fold in the remaining whipped cream until no white streaks remain.
  5. Spoon the mousse over the cooled cake. Cover and refrigerate for at least 6 hours or up to 1 day.
  6. Run a sharp knife around the edge of the pan to loosen the torte if it hasn't pulled away from the sides of the pan while cooling.
  7. Release the springform pan sides. Transfer the torte to a platter, if desired (often, I just leave it on the base of the springform pan).

  1. For the whipped cream topping, using an electric mixer, beat the cream and powdered sugar in a medium bowl until soft peaks form. Spread the whipped cream over the torte. Dust with grated chocolate, if desired.
  2. Top with raspberries. Chill for up to an hour or serve immediately.

click here for original source

2.19.19: tt: deviled egg cover 
2.19.18: macrame wall hanging (and Sarge "helping me")
2.19.16: kid craft - decorate notebooks

Wednesday, January 2, 2019

Diaper Fold Gift Holder

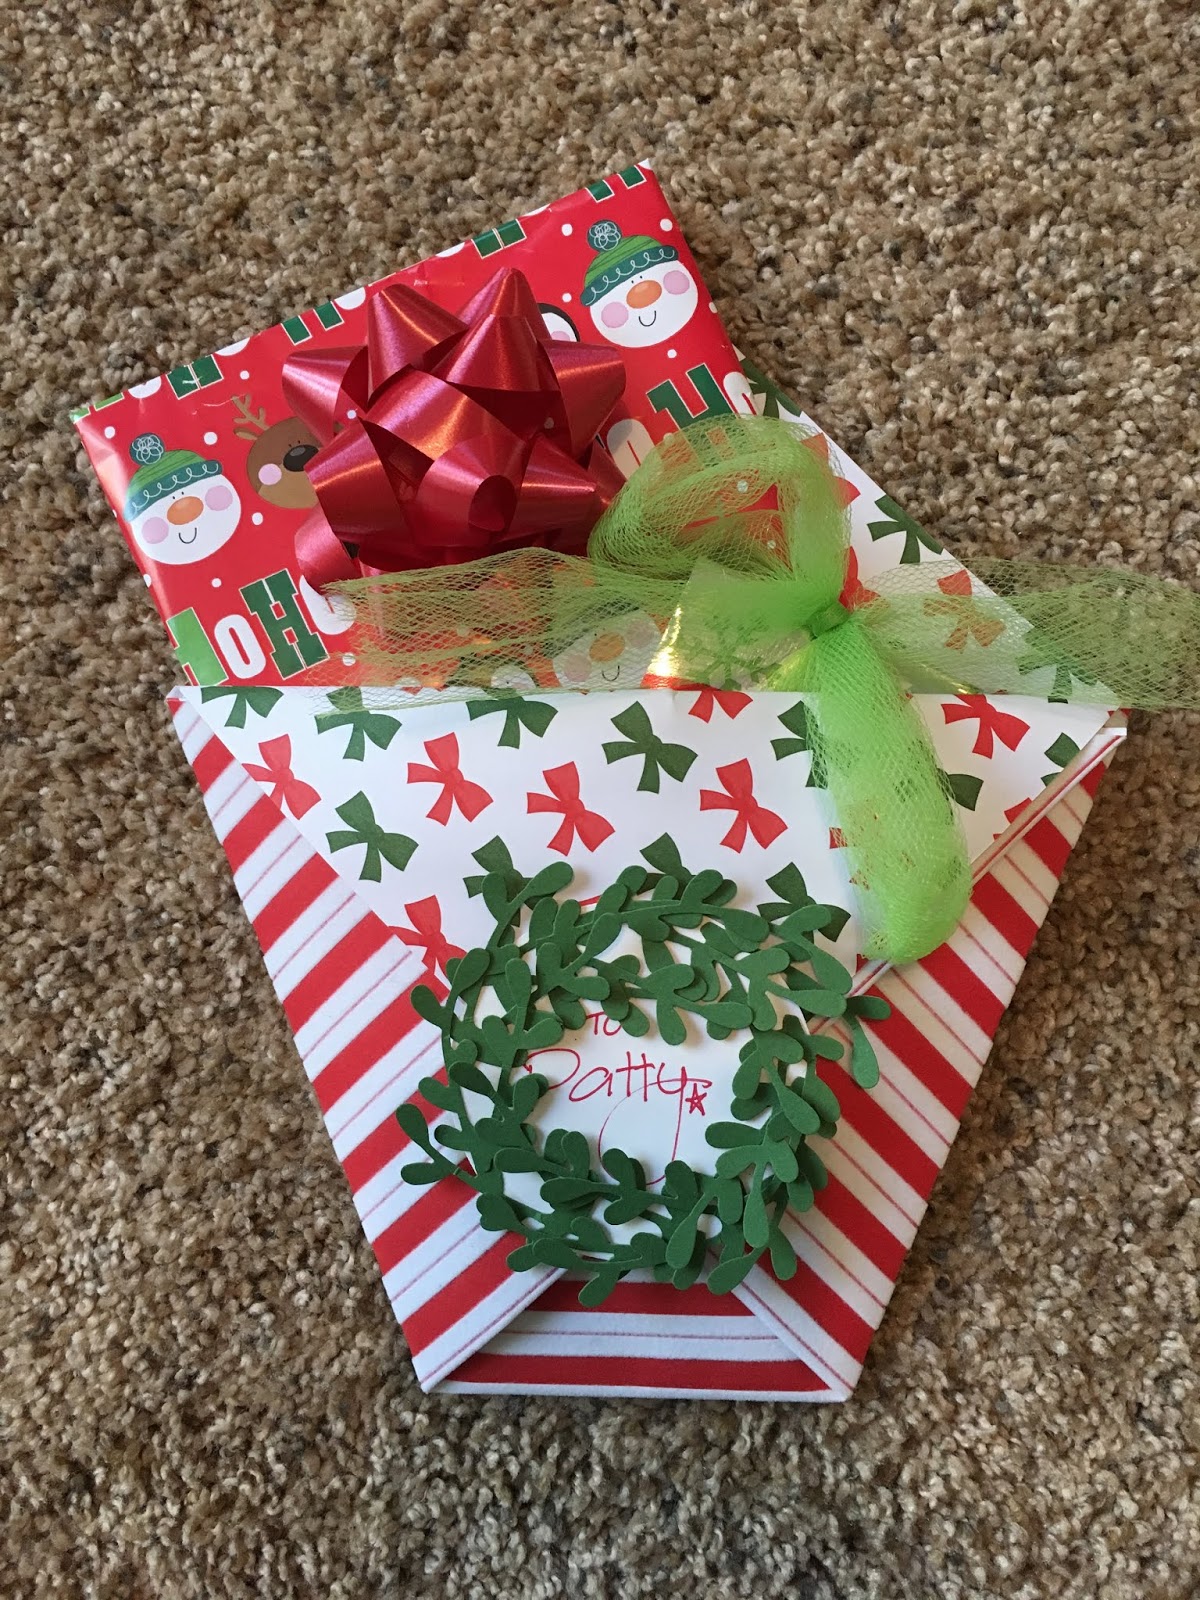
I watched a video that Ronda posted showing how to make this diaper fold gift holder; after all the times I've helped her at her Stampin' Up studio - and trust me, I've made a lot of paper gift holders for her - I've never seen this one! Super easy and it turned out soooooo cute I have to share with you. You're gonna want to do this for sure - it's now part of my commonly used techniques (along with wrapping paper gift bags, I use that ALL the time).

We just had our last holiday gift exchange so I made this holder with Christmas paper and decorations, obviously you can use this year round by using different papers, etc...You can also vary the sizes - this one I started with a 12" square piece of double sided decorative paper (this is Stampin' Up Christmas paper that is fuzzy on one side, how fun); if you don't use double sided paper then the inside of your holder and the flap that folds down in the front will be white - not bad, but I like the different patterns showing together. Do what ya' want! Change the size of the holder by changing the size of the square you start with - Ronda did as small as 6" square, up to a 12" one. The 12" is too big for a lone gift card, but if you have other things to put in the pouch, like I did, then big is ok.


1. fold the paper in half forming a triangle. Creasing the fold with a bone-folder will give you a nice crisp edge - if you don't have one I'd run something smooth and hard over the folds, like maybe a ruler or credit card.


2. with the point of the triangle that is open at the top and the folded edge at the bottom, fold in one side of the triangle straight across reaching the other side (see picture below), then fold in the other side. Add a glue dot or a little adhesive under the top flap to keep it down.


3. now that it's folded it sort of looks star-shaped to me - at the top is two open points, fold down the top one over the folds you created in step 2 leaving the bottom one still up. In the picture below, the bow print is what is on the back side of the striped paper, you see it once you fold the front point down. This opens the holder into a pouch where you place your small gift or gift cards.


To finish I cut out a 2.5" circle and a bunch of green sprig punches (using both a Stampin' Up circle and sprig punch). Glued the sprigs around the edge of the circle using a glue stick, creating a wreath. Attach to the front with adhesive.


Cute right? And simple! I love cute and simple ;)


1.2.2016: hot buttered rum. yum. 


Tuesday, August 28, 2018

S'Mores Cookies

I have been busy all day in the kitchen and am just now sitting down to share with you! It was pouring rain and a little cooler (a little as in 80 instead of 90!) this morning so I was in the mood to bake cookies (and make some other goodies I'll share with you a diff day). Saw this on a site I follow (Mel's Kitchen Cafe) and they got rave reviews so I wanted to try them...we've been camping a lot this summer but so far we haven't made S'mores - these cookies seem like the next best thing to actually roasting marshmallows over the campfire.


I'm a little peeved at Dave because he came in as I was baking them and asked which one he could taste test (he knows to not just grab a cookie, he gets to eat the ones that don't look so great haha) - I gave him one and asked his opinion, he said "well it's such a small cookie I couldn't really get a good taste" so he had another. And said the same thing. Then I yelled at him to please at least slow down and tell me if they are good before popping another in his mouth! I mean seriously, most cookies are good - but is this a 'keeper' good recipe or a 'one time' good recipe? Then LeDonna came in the kitchen and tried one like a normal person and told me they are indeed a 'keeper' good recipe and she wouldn't change a thing - she did say they brought one word to mind..."s'more" (as in she wanted more haha!).

Here is Mel's recipe ~ my changes are that I used store-bought graham cracker crumbs because I happen to have a box on hand; I used coarse salt instead of regular; and I scooped the cookie dough using my small cookie scoop so I have small one- (if you're Dave) or two-bite cookies that only took 9 minutes to bake, and it made over 5 dozen instead of the 2-3 dozen her recipe says.

INGREDIENTS:

  • 3/4 cup (12 tablespoons, 6 ounces) butter, softened
  • 1 cup (7.5 ounces) packed light or dark brown sugar
  • 1/3 cup (2.5 ounces) granulated sugar
  • 1 teaspoon baking soda
  • 1/2 teaspoon salt
  • 2 large eggs
  • 1 teaspoon vanilla extract
  • 1 3/4 cups (8.75 ounces) all-purpose flour 
  • 1 cup (4.5 ounces) graham cracker crumbs (about 9 rectangle crackers crushed)
  • 2 cups (12 ounces) chocolate chips or chunks
  • 1 cup (1.75 ounces) miniature marshmallow bits (see note)

DIRECTIONS:


  1. Preheat the oven to 350 degrees F. Line baking sheets with parchment paper. Set aside.
  2.  
  3. Using an electric stand mixer fitted with the paddle attachment or in a bowl with a handheld electric mixer, add the butter, brown sugar, granulated sugar, baking soda, and salt. Mix together until very light and creamy, 2-3 minutes, scraping down the sides of the bowl as needed.
  4. Add the eggs and vanilla and mix until evenly combined.
  5. Add the flour and graham cracker crumbs and mix until just barely combined; a few dry streaks are ok.
  6. Add the chocolate chips or chunks and marshmallow bits and mix until incorporated.
  7. Scoop the dough by heaping tablespoons onto the prepared baking sheets, spacing at least 2-inches apart.. I like to roll the mounds of dough so they are smooth, but you don’t have to be obsessive like me.
  8. Bake for 10-12 minutes until just golden on the edges and a little crackly on top. Let the cookies sit for a few minutes on the baking sheet before removing to a wire rack to cool completely.

note:
About those marshmallow bits, your average mini marshmallows will not work! They’ll melt into huge craters and become a puddly, burned mess ruining one of summer’s most perfect cookies. Trust me, I tried it. Instead, you need marshmallow bits. In other words, dehydrated marshmallows. They should be pretty easy to find. They are often located right by the other marshmallows in the grocery store or by the hot chocolate (another great way to use them, btw), and someone mentioned looking by the ice cream toppings. I’ve also ordered them on Amazon (this brand and this brand – aff. links) and found them in bulk at my local Cash and Carry.


Sunday, August 5, 2018

Creamy Cucumber Salad

I have been obsessed with this salad lately! It's great with just cucumber (typically it has thinly sliced onions in it but D doesn't like that so I just do cukes) or a mix of halved cherry tomatoes and slices or chunks of cucumber - and it's the inspiration for the cuke and chickpea salad I made last week (click here for that post).  I've never been a big cucumber lover but this salad is sort of like creamy pickles so I'm a huge fan.


  • 2 cucumbers, peeled and thinly sliced (sometimes I leave them in chunks, your call)
  • 1 tablespoon sea salt
  • 1 1/2 cups mayonnaise (or to taste, I don't usually use this much. and sometimes I use half plain greek yogurt and half mayo)
  • 2 tablespoons vinegar
  • 1 tablespoon white sugar
  • 1 teaspoon dried dill weed
  • 1 teaspoon garlic powder
  • 1 teaspoon ground black pepper
Mix cucumbers and salt together in a bowl. Cover with plastic wrap and let sit for 30 minutes.

Turn cucumbers into a colander set in the sink and let drain, stirring occasionally, until most of the liquid has drained, about 30 minutes more. Transfer drained cucumbers to a large bowl.

Stir mayo, vinegar, sugar, dill, garlic powder, and pepper together in a bowl until smooth; pour over the cucumbers and stir to coat with the dressing.

Cover bowl with plastic wrap and refrigerate at least 2 hours. 

grilled chicken, cucumber salad, and my go-to side of black beans, corn, tomatoes,
and avocado with a little olive oil and southwestern seasoning mix. Yum. 


Sunday, April 8, 2018

Ham Pasta Salad

Dave is going to a photo party and needs a dish to pass - we have ham left over from Easter last week and I decided to make a cold pasta salad for him to take. Actually I was going to make a dessert but he's worried there won't be anything he can eat - if you're worried about that then the rule of thumb is to take something you know you can eat! That way at least there is one thing that'll work. So...ham pasta salad it is.

I made up the dressing for this salad and it turned out pretty tasty if I do say so myself. I don't have exact amounts, just add until you like how it tastes. I mixed together equal parts mayo and plain greek yogurt (about 1/2 cup each), a big tablespoon of dijon mustard, some lemon juice, a bit of olive oil to help loosen the dressing up, cayenne, paprika, pepper, and just a little salt (the salad has the salty ham so don't add much). Whisk it all together and taste if you want to adjust the seasonings. Fold into a bowl of cooked pasta shells, chopped ham, thawed frozen peas, and a big handful of shredded cheese; mix well until the dressing is completely incorporated and covering all of the pasta. If it seems dry just make up another batch of dressing.

I'm not sure he's going to remember to bring home my bowl, so I put the salad in a large plastic container and topped with a bit of finely chopped italian parsley to make it look a little nicer ;).

Saturday, April 7, 2018

Swedish Fish

I don't eat much candy and when I do it isn't gummy chewy things so I've never had swedish fish candy...but if it tastes anything like this yummy drink I might be missing out! This isn't overly sweet and with the lime juice it has just the right bit of tart to it - don't let the name stop you from trying this drink.  I found the recipe here, but I didn't put it with ice in a shaker like a martini - it tasted great just mixed together in a glass with a bit of ice. And I definitely didn't put a swedish fish candy in it for garnish...!

2 oz. vodka
2 oz. cranberry juice
1 oz. Rose's lime juice
1 oz. triple sec

Shake with ice and strain into a martini glass. Garnish with a swedish fish candy.


Friday, April 6, 2018

DIY Heating Pad

My neck and back have been bothering me so I went to an ex-ortho nurse turned massage therapist today that does NOT give the kind of relaxing massage that sounds like heaven right now but works on the painful issues instead...so I can't really say I had a "massage", more like intensive therapeutic work! Anyway, you don't care about that and it's not my point hahaha...she mentioned that heat would be helpful to loosen things up and I said I have an electric heating pad and she said what would be better is one of those microwaveable packs that only stay hot for a few minutes and really target the areas that need it. I don't have one of those here but I do have scrap material, a couple bags of small dried beans, and a sewing machine...so...about 10 minutes later my heating pad was made.

I cut up an old pillowcase into a rectangle about 6" x 19". Turn the right sides facing each other and sew around all open sides leaving a couple inch gap in one end so you can fill it. Turn the whole thing right side out, fill it with the beans (you can also use rice), hand sew the little opening or do what I did and just machine sew across the entire end to close it. I did this because (a) it's for me and no one will ever see it so it didn't need to look perfect and (b) I was sitting at my machine and it's way faster to machine sew than hand stitch hahahah - which is sort of (c) I'm lazy. If I was making these for gifts I'd totally do it the right way and hand sew to close the opening!


I shaped a piece of paper into a cone as a makeshift funnel 


In the middle of making this heating pad Dave brought me Sarge's new stuffed hedgehog that needed a trip to the "hospital" because his nose was bit off and the stuffing was coming out - I had to stop what I was doing to fix it because Sarge was driving me crazy wanting it back!


 Right now I have it on my neck while blogging this and it isn't even warm - just the weight of it feels SO good....ahhhhhhh.....some relief! Oh, I forgot that when I was filling the pad with the beans I added a few drops of doTerra lavender oil in case the beans smelled funny after heating them. So it feels good AND smells good :)

one year ago: household emergency kit
two years ago: Sheryl's stuffed mini sweet peppers


Saturday, March 31, 2018

Chocolate Covered Strawberry "Carrots"

One last quick post before Easter - if you haven't decided on dessert or just want a fun little thing to make and/or take check out these fun chocolate covered strawberries. This is very easy and fast to do. I am making chocolate frosted, and green "grass" frosted cupcakes, and will plant one of these "carrots" on top. Gonna be cute :)

You just melt orange chocolate disks (they come in a bag, I find them at the craft store and sometimes the grocery store) and holding the green top part of the clean dry strawberry, dunk it in. Shake off the excess (gently, you want to keep the green stem if possible) and lay on a piece of parchment or waxed paper until they dry. Repeat for as many berry "carrots" as you want. To finish, put the remaining melted chocolate in a plastic baggie, snip a small corner off, and drizzle it over.


one year ago: Brooke makes a candleholder


Thursday, March 29, 2018

Butternut Bunny


Oh. My. Cuteness. Check out this bunny made from a butternut squash - seriously, this was very easy and quick...and it's too dang cute. I'm thinking I'll make a couple more and come up with an adorable dining room centerpiece for Easter!


Check back next week, I have a cool (unpainted!) butternut squash recipe to share with you.

Psst: notice the pretty colored eggs? I made those today too and will show you how tomorrow!

Supplies:

  • butternut squash (I tried to find one that would stand up pretty straight, and I wanted one that was a little fatter around - some are too tall and skinny)
  • craft paint and brushes
  • big black sharpie (or black paint and a small brush)
  • cotton ball
  • white paper
  • white glue
Directions:

Paint the entire squash with whatever main color you want your bunny, I did yellow. Also paint the white paper with the main color (you'll cut the ears out of the painted paper). 


Once it's dry, paint on 2 white patches for its belly and face. Add feet using a color that is a bit darker than the base color. Let it dry.

Cut 2 long pieces of paper for the ears, rounded on one end and slightly tapered on the other end. Fold little tabs along the squared end and glue the tabs to the top of the squash by the stem.


Glue the cotton ball on the back for the tail.

When the white patch is dry, draw on a face with the sharpie (or paint it on). 


I found the instructions for this here. It was originally meant for a Thanksgiving table but it's way more Easter-y to me!

Wednesday, March 28, 2018

Spring Flower Hanging Wreath

I'm loving this upside down wreath I made to hang from our chandelier - yes, it's a lot going on since the chandelier is solid shells... but I like it. I made it out of dollar store finds so it only cost 7 bucks, you could spend less by not buying as many flowers and/or skipping the garland, and you could make a simple wire ring instead of using a pre-made wreath form.

For my base I saw a plastic and tinsel bunny hanging thing, I only wanted the bigger circle so I just snipped off the top and used the body. Using little wire cutters, I snipped off the flowers and stems from the bouquet base and bent the ends to create little hooks. Before attaching the flowers I needed to hang the thing up so I could build the wreath - using white twine I ran it around the outside edges 4 times to make a hanger, then hung it from a cabinet knob so I could add the flowers. Then working from underneath, push the little hooked ends up thru the tinsel and hook on one of the plastic rings that form the wreath. Fit as many as you want - I made some short, some long, and tried to stagger the different colors thruout the wreath. Once you have it how you want, attach to the bottom of your chandelier using more twine. To finish it I just wrapped a piece of 4' garland around the top part.


Supplies:

  • wreath base (if it isn't covered already you'll want to wrap it with something - rope, yarn, garland, tinsel, etc.)
  • 5 flower bouquets (each bouquet had 6 flowers in it, except for one of them that I didn't check before buying it and it was missing a flower!)
  • little wire snippers or strong scissors to cut the flowers off the bouquet.
  • twine to hang the wreath.
  • garland to finish (not really necessary but I had it so I used it). 


My dining room table is covered with junk so I didn't take a picture from a distance - hope you can tell how pretty this turned out without a photo from farther away!


one year ago: how to make mod podge
two years ago: make a bracelet out of a zipper

Monday, March 19, 2018

Bunny Egg Cozy

Have a headache (and not a "drank too much" headache!) so took a lazy day (sort of like a "personal day" or "mental health" day if I was working outside of the house, but since I'm at home I'm calling it "lazy day" haha) ...put away all the shamrock crap and almost got rid of the leftover Irish bread and Irish cream bundt cake (both of which were a big hit btw) - my plan was to throw them both out but couldn't do it, they can stay one more day and then I'm pitching them! Anyway...now that St. Patrick's Day is behind us it's time to start thinking about Easter - can you believe it's almost Easter already?!

I was surfing for Easter ideas and came across this egg cozy project on Joanne.com - and even though I am a grown-up I'm still a sap for cutie little stuffed animals so I gave this a try. And it turned out super cute! It took me about an hour and he makes me so happy I'm planning to make lots more in different colors - either I'll send them to the fam, or use them as table decoration/party favors for Easter dinner.

This crocheted bunny has an opening in the bottom that is big enough to slip a plastic egg in, I'm going to fill the egg with little candies before putting the bunny cozy over top of it. The yarn gives the egg stability and will stand up without rolling over - seriously, this is too cute.

3 crocheted pieces - the body and two ears. you'll also need a couple beads for the eyes and a plastic egg, along with scissors, yarn, and a big needle.
after sewing the ears to the body, make a pompom tail
(I just wound yarn around a credit card about 50 times. carefully pull it off the card
and tie a long piece of yarn around the middle, pull tight and tie in a knot.
cut the loops and then trim to an even ball)and attach it to the back.
then sew the beads on for eyes and a triangle of yarn for the nose. 
bunny tail... obviously. 


This reminds me of the crocheted cactus I made for Kelly a few months ago, click here for that post. Not as cute as the bunny Mary knitted me of course - I just looked and don't think I ever posted her adorable bunny "Dottie"!! I can't believe it - I will show you tomorrow because if you're a knitter you totally should make one!

I saw this project on Joanne.com, get the crochet directions here.