Showing posts with label crafts. Show all posts

Wednesday, February 12, 2020

Yarn Heart

This took me literally 5 minutes to make and turned out very cute - cuter than I expected actually! Perfect kid craft, but as always I'm not waiting for a kid to come make stuff with me and I just made it anyway ;) All you need is a cardboard heart, a piece of tape, and some yarn.

Don't have cardboard? When I'm searching for a thin piece (not thick like a box is made of) I'll raid anything - cereal or cracker boxes, the back of a notepad, etc. Dave doesn't even ask anymore why the bag of crackers is in the pantry not in a box hahahaha. Hey, you do what you have to do in the name of crafting.

So, trace and cut out a heart from a thin piece of cardboard - whatever size you want. Tape one end of the yarn to the heart to hold it in place and then start wrapping. And wrapping. And wrapping. Keep on going any which way to cover the cardboard completely. I found that in the beginning the yarn wanted to slip off the edges but as the heart got more and more covered it was easier to keep it in place. One thing I was thinking as I was trying to get all the cardboard covered so you couldn't see it, is that if you colored the cardboard the same color as the yarn then you could get away with tiny holes in the yarn wrapping.


Once the heart was completely covered and I liked how the yarn looked, cut the yarn from the rest of the skein and tuck the loose end in underneath the wrapped yarn. I pushed it in with the end of some not-sharp scissors to make sure the end was good and buried and wouldn't pull out. Then I attached a length of yarn to the top in order to hang it. Cute, right?


2.12.17: goat cheese tart
2.12.16: Brooke and Sydney make 'cootie catchers'

Monday, January 13, 2020

Crocheted Messy Bun Hat

Tesha and I were talking and I can't remember why but she told me she has to wear her hair down when she walks outside because a hat doesn't fit over her ponytail. I said she needed a 'messy bun' or ponytail hat. She'd never heard of it so for Christmas I made her one - patterns are very easy to find online, I picked this simple (and free) one and whipped it out quite quickly. I made orange so she's more visible when walking down her road (she lives in Michigan and between the trees and snow, and early disk, sometimes it's hard to see good!).


Here's the pattern I followed, I added a few more rows to make it longer - note I didn't use the yarn called for in the pattern and that apparently changed the scale, the circumference was fine it just wasn't long enough. I used Joann yarn 100% acrylic (but very soft) medium #4 weight and K hook.


Simplicity Messy Bun Hat 2-in-1


Yarn – Lion Brand Vanna’s Choice, worsted weight, 3.5 oz/170 yds – Silver Blue
Materials – K/10 1/2 – 6.50mm
Difficulty –  Easy
Size – 20” circumference, fits 24″
Measurements in Pattern – 4.5” inch diameter
Gauge – 4” = 9 rows, 11 stitches
Stitch Guide in American Terms:
HDC – Half double crochet
Special Stitches:
HDC in the 3rd loop – Yarn over, insert your hook in the loop behind the back loop, yarn over, pull up a loop, 3 loops on hook, yarn over, pull through all 3.
Notes – Worked from the top down in rounds. Chain does not count as a stitch. Do not turn your work.
Instructions:(To Make a Full Beanie- Start with a chain 3, HDC 6 in the 3rd chain from the hook, slip stitch to form a loop. Round 2: chain 1, make 2 HDCs in each stitch around for a total of 12 stitches. Round 3: make 2 HDCs in each stitch around for a total of 24 stitches. Now, skip to the instructions below starting at Round 1.)
Chain 24, slip stitch to form a loop, chain 1Round 1: HDC in each chain around, slip stitch, chain 1, do not turn – 24 HDCs total.Round 2: 2 HDC in each stitch around, slip stitch, chain 1, do not turn – 48 HDCs.Round 3: HDC in each around, slip stitch, chain 1, do not turn – 48 HDCs.Round 4: * HDC 7, 2 HDC in the next, repeat from * around 6 times, slip stitch, chain 1, do not turn – 54 HDCs.Round 5 – 15: HDC in each around, slip stitch, chain 1, do not turn – 54 HDCsRound 16-18: Using the 3rd loop only (VIDEO below – behind the stitch) HDC in each around, slip stitch to the top of the chain to join, chain 1, do not turnRound 19: Still using the 3rd loop only HDC in each around, slip stitch, fasten off.Finishing: Sew in the ends.

click here for original source


Friday, July 5, 2019

Lego Scottie and Hydrant

Yes, I'm a grown up. Yes, I have other things to do. No, I haven't given away the Legos yet. 

That's all I'm gonna say. Bam - shortest post ever. 


Monday, October 15, 2018

Sequin Pumpkin

Here's a very easy way to decorate a pumpkin (and an artificial Dollar store one to boot, that means I'll be able to keep it for next year!) - paint it a color using basic craft paint and a sponge brush (I did black because I still had some leftover from painting the pumpkin pail and the flamingo, I like to put paint on a paper plate and then can store it and the wet brush in a big gallon bag until I'm done with it); after the paint dries spread on white glue using a small clean paintbrush - I did about a quarter of the pumpkin at a time - and dump sequins on the wet glue. Literally, I just took a handful and threw them into the glue! Using the end of the paintbrush I spread the sequins around if they were overlapping too much, but I didn't really "place" them - just pretty much let 'em go where they go. Then give it a good sprinkle with glitter to fill in the gaps. Let it dry. I love how this turned out - it's really pretty in person!


Saturday, October 6, 2018

Skeleton Pumpkin Man

Pop the head, arms, and legs off the body of a $1 plastic skeleton and attach to a $1 craft pumpkin and you have an inexpensive funny "creepy" Halloween decoration - I would say perfect for the kiddos to make but I have the biggest blister on the tip of my finger from hot gluing this thing in place so I'm a little hesitant right now to advise you that it's a kid craft! Seriously I haven't had a glue gun burn this bad in a long long time. I'd show you a picture but you might be reading this while eating your lunch and I'm not going to be responsible for you being too grossed out to eat. Trust me on this one.


Anyway - I'm not sure what exactly this is supposed to be hahahaha, for whatever reason a skeleton has wrapped himself around a cutie google-eyed little pumpkin...I was playing around and this just looked good to me. Change yours up accordingly!

The skeleton head fit right over the stem of the pumpkin, just glue in place. Attach two big googly eyes, then adjust the arms so they fit in front of the face like the arms are trying to wrap around it. I used a piece of invisible fishing line to hold the hands in place - I burned myself trying to glue the arms in the front so just went with the fishing line instead! Glue the legs in place and add some plastic spiders here and there...or don't...whatever you like :)


10.6.2017 Ronda makes a Halloween Treat Box
10.6.2016 Dog on the blog - sweet potato dog cookies
10.6.2015 Make a spooky terrarium

Friday, October 5, 2018

Paper Pumpkin

Sitting in my craft room literally waiting for paint to dry (spider earrings coming up soon!) and looking for a quickie project -  this pretty marbled paper from Stampin' Up reminds me of a squash so I whipped up a paper pumpkin that I'm going to put on my desk (and if I get out to Ronda's studio any time soon I'll make one to add to her seasonal display table!). This is a very easy, kid friendly, cute Halloween or fall decoration - cheap and quick too! That kinda makes for the perfect craft in my book.


Supplies:

  •  decorative paper
  • 2 brads
  • small hole bunch
  • scissors and ruler,  or cutting board
  • 2 green pipe cleaners (chenille stems, whatever - I've always called them pipe cleaners!)
  • pencil to curl the pipe cleaners
  • twine
  • cork
  • round cardboard to give the bottom some stability


Cut 1 inch strips of paper (how long the strips are will determine the size of your finished pumpkin). My paper is 12" square and I cut 24 strips (2 pieces of paper) and that's as big a pumpkin as you're going to get with standard 12" square paper.

Hole punch both ends of each strip and thread all of one end onto a brad, then all of the other end onto a brad. Spread the strips apart evenly to form the pumpkin.


 Glue a piece of cardboard to the bottom to make it more stable and it'll help keep the strips in place.


Glue a wine cork to the top like a stem - you can paint it if you want but I wrapped twine around mine instead. I also found the cork sat better on top of the brad by carving out a little circle from the bottom of the cork - then fit the cork over the brad.


Curl both ends of the pipe cleaner around a pencil, then twist around the cork. Glue twine around the cork if you want - I like how it looks but painting the stem cork would also be cool - how about glitter paint?


10.5.17 make a mummy picture


10.5.16 m&m cookie bars


10.5.15 squash ghosts


Thursday, October 4, 2018

Skeleton Hand Wreath


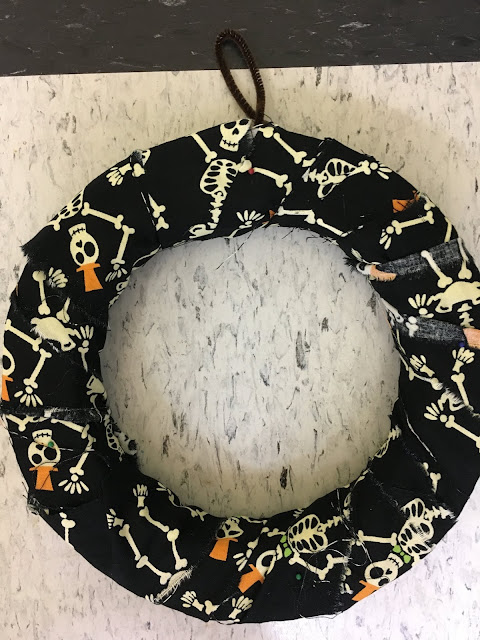
I don't usually decorate with "scary" things for Halloween - my moss and bug covered wreaths are about as creepy as it gets but I've been using them for years now (click here for that post) and it's time to change it up; this skeleton hand wreath is just creepy enough - from a distance it takes a minute to realize you're even looking at skeleton hands. This came from wasting time doing serious research online, I was inspired by someone else's Dollar Store hand wreath, but of course I changed it up and made it my own! Be inspired by others and then either flat out copy them (imitation is the sincerest form of flattery and all that - just be sure to give credit where credit is due!), or tweak it and make it yours.


I found 9 skeleton hands at the dollar store along with some black "creepy cloth" (their name, not mine) which is a stretchy soft net material, and an 8.8" styrofoam wreath base at Hobby Lobby for 3.49 - each wreath cost about $14.

For my first attempt I cut strips of the black creepy cloth and wound it around the form - after glueing the hands on tho I realized the material is too stretchy and didn't hold the hands tight enough against the wreath form. So I ripped it all off and started over - that was a waste of 50 cents of "creepy cloth"! Second try worked...rip strips of whatever material (I used leftover lightweight cotton, you don't see much of it so it doesn't really matter - just pick something that either matches or just goes away...) and wind them around the wreath base to cover the styrofoam (note: hot glue doesn't stick very good to styrofoam). Tuck in the last end or stick a pin in it to hold. Oh, and I made a hanging loop from a pipe cleaner tied onto the styrofoam wreath base before winding the material on.

twist a pipe cleaner around the wreath base for a hanging loop.

wrap the entire wreath with lightweight material to cover the foam.

Arrange the hands on the wreath so you have them evenly spaced, and then hot glue the heck out of them. Note: it takes a LOT of hot glue!


After the hands are glued on, attach the black net material (I mean, the 'creepy cloth') to the back using little straight pins. Let the excess material hang down the back of the wreath, sort of looks like spider webs.


I made another one of these for my sister but instead of attaching black net across the center I found this plastic plate at the grocery store that is 8.5 inches and fits perfectly! I just hot glued it to the back of the wreath after wrapping it with material strips, making sure the face is centered before gluing it down. So cool, I debated keeping this for myself but it looks like something she'll like so I'm giving it up...


                                       tip: make a small cut in the end of the material and rip it, you'll
                                           get straight strips and don't need to cut the entire length of the fabric.
                                 plus it's fun to do :)

10.4.2017: Jen decorates for Halloween (and yes, there's a bloody baby on the dining table. don't ask)
10.4.2016: photo coasters
10.4.2015: pumpkin bisque

Thursday, September 27, 2018

Mixing Morse Code Bracelets with Coordinating Beaded Strands


Well that was a really long title and sort of sums up this post...I made 3 morse code bracelets for a birthday present and then made 6 other beaded ones so she'll have a wrist full of them that can be worn all together or separately. You know me, once I start I don't know when to stop! HA!

These turned out so pretty that other than the morse code messages that are specifically for her, I wanted to keep them! I did them in shades that make me think of my friend -  blues, creams, gold and silver, a little green...was going for a beachy vibe. All of them are on stretchy cord except one that has bigger pearly stone beads that made it a little heavier so I strung it on beading string and attached a clasp in case it was too heavy for stretch cord.


Monday, September 24, 2018

Jute Wrapped Candle

I have a big ball of jute twine left over from making that plant hanger for the RV last week - and there's this plain white boring flameless candle kicking around the RV that I thought about returning to the store because it's nothing and we don't have room in the camper for boring nothing fake candles....except what if I wrapped some jute around said candle?

So much better. Boring candle got a new lease on life in the motorhome :)

I used the same technique I just learned to make a wrapped knot for the hanger, worked perfect for this candle - I tied the ends in the front instead of clipping off, it'd look just as good without them tied since this knot leaves things looking so neat and finished.

Easy Peasy fix. Try it!