Showing posts with label halloween decor. Show all posts

Friday, October 19, 2018

Ghost Sucker Wreath

I've made ghost sucker wreaths for a long time but this time I switched it up a bit. The "classic" way is to wrap a kleenex around a sucker, knot it to a wire wreath and hang a small pair of kids safety scissors from the bottom so you can cut off one "ghost" at a time as needed (either to give a sucker to someone or if you need a sugar fix haha!). For this wreath I wrapped each sucker in a coffee filter which makes a pretty ruffly wreath that I think looks better than the kleenex version!


Instead of knotting them on I tied each one on with a bow so I don't need scissors to get the ghosts off the wreath. Because the coffee filters are thicker, it worked better to alternate the suckers with head facing into the center and head facing out - I was able to fill in the holes easier this way and make the wreath look nice and full.

After wrapping the coffee filter around the sucker just dot on eyes using a fat sharpie - I enjoy the little faces peeking out between the filter ruffles.

Black curly ribbon would have been better looking probably, but I didn't have any so just used white - still cute! I finished this one by adding a Dollar store bow (attach with a pipe cleaner and make a loop for hanging), but that's your call - it also looks good without one!


10.19.2017: bloody handprint decals
10.19.2016: graveyard dirt cake
10.19.2015: halloween gingerbread houses

Wednesday, October 17, 2018

Mini Pumpkin Diorama

Ok, here's the last craft using Dollar store mini carveable pumpkins. Customize it however you want, I went a little "spooky" (you know me tho, I'm not very spooky haha)  but this would be cute with flowers or succulents; you could have bugs, worms, or spiders spilling out; instead of the paper headstone you could do a creaky house or trees; endless options!


To make this diorama I cut an oval in the front of the pumpkin using a craft knife and painted the inside and cut edges with black craft paint (leftover and still on the paper plate from the painted pail and flamingo). Then I filled it with things I had in my stash - a square of Halloween decorative paper that has a big moon and tree silhouette on it for the background (Stampin' Up), line the bottom with moss, a little stick stands up to mimic a tree with a plastic bat glued to it. I made a small headstone out of black cardstock trimmed in silver pen and rested a skull up against it. Note the bat and skull are both plastic rings that I cut the ring part off).

Cute, inexpensive, and other than waiting for the paint to dry it's quick!


Three ideas for mini pumpkin decorating - a mummy, a sequined one,
and this diorama - all easy, quick and cute! 


10.17.2017: make a candy corn wreath

10.17.2017: paint a Halloween canvas

Monday, October 15, 2018

Sequin Pumpkin

Here's a very easy way to decorate a pumpkin (and an artificial Dollar store one to boot, that means I'll be able to keep it for next year!) - paint it a color using basic craft paint and a sponge brush (I did black because I still had some leftover from painting the pumpkin pail and the flamingo, I like to put paint on a paper plate and then can store it and the wet brush in a big gallon bag until I'm done with it); after the paint dries spread on white glue using a small clean paintbrush - I did about a quarter of the pumpkin at a time - and dump sequins on the wet glue. Literally, I just took a handful and threw them into the glue! Using the end of the paintbrush I spread the sequins around if they were overlapping too much, but I didn't really "place" them - just pretty much let 'em go where they go. Then give it a good sprinkle with glitter to fill in the gaps. Let it dry. I love how this turned out - it's really pretty in person!


Friday, October 12, 2018

Halloween Flamingo


I'm seriously wishing I saved that flamingo that the lawnmower guy chopped up (I'm pretty sure he was mad at me and getting retaliation hahaha!) - it would have been perfect for a creepy halloween decoration. Oh well - at the time it didn't occur to me that a ruined flamingo could be turned into something cool! Fortunately (not sure others would call my plastic flamingo collection "fortunate") I have lots more so turned one of them into this fun porch decoration by just painting it black and gluing on some googly-eyes. My original plan was to make a scary flamingo but once you add googly eyes the scary factor disappears!


painting tip: if you're painting a project that needs a second coat or touching up
you don't have to wash the brush or put the paints away (I pour paint onto
a paper plate when I'm doing this kind of craft) - just pop the whole
 thing into a large ziplock bag - the brush and paint won't dry out!  

Sarge wanted to be part of the porch display..

this is the maimed flamingo that would have made a perfect Halloween decoration!

10.12.2017: paper covered owl
10.12.2016: Cassandra's no-bake cookies
10.12.2015: Halloween tree

Wednesday, October 10, 2018

Mummy Pumpkin

Well this mummy pumpkin is definitely not very scary - I think adding google eyes to anything sorta takes the scary away hahaha. Whatever, he's cute!

Just stick some big google eyes on a small Dollar store pumpkin, and wrap with strips of cheesecloth. I gave him a "mouth" by adding a small piece of black cardstock under the cheesecloth and then cut a small slit in the cheesecloth over the paper.

He looks really cute standing on a wood candlestick, but then I stacked him on this painted pail (click here for that post) and added a black bird on top - I couldn't decide if it was too much of a random stack of things so asked my sis, she likes it and says it's cool so I'm leaving it like this. Sometimes I look at something too long and can't tell if it's good!


Tuesday, October 9, 2018

Paint a Pumpkin Pail

A classic trick or treat pumpkin pail is cute enough on its own...but paint it black and silver and it's  now a cool kinda-spooky updated piece that could be a fun vase for flowers or a plant (I'm thinking a small mum would be perfect), a candy bowl on your desk or at home, or as a Halloween decoration around the house - just don't put it outside, the paint will wash right off!
How easy is that?!

Come back tomorrow and see how I stacked it with a mummy and a bird - super cute. 


10.9.2016: baked crab cakes


10.9.2015: spider soap


Saturday, October 6, 2018

Skeleton Pumpkin Man

Pop the head, arms, and legs off the body of a $1 plastic skeleton and attach to a $1 craft pumpkin and you have an inexpensive funny "creepy" Halloween decoration - I would say perfect for the kiddos to make but I have the biggest blister on the tip of my finger from hot gluing this thing in place so I'm a little hesitant right now to advise you that it's a kid craft! Seriously I haven't had a glue gun burn this bad in a long long time. I'd show you a picture but you might be reading this while eating your lunch and I'm not going to be responsible for you being too grossed out to eat. Trust me on this one.


Anyway - I'm not sure what exactly this is supposed to be hahahaha, for whatever reason a skeleton has wrapped himself around a cutie google-eyed little pumpkin...I was playing around and this just looked good to me. Change yours up accordingly!

The skeleton head fit right over the stem of the pumpkin, just glue in place. Attach two big googly eyes, then adjust the arms so they fit in front of the face like the arms are trying to wrap around it. I used a piece of invisible fishing line to hold the hands in place - I burned myself trying to glue the arms in the front so just went with the fishing line instead! Glue the legs in place and add some plastic spiders here and there...or don't...whatever you like :)


10.6.2017 Ronda makes a Halloween Treat Box
10.6.2016 Dog on the blog - sweet potato dog cookies
10.6.2015 Make a spooky terrarium

Thursday, October 4, 2018

Skeleton Hand Wreath


I don't usually decorate with "scary" things for Halloween - my moss and bug covered wreaths are about as creepy as it gets but I've been using them for years now (click here for that post) and it's time to change it up; this skeleton hand wreath is just creepy enough - from a distance it takes a minute to realize you're even looking at skeleton hands. This came from wasting time doing serious research online, I was inspired by someone else's Dollar Store hand wreath, but of course I changed it up and made it my own! Be inspired by others and then either flat out copy them (imitation is the sincerest form of flattery and all that - just be sure to give credit where credit is due!), or tweak it and make it yours.


I found 9 skeleton hands at the dollar store along with some black "creepy cloth" (their name, not mine) which is a stretchy soft net material, and an 8.8" styrofoam wreath base at Hobby Lobby for 3.49 - each wreath cost about $14.

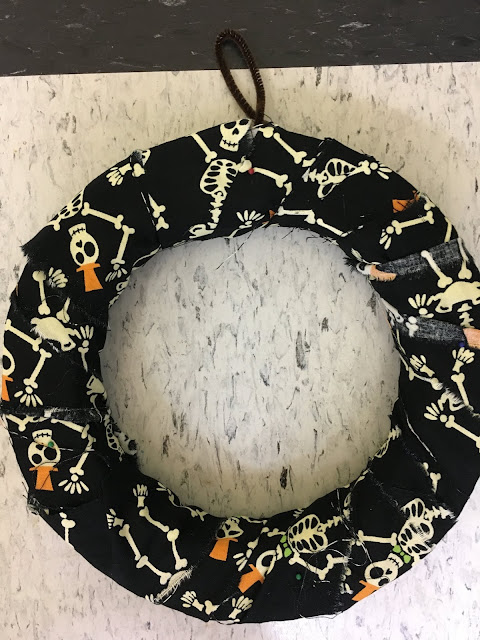
For my first attempt I cut strips of the black creepy cloth and wound it around the form - after glueing the hands on tho I realized the material is too stretchy and didn't hold the hands tight enough against the wreath form. So I ripped it all off and started over - that was a waste of 50 cents of "creepy cloth"! Second try worked...rip strips of whatever material (I used leftover lightweight cotton, you don't see much of it so it doesn't really matter - just pick something that either matches or just goes away...) and wind them around the wreath base to cover the styrofoam (note: hot glue doesn't stick very good to styrofoam). Tuck in the last end or stick a pin in it to hold. Oh, and I made a hanging loop from a pipe cleaner tied onto the styrofoam wreath base before winding the material on.

twist a pipe cleaner around the wreath base for a hanging loop.

wrap the entire wreath with lightweight material to cover the foam.

Arrange the hands on the wreath so you have them evenly spaced, and then hot glue the heck out of them. Note: it takes a LOT of hot glue!


After the hands are glued on, attach the black net material (I mean, the 'creepy cloth') to the back using little straight pins. Let the excess material hang down the back of the wreath, sort of looks like spider webs.


I made another one of these for my sister but instead of attaching black net across the center I found this plastic plate at the grocery store that is 8.5 inches and fits perfectly! I just hot glued it to the back of the wreath after wrapping it with material strips, making sure the face is centered before gluing it down. So cool, I debated keeping this for myself but it looks like something she'll like so I'm giving it up...


                                       tip: make a small cut in the end of the material and rip it, you'll
                                           get straight strips and don't need to cut the entire length of the fabric.
                                 plus it's fun to do :)

10.4.2017: Jen decorates for Halloween (and yes, there's a bloody baby on the dining table. don't ask)
10.4.2016: photo coasters
10.4.2015: pumpkin bisque

Tuesday, October 2, 2018

Baggie Wreath

Michelle, did you think I forgot this idea you gave me (along with the baggies)? Well I didn't - it just took me this long to finally make it!!! Thanks again, I love how it turned out. Initially I was going to make this for December/January - it's going to be so pretty with ornaments or snowflakes attached, but it's got a little "ghosty" feel to it and I think it's also great for Halloween. You'll definitely be seeing this a couple months from now changed up for winter!


This is a very easy project, and inexpensive - it's just 2 boxes of dollar store fold-over sandwich baggies and a wire coat hanger. No other supplies at all - not even scissors or glue. And as long as your littles can tie, this is a great kid craft too.

Bend a coat hanger into a circle, and bend the hook down a bit to form a loop for hanging. Then get to tying the baggies on...I started by folding the baggies into orderly little rectangles but realized it totally doesn't matter - just wrap a baggie around the wire and tie on. Keep going until you can't fit one more baggie and you're done. Decorate however you want - I did a Dollar Store bow and cutie spider.

a regular wire hanger made a 12" circle

don't know if it matters, but I alternated turning the bags
up and down when tying them on. 


Ronda was with us when Michelle was telling me how to make this, and she said "oh Jill is going to love this, she loves making crap out of random things" hahahahah. Yep, I do actually ;)

one year ago: Jen's caramel apple pudding shots
two years ago: vegetable soup
three years ago: how to make "bloody" candles