Monday, April 29, 2024

Baked Broccoli Cheese Balls

I saw this recipe and thought it seemed like something baby Georgie would like, I asked Mickey if all the ingredients were ok and if she thought it would be ok for G to eat - she said 'forget George, can I have some too HA!" and "She can eat all of them! The balls just have to be big enough that she can’t shove the entire thing in her mouth but otherwise that’s amazing!" So I rolled the balls a little bigger using my medium scoop (about 1.5") and they were done in 18 minutes. The original recipe says you can serve them with marinara as an appetizer, with a salad for a light meal, with tomato soup or a grain pilaf for a heavier meal. 


Ingredients
- 2 cups of broccoli florets, finely chopped
- 1 cup of breadcrumbs
- 1 1/2 cups of shredded cheddar cheese
- 1/3 cup of Parmesan cheese, grated
- 2 eggs
- 2 tablespoons of all-purpose flour
- 1/2 teaspoon of garlic powder
- 1/2 teaspoon of onion powder
- Salt and pepper to taste
- Cooking spray, for greasing
Directions
1. Preheat your oven to 400°F (200°C) and line a baking sheet with parchment paper or lightly greased foil.
2. Steam the broccoli florets until they're tender-crisp, which should take about 3-5 minutes. Let them cool, then chop them up nice and fine—you can even throw them in a food processor if you're short on time!
3. In a large mixing bowl, combine the chopped broccoli with breadcrumbs, cheddar, Parmesan, eggs, flour, garlic powder, and onion powder. Season with salt and pepper, and give everything a good stir until it's well mixed.
4. Shape the mixture into small balls, about an inch in diameter, and place them on the prepared baking sheet.
5. Bake for 20-25 minutes, or until the cheese balls are golden and firm to the touch.
6. Let them cool for a few minutes before serving. 

Servings: Makes about 24 (1") cheese balls (or 20 1.5" balls)


 recipe found here at cooktop cove

4.29.23: words

Sunday, April 28, 2024

🔥 Around the Campfire (week 17)

Dear Campers ~ 

Here's a quick recap in case you missed anything at camp last week:

Posts ~

4/21: 🔥 week 16

4/22: sock cupcake gift

4/23: tt floor squeegee

4/24: chicken scaloppine al marsala (chicken marsala)

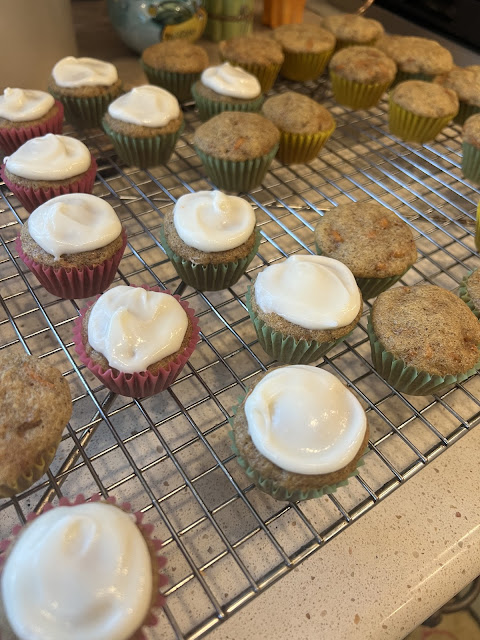
4/25: carrot muffins with cream cheese frosting

4/26: crispix mix

4/27: words


our seedlings are getting so big! 

Lucy trying out the leaf of a sweet pepper seedling

That's it for this week! See you next week for more projects, crafts, recipes, whatever we can think of to make at camp - bye :)


Sincerely ~

Jill
camp counselor


Friday, April 26, 2024

Crispix Mix

Mark and LeDonna were heading north the other day and I thought I'd make them a road trip snack. It's been a long time since I've made Chex mix so googled for some recipes and came across this one that had bagel chips in it that sounded good. I made a couple changes - substituted one box of Crispix cereal (rice on one side, corn on the other) for the 3 different Chex mix cereals, increased pretzels and bagel chips to make up the difference (the recipe calls for more Chex than is in one box of Crispix), and added M&M's after the mix cooled. Here's the recipe as written that I found here at half baked harvest:


  • 3 cups corn chex
  • 3 cups rice chex
  • 2 cups whole wheat chex
  • 2 cups mixed nuts
  • 2 cups bite-size pretzels
  • 2 cups garlic-flavor bite-size bagel chips or regular bagel chips
  • 1 ½ sticks (3/4 cup) salted butter, melted
  • 4 tablespoons worcestershire sauce
  • 2 teaspoons seasoned salt
  • ¾ teaspoon garlic powder
  • ½ teaspoon onion powder

  1. 1. Preheat oven to 250 degrees F.

    2. In large bowl, mix the chex cereals, mixed nuts, pretzels and bagel chips. Set aside.

    3. Melt the butter in a bowl and mix in the worcestershire sauce, seasoned salt, garlic powder, onion powder and a good pinch of pepper. Pour the butter over the cereal mixture, tossing well for 3-5 minutes or until the cereal mixture is evenly coated.

    4. Bake 1 hour, stirring every 15 minutes. Spread on paper towels to cool, about 15 minutes (or just start eating!!). Store in airtight container.


    True Story ~ I intended to make this whole batch for M and L, but I forgot HOW MUCH a batch makes LOL. So they got a bag, Kyle/Mickey got a bag, Teri got a bag, Brooke got a bag...😂...and I still had more! 


    4.26.23: bland dog diet

    4.26.22: TT front or back 

    4.26.21: crockpot golden mushroom pork chops

    4.26.20: ðŸ”¥week 17

    4.26.19: how to design a spring planter


Thursday, April 25, 2024

Fluffy Carrot Muffins with Cream Cheese Frosting

I wanted a quick little thing to take to my tap class and since I had carrots and cream cheese left over from making the bundt cake I was able to make these in under an hour. I made them in a mini muffin tin (using cupcake liners) so it made a lot more than 12 - and I told everyone they could decide if these are cupcakes, or frosted muffins hahah. Even without the frosting they are really moist - I added 1 1/2 t. cinnamon and 1/2 t. nutmeg just because it sounded good to me!   


for the muffins:
  • 1 ⅓ cups all-purpose flour
  • 1 ½ teaspoons ground cinnamon
  • 1 ½ teaspoons baking soda
  • 1 ¼ teaspoons baking powder
  • ½ teaspoon salt
  • 3 eggs
  • 1 cup white sugar
  • ¾ cup vegetable oil
  • 1 teaspoon vanilla extract
  • 2 cups grated carrot
for the frosting: 
  • ¼ cup cream cheese, softened
  • 2 tablespoons butter, softened
  • 1 teaspoon vanilla extract
  • 1 ½ cups sifted confectioners' sugar
  1. Preheat the oven to 350 degrees F (175 degrees C). Grease the bottoms only of 12 muffin cups, or line with baking cups. Sift together flour, cinnamon, baking soda, baking powder, and salt; set aside.

    Beat eggs and sugar until frothy and lightened in color. Stir in oil, vanilla extract, and grated carrot; fold in flour mixture. Pour batter into prepared muffin tins.

  2. Bake in the preheated oven until a toothpick inserted in the center comes out clean, 15 to 20 minutes. Remove to cool on wire racks.

  3. Meanwhile, prepare frosting by beating cream cheese, butter, vanilla, and confectioners' sugar together until fluffy. Frost the cooled muffins and chill until ready to serve.

    recipe found here


    4.25.23: TT medication chart

    4.25.22: chocolate caramel pretzel candy

    4.25.21: ðŸ”¥ week 17

    4.25.20: coffee filter glass cleaner

    4.25.19: topopo salad

    4.25.18: Mickey's DIY sensory boxes

    4.25.17: organizing recipes

    4.25.16: washi tape feathers


Wednesday, April 24, 2024

Chicken Scaloppine al Marsala

This recipe has been in my folder for a really long time and we love it - I don't follow it for the chicken prep (which is to dredge and fry the chicken) but that would make it more of a traditional Chicken Marsala, I just make the mushroom sauce and put it over grilled chicken and noodles. So good. 

PS: don't let the 'fancy' title scare you off - it's thin chicken cutlets ('scaloppine') in a mushroom wine sauce ('al marsala'). 


I'll give you the recipe as written (by the way, I have no idea what magazine I tore this out of so don't know who to credit!), then I'll tell you my changes after.

  • 1/4 cup rice flour
  • 6 thin-cut boneless, skinless chicken breasts, about 4 ounces each
  • 3 T. olive oil
  • 1 package (8 oz.) sliced brown mushrooms
  • 1/2 cup marsala wine
  • 1/2 cup low-sodium beef broth
  • 1/4 t. salt
  • 1/8 t. pepper
  • 1 package (10 oz.) brown rice couscous (such as Lundberg)
  • 1 T. unsalted butter
  • 1 T. chopped parsley
1. Place the rice flour on a large plate. Coat the chicken in the flour. Heat a large nonstick skillet over medium-high heat. Add 1 T. of oil and sauté half the chicken for 1 to 2 minutes per side until lightly browned. Remove to a plate and keep warm. Repeat with a second tablespoon of the oil and the remaining chicken. 

2. Add the remaining tablespoon of oil to the skillet and stir in the mushrooms. Cook for 2 to 3 minutes until tender. Off heat, add in the marsala and cook for 1 minute, scraping any brown bits from the skillet. Add the broth, salt, and pepper. Bring to a simmer and return the chicken and any accumulated juices to the skillet. Gently simmer, covered, for 15 minutes. 

3. Meanwhile, prepare the couscous following package directions, about 15 minutes. 

4. Stir butter and parsley into the chicken and sauce and serve with the prepared couscous. 

My notes:
  • we serve the mushroom sauce over grilled chicken, so I don't use flour or sauté the chicken in the skillet. 
  • I double the sliced mushrooms (brown or white) and cook them in 1 T. oil; add the wine, broth, salt and pepper, butter and parsley as directed. 
  • I usually serve this over buttered noodles. 
  • substitutes for marsala include madeira, sherry, vermouth, and wine. 


Tuesday, April 23, 2024

Tip-sy Tuesday: floor squeegee

Dave asked if I'd order a floor squeegee for him - I said a what? I don't think I've ever heard of that - sure enough it's a thing! Makes cleaning the garage floor so easy - I've always hosed the floor down and then pushed the water and debris out using a big push broom, with the squeegee you can easily just slide it along the floor removing the water much quicker. And I have to say it's a little more fun than the broom!


They make different sizes, I could have ordered a wider one but this works just fine. 

Monday, April 22, 2024

Sock Cupcake Gifts

Amy sent me this picture from dance recital last weekend thinking I'd like to see it - I immediately told her I'm totally stealing this and blogging it (people should know to not send me ideas if they don't want me to ask if I can blog LOL). She said that Miss Lori gave them out at recital. So I figured I should not be rude or presumptuous to just post them without first asking Miss Lori if she minded my sharing (obviously she ok'd it since I'm telling you about it ahahaha!). 

Here's what she did - isn't this a super cute idea?!


I bought the socks personalized with our logo on Etsy, then I rolled up 50 little cupcakes for recital gifts for my teachers, assistants, and the family kids! I ordered little toothpicks with stars from Michael’s to add a topper!


4.22.23: words


Sunday, April 21, 2024

🔥 Around the Campfire (week 16)

Dear Campers ~ 

Here's a quick recap in case you missed anything at camp last week:

Posts ~

4/14: ðŸ”¥ week 15

4/15: bbq chicken sliders

4/16: TT golf club/truck bed storage

4/17: pizza baked potato

4/18: baked pork chops

4/19: PSA carpet cleaning and birds

4/20: words

seedling update - they are growing so big already! 

That's it for this week! See you next week for more projects, crafts, recipes, whatever we can think of to make at camp - bye :)


Sincerely ~

Jill
camp counselor


Friday, April 19, 2024

PSA: Carpet Cleaning and Birds

Quick PSA for today's post - we had our carpets cleaned and it did not occur to me that it might be harmful for birds until I walked back into the house a couple hours after they were done and the smell was SO strong. I immediately thought to myself "I wonder if this is harmful..." and Googled it - sure enough it can be very toxic to birds! And poor Lucy our parrot was sitting nearby rooms that were done. I panicked of course, got her into a room away from carpet and just kept an eye on her, she was fine the rest of that day but the next morning she had a spell of sorts, like she was frozen or something and she fell out of the cage! Not tripped out, but tumbled out. I freaked. 

(Sorry, I probably should have started this post with the fact that she is ok now in case you were worried this story was going to end badly.)

I picked her up and put her on the counter, it took a few minutes but eventually she was walking around and climbing on her cage, ate breakfast and seemed ok once again. I called the vet and they didn't know what would cause her to freeze up like that but if it was a reaction to the chemicals they would expect her to show respiratory issues and I should just keep her away from the carpet areas for a few days and continue to monitor her. It's been a couple days and so far so good - but I wanted to warn anyone with a bird and dirty carpets that you should tell the cleaners that you have a bird, there are other solutions they can use; or remove the bird before having them cleaned. So scary!

LeDonna took this funny pic of Lucy sitting on the stove knob - good
thing she isn't heavy enough to push and turn a burner on haha. 


Thursday, April 18, 2024

Baked Pork Chops

If the weather is decent we like to just do a main protein on the grill, and I have fun with different side dishes. We were in CA for a bit and it rained a lot, A LOT - so I had to come up with meals made in the oven or stovetop. So when I bought boneless pork chops before realizing it was going to rain again and Dave wouldn't be able to grill them I figured I'd just Shake-and-Bake 'em, and then found that I don't have any Shake-and-Bake. 

I did have the ingredients on hand to make this recipe for baked pork chops I found here at Food Network so made this easy coating that didn't take much more time than if I'da shaken them up with premade mix - and sure enough, they tasted really good...yeah, yeah, I should probably always be making my own coating and forego the boxed stuff but I probably won't haha. But I will use this as my plan B of choice from now on.

  • 1 1/2 cups panko
  • 5 T. vegetable oil
  • 3 T. grated Parmesan
  • 2 t. dried Italian seasoning
  • kosher salt and ground pepper
  • Four 3/4" bone-in pork chops (about 2 1/4 pounds)
Preheat the oven to 450'.

Combine the panko, oil, Parmesan, Italian seasoning and 3/4 t. each salt and pepper in a large resealable plastic bag. Put the pork chops in a large bowl and toss to coat with 1 T. water. Place the pork chops in the bag and shake well to coat, pressing the breadcrumb mixture firmly into the meat. 

Place the pork chops on a wire rack set on a baking sheet and top evenly with any breadcrumbs remaining in the bag. Bake until the breadcrumbs are dark golden and the internal temperature of the chops registers 145' F. on an instant-read thermometer (avoid touching bone), 15 to 20 minutes. 

My Notes: I followed this recipe as written other then I baked the boneless chops at 375' for 15-20 minutes until done (watch them, baking time will depend on how thick your chops are). 

I don't have any photos to show you - Dave asked if I wanted him to take a picture and I said no, they're just plain old pork chops and I'm not blogging it...but then they turned out really good and I wanted to share! Guess what? They look an awful lot like I Shake-and-Baked them!!! 😂😂


Wednesday, April 17, 2024

Pizza Baked Potato

This was a really quick dinner I made for myself based on my favorite go-to when I'm eating alone - baked potatoes! Dave doesn't share my love for baked potatoes so it's my treat when he isn't home. 

I made a microwaved baked potato, wrap in foil and keep it hot. Saute mushrooms, chopped cherry tomatoes, chopped green olives, and chopped turkey pepperoni until hot, stir in pizza sauce to taste. Season with Italian Seasoning, salt and pepper to taste. Put the potato on a baking sheet, top with the pizza toppings and sprinkle with mozzarella cheese. Bake at 400' until the cheese melts. 


4.17.22: ðŸ”¥ week 16

4.17.21: ramen dinner by Brooke

4.17.20: no-sew t-shirt mask 

4.17.19: Cathy's baked mostaccioli 

4.17.18: shoelace tightening tip

4.17.17: money origami

4.17.16: baeckeoffe - can't pronounce it but it's good!


Tuesday, April 16, 2024

Tip-sy Tuesday: Golf Club/Truck Bed Storage

It's almost time to think about (attempting to) golf and I remembered this convenient storage solution for my golf stuff in the back of my truck - I got an underbed plastic storage tub with rollers on the bottom that is long enough to hold my golf clubs and wide enough for my shoes, cart blanket, balls, etc.  The rollers fit in the grooves of my bed liner and slides in and out of the truck bed so easily. I love this handy solution! 


During golf season I just leave my clubs in the truck most of the time, off season I store them and use the plastic tub for groceries. These work so good for me that I bought a second tub and have them side by side in the truck bed. This system has replaced my original short-person truck bed organizing post, click here for the initial solution. 


Monday, April 15, 2024

BBQ Chicken Sliders

Paige sent me the recipe for her bbq chicken sliders, I said it looks and sounds great but what I really want are the fries that are in the background LOL.

In her words:


I took a whole pack of Hawaiian rolls cut them in half; filled the bottom half with a layer of provolone cheese, topped it with grilled chicken, crispy bacon, and red onion. I added a drizzle of ranch and barbecue. I placed the top buns back on, brushed the tops of them all with a light layer of melted butter and some seasoning (of your choice) and baked them at 350' until the top of my buns were a little crispy! 


And of course you gotta have the chili cheese fries on the side :)  


4.15.21: kid craft - paper butterflies

4.15.20: tuna salad stuffed avocado

4.15.19: eggshell candles

4.15.18: LeDonna's Broccoli Cottage bake

4.15.17: cork gardening

4.15.16: t-shirt hack


🔥 Around the Campfire (week 15)

Dear Campers ~ 

Here's a quick recap in case you missed anything at camp last week:

Posts ~

4/7: 🔥 week 14

4/8: starting vegetable seeds

4/9: TT McDouble hack 

4/10: shrimp, pesto, quinoa bowls

4/11: carrot cake cream cheese bundt cake

4/12: cream eggs

4/13: words

Keeping it super short this week since I forgot to post this yesterday!

See you next week for more projects, crafts, recipes, whatever we can think of to make at camp - bye :)


Sincerely ~

Jill
camp counselor


4.14.23: MSTI: pickle in a blanket

4.14.22: MSIH taco-tot casserole 

4.14.21: french breakfast puffs 

4.14.20: fabric masks 

4.14.19: ðŸ”¥ recap (with a beautiful bunny cake!)

4.14.18: strawberry cream cheese frosting

4.14.17: Brooke's DIY speaker

4.14.16: how to repair an ironing board


Friday, April 12, 2024

Cream Eggs

Mickey told me about an egg recipe she made for breakfast that she loved - actually her exact words were 'it was the BOMB' and 'it was delishhhh'. She saw this on Instagram (search for audrey roloff if you want to watch her video) and sent me the video, she didn't take pics so I'll describe what I see on the video as best as I can (and I took some screen shots to tide us over for now until I make this for myself and take better pictures!). 

Heat a skillet and pour in heavy whipping cream to cover the bottom; turn the heat down and crack eggs directly into the cream, season with salt and pepper. Cover and cook 5 to 7 minutes until the eggs are done to your liking; using a spatula, scoop up the eggs and a little of the cream it cooked in. Serve on toast if desired.