Showing posts with label blog. Show all posts

Monday, April 12, 2021

Lemon-Paprika Chicken with Chickpeas and Couscous

I made this for dinner and I think it's really good. I don't mean I think it's good but no one else does, I mean I think it's good - hard to know for sure because instead of fresh thyme I used dried and used waaaaaaay to much. Like the dish was so heavily thyme-seasoned it was hard to taste the other ingredients! But from what I can tell, minus too much thyme, I think the dish is really good! 

Other than overdoing the thyme, my changes are that I didn't have fresh lemon so I used bottled juice and didn't serve with wedges; I added garlic powder instead of cloves; I omitted the red pepper; and I made a box of pine nut couscous that I had on hand. 


  • 1/4 cup fresh lemon juice
  • 1 T. tomato paste
  • 3 T. olive oil
  • 2 t. paprika
  • 2 t. chopped fresh thyme
  • 3 cloves garlic, finely chopped
  • salt and pepper
  • 4 skinless, boneless chicken breasts (6-8 oz. each)
  • 1 15 oz. can chickpeas (don't drain)
  • 1 red bell pepper, chpped
  • 3/4 cup couscous
  • 2 T. chopped fresh parsley
  • lemon wedges for serving
  1. Preheat oven to 375'. Whisk the lemon juice, tomato paste, 2 T. olive oil, paprika, thyme, garlic and 1/2 t. each salt and pepper in a small bowl. Pat the chicken dry with paper towels; season with salt and pepper. Rub the chicken with 3 T. of the lemon-paprika mixture to evenly coat.
  2. Heat the remaining 1 T. olive oil in a large ovenproof skillet over medium-high heat. Add the chicken and cook until browned on one side, about 5 minute. Meanwhile, remove 3 T. liquid from the can of chickpeas and transfer to a medium bowl. Drain and rinse the chickpeas. Add to the bowl with the chickpea liquid and add the remaining lemon-paprika mixture and the bell pepper; toss. Flip the chicken and scatter the chickpea mixture around the chicken, scraping any liquid into the pan. Transfer the skillet to the oven and roast until the chicken is cooked through, 8 to 12 minutes. 
  3. Meanwhile, cook the couscous as the label directs. Fluff the couscous with a fork.
  4. Remove the chicken to a plate. Add the couscous to the chickpea mixture and stir together to absorb the pan sauce; season with salt and pepper. Slice the chicken and divide amount plates along with the couscous-chickpea mixture. Top with the parsley and serve with lemon wedges. 
4 servings. Per serving: calories 580; fat 18g; carb 47g; pro 55g; sugar 6g; fiber 8g.

from 3/21 Food Network Magazine


 4.12.20: ðŸ”¥week 15

4.12.19: dog in the blog - food bowl tip

4.12.18: one year old's birthday cake

4.12.17: granola cookies

4.12.16: tidying up


Saturday, April 10, 2021

Crock Pot Country Ribs

This is just about the easiest recipe ever - and it's delicious. What's not to love about that hahaha?!


Put a package of boneless, pork country ribs in a large crockpot (I spray the crockpot with no-stick cooking spray first). Add 1 large can of cream of mushroom soup and 1 or 2 cans of mushrooms, including the juice. Cover and cook on LOW for 8-9 hours. If you don't want as much sauce just use a small can of soup, but I like to have extra to put over noodles or mashed potatoes as sort of a gravy. Yum. 


Note: country ribs aren't actually ribs, not sure why they're called that! Maybe because of the way they're cut? I've only ever made them in the crockpot - they are very moist, meaty, and flavorful. 


Friday, January 15, 2021

(Skinny) Skillet Chicken Parmesan

 This is another delicious looking recipe from Macey - I love the idea of putting the chicken and sauce over vegetables and cauliflower rice instead of pasta. Good job Mae! Here's what she did, in her words:

In case the text is too small, here's help:

Season chicken breasts with salt, pepper, oregano and brown them in an ovenproof skillet. Spread basil pesto, parmesan cheese, and marinara over the chicken and place the skillet in a hot 350' oven and cook until the chicken is done. Add more cheese, fresh basil, fresh tomatoes on top if you like. Serve the chicken and sauce over top of sautéed medley of veggies (she suggests onions, spinach, red peppers, tomatoes, basil, Rotel mild chile tomatoes, and cauliflower rice). 

Yum, this sounds and looks amazing - thanks for sharing Mace!

Thursday, January 14, 2021

Dog Crochet Basket

A while back when I made the crocheted owl basket and small cat basket I sent a picture to the fam and Macey made the comment that if I made the cat one in black it would look like her dog Nahla - so I did. And it does hahaha. I added a bit of fringe at the ears this time to make it resemble a yorkie, isn't it cute? It's much bigger than it looks, it's about 10" wide and tall. 


I combined the pattern for the owl basket found at bhg.com, and the cat basket pattern found at woolstreeet.ca to come up with this dog basket. 

Wednesday, January 13, 2021

Lemon Honey Dijon Chicken

It's my self-proclaimed 'healthy week' - here's the first of the dishes I made this week. Dave and I both loved this recipe and will definitely make it again - easy and healthy! 

I served it with beans and kale but it wasn't necessary!

Ingredients:

  • 3 tablespoons honey
  • 1 teaspoon lemon zest 
  • 2 tablespoons freshly squeezed lemon juice 
  • 2 tablespoons Dijon mustard
  • 1/2 teaspoon garlic powder
  • 1 1/2 teaspoon kosher salt, divided
  • 6 skinless bone-in chicken thighs 
  • 3 sprigs rosemary
  • 1 large fennel halved and sliced 
  • 1/2 onion sliced
  • 1 tablespoon olive oil
Instructions:

  • 1. In a large resealable bag, combine the honey, lemon zest, lemon juice, Dijon mustard, garlic powder and 1 teaspoon salt. Add the chicken thighs to the marinade. Seal the bag and massage the chicken with the marinade to coat well. Marinate at room temperature for 30 minutes or up to 4 hours in the refrigerator.
  • 2. Preheat the oven to 425 degrees F. Remove the chicken from the refrigerator 30 minutes before cooking.
  • 3. Add the rosemary, fennel and onion in the bottom of a 9x13 baking dish. Drizzle with the oil and season with the remaining salt. Toss well to coat. Spread the vegetables evenly over the bottom of the pan. Place the chicken pieces on top of the vegetables allowing the marinade to drip off before adding to the pan. Bake for 50 minutes, basting with any remaining marinade every 10 minutes for the first 20 minutes. The chicken should be golden brown and cooked to 165 degrees F. Remove from the oven and allow to rest for 10 minutes before serving topped with the softened vegetables.
my notes: I used skinless boneless chicken thighs. Omitted the onion. Baked for about 40 minutes. To serve I scooped the veggies with a piece of chicken on top, then drizzled with a little of the pan juices. Click here to see yesterday's post on how to work with fennel.


4 servings
318 calories per serving, 20g carb, 34g protein

click here for original source 


Saturday, November 14, 2020

Pickled Red Onions

While on my pickling kick (along with cucumbers and green beans) I decided I'd like to try pickled red onions - very easy to do and I love them! You can add to sandwiches, chop up in chicken or tuna salad, put on salads or tacos, or just eat straight out of the jar hahahaha. Since I've never done it, and because Dave will not eat them, I didn't want to make too many jars for my first time - I found a small batch recipe and just made 2 small 8 ounce jars of them and I'm wishing I would have made more! Who cares if I have to eat them all by myself - I'm up for that challenge ;)


I changed the recipe a bit so am just going to tell you what I did:

  • 1 large red onion, thinly sliced 
  • 1/2 cup apple cider vinegar
  • 1/2 cup distilled white vinegar
  • 2/3 cup sugar
  • 1 T. pickling salt
  • 1 T. pickling spices (you can omit this, or add peppercorns or other spices)
                           

Follow standard canning methods, there is tons of info online for how to can - here's a couple basic things to know: 
*you want the jars sterilized and hot, either by running them in the dishwasher before starting to can (leave them in the hot dishwasher after the load has stopped so they stay warm) or immerse them in a large pot of boiling water for 5 minutes. I do this right in my big canning pot since you'll also need a hot water bath for processing the jars. 
*put the canning lids into a small saucepan with water and bring up to almost a boil. Turn off and leave covered so they are hot when time to seal the filled jars. 
*have a funnel, ladle, and a wet paper towel handy for filling the jars. 

1. Dissolve the vinegar, sugar and salt in a saucepan and bring to a simmer.
2. Add the onions and pickling spices or other spices if you're using to the saucepan and simmer on low for 5 minutes uncovered. Remove from heat. 
3. Using clean tongs, pack the onions into each jar. Add the spices from the pan if you're using.
4. Using a ladle, fill the space around the onions with the pickling brine, leaving about 1/2 inch head space.
5. Wipe the rim with a wet paper towel so it's clean, then add a lid from the hot water in the small saucepan. Screw in place with a ring.
6. Process for 10 minutes submerged in the large pot of hot water, make sure there's about an inch of water over top of the jars. Remove carefully with long tongs and set on the counter or a rack to cool - you'll know the jars have sealed when you hear my favorite canning sound, it's sort of a 'ping' or a popping sound. Cool completely.

Store for up to 1 year, once opened store in the fridge for up to a month. 


Wednesday, April 15, 2020

Tuna Salad Stuffed Avocados

Got the idea for tuna stuffed avocados from allrecipes.com, but their recipe for tuna salad included green onions, bell pepper, garlic and balsamic vinegar which is not how we like our tuna salad...so I adapted the idea to suit us. Make your favorite tuna salad and fill avocado halves with it, put on a bed of lettuce and have a delish and pretty lunch.


I have been making tuna salad this way since I met Dave, it's how his mom made it and it's great:
Mix together one can drained tuna fish, chopped celery, sliced green olives with pimentos, and enough mayo to stick it together. Season with salt and pepper. I know - olives? Trust me, it's delish.


Now in the interest of full disclosure and keepin' it real - the above filled avocado looks pretty and all that, but really - that is not enough tuna to fill me up at lunch! This is how my plate looked after I took the 'pretty' picture (the half avocado is under that mound of tuna salad)!!


4.15.19: eggshell candles
4.15.18: LeDonna's Broccoli Cottage bake

Saturday, April 11, 2020

Hot Cross Buns

Dave and I were watching Jeopardy the other night and one of the answers was hot cross buns. He looked at me and said he'd never had a hot cross bun - and neither have I. So guess what I made today as my boredom buster thing to do?

Yep. We got buns. (And they turned out great!)


Apricot-Raisin Hot Cross Buns

  • 4-4.5 cups all-purpose flour
  • 1 package active dry yeast
  • 1/4 cup warm water (110')
  • 1/8 teaspoon sugar
  • 3/4 cup milk
  • 1/2 cup butter (1 stick)
  • 1/3 cup sugar
  • 1/2 teaspoon salt
  • 2 eggs (plus 1 egg white, see below)
  • 1/2 cup finely snipped dried apricots
  • 1/2 cup raisins, coarsely chopped
  • 1 egg white, beaten
  • 1 tablespoon water
  • dried apricots cut into strips (optional) or confections' sugar glaze (optional)
Step 1
In a large mixing bowl place 2 cups of the flour; set aside. In a small bowl combine the yeast, warm water, and 1/8 t. sugar. Stir until yeast is dissolved; set aside. In a medium saucepan heat and stir the milk, butter, 1/3 cup sugar, and salt until warm (120'- 130'F) and butter almost melts. Add to flour mixture along with the yeast mixture and eggs. Beat with an electric mixer on low to medium speed for 30 seconds, scraping sides of bowl constantly. Beat on high speed for 3 minutes. Stir in apricots, raisins and as much of the remaining flour as you can with a wooden spoon.


Step 2
Turn dough out onto a lightly floured surface. Knead in enough remaining flour to make a moderately soft (not sticky) dough that is smooth and elastic (3 to 5 minutes total). Shape dough in a ball. Place dough in a lightly greased bowl, turning once to grease surface of dough. Cover and let rise in a warm place until double in size (about 1-1 1/2 hours).


Step 3
Punch dough down. Turn out onto a floured surface. Cover and let rest 10 minutes. Grease two baking sheets; set aside. Divide dough into 20 portions; shape each into a smooth ball. Place balls 2 inches apart on prepared baking sheets. Cover; let rise until nearly double (45 to 60 minutes). 


Step 4
Preheat oven to 375'. Make a crisscross slash across top of each bun with a sharp knife or scissors. In a small cup combine beaten egg white and water. Brush mixture over buns. Bake for 12 to 15 minutes or until golden brown, rotating baking sheets halfway through baking. Top with apricot strips or glaze in an x-shape if desired. Serve warm. Store remaining buns in an airtight container in the refrigerator up to 3 days. To reheat, place 1 or 2 buns at a time on a microwave-safe plate and heat 15-20 seconds. Makes 20 buns. 


per serving: 177 calories; 6 g total fat; 28 g carb; 1 g  fiber; 8 g sugar; 4 g protein

© Copyright 2020 bhg.com. All rights reserved. Printed from https://www.bhg.com 04/10/2020


click here for source

4.11.19: Al and Cathy's DIY fire pit


Wednesday, February 19, 2020

Double Chocolate Mousse Torte

You guys!!  This mousse torte thing is amazing! I saw the recipe at melskitchencafe.com and didn't change a thing - and after making it I'm not sure there's even anything that you'd want to change, it's kinda perfect. I made it for our "Pal-entine's" dinner thinking it'd be safe because I don't like chocolate therefore I wouldn't be tempted - but after trying a tiny little sliver I might be changing my mind about chocolate hahahah. I have a little leftover in the fridge and it took all my willpower to not eat it for breakfast. You want to make this, I promise.


DOUBLE CHOCOLATE MOUSSE TORTE

CAKE:

  •  8 ounces bittersweet or semisweet chocolate, chopped (see note)
  •  1 cup (8 ounces, 2 sticks) butter
  •  1 cup (7.5 ounces) granulated sugar
  •  5 large eggs
  •  1 tablespoon vanilla extract
  •  1/4 teaspoon salt
  •  1/4 cup (1.25 ounces) all-purpose flour

MOUSSE:

  •  2 tablespoons unsweetened natural or Dutch-process cocoa powder
  •  5 tablespoons hot water
  •  8 ounces bittersweet or semisweet chocolate , chopped fine
  •  1 tablespoon butter
  •  1 1/2 cups cold heavy cream
  •  1 to 4 tablespoons granulated sugar, depending on desired sweetness
  •  1/2 teaspoon vanilla extract
  •  pinch of table salt

WHIPPED CREAM TOPPING:

  •  3/4 cup cold heavy cream
  •  2 tablespoons powdered sugar
  •  Grated chocolate, for garnish (optional)
  •  2 cups fresh raspberries (or other fresh fruit)

INSTRUCTIONS

  1. For the cake: preheat the oven to 325°F.
  2. Lightly grease a 9- or 10-inch springform pan; dust with sugar (optional).
  3. Combine the chocolate and butter in a saucepan or in a microwave-safe bowl. Melt over low heat (on the stovetop) or on 50% power in the microwave at 1-minute increments, stirring in between.
  4. Cool the mixture to lukewarm. Whisk in the sugar to combine.
  5. Add the eggs one at a time, blending well after each addition. Mix in the vanilla and salt. Add the flour and mix until just combined.
  6. Pour the batter into the springform pan. Bake until the cake just rises in center (a tester inserted into center will not come out clean) and springs back lightly to the touch, 30-35 minutes.
  7. Cool completely in the pan (the center of the cake may fall slightly). Cover and chill while making mousse.

  1. For the mousse: whisk together the cocoa powder and hot water in a small bowl; set aside.
  2. Melt the chocolate and butter together in a microwave-safe bowl on 50% power, stirring often, until smooth (don't overheat!). Whisk the cocoa/water mixture into the melted chocolate until smooth (if there are little lumps, you can press the mixture through a fine mesh strainer into a clean bowl). Let it cool to room temperature (just slightly lukewarm is fine, too, as long as it isn't warm or hot).
  3. In a medium bowl with an electric mixer, whip the cream, granulated sugar, vanilla, and salt at medium speed until the mixture begins to thicken, about 30 seconds. Increase the speed to high and whip until soft peaks form when beaters are lifted (I often use my Blendtec blender to whip cream - only takes a few seconds).
  4. Using a rubber spatula, fold 1/3 of the whipped cream into chocolate mixture to lighten. Fold in the remaining whipped cream until no white streaks remain.
  5. Spoon the mousse over the cooled cake. Cover and refrigerate for at least 6 hours or up to 1 day.
  6. Run a sharp knife around the edge of the pan to loosen the torte if it hasn't pulled away from the sides of the pan while cooling.
  7. Release the springform pan sides. Transfer the torte to a platter, if desired (often, I just leave it on the base of the springform pan).

  1. For the whipped cream topping, using an electric mixer, beat the cream and powdered sugar in a medium bowl until soft peaks form. Spread the whipped cream over the torte. Dust with grated chocolate, if desired.
  2. Top with raspberries. Chill for up to an hour or serve immediately.

click here for original source

2.19.19: tt: deviled egg cover 
2.19.18: macrame wall hanging (and Sarge "helping me")
2.19.16: kid craft - decorate notebooks

Tuesday, February 18, 2020

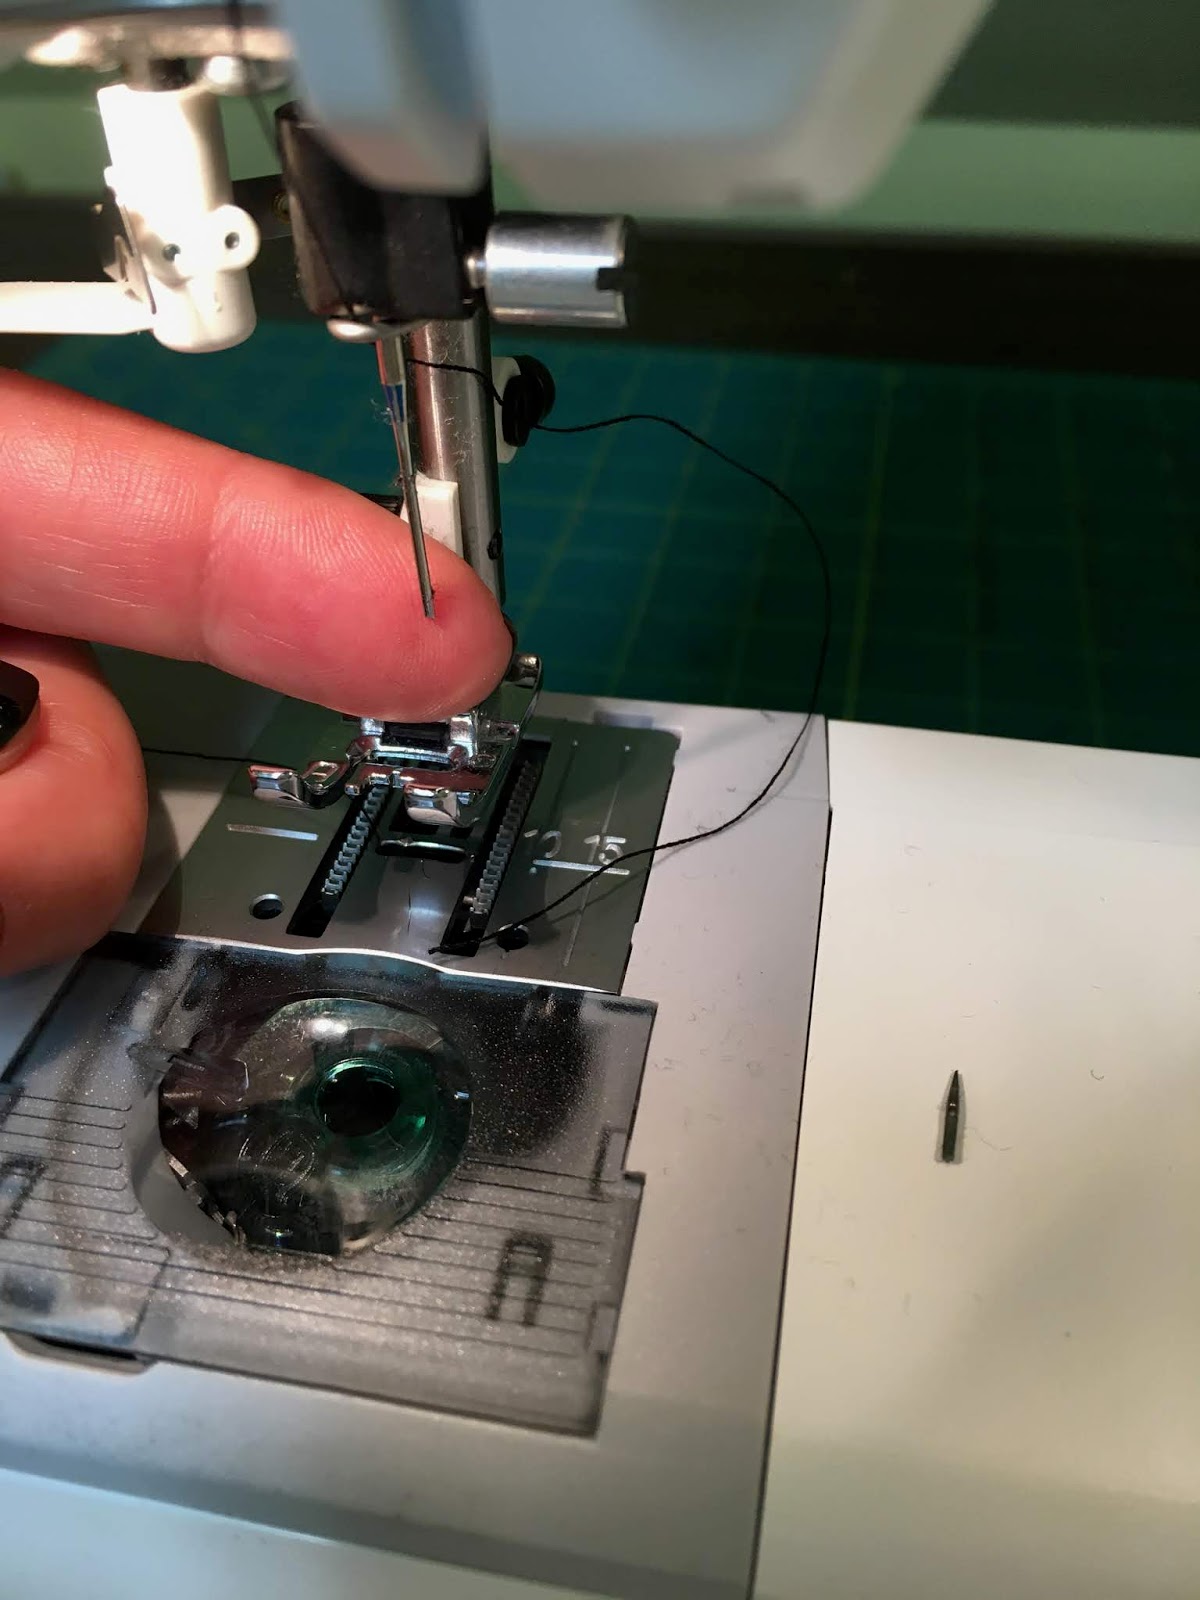
Tip-sy Tuesday: How To Change a Sewing Machine Needle

Oops, I tried to sew thru something thick and my needle wasn't up to the task and broke off in the machine. If this happens to you, don't fret - it's a very easy fix (well it's easy if you have the extra needles that probably came with your machine - if not, you'll need to get yourself some new needles before continuing!). It's also helpful to know (and a reminder to myself) that they make assorted sized needles for different tasks - follow the instructions below to change to the appropriate needle that works for the material you are sewing on...or don't, and risk breaking one like me! 


First you need to remove the broken needle: loosen the screw that's right above the needle, either with a small screwdriver if there's a slot or turn it by hand - I have two machines and one turns with a screwdriver and the other by hand - until the needle is loose enough to pull out; then slide the new needle up into place - most likely the head of the needle is flat on the backside and curved on the front, make sure you put it in so it fits correctly in the space (curved side facing you and the eye of the needle in front), then tighten the screw back up. Done. 


Note on needles: my case indicates which needle is used based on the weight and texture of the fabric - this case includes needles for thick jeans, stretchy material, a wing needle used for hemstitching, and universal 'all-purpose' needles used for most fabrics. 


All the sewing machines I've ever had work like this, sorry if yours is different and this is no help to you at all!


Wednesday, February 12, 2020

Yarn Heart

This took me literally 5 minutes to make and turned out very cute - cuter than I expected actually! Perfect kid craft, but as always I'm not waiting for a kid to come make stuff with me and I just made it anyway ;) All you need is a cardboard heart, a piece of tape, and some yarn.

Don't have cardboard? When I'm searching for a thin piece (not thick like a box is made of) I'll raid anything - cereal or cracker boxes, the back of a notepad, etc. Dave doesn't even ask anymore why the bag of crackers is in the pantry not in a box hahahaha. Hey, you do what you have to do in the name of crafting.

So, trace and cut out a heart from a thin piece of cardboard - whatever size you want. Tape one end of the yarn to the heart to hold it in place and then start wrapping. And wrapping. And wrapping. Keep on going any which way to cover the cardboard completely. I found that in the beginning the yarn wanted to slip off the edges but as the heart got more and more covered it was easier to keep it in place. One thing I was thinking as I was trying to get all the cardboard covered so you couldn't see it, is that if you colored the cardboard the same color as the yarn then you could get away with tiny holes in the yarn wrapping.


Once the heart was completely covered and I liked how the yarn looked, cut the yarn from the rest of the skein and tuck the loose end in underneath the wrapped yarn. I pushed it in with the end of some not-sharp scissors to make sure the end was good and buried and wouldn't pull out. Then I attached a length of yarn to the top in order to hang it. Cute, right?


2.12.17: goat cheese tart
2.12.16: Brooke and Sydney make 'cootie catchers'

Monday, January 13, 2020

Crocheted Messy Bun Hat

Tesha and I were talking and I can't remember why but she told me she has to wear her hair down when she walks outside because a hat doesn't fit over her ponytail. I said she needed a 'messy bun' or ponytail hat. She'd never heard of it so for Christmas I made her one - patterns are very easy to find online, I picked this simple (and free) one and whipped it out quite quickly. I made orange so she's more visible when walking down her road (she lives in Michigan and between the trees and snow, and early disk, sometimes it's hard to see good!).


Here's the pattern I followed, I added a few more rows to make it longer - note I didn't use the yarn called for in the pattern and that apparently changed the scale, the circumference was fine it just wasn't long enough. I used Joann yarn 100% acrylic (but very soft) medium #4 weight and K hook.


Simplicity Messy Bun Hat 2-in-1


Yarn – Lion Brand Vanna’s Choice, worsted weight, 3.5 oz/170 yds – Silver Blue
Materials – K/10 1/2 – 6.50mm
Difficulty –  Easy
Size – 20” circumference, fits 24″
Measurements in Pattern – 4.5” inch diameter
Gauge – 4” = 9 rows, 11 stitches
Stitch Guide in American Terms:
HDC – Half double crochet
Special Stitches:
HDC in the 3rd loop – Yarn over, insert your hook in the loop behind the back loop, yarn over, pull up a loop, 3 loops on hook, yarn over, pull through all 3.
Notes – Worked from the top down in rounds. Chain does not count as a stitch. Do not turn your work.
Instructions:(To Make a Full Beanie- Start with a chain 3, HDC 6 in the 3rd chain from the hook, slip stitch to form a loop. Round 2: chain 1, make 2 HDCs in each stitch around for a total of 12 stitches. Round 3: make 2 HDCs in each stitch around for a total of 24 stitches. Now, skip to the instructions below starting at Round 1.)
Chain 24, slip stitch to form a loop, chain 1Round 1: HDC in each chain around, slip stitch, chain 1, do not turn – 24 HDCs total.Round 2: 2 HDC in each stitch around, slip stitch, chain 1, do not turn – 48 HDCs.Round 3: HDC in each around, slip stitch, chain 1, do not turn – 48 HDCs.Round 4: * HDC 7, 2 HDC in the next, repeat from * around 6 times, slip stitch, chain 1, do not turn – 54 HDCs.Round 5 – 15: HDC in each around, slip stitch, chain 1, do not turn – 54 HDCsRound 16-18: Using the 3rd loop only (VIDEO below – behind the stitch) HDC in each around, slip stitch to the top of the chain to join, chain 1, do not turnRound 19: Still using the 3rd loop only HDC in each around, slip stitch, fasten off.Finishing: Sew in the ends.

click here for original source


Friday, January 10, 2020

Al's Sweet & Sour Cabbage

Al and Cathy had us over for dinner and Al was in a cabbage mood (well I'm not sure he called it a 'mood' hahah, maybe more like he just felt like making cabbage dishes!); fortunately we love cabbage and all 3 dishes he made were great. He was nice enough to share the recipes - I haven't made them yet but I definitely will, Dave especially liked the nappa salad - but first up is this delicious recipe for sweet and sour cabbage that is making my mouth water just thinking about it:

3-4 slices bacon, diced
1 medium onion, diced
2 Red Delicious apples - peeled, cored, diced
1 medium head of red cabbage, sliced into 1/4-1/2" strips
3/4 cup brown sugar
1/4 cup apple cider vinegar
1/2 cup chicken stock


1. Sauté bacon, until browned – remove some of the grease leaving some in the pan


2. Sauté onion and apple until tender

3. Add cabbage to pan cover and cook on low for about 20 min.

4. Add brown sugar, vinegar, chicken stock and mix, cover and simmer until cabbage is tender.


1.10.19: happy moments (I completely forgot about this!)
1.10.18: savory monkey bread
1.10.17: kitchen tip: dating spices
1.10.16: bean and vegetable soup