Showing posts with label stampin up. Show all posts

Wednesday, January 2, 2019

Diaper Fold Gift Holder

I watched a video that Ronda posted showing how to make this diaper fold gift holder; after all the times I've helped her at her Stampin' Up studio - and trust me, I've made a lot of paper gift holders for her - I've never seen this one! Super easy and it turned out soooooo cute I have to share with you. You're gonna want to do this for sure - it's now part of my commonly used techniques (along with wrapping paper gift bags, I use that ALL the time).

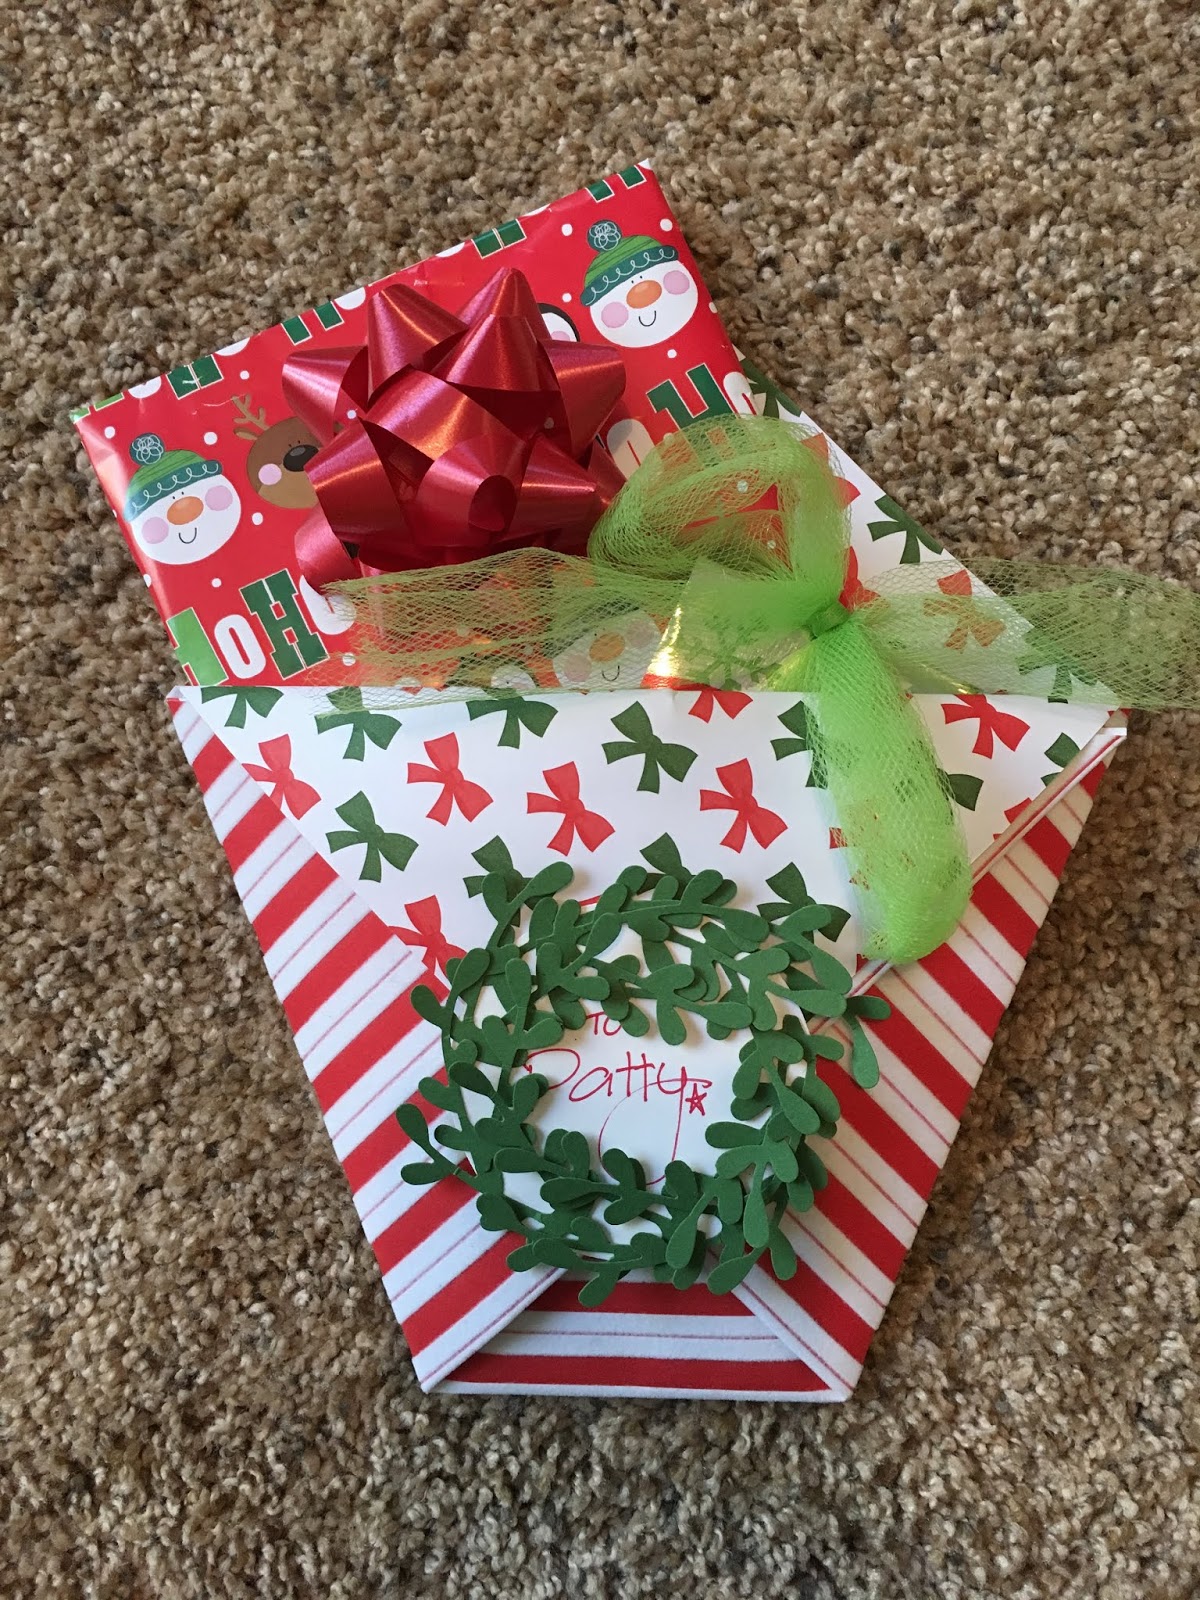
We just had our last holiday gift exchange so I made this holder with Christmas paper and decorations, obviously you can use this year round by using different papers, etc...You can also vary the sizes - this one I started with a 12" square piece of double sided decorative paper (this is Stampin' Up Christmas paper that is fuzzy on one side, how fun); if you don't use double sided paper then the inside of your holder and the flap that folds down in the front will be white - not bad, but I like the different patterns showing together. Do what ya' want! Change the size of the holder by changing the size of the square you start with - Ronda did as small as 6" square, up to a 12" one. The 12" is too big for a lone gift card, but if you have other things to put in the pouch, like I did, then big is ok.


1. fold the paper in half forming a triangle. Creasing the fold with a bone-folder will give you a nice crisp edge - if you don't have one I'd run something smooth and hard over the folds, like maybe a ruler or credit card.


2. with the point of the triangle that is open at the top and the folded edge at the bottom, fold in one side of the triangle straight across reaching the other side (see picture below), then fold in the other side. Add a glue dot or a little adhesive under the top flap to keep it down.


3. now that it's folded it sort of looks star-shaped to me - at the top is two open points, fold down the top one over the folds you created in step 2 leaving the bottom one still up. In the picture below, the bow print is what is on the back side of the striped paper, you see it once you fold the front point down. This opens the holder into a pouch where you place your small gift or gift cards.


To finish I cut out a 2.5" circle and a bunch of green sprig punches (using both a Stampin' Up circle and sprig punch). Glued the sprigs around the edge of the circle using a glue stick, creating a wreath. Attach to the front with adhesive.


Cute right? And simple! I love cute and simple ;)


1.2.2016: hot buttered rum. yum. 


Friday, October 5, 2018

Paper Pumpkin

Sitting in my craft room literally waiting for paint to dry (spider earrings coming up soon!) and looking for a quickie project -  this pretty marbled paper from Stampin' Up reminds me of a squash so I whipped up a paper pumpkin that I'm going to put on my desk (and if I get out to Ronda's studio any time soon I'll make one to add to her seasonal display table!). This is a very easy, kid friendly, cute Halloween or fall decoration - cheap and quick too! That kinda makes for the perfect craft in my book.


Supplies:

  •  decorative paper
  • 2 brads
  • small hole bunch
  • scissors and ruler,  or cutting board
  • 2 green pipe cleaners (chenille stems, whatever - I've always called them pipe cleaners!)
  • pencil to curl the pipe cleaners
  • twine
  • cork
  • round cardboard to give the bottom some stability


Cut 1 inch strips of paper (how long the strips are will determine the size of your finished pumpkin). My paper is 12" square and I cut 24 strips (2 pieces of paper) and that's as big a pumpkin as you're going to get with standard 12" square paper.

Hole punch both ends of each strip and thread all of one end onto a brad, then all of the other end onto a brad. Spread the strips apart evenly to form the pumpkin.


 Glue a piece of cardboard to the bottom to make it more stable and it'll help keep the strips in place.


Glue a wine cork to the top like a stem - you can paint it if you want but I wrapped twine around mine instead. I also found the cork sat better on top of the brad by carving out a little circle from the bottom of the cork - then fit the cork over the brad.


Curl both ends of the pipe cleaner around a pencil, then twist around the cork. Glue twine around the cork if you want - I like how it looks but painting the stem cork would also be cool - how about glitter paint?


10.5.17 make a mummy picture


10.5.16 m&m cookie bars


10.5.15 squash ghosts


Friday, September 14, 2018

How To Use a Big Shot Die-Cutting Machine

Hey - do you guys know how to use a Big Shot die cutting machine? There are other names for these things, the one I have from Stampin' Up is called "Big Shot" - it's a simple tool but makes paper crafting so, so, so much easier and neater than hand cutting! You can buy tons of different templates, everything from tags and labels to words, shapes, ovals, sqaures...the list is endless. 


Anyway, after posting yesterday about making the card with a gift holder inside I was remembering that the first time I went to a card-making class at Ronda's I had zero idea how to use this thing and the other crafters were just whipping around me cutting things out without even a second thought and after watching for a bit I got the gist. Now that I've been helping Ronda at her Stampin' Up studio and cranking pieces out for her for the past couple years I can now run this beast in my sleep (in fact I'm pretty sure I've had dreams about die cutting LOL)!

So, in case you have no idea what I'm talking about, here's a simple tutorial that will give you the basic technique and you'll have an idea of what to do if you're in a situation like I was feeling like such a novice and newbie at paper crafting!

You sandwich a piece of paper (cardstock, decorative paper, foil, etc.) and the cutting template you've chosen (in these pictures I'm just cutting out a white circle) between need two clear cutting pads. Lay the "sandwich" on a base pad on either side of the Big Shot, lining it up on the tray so it'll fit cleanly thru the slot. Crank the handle and the sandwich will advance and the roller presses down on the cutting pads/paper/template stack making a sharp crisp cut out, then it comes out on the other side of the Big Shot. Make sense? Look at the pics, that'll help.

The picture above shows the Big Shot with the base plate in place on the right side of the machine,
two clear cutting pads (which have been well used and are all marked up, it's normal),
and 2 circle metal die cut templates laying on turquoise and white cardstock 

I've sandwiched a piece of white cardstock with the die cut circle on top between 2 clear cutting pads.
Lay the stack on top of the base plate so it'll go thru the channel in the machine under the handle.

crank the handle and the tray moves thru the machine

keep cranking the handle until the sandwiched template has cleared the handle,
then remove from between the cutting pads.


A couple more tips:

  • Occasionally the paper and template might be too thick so the "sandwich" won't fit thru the machine, in that case you'll need a thinner base plate (that doesn't come with the starter Big Shot but can be purchased) or it might be too thin if you're using a skinnier template so the roller isn't able to press down hard enough on your cutting pad stack - if that happens you can make a "shim" of sorts by adding a second piece of paper to the stack (that helps to make the sandwich stack thicker and the roller can then do it's job). There are different base plates and adapters you can interchange to get the right thickness needed for the machine to do it's cutting - for the most part just the basic plates that come with the machine do the job. 
  • The die cut thing has a cutting ridge on one side of it and is smooth on the other - lay the ridged cutting side so it's against the paper otherwise it won't make the cut. 


  • The clear cutting pads get really beat up and warp - turn them over and rotate them to even out the wear and tear. You will eventually have to replace them and there's nothing you can do to prevent it!
  • They sell a magnetic base board that helps to hold the metal templates in place which is super helpful if you have little things to cut out - they tend to shift around between the clear plates so having the magnet board makes that part easier. I don't have one, it's on my list :)
  • Click here, here, and here for examples of things you can make using the die cut machine. 

Thursday, September 13, 2018

Card with Gift Holder

Ronda showed me how she made this cute birthday card that has a space in the center for a gift card or other small flat gift - I made one this morning to give a thank you card and gc to a friend, it comes together very quickly (especially if you make it as simple as mine - Ronda's is much more finished but that's ok, 'you do you' is my motto today). Be plain or fancy - your choice.


Start with a 12" x 6" piece of double sided decorative paper; make score lines at 4.25" and 7.75", then  flip paper over and score at 6". Fold the outer two score lines in, flip over and fold at the center line - you are creating a "w" shape in the middle of the paper.


You need to notch the center fold line, I don't remember how Ronda notched hers but I used a big square die cut thing and ran it thru my Big Shot to get a nice clean cut. You can just free hand this if you want.


After notching, glue the folds closed so when you put the gift card or gift in the notched part it won't fall thru.

Cut a rectangle piece of cardstock that is slightly smaller than the card and glue on the inside so you have a place to write a message. Ronda made a pretty decorative "happy birthday" card and added a balloon on top with foam dimensionals for the front, and added a belly band underneath. My Stampin' Up sunflower paper is pretty enough that I decided to leave it plain and just tie a ribbon around the card to keep it closed.


Insert the gift into the notched fold, write your message, tie it closed. Isn't this a clever idea?


Here's the pretty card that Ronda made:


two years ago: wine cork keychain


Tuesday, September 26, 2017

Paper Sunflower in a Wine Cork

The cute artificial flower in a wine cork (click here for that post) I made recently to hang in our RV inspired me to make this little decoration for Ronda's display table. Using her Stampin' Up daisy punch I punched flowers out of orange and yellow cardstock, stack three on top of each other to look like a sunflower and glue together. Hole punch a few circles out of brown cardstock and glue to the center of the flower. Tape a short piece of green wire to the back and stick down into the hole made in the top of the cork from the wine opener. Glue to a piece of chip board or cardboard, something strong enough to keep the flowers from falling over.

Tuesday, September 19, 2017

Paper Mugs

Oh my gosh these paper mugs turned out so cute! And they are quite easy to make, which is a bonus...I'm thinking of so many uses for them - they'll make adorable table decorations and gift holders for sure.

I made 2 of them for Ronda's seasonal display table out of coordinating Stampin' Up papers and attached them to Stampin' Up paper doilies - LOVE - but they were just as cute on their own without the doily if you prefer.

They aren't difficult but my describing it might be - I took lots of pictures though and there's youtube videos you can google if you want to watch how its done. For demonstration purposes I made one out of plain paper so you can see the scoring and cuts easier, the finished ones out of decorative papers  are way cuter :)

All you need is a sheet of cardstock or scrapbook paper, scissors, adhesive (I used glue stick), and a scoring board helps but you could do it with a ruler and something pointy but not sharp (I used a crochet hook until I got this scoring board from Ronda).

1. Cut the paper into a 8.5" x 4.5" rectangle for the mug, and another piece 4.5" x 3/4" for the handle. Note for the plain example mug I made the handle 1" wide but later decided 3/4" looked better. Up to you!


2. Score 1.5" from one edge vertically (the long way) as shown below.


3. Turn the paper and score every inch 8 times (so make a score line at 1", 2", 3", 4", 5", 6", 7", and 8"). There will be a little 1/2" inch end flap left over that you'll use to glue the mug together. Fold along all of the lines so you can see them better.


4. Remove the bottom corner of the 1/2" strip just up to the 1.5" vertical score you made in step 1. Then make cuts on each of the other 7 score lines you made in step 3, stopping at the 1.5" initial vertical score line. See the picture below.

5. Fold up the paper making a circle/mug shape with the cut pieces at the top as shown. Glue the 1/2" end flap to the beginning of the rectangle so it keeps its shape.


6. Fold each cut piece out so it's easier to work with the little tabs.


7. Fold in the tabs that are directly across from each other and glue to connect. Be careful to not pull or force the tabs and get the mug all out of shape and wonky. Continue folding in and gluing the tabs across from each other all around the circle for a total of 4 connections.


8. Once all the folds are connected this is what it looks like (below) and forms the bottom of the mug.


9. Turn the cup right side up and glue the 4.5" x 3/4" strip to the edge of one of the panels as shown. Note for this example mug I used 1" for the handle but decided it looks better 3/4" for the others I made. Do whatever looks good to you!

10. Bend the strip down so it curls into a handle shape and attach at the bottom.


The finished project made out of pretty papers and attached to a paper doily - cute, right?


one year ago today: beaded bracelets with words
two years ago today: make a dog crate cover