Sunday, October 11, 2020

🔥Around the Campfire (week 41)

Dear Campers ~

Here's a quick recap in case you missed anything at MMDC last week:

Posts ~

10/4: 🔥week 40

10/5: crochet owl basket

10/6: tip-sy tuesday: dilly bean hack

10/7: creamy polenta with garden tomato sauce

10/8: MSIH: zucchini bread cookies

10/9: Grace's stitch doll

10/10: bacon-wrapped cocktail sausages

What's Cooking ~

  • steak, roasted baby potatoes, chopped salad
  • tuna noodle casserole, wilted spinach
  • grilled chicken, wonton ravioli with pesto, green beans
  • crab legs, broccoli slaw, sourdough bread
  • pork chops, sweet potatoes, roasted broccoli
  • chicken sausage, beans baked in marinara, wilted spinach
Miscellaneous stuff keeping me busy ~
  • I canned a few things that I'll be sharing with you soon - jilly's jam, pickled red onions, pickles, and pickled green beans (instead of 'dilly beans' I'm calling them 'jilly beans' hahahah)
  • made a few masks, including the creepy clear front kind
  • started putting the garden to bed, even tho my tomatoes still have flowers and green tomatoes. I'll give them a few more days before I crush their little dreams ;)


Very quick recap today, we are heading to the lake to wrap up things at the camper. It's chilly and overcast but there's lots that needs to be done - so gotta keep moving instead of blogging. Stop back this week for more fun projects, recipes, and whatever else I can think to make at camp!

Sincerely ~


Jill
camp counselor


Saturday, October 10, 2020

Bacon-Wrapped Cocktail Sausage

Al and Cathy brought these bacon wrapped mini sausages as an appetizer for dinner one night, like everything they make we loved them and devoured them and then I asked for the recipe - here's how to make them in Cathy's words (note: she texted it to me and I asked a couple questions about the bacon and what kind of sausages, in case you think you're missing part of a conversation you are hahaha): 


Wrap bacon around sausage. Mix brown sugar with cayenne pepper. 
The recipe ratio was  3/4 cup brown sugar to a half a teaspoon of cayenne. Al used way less cayenne because he thought it was going to be too hot. Roll the sausages in the sugar mixture and bake at 350° for 30 minutes.

Al partially pre-baked the bacon (maybe half way) before he wrapped the sausages.

He used little Smokies. After he wrapped the sausages he actually put them back in the oven for a little bit so that the bacon could get warm and possibly allow the sugar to stick better. But it still didn’t stick that well

The brown sugar would probably have stuck better to raw bacon or if the bacon is moist enough from its own grease it would probably stick good too.

Friday, October 9, 2020

Stitch Dolls by Grace

Quick Intro - this is from my niece Grace. She is super crafty, artistic, and creative and when she said she'd like to make and blog some things I jumped at her offer! Here is a fun creepy little project just in time for Halloween - or any time you want to make a quirky hand-sewn felt doll - in her words:


 I saw a doll like this, so I decided to make my own version of it and it's perfect for a spooky gift.

Materials:

Fabric, needle, thread and embroidery thread, scissors, bottoms, paper cut out, and safety pins

Fluff is optional


First I take the paper cut out and trace the shape on to the fabric then cut it out


And I safety pin it so it doesn't move around when I'm working with it


Then I take two different buttons for cuteness and sew them on


I decided to change the fabric because the other one was not working out, but your doll should look something like this: 


Then I do a running stitch and leave less then an inch open so I can stuff it with fluff


Then when I stuff it I take a pencil so I can get the stuffing even and into the limbs


Do not panic when you see this. We are going to fix that in just a minute:


When you finish filling it with your desired amount go ahead and close em up


Now we are going to do a stitch and I don't know the name so I'll just tell you how to do it. So now with the embroidery thread, we are going to insert the need in the front and the needle facing away


Then take the needle that came out from the back side and pull it between the thread in the front and pull all the way


Should start to look like this


Repeat until you make it all the way around the doll. We are back to this part where I told you not to panic. Insert the needle at a small angle and do the stitch:


Boom all fixed:


At the very end I decided I wanted to embroider a heart which was super hard😅 but that's it!


Thursday, October 8, 2020

My Sis is Hungry: Zucchini Bread Cookies

My sister ripped this recipe out of a magazine, handed it to me and asked me to make them for her. Um, that's a little bossy but ok, whatever. So when Brooke came over yesterday and was bored I asked if she wanted to make these cookies for me - as in for me to give to her mom LOL, and she did. I would never have made these if it wasn't for B, they didn't sound good to me at all hahahah.  

While she was scooping out the batter onto the cookie sheets I said they look a little weird, maybe more of a breakfast thing - and she said they look weird and more like a salad. I laughed hard. 

I know my sis is going to review these and ask if they're healthy, she told me not to tell her because if they're healthy she'll give them a higher rating hahah. When she texted me 'thanks for the cookies and they taste better than they look', I may have yelled 'THEY LOOK EXACTLY LIKE THE PHOTO YOU GAVE ME' like somehow I just randomly made these cookies for her and not based on the recipe she insisted I make? Like it's my fault they look like they do? LOL.

I wrote 'you realize these are the cookies you wanted me to make for you, right?' She said 'no, not until Brooke told me' 🤦‍♀️


I'm writing this before receiving her review just to prove I know what she's going to say hahahah.

  • 2 ripe medium bananas
  • 1/4 cup coconut oil, melted and cooled
  • 2 T. honey
  • 1 1/2 t. vanilla
  • 1/2 cup whole-wheat flour (I didn't have ww flour, used all white flour)
  • 1/4 cup all purpose flour
  • 1/2 t. baking soda
  • 1/2 t. ground cinnamon
  • 1/4 t. salt
  • 1 cup old-fashioned rolled oats
  • 2 medium zucchini, coarsely grated
  • 1/2 cup bittersweet chocolate chips (note B used milk chocolate mini chips)
  • 1/4 cup walnuts, chopped (we omitted the nuts)
  1. Heat oven to 350'. Line a large baking sheet with parchment paper.
  2. In a large bowl, mash bananas with coconut oil, honey, and vanilla.
  3. Add flours, baking soda, cinnamon, and salt; mix to combine. Fold in oats, then zucchini, chocolate chips, and walnuts.
  4. Drop 1/4 cupfuls of batter onto prepared sheet, spacing 2" apart. Bake until golden brown, 14-18 minutes. Let cool on sheet for 3 minutes, then transfer to a wire rack to cool completely. Once cool, refrigerate for up to 1 week or freeze for up to 3 months.'


Jen's review in her words:

So first I have to start with that these were my “find”.  I got a mystery delivery of the food network magazine in the mail- I knew I absolutely wouldn’t subscribe to something like that and forget. I thought maybe my husband or teen had done it as a hint?  Turns out it was my mother.  Apparently she knows me well. 

Anyway- I then feel obligated to flip through this magazine (or I’m wasteful).  Anyway- stumbled across Zucchini cookies.  WHAT? A chance to eat cookies and pretend I’m still healthy? COUNT ME IN.  oh wait.. except I don’t actually bake.  Darn.  Then VOILA! My sister and teen produce these cookie’s!! I was SUPER thankful (wanna say that off the bat).. but they looked like garbage.  Green garbage with chocolate chips.  At first bite I was perplexed.  It didn’t taste like a cookie at all but did taste like a version of delicious moist zucchini bread.  The chocolate chips made me feel like I couldn’t put butter on it though so that was an issue.  They were VERY moist – and quite sticky.  Didn’t love that part.  And wasn’t as firm as bread. Didn’t love that part.  I guess my rating of these is average.  Flavor was good but I was perplexed by the not a cookie not bread status.

Hopefully our mother keeps sending this magazine so I can give my sister more things I would like her to try and make me.. what a giver I am. HAHAHA


Wednesday, October 7, 2020

Creamy Polenta with Garden Tomato Sauce

I've been looking for different ways to use the tomatoes and beans from my garden when I found this old recipe - except I didn't plant plum tomatoes this year so had to buy some to make this dish 🤷‍♀️ so I'm still on the lookout for tomato recipes haha. Oh well - this recipe is totally worth having to buy tomatoes! I added meatballs and sausage chunks but think it would taste great meatless, and if you don't want to deal with making polenta the sauce would be great over pasta.


Garden Tomato Sauce Ingredients:
  • 2 tablespoons olive oil
  • 1 medium carrot, peeled and diced, about 1/2 cup
  • 1 small celery stalk, trimmed and diced, about 1/2 cup
  • 1 medium onion, peeled and chopped
  • 2 large garlic cloves, diced
  • 18 plum tomatoes, peeled and chopped
  • 1/2 teaspoon dried oregano
  • 1/2 teaspoon salt
  • 4 to 8 pre-cooked Italian-style chicken sausage, cut into chunks (optional)
  • 1/4 cup grated Parmigiano Reggiano cheese
Creamy Polenta ingredients:
  • 2 cups reduced-fat milk
  • 2 cups water
  • 3/4 teaspoon salt
  • 1 1/2 cups stoneground cornmeal
  • 2 tablespoons butter
Heat oil in a large skillet over medium-high heat. Add carrot, celery, onion, and garlic; cook, stirring, 5 minutes.

Add tomatoes and any juice from the bowl. Mash lightly with a wooden spoon. Add oregano and salt. Cook, stirring occasionally, about 20 minutes, until tomatoes have cooked down and formed a chunky sauce. Add sausage and stir to combine. Cook 5 to 10 minutes, until sausage is heated through. Add cheese and stir well. Remove from heat and keep warm until ready to serve.

                 
To make polenta, combine milk and water in a large saucepan over medium-high heat and bring to a simmer. Gradually add cornmeal, whisking constantly to avoid lumps. Add butter. Reduce heat to medium and cook, stirring almost constantly, 25 to 30 minutes, until polenta is thick. Serve topped with warm sauce and chunks of sausage. Serves 4.

recipe by Karen Berman (I ripped this out of a newspaper and it's been in my file forever - I have no idea where it's from!)
                                     

*my notes:
-there was a lot of juice in the tomatoes so it took longer than 20 minutes for it to cook down into a chunky sauce.
-I added 4 chicken sausages and also 16 small frozen meatballs, let them cook in the sauce until warmed thru. We weren't eating this until later so I put it in the fridge and warmed up in the microwave before serving.
-I always have to add additional water when cooking polenta, not sure what I'm doing wrong but every time it is immediately too thick but not cooked yet; I stir in more water in 1/2 cup increments until the polenta is done and the consistency is what I want.

Tuesday, October 6, 2020

Dilly Bean Hack

This hack to make dilly beans is from my sister - I haven't tried them this way but they sound good! Here's what she did, in her words:


So I spent a day canning with my friend and her family and after an entire day of work and 20 pounds of green beans we ended up with a totally of 20 precious jars to split. These jars are like gold.. priceless. So after that long weekend one day I finished a jar of pickles and thought hmmm this juice is very similiar. I wonder...

that said I went to the store and bought fresh green beans, came home and washed them, snipped the ends (I had ALOT of experience at that part), and cooked for a couple minutes to soften.  I then put those in the pickle jar, added a tiny bit of white vinegar and let them sit for 2 weeks! Nope definitely can’t compete with the home canned version (I knew better than to think it would) but it sure was delicious anyway!! A pretty good easy hack!  Maybe my sister already knew this Idea and just didn’t share with me? Hopefully it wasn’t already on the blog cuz then I’ll get in trouble for not reading it all.. HAHAHA.


Monday, October 5, 2020

Crochet Owl Basket

True story:

I was crocheting in the car and Dave asked what I was making, I said an owl basket. 

Dave: why?

Me: why? Uh, 'cause - hello, owl basket! Why wouldn't I? Duh. 


I'm not going to reprint the instructions, you can find them on bhg.com or click here. For the record, the headline reads "this easy crochet owl basket is the perfect project for beginners" and I beg to differ. I've been crocheting for years and had to google a couple of things - I've never heard of a picot stitch and even after googling not sure I did it correctly but the owl looks cute so am not going to overthink it. I also didn't know how to hdc dec (half double crochet decrease) or what a 'double treble' stitch is, thank goodness for google and youtube hahaha. I could not figure out the instructions for the left eye so I just made 2 right eyes and turned it so it was placed like the sample picture/instructions. 

Isn't it cute?! 

Here's the directions in case the link doesn't work:

Step 1: Crochet the Basket 

The basket is worked in a spiral, so joining rounds is not necessary. Mark the beginning of each round.

Rnd 1: With 2 strands of yarn held together, chain or ch 3 (2 chs counts as half double crochet or hdc), hdc 7 times in beg ch (8 hdc).

Rnd 2: Hdc-inc in each stitch or st (16 hdc).

Rnd 3: *Hdc-inc, hdc in next st; rep from * 7 more times (24 hdc).

Rnd 4: *Hdc-inc, hdc in next 2 sts; rep from * 7 more times (32 hdc).

Rnd 5: *Hdc-inc, hdc in next 3 sts; rep from * 7 more times (40 hdc).

Rnd 6: *Hdc-inc, hdc in next 4 sts; rep from * 7 more times (48 hdc).

Rnd 7: *Hdc-inc, hdc in next 5 sts; rep from * 7 more times (56 hdc).

Rnd 8: * Hdc-inc, hdc in next 6 sts; rep from * 7 more times (64 hdc).

Rnds 9-17: Hdc in each st around (64 hdc).

Rnd 18: *Hdc-dec, hdc in next 6 sts; rep from * 7 more times (56 hdc).

Rnd 19: *Hdc-dec, hdc in next 5 sts; rep from * 7 more times (48 hdc).

Rnd 20: *Hdc-inc, hdc in next 5 sts; rep from * 7 more times (56 hdc).

Rnds 21-26: Hdc in each st around (56 hdc).

Single crochet or Sc in next st, slip stitch or sl st in next st to finish off. Fasten off, and weave in ends.

Buy It: Plastic Crochet Hook Set ($12, Michaels)

Step 2: Make the Eyes 

Each eye is worked in a spiral, so joining rounds is not necessary. Mark the beginning of each round.

First Eye

Rnd 1: With 2 strands of yarn held together, ch 2 sc 6 times in beg ch (6 sc).

Rnd 2: *Sc 2 times in each st; rep from * 5 more times (12 sc).

Rnd 3: *Double crochet or dc 2 times in each st; rep from * 11 more times (24 sc).

Rnd 4: *Dc 2 times in next st, dc; rep from * 5 more times, treble crochet or tr, dtr, picot; fasten off.

Second Eye

Rnds 1-3: Rep First Eye instructions.

End 4: Picot, dtr, tr, *dc, dc 2 times in next st; rep from * 5 more times, hdc, sc, sl st to finish off eye; fasten off and weave in ends.

Step 3: Add Eyes to Basket 

Position the right eye on the basket at the point of the last st. Using two strands of yarn and a tapestry needle, tack down the center of the eye; using the center hole as a guide, bring the needle up through the center and then back down in the first round of stitches. Continue until the center is secure.

Using two strands of yarn and the outside stitches of the eye, tack down the eye securely, leaving the picot stitches unsewn. Weave in all ends. Repeat with the left eye.

Buy It: Large-Eye Blunt End Needles-6/Pkg ($7, Walmart)

Step 4: Add the Beak 

Using two strands of yarn and long straight stitches, embroider a beak between the bottoms of the eyes. Once you've mastered the technique, you can modify the basket to make it as big or tall as you desire by adding or subtracting stitches. The finished design makes a heartfelt DIY gift or keep it for yourself and use it to stash office accessories or crafts supplies.

Sunday, October 4, 2020

🔥Around the Campfire (week 40)

Dear Campers ~

Well, it was a better week of keeping up with the posts hahaha! Here's a quick recap in case you missed anything:

Posts ~

9/27: 🔥week 39

9/28: and the winner is...

9/29: tip-sy Tuesday: accessory organizing

9/30: german chocolate bars

10/1: MSIS: italian meatball soup

10/2: popsicle stick frankenstein

10/3: parmesan bubble bread

What's Cooking ~

  • pork schnitzel (from Costco - it was a little work but we loved it!), penne, mixed veggies
  • blackened salmon, brown rice, steamed broccoli
  • baked eggplant, mac and cheese
  • mini grilled pizzas, caesar salad
  • grilled chicken, roasted asparagus, basmati rice with lemon
Miscellaneous stuff keeping me busy ~
  • read 'Truths I never told you' by Kelly Rimmer. This is the 3rd book I've read by her, first was 'before I let you go' ⭐️⭐️ reviewed here; 'the things we cannot say' which gets great reviews but I struggled to finish it (the book goes back and forth between holocaust era historical fiction and present day characters piecing together the past) ⭐️⭐️; and now this one (about postpartum depression, another book where the storyline is going back and forth between the past and present day characters piecing together the past, and an annoyingly unsympathetic lead character) which is going to continue my 2 star streak ⭐️⭐️  - I think she is just not on the top of my favorite author list and I'm probably not going to be searching out any more of her books!
Hope everyone had a good week - stop by to see more recipes, crafts, and whatever else I can think of to make!  (or bribe other people into sharing haha). 

Sincerely ~


Jill
your camp counselor


Saturday, October 3, 2020

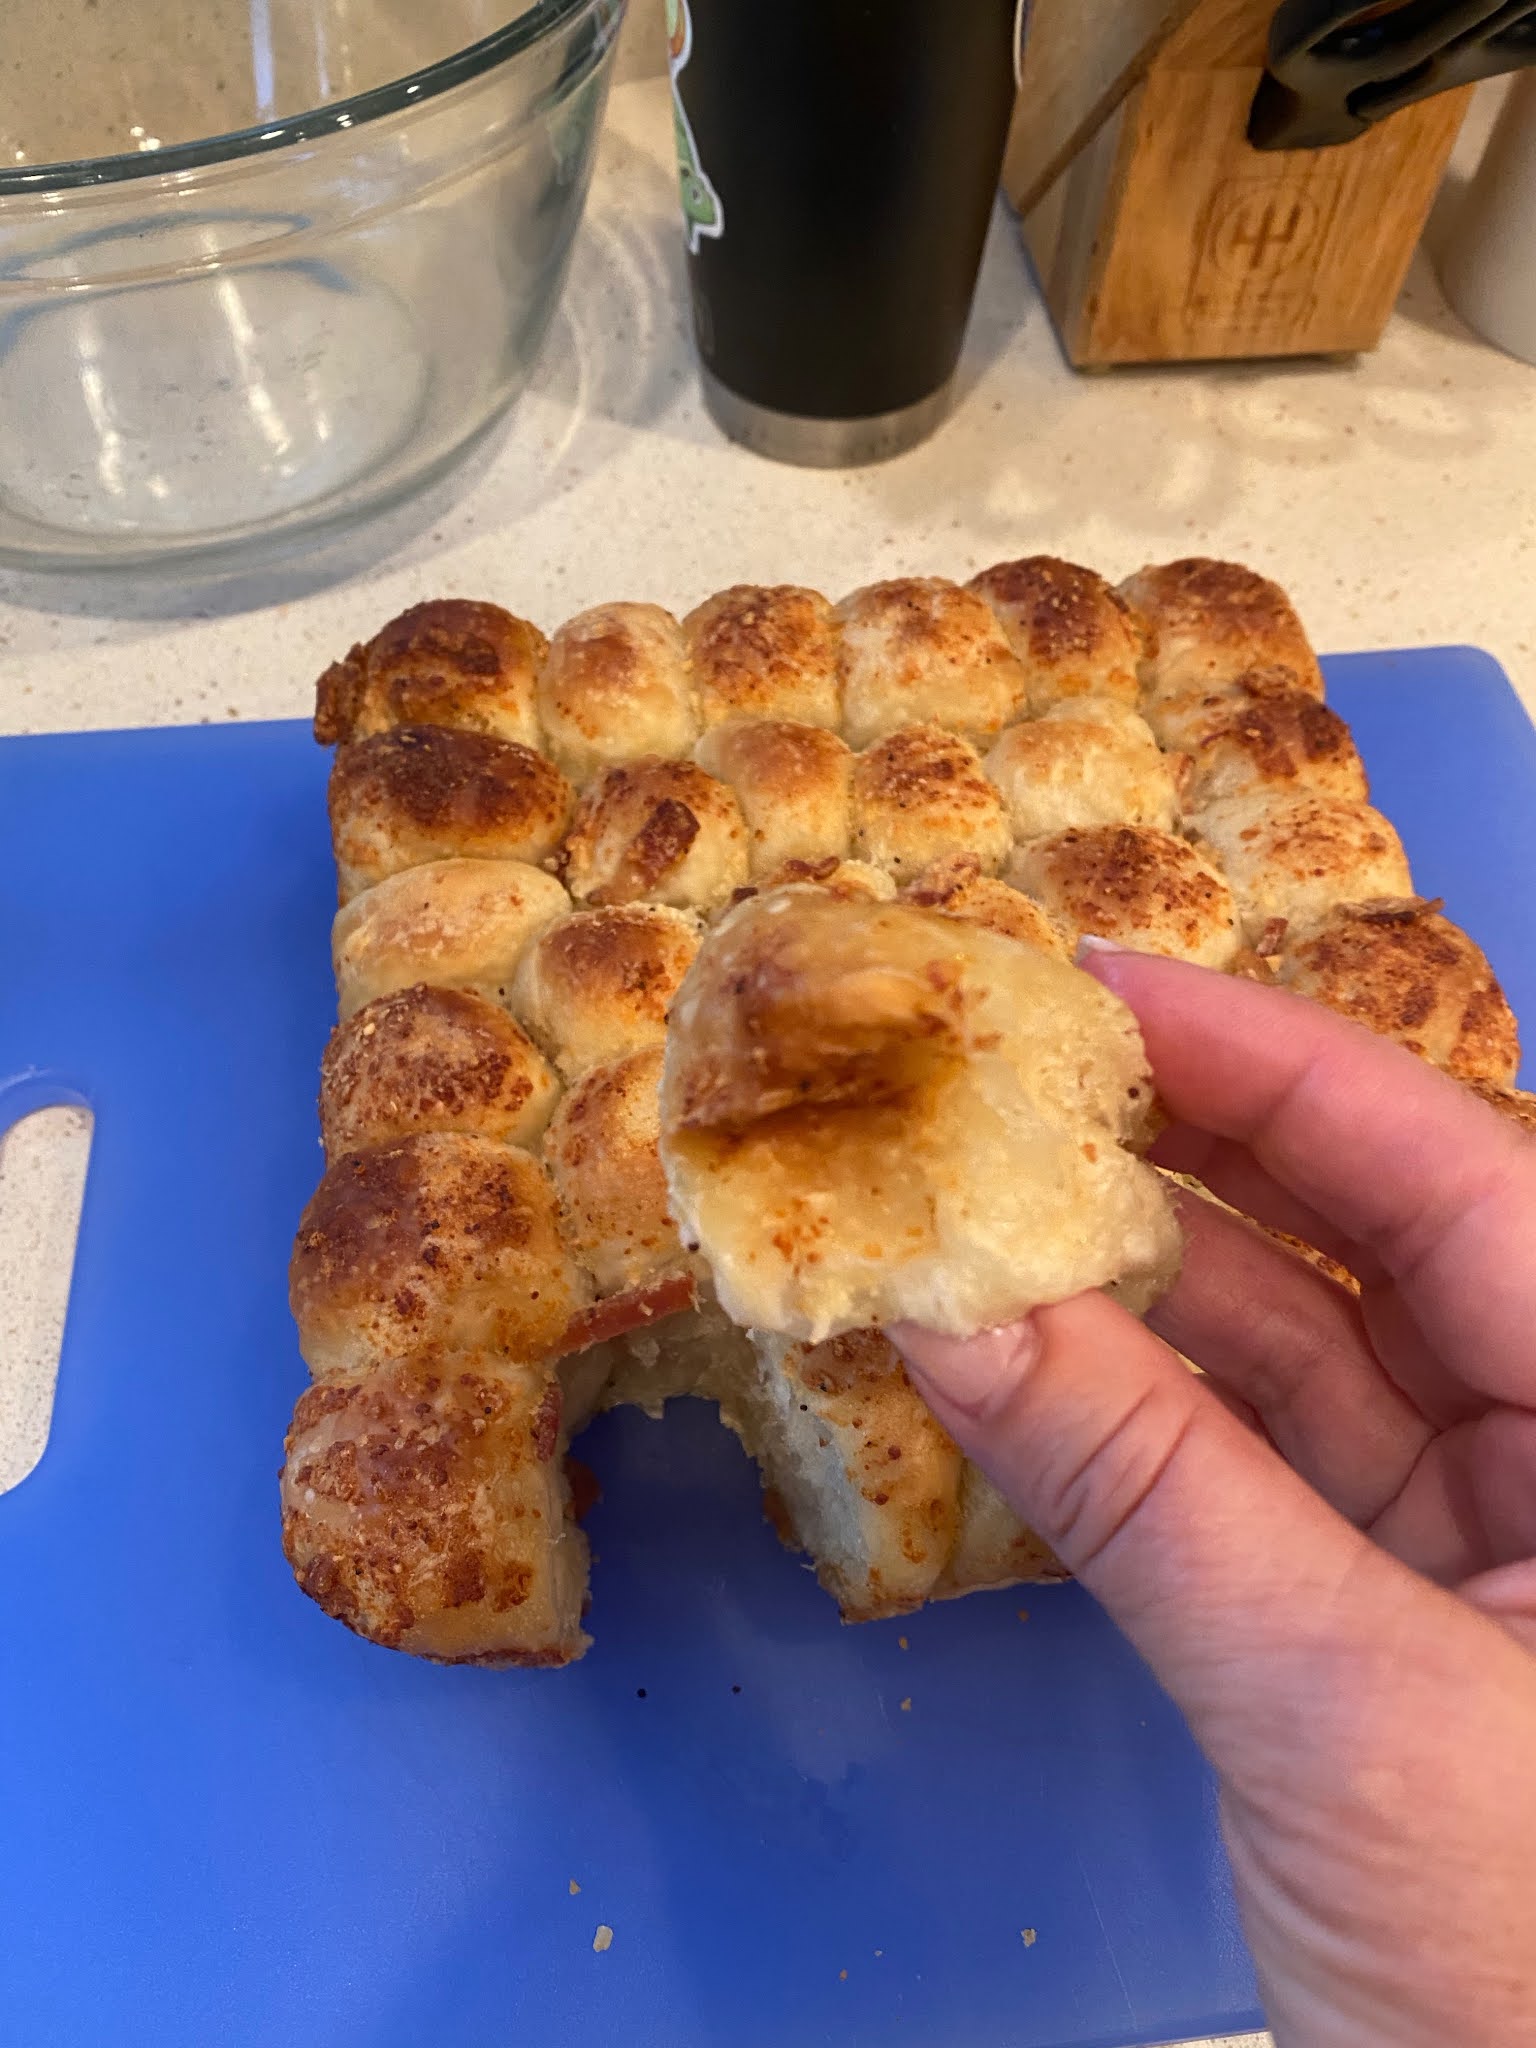
Parmesan Bubble Bread

Here's the recipe for the bread my sis reviewed along with the Italian meatball soup a couple days ago (click for that post). I found half a bag of unbaked frozen rolls while cleaning out the freezer and wondered how to use them up besides just baking Dave and I a batch of random rolls hahaha. Bubble bread came to mind, I've made pull-apart monkey bread in the past but this one is a little different - I didn't really follow a recipe so all amounts are just to your taste or what you have on hand. 

Let the frozen rolls thaw enough to shape them but the dough is still cold. Cut in half and roll in smaller balls. Roll each ball first in melted butter, and then in grated parmesan mixed with chopped cooked bacon, garlic powder, and a little pepper. Place in a baking dish, cover with a kitchen towel; let rise in a warm place until doubled, about an hour. Preheat oven to 350', bake rolls until golden brown about 20-25 minutes. 


Here's her review in case you missed it the other day:

the bread she sent was fantastic.  I could just eat it .. and eat it.. and eat it. 

Whatever is sprinkled on the top was GREAT.  My only negative comment is that they were in tiny little circles (all stuck together) so I had to break off a piece to eat it. That made me feel bad when I scarfed the first one and took a second.  Like I was eating a second roll.  In my defense the first one was tiny… 

Anyway.. the rolls were yum. 

Friday, October 2, 2020

Popsicle Stick Frankenstein

 I was whining to B about her being all grown up and now I don't have anyone to make kid crafts for me - and she nicely whipped up this cutie Frankenstein :) Here's what she did in her words:


hey guys! so today i made this super cute Frankenstein for halloween out of popsicle sticks! first i took 7 popsicle sticks and colored them all green. then i flipped them all over and took another popsicle stick that i colored black and put it a little bit lower than half way and glued it on. then i let that dry and after i did that i glued 2 white sequins for the eyes and drew on the rest of his face with a sharpie!