Here's a very easy way to decorate a pumpkin (and an artificial Dollar store one to boot, that means I'll be able to keep it for next year!) - paint it a color using basic craft paint and a sponge brush (I did black because I still had some leftover from painting the pumpkin pail and the flamingo, I like to put paint on a paper plate and then can store it and the wet brush in a big gallon bag until I'm done with it); after the paint dries spread on white glue using a small clean paintbrush - I did about a quarter of the pumpkin at a time - and dump sequins on the wet glue. Literally, I just took a handful and threw them into the glue! Using the end of the paintbrush I spread the sequins around if they were overlapping too much, but I didn't really "place" them - just pretty much let 'em go where they go. Then give it a good sprinkle with glitter to fill in the gaps. Let it dry. I love how this turned out - it's really pretty in person!Welcome to day camp - it's either a place for you to get inspired and want to make stuff, or a place where I can show off the cute things I've made since my family is tired of my texting them pictures every day! Just like camp I do all kinds of fun projects - crafts, DIY, bake, cook, garden and more - and can't wait to share them with anyone looking for ideas.
Showing posts with label dollar store craft. Show all posts
Monday, October 15, 2018
Sequin Pumpkin
Here's a very easy way to decorate a pumpkin (and an artificial Dollar store one to boot, that means I'll be able to keep it for next year!) - paint it a color using basic craft paint and a sponge brush (I did black because I still had some leftover from painting the pumpkin pail and the flamingo, I like to put paint on a paper plate and then can store it and the wet brush in a big gallon bag until I'm done with it); after the paint dries spread on white glue using a small clean paintbrush - I did about a quarter of the pumpkin at a time - and dump sequins on the wet glue. Literally, I just took a handful and threw them into the glue! Using the end of the paintbrush I spread the sequins around if they were overlapping too much, but I didn't really "place" them - just pretty much let 'em go where they go. Then give it a good sprinkle with glitter to fill in the gaps. Let it dry. I love how this turned out - it's really pretty in person!Saturday, October 6, 2018
Skeleton Pumpkin Man
Pop the head, arms, and legs off the body of a $1 plastic skeleton and attach to a $1 craft pumpkin and you have an inexpensive funny "creepy" Halloween decoration - I would say perfect for the kiddos to make but I have the biggest blister on the tip of my finger from hot gluing this thing in place so I'm a little hesitant right now to advise you that it's a kid craft! Seriously I haven't had a glue gun burn this bad in a long long time. I'd show you a picture but you might be reading this while eating your lunch and I'm not going to be responsible for you being too grossed out to eat. Trust me on this one.
Anyway - I'm not sure what exactly this is supposed to be hahahaha, for whatever reason a skeleton has wrapped himself around a cutie google-eyed little pumpkin...I was playing around and this just looked good to me. Change yours up accordingly!
The skeleton head fit right over the stem of the pumpkin, just glue in place. Attach two big googly eyes, then adjust the arms so they fit in front of the face like the arms are trying to wrap around it. I used a piece of invisible fishing line to hold the hands in place - I burned myself trying to glue the arms in the front so just went with the fishing line instead! Glue the legs in place and add some plastic spiders here and there...or don't...whatever you like :)
10.6.2017 Ronda makes a Halloween Treat Box
10.6.2016 Dog on the blog - sweet potato dog cookies
10.6.2015 Make a spooky terrarium
The skeleton head fit right over the stem of the pumpkin, just glue in place. Attach two big googly eyes, then adjust the arms so they fit in front of the face like the arms are trying to wrap around it. I used a piece of invisible fishing line to hold the hands in place - I burned myself trying to glue the arms in the front so just went with the fishing line instead! Glue the legs in place and add some plastic spiders here and there...or don't...whatever you like :)
10.6.2017 Ronda makes a Halloween Treat Box
10.6.2016 Dog on the blog - sweet potato dog cookies
10.6.2015 Make a spooky terrarium
Thursday, October 4, 2018
Skeleton Hand Wreath
For my first attempt I cut strips of the black creepy cloth and wound it around the form - after glueing the hands on tho I realized the material is too stretchy and didn't hold the hands tight enough against the wreath form. So I ripped it all off and started over - that was a waste of 50 cents of "creepy cloth"! Second try worked...rip strips of whatever material (I used leftover lightweight cotton, you don't see much of it so it doesn't really matter - just pick something that either matches or just goes away...) and wind them around the wreath base to cover the styrofoam (note: hot glue doesn't stick very good to styrofoam). Tuck in the last end or stick a pin in it to hold. Oh, and I made a hanging loop from a pipe cleaner tied onto the styrofoam wreath base before winding the material on.
![]() |
| twist a pipe cleaner around the wreath base for a hanging loop. |
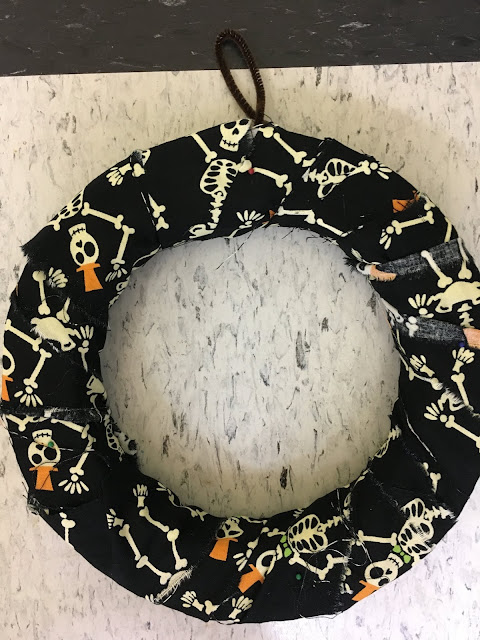
![]() |
| wrap the entire wreath with lightweight material to cover the foam. |
Arrange the hands on the wreath so you have them evenly spaced, and then hot glue the heck out of them. Note: it takes a LOT of hot glue!
I made another one of these for my sister but instead of attaching black net across the center I found this plastic plate at the grocery store that is 8.5 inches and fits perfectly! I just hot glued it to the back of the wreath after wrapping it with material strips, making sure the face is centered before gluing it down. So cool, I debated keeping this for myself but it looks like something she'll like so I'm giving it up...
![]() |
| tip: make a small cut in the end of the material and rip it, you'll get straight strips and don't need to cut the entire length of the fabric. plus it's fun to do :) |
10.4.2016: photo coasters
10.4.2015: pumpkin bisque
Labels:
blog,
crafts,
dollar store craft,
front door wreath,
halloween,
halloween decor,
jill pasant,
makemydaycamp,
seasonal display,
seasonal wreath,
skeleton hands,
skeleton wreath,
styrofoam wreath
Tuesday, October 2, 2018
Baggie Wreath
Michelle, did you think I forgot this idea you gave me (along with the baggies)? Well I didn't - it just took me this long to finally make it!!! Thanks again, I love how it turned out. Initially I was going to make this for December/January - it's going to be so pretty with ornaments or snowflakes attached, but it's got a little "ghosty" feel to it and I think it's also great for Halloween. You'll definitely be seeing this a couple months from now changed up for winter!
This is a very easy project, and inexpensive - it's just 2 boxes of dollar store fold-over sandwich baggies and a wire coat hanger. No other supplies at all - not even scissors or glue. And as long as your littles can tie, this is a great kid craft too.
Bend a coat hanger into a circle, and bend the hook down a bit to form a loop for hanging. Then get to tying the baggies on...I started by folding the baggies into orderly little rectangles but realized it totally doesn't matter - just wrap a baggie around the wire and tie on. Keep going until you can't fit one more baggie and you're done. Decorate however you want - I did a Dollar Store bow and cutie spider.
Ronda was with us when Michelle was telling me how to make this, and she said "oh Jill is going to love this, she loves making crap out of random things" hahahahah. Yep, I do actually ;)
one year ago: Jen's caramel apple pudding shots
two years ago: vegetable soup
three years ago: how to make "bloody" candles
This is a very easy project, and inexpensive - it's just 2 boxes of dollar store fold-over sandwich baggies and a wire coat hanger. No other supplies at all - not even scissors or glue. And as long as your littles can tie, this is a great kid craft too.
Bend a coat hanger into a circle, and bend the hook down a bit to form a loop for hanging. Then get to tying the baggies on...I started by folding the baggies into orderly little rectangles but realized it totally doesn't matter - just wrap a baggie around the wire and tie on. Keep going until you can't fit one more baggie and you're done. Decorate however you want - I did a Dollar Store bow and cutie spider.
![]() |
| a regular wire hanger made a 12" circle |
![]() |
| don't know if it matters, but I alternated turning the bags up and down when tying them on. |
Ronda was with us when Michelle was telling me how to make this, and she said "oh Jill is going to love this, she loves making crap out of random things" hahahahah. Yep, I do actually ;)
one year ago: Jen's caramel apple pudding shots
two years ago: vegetable soup
three years ago: how to make "bloody" candles

Wednesday, March 28, 2018
Spring Flower Hanging Wreath
I'm loving this upside down wreath I made to hang from our chandelier - yes, it's a lot going on since the chandelier is solid shells... but I like it. I made it out of dollar store finds so it only cost 7 bucks, you could spend less by not buying as many flowers and/or skipping the garland, and you could make a simple wire ring instead of using a pre-made wreath form.
For my base I saw a plastic and tinsel bunny hanging thing, I only wanted the bigger circle so I just snipped off the top and used the body. Using little wire cutters, I snipped off the flowers and stems from the bouquet base and bent the ends to create little hooks. Before attaching the flowers I needed to hang the thing up so I could build the wreath - using white twine I ran it around the outside edges 4 times to make a hanger, then hung it from a cabinet knob so I could add the flowers. Then working from underneath, push the little hooked ends up thru the tinsel and hook on one of the plastic rings that form the wreath. Fit as many as you want - I made some short, some long, and tried to stagger the different colors thruout the wreath. Once you have it how you want, attach to the bottom of your chandelier using more twine. To finish it I just wrapped a piece of 4' garland around the top part.
Supplies:
For my base I saw a plastic and tinsel bunny hanging thing, I only wanted the bigger circle so I just snipped off the top and used the body. Using little wire cutters, I snipped off the flowers and stems from the bouquet base and bent the ends to create little hooks. Before attaching the flowers I needed to hang the thing up so I could build the wreath - using white twine I ran it around the outside edges 4 times to make a hanger, then hung it from a cabinet knob so I could add the flowers. Then working from underneath, push the little hooked ends up thru the tinsel and hook on one of the plastic rings that form the wreath. Fit as many as you want - I made some short, some long, and tried to stagger the different colors thruout the wreath. Once you have it how you want, attach to the bottom of your chandelier using more twine. To finish it I just wrapped a piece of 4' garland around the top part.
Supplies:
- wreath base (if it isn't covered already you'll want to wrap it with something - rope, yarn, garland, tinsel, etc.)
- 5 flower bouquets (each bouquet had 6 flowers in it, except for one of them that I didn't check before buying it and it was missing a flower!)
- little wire snippers or strong scissors to cut the flowers off the bouquet.
- twine to hang the wreath.
- garland to finish (not really necessary but I had it so I used it).
My dining room table is covered with junk so I didn't take a picture from a distance - hope you can tell how pretty this turned out without a photo from farther away!
Friday, August 12, 2016
Candy Bouquet
Brooke and I made this candy bouquet to take the birthday party last weekend (see here for the desserts we made) - it's a pretty easy project and makes a great, fun gift or centerpiece.
I found this flower pot at a dollar store, you want the container to be weighted or else it will tip over when you put the candy in it. I bought a small piece of floral foam that fit in the pot but you can fill it with whatever you can find that will hold the candy in place. Next time I will tape the foam down (criss cross tape across the top of foam and stick to the edge of the container), when I started adding the candy the foam wanted to pop out - I just kept shoving it back in and eventually it held. Cut up small squares (maybe 4" or so, does not have to be perfect cuz you're scrunching them up) of tissue paper, I sort of folded them and bunched them up so they are ruffly, and attach them to the foam around the edge of the pot. Note: I burned my finger bad doing this so be careful! I still have a blister on the whole top of my index finger - my advice is to use a skewer or something other than your finger to press the tissue squares in place!
Next attach the candy to bamboo skewers with clear packing tape - note for the rolos we just stuck individual ones onto the tip of the skewer. Place the largest candy in first - this is just like if you're flower arranging, put in the green cover that covers the foam, add the eye-catching large blooms, then the medium flowers, and last fill in with the small filler - followed by the medium sized candy in wrappers and lastly I filled in with the shooty rolos. Isn't it cute?
Monday, May 16, 2016
Crochet a Dish Scrubby
I found a package of polypropylene twine in the hardware section at a dollar store, I didn't know what I was going to make with it but figured I'd find something...with the yellow I made this scrubby and with the other two colors (blue and green) I made a hanging fruit basket for the Turtle (RV). Click here to see that post. For the scrubby I used this pattern (but didn't do the whole cutting net into strips and tie together part - I just used the twine), it crocheted up quickly and I used it all the way across the country on our road trip is exactly what I wanted it to be.
![]() |
| taking photos while riding in the back of the rv is difficult, it's super bumpy back there! I know this isn't the best scrubby picture I could have taken, but you get the idea! |
Monday, May 2, 2016
Dipped Candles
Saw this idea for these pretty dipped candles online and went right out to the dollar store to get some supplies to make them.
I bought 4 small white pillar candles (2.5"x 2.8") and a box of cheap crayons (I have a thing about my giant crayon box, ask Brooke - no way I'm breaking up my pristine crayons to make this, HA!); the other supplies needed are a paper plate, plastic fork, and a clean empty aluminum can that is bigger around than the candle. I used a regular size can out of the recycle bin and it's 3" across. Note: I melted and colored one of the candles to dip the other 3 into (and had some melted wax leftover, see below).
Put an inch or two of water in a saucepan, set the can in the pan of water, then put one of the candles (take off any packaging first) in the can. Turn the stove on low heat and wait for the candle to melt, stirring occasionally with the fork, it took about 15 minutes. Fish out the wick - I reused it in an empty candle jar that I've been saving and will fill with any left over melted wax after I'm done dipping. Then add a piece of broken crayon in whatever color you want, I used about an inch of aqua and an inch of green to get this color. Maybe it's because I was using cheap crayons but the color was not very saturated - and I had already put the crayons away in my craft room all the way downstairs and was too lazy to go get more to add to the melted wax to see about getting a deeper color!
Once the wax and crayons are melted, slowly dip one of the candles (remove the packaging and sticker from the bottom first) into the can as far down as you want the color. The first coat was very light, so I continued dipping a few times until I reached the color I wanted. Set them on a paper plate to dry. Best thing is the clean up, there really wasn't any! Toss the can, fork, and paper plate - yay, I love crafts that aren't hard to clean up hahah!
-here is the melted wax and crayon in the empty can in a pan of water:
-pour any leftover candle wax into an empty candleholder, I reused the wick from the melted candle:
Put an inch or two of water in a saucepan, set the can in the pan of water, then put one of the candles (take off any packaging first) in the can. Turn the stove on low heat and wait for the candle to melt, stirring occasionally with the fork, it took about 15 minutes. Fish out the wick - I reused it in an empty candle jar that I've been saving and will fill with any left over melted wax after I'm done dipping. Then add a piece of broken crayon in whatever color you want, I used about an inch of aqua and an inch of green to get this color. Maybe it's because I was using cheap crayons but the color was not very saturated - and I had already put the crayons away in my craft room all the way downstairs and was too lazy to go get more to add to the melted wax to see about getting a deeper color!
Once the wax and crayons are melted, slowly dip one of the candles (remove the packaging and sticker from the bottom first) into the can as far down as you want the color. The first coat was very light, so I continued dipping a few times until I reached the color I wanted. Set them on a paper plate to dry. Best thing is the clean up, there really wasn't any! Toss the can, fork, and paper plate - yay, I love crafts that aren't hard to clean up hahah!
-here is the melted wax and crayon in the empty can in a pan of water:
-holding onto the wick, slowly dip a candle into the can making sure to stop before the color reaches the top of the candle (or can):
-this is two coats, continue dipping until you get the color you want:
Friday, April 29, 2016
Picture Frame with Clip
Super simple decorating idea - I took a dollar store frame, put a piece of scrapbook paper inside, and hot glued a clip to the front of the glass. Now I can change out the picture so easily, although this is such a cute picture of handsome Sarge (my neighbor took this picture and really captured his serious little expression) that I probably won't change it any time soon haha ;)Couple problems: initially I was going to paint the frame a fun color and fill it with bright paper, but the paint I was using wouldn't stick - I could wipe it right back off without any staying on the frame! So yeah, that was a fail. I just found a piece of paper that matched the frame instead.
![]() |
| painting the frame didn't work... |
![]() |
| ...and neither did using e-6000! |
The second problem was gluing the clip on with E6000, maybe I didn't let it set long enough but I couldn't get that to hold... I hot glued it instead and that worked immediately. So if you get a frame that you can use without painting and just hot glue the clip on in the first place (see, I saved you some time) then this is like a 2 minute project. And it's cute!
The clip I had on hand was also a tack, I just removed the tack part with a pair of pliers - it came off with no effort at all.
![]() |
| removing the tack from the back of the frame |
![]() |
| I measured where the center of glass is to get it right in the middle, normally I would have just eyeballed it though! |
Subscribe to:
Posts (Atom)


