Wednesday, May 8, 2019

Beef Enchiladas...by Jenny


So I don’t know why my sister wants me to blog things.  I’m guessing so she can mock me but whatever. 
I told her clearly I have nothing to blog.  I cook nothing good, I craft nothing exciting. So if she REALLY wants my blogging then here it is. 
The Husbands favorite meal.  Ok well his favorite meal that isn’t King Crab Legs. LOL.
This is NOT exciting but is actually delicious.  Super super easy and delicious.  Oh and 4 ingredients.


  • 1 lb Beef
  • 2 cans Enchilada Sauce (1 medium and one mild is the perfect mix)
  • 1 bag of flour tortillas
  • 1 bag any kind of cheese (I like Colby/Jack)


I do add more ingredients for mine and the kids.  We like refried beans in ours.  Crazy easy and super delicious.

Brown and drain the beef.  Mix in ½ the enchilada sauce.  Mix in 1 cup of cheese. Fill each tortilla and roll seam side down.  Cover with the rest of enchilada sauce and the rest of the cheese.
Bake uncovered at 350 for 25 minutes or until hot. 


I try to pretend I’m healthy by adding a pile of lettuce, light sour cream and jalepenos to the top.  Oh and I slip him 90% fat free beef and carb smart tortilla’s.  He hasn’t caught on to that yet or he will automatically proclaim that he can taste the difference.  Which he can’t.  Lucky for me I’m doubting he reads my sisters blog so he will have no idea.


5.8.18: tip: watch battery 
5.8.17: tip: organize salad dressing

Tuesday, May 7, 2019

Tip-sy Tuesday: Vanilla

Did you know that the cap on a vanilla extract bottle equals 1 teaspoon? Yep - so if your recipe calls for 1 teaspoon you don't need to use a measuring spoon, just pour it into the cap. Wonder if they did that on purpose, or if it's just a smart fluke?


I haven't made my own vanilla extract yet but it's on my list of things-to-do - I'll follow Ina Garten's instructions, which is basically to steep vanilla beans in vodka for a month. But I'll need to find bottles that have 1 teaspoon capacity lids!

5.7.18: adorable hedgehug cards
5.7.17: coconut curry sauce


Happy moment ~ fresh new green leaves

Monday, May 6, 2019

Tiny Macrame Plant Hangers


I made a few of these tiny macrame plant hangers for gifts, they come together super fast and are very easy to make. It's just tying a few knots, not much skill needed!


Cut 8 pieces of jute, twine, cord, or yarn twice as long as you want the hanger - I cut mine about 26" long. Put all 8 strands thru a keyring (or whatever you want to hang the planter), place the keyring at the halfway point and tie it in place. I did a wrapped knot (click for directions) under the keyring, you can also just do a regular knot. You now have 16 strings to work with. Sort the strings into 8 groups.


I find it helps to attach the keyring to my craft mat so it doesn't move around while I'm tying the knots. Holding one group of 2 strands, make a knot about 6" down from the keyring, repeat with the other groups of 2 making the the knots the same distance from the top. Here's a little tip that makes that easier - make a loose knot approximately where you want it, put a thick needle or a skewer in the knot and place the point of the needle on a ruler before pulling the knot tight. The needle helps guide the knot to the exact place you want it.


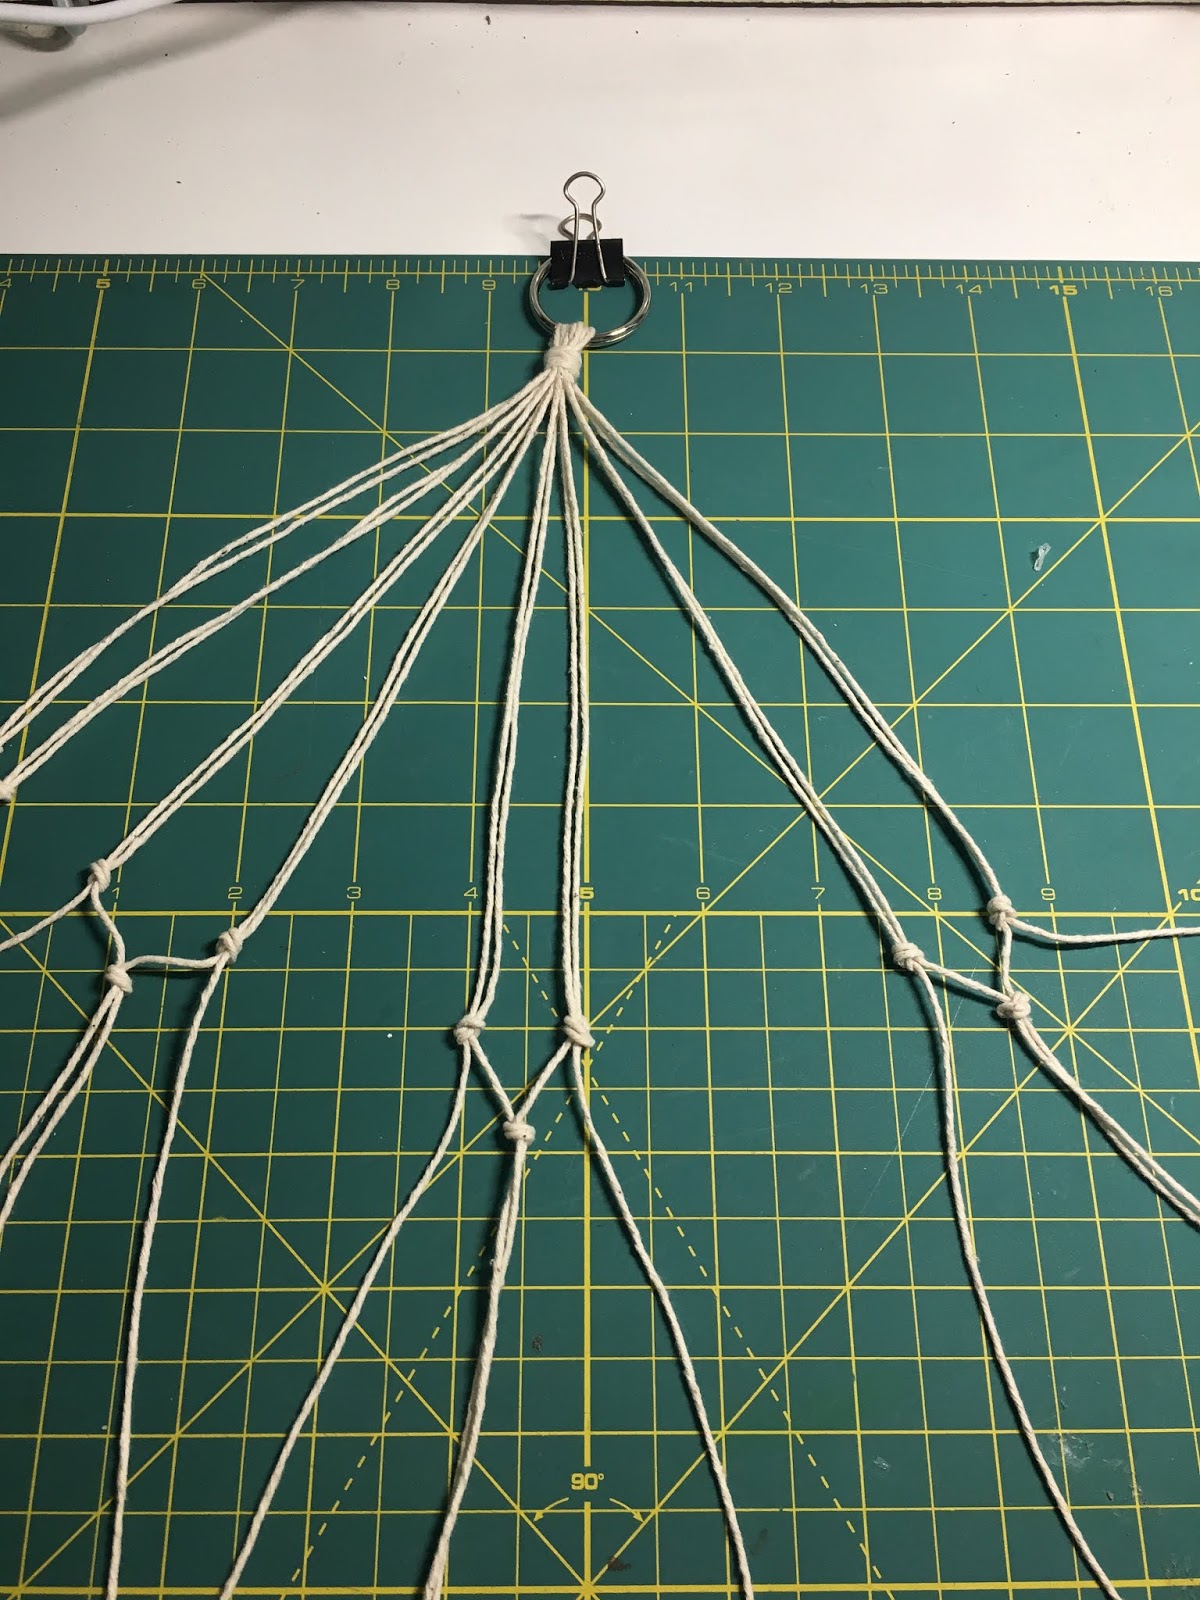
Once you've made the first row of knots take one strand from 2 groups that are next to each other and tie them together using the same technique about an inch below the first row - can you see from the next picture what I mean? It's basic macrame, if you can't figure out what I'm saying just google for better directions! Continue until you have a second row of 8 knots. Repeat for a third row.


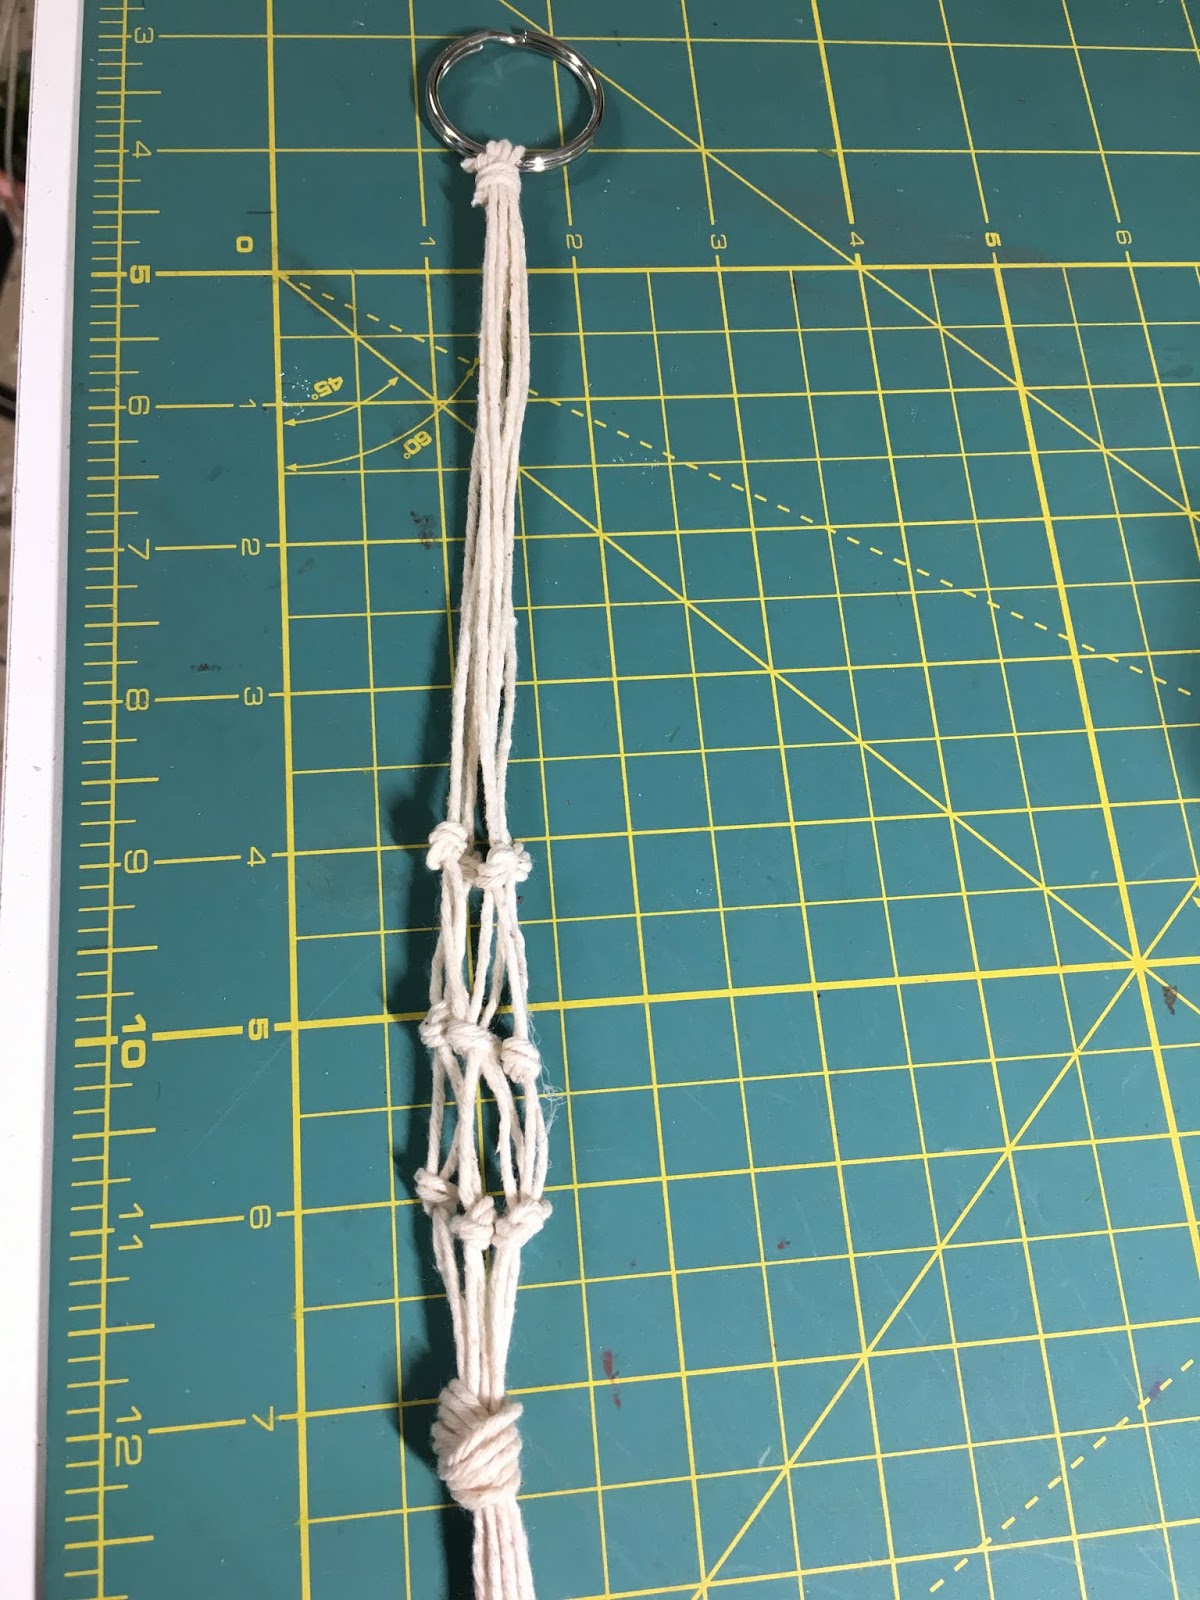
You now have a circle of strands that are somewhat like mesh. Insert the planter into the center of the knotted mesh before tying off the bottom - where you tie the bottom knot that holds the planter in place will vary depending on the size of the planter. I made a small one for this pretty little china cup, for 1.5 inch and 3 inch terra-cotta pots.


Trim the hanging strands under the planter however long you like. I did some a couple inches long, and left others very long.


To finish,  I glued fun little trims on my pots and filled some with artificial succulents and some with real.


5.6.18: polenta with spinach and beans
5.6.17: Mickey and Kyle's cute zucchini planter

Happy moment ~ working outside and see these cute lovie-dovies watching my every move


Sunday, May 5, 2019

Around the Campfire 🔥 (week 18)

Dear Campers

Happy Cinco de Mayo (and happy birthday to my dad)! Here's a quick recap of this week of reposts, in case you missed anything the second time around:

Posts ~

4/28: around the campfire (week 17)
4/29: make a cork trivet
4/30: tip-sy Tuesday: pill box travel container
5/1: bake a lemon cake
5/2: layered vegetable bake
5/3: framing and matting tips from Mark
5/4: gift a college survival kit

What's cooking ~
  • Mediterranean Lentil Salad (recipe to follow soon!)
  • grilled chicken, stir-fry veggies with teriyaki sauce, sticky rice
  • steak, caesar salad, roasted baby potatoes
  • tuna "over Nice" (a play on nicoise salad - grilled tuna, hardboiled eggs, capers, green beans, potatoes)
  • grilled pork chops, sweet potato 
  • bbq ribs, sweet kale chopped salad, roasted asparagus 
Other miscellaneous things keeping me busy this week ~
  • read "The Vacationers" by Emma Straub, easy quick summer beach kind of read that I enjoyed. Also read "Why Not Me?" by Mindy Kaling.
  • Forgot to tell you about other books I've recently read:
    • "Our Kind of Cruelty" by Araminta Hall (dark and creepy - I really liked it!) 
    • "House of Secrets" by Train Peterson (not dark or creepy and I really like it!)
    • "Social Creature" by Tara Burton (dark and creepy - really good!) 
  • working on growing a plumeria plant from a cutting we brought back from CA. I'll let you know how that goes (if it goes). I had to dry out the ends, dip in rooting powder, and plant in a mixture of 1/3 potting soil 2/3 perlite until roots form. We'll see...
Hope you have a great week - check back often to see what's going on around here, maybe get an inspiration or two for things you'd like to try...or just to see if I make anything weird this week :)

Sincerely ~


Jill
camp counselor and wanna-be green thumb

Saturday, May 4, 2019

College Survival Kit

originally posted 6/17 ~ these make great graduations gifts:

I have made these in the past for my nieces going off to college - it's a practical, useful, and very easy to make gift. Find a container that has lots of dividers, and fill it up with all those little things that everyone eventually needs but never has.

make my day camp, jill pasant, blog,

I found this double-sided case at Hobby Lobby but usually I use one of the clear plastic holders like the kind that were originally meant for organizing embroidery thread and has customizable dividers.

Hit up the dollar store, grocery store, drug store, or even look around your house for (unused!) things that a college kid might need (and not even know they are going to need!). You can find most everything in mini travel sizes now which makes putting this together so easy.


Have fun thinking of things to put in the survival kit - some ideas:

  • gift cards for (emergency) fast food - pizza, subs, Taco Bell, Starbucks
  • cotton balls and q-tips
  • small sewing kit with pre-threaded needles in basic colors, a couple buttons, safety pins
  • tiny stapler, paper clips, rubber bands, sticky notes, tape, krazy glue, a sharpie pen
  • phone cord
  • tylenol, airborne, throat lozenges, rolaids, neosporin, bandaids, chapstick, sunscreen
  • lysol, tide stick, lint roller
  • hair ties, nail clippers, tweezers, nail file
  • tiny toothpaste, mouthwash, floss sticks
  • batteries, matches and a tea light
  • gum, package of fruit snacks, package of almonds 

I found the "college survival kit" printable here and taped one on each side. Just 'cuz it's cute.


I wrapped it in tissue paper and made one of my favorite tissue flower bows for the top (click here to see how to make them!)

Friday, May 3, 2019

Framing and Matting Photos


Mark from Paul's Photo gave us a few tips and tricks for framing and matting photos back in 3/2017, they are so useful I wanted to share again (I've combined and changed a couple of posts into one handy update) ~


My favorite tip that makes so much sense is to only buy black or white frames in standard sizes - you do not have to match the frames and mats to your wall color, or furniture, or style! Most photos will look good in either black or white, and limiting your color palette keeps things simple and cohesive. 

There are so many customized shapes and sizes to mat and frame your pictures if you go to a frame store, but if you stick with standard sizes (8x10, 11x14, 16x20, etc.) you only have to buy your frames once - when you want to change the picture you only need to get a new mat that fits your new photo and pop it into your existing frame. That'll save tons of money and is such a great idea that never occurred to me - every time I want to put a new picture up I go get a new frame! 

Another great tip is to hinge mat your photos - hinge matting is just taping the 2 mat boards together along the top edge only, and instead of taping all 4 sides of the photo to the mat (which is how I've always done it), you only need to tape the top edge and let gravity do the rest. 


  • Print your picture. For this demonstration Mark printed his picture on 13"x19" paper, and is using an archival quality no-acid white mat that is 16"x20" overall with a 12"x18" opening. In this case his photo is 1" larger that the opening in the mat so only 1" of the photo's border will be covered - when printing your photo you need to figure out what size photo you'll need that fits the mat and frame. For example - if I have an 8x10 frame I probably wouldn't want to print the picture 8x10 or the mat might cover too much of the photo. The exception I guess would be if the image on the 8x10 photo is small and in the center, so my 8x10 mat opening would not be covering the image. Make sense? 


  • When choosing the mat - since you've chosen standard size frames it's easy to find mats that fit - your biggest decision is how wide you want the opening or window of the mat to be based on how much of the photo you want covered.  
  • Mats come in two pieces - the top window piece has the opening where your photo will show and the bottom is solid, the photo goes between them like a sandwich. To create the hinge mat, lay the top mat on your picture and pick them both up together. Hold them up towards a bright light source so you are looking thru the back of the picture, this way you can easily see where the picture should go in the mat. Get it exactly where you want it, carefully lay them down on a surface and tape the top edge of the picture to the mat using blue painters tape (or archival linen hinging tape if you are hanging in a gallery or long term).

hold the photo and top piece of mat towards
a bright light to help you see where the photo
should go in the mat

lay them down on your work surface making
sure to keep the photo exactly where you want
it in the mat, tape the top of the photo to the mat

  • Lay the mat backing board next to the top mat, lining up the edges. Tape the two boards together at the top only creating a hinged mat, the window mat and picture in the front with the solid mat backing board sandwiching the picture. Because you've only taped the top edge of the picture gravity is allowing it to hang flat without buckling like it tends to do if you tape all of the edges.
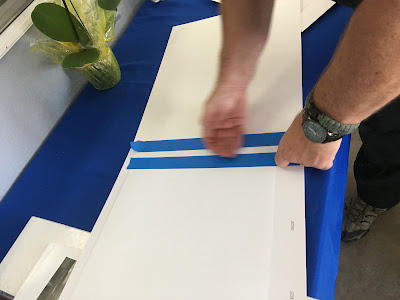
tape the top edges of the mats together (on the wrong side)


Now you're ready to put it in your frame - easy!

Choosing what color mat to buy is just like with the frames - Mark recommends sticking with black or white. Once again, he says not to match the mat to your room, or your furniture (or your hair...funny guy), that simple white or black goes with everything, coordinates with everything, will make your photo stand out, and that the simple act of matting your photo will make it look so much better!

These cool tips come to you from Mark Comon at Paul's Photo (remember when I took the creative photo classes? Click here to see one of those posts) - check them out online and get inspired with tons of ideas or classes! These are super creative and helpful people - thanks for the blog post Mark! paulsphoto.com, creativephotoacademy.com

He made a short video on how to create the hinged mat - click here to watch him in action.

Thursday, May 2, 2019

Provencal Vegetable Bake

Originally posted 11/8/15:


Layers of sliced summer squash, potatoes and tomatoes over a bed of white beans, topped with crumbled cheese - I found this recipe in an old Family Circle (click for recipe) magazine and it's really good. I do it a little differently from the original recipe omitting the called for eggplant (I don't love eggplant) and onion (my husband doesn't like onion) and I don't think it's missing either of those ingredients - it's very flavorful and pretty! It also calls for herbes de provence which is a mixture of dried herbs that you can make yourself or buy in the spice section at the grocery store (I bought it in a jar and had no problem finding it), if you don't have it or want to buy it I think this would taste just fine without it - add salt and pepper to taste and maybe a sprinkling of any kinds of herbs you happen to have - thyme, rosemary, etc. I served it on the side with grilled chicken - it would taste good with lots of different meats and could also be served alone since it has the beans for a protein. Usually I slice all of these by hand but I'm still learning how to use all the attachments on my food processor so decided to play with the slicing disk and it worked great - saved some time and made everything more uniform for sure. It works just fine slicing by hand tho, don't let that stop you from making this! It's a good one - enjoy!
the magazine shows these arranged in overlapping layers, I stand
 them up alternating veggies and like how it looks...

Ingredients


2 medium sweet onions
3 tablespoons olive oil
3/4 teaspoon salt
2 cloves garlic, chopped
15 ounce cannellini beans, drained and rinsed
2 1/2 teaspoons herbes de Provence
1/4 teaspoon pepper
1 large eggplant (about 1 pound), ends trimmed, halved lengthwise
3 large summer squash (combination of zucchini and yellow squash), ends trimmed
1/2 pound russet potatoes
3 plum tomatoes
4 ounces goat cheese

Directions

  1. 1. Heat oven to 400 degrees . Peel and halve onions; cut into 1/4-inch-thick slices. Heat 1 tablespoon of the oil in a large saute pan over medium heat. Add onions and 1/4 teaspoon of the salt. Cook 8 to 10 minutes or until softened. Add garlic and cook 1 minute. Stir in beans, 1/2 teaspoon of the herbes de Provence and 1/8 teaspoon of the pepper. Pour mixture into bottom of a 9 x 13 oven-safe casserole.
  2. 2. Meanwhile, cut eggplant, squash, potatoes and tomatoes into 1/4-inch thick slices. (To speed things up, use a food processor fitted with a slicing blade or a mandoline.) Toss vegetables with remaining 2 tablespoons olive oil, 1/2 teaspoon salt, 2 teaspoons herbes de Provence and 1/8 teaspoon pepper. Arrange vegetables on top of onion-bean mixture in 1 layer; pack tightly.
  3. 3. Cover dish with aluminum foil and bake at 400 degrees for 45 minutes. Remove foil and crumble goat cheese on top. Bake 15 more minutes. Cool slightly and slice into 4 servings.
Nutrition Information for Provencal Summer Vegetable Bake
Servings Per Recipe: 4
Per Serving: 12 g fiber, 701 mg sodium, 6 g sat. fat, 13 mg chol., 15 g pro., 378 kcal cal., 17 g Fat, total, 45 g carb.

Wednesday, May 1, 2019

Lemon Cake

originally posted 2/16/16 ~


My friend Sheryl brought a slice of this lemon cake to me at work and I loved it SO much she brought a whole loaf over for our super bowl party. I asked her to share the recipe along with any changes or tips she has so I could share it with you guys (well for you guys and also so I'd have it too haha) - and here it is! This is a very lemony cake, I actually think it's more of a lemon quick bread but whatever category you want to put it in it is delicious and if you like lemon I hope you'll try this! Promise, it's really really good.

It's an Ina Garten/Barefoot Contessa recipe on Food Network - you can always trust Ina! (click here for the original source)

Ingredients:

  • 1/2 pound (2 sticks) unsalted butter, at room temperature
  • 2 1/2 cups granulated sugar, divided (that means you don't use it all at once)
  • 4 extra-large eggs, at room temperature
  • 1/3 cup grated lemon zest (6 to 8 large lemons)
  • 3 cups flour
  • 1/2 teaspoon baking powder
  • 1/2 teaspoon baking soda
  • 1 teaspoon salt
  • 3/4 cup freshly squeezed lemon juice, divided
  • 3/4 cup buttermilk, at room temperature
  • 1 teaspoon vanilla extract
For the glaze:
  • 2 cups confectioners' sugar, sifted
  • 3 1/2 tablespoons freshly squeezed lemon juice
Directions:


  1. Preheat the oven to 350 degrees F. Grease and flour 2 (8 1/2 by 4 1/4 by 2 1/2-inch) loaf pans. You may also line the bottom with parchment paper, if desired.
  2. Cream the butter and 2 cups granulated sugar in the bowl of an electric mixer fitted with the paddle attachment, until light and fluffy, about 5 minutes. With the mixer on medium speed, add the eggs, 1 at a time, and the lemon zest.
  3. Sift together the flour, baking powder, baking soda, and salt in a bowl. In another bowl, combine 1/4 cup lemon juice, the buttermilk, and vanilla. Add the flour and buttermilk mixtures alternately to the batter, beginning and ending with the flour. Divide the batter evenly between the pans, smooth the tops, and bake for 45 minutes to 1 hour, until a cake tester comes out clean.
  4. Combine 1/2 cup granulated sugar with 1/2 cup lemon juice in a small saucepan and cook over low heat until the sugar dissolves. When the cakes are done, allow to cool for 10 minutes. Remove the cakes from the pans and set them on a rack set over a tray or sheet pan; spoon the lemon syrup over them. Allow the cakes to cool completely.
  5. For the glaze, combine the confectioners' sugar and the lemon juice in a bowl, mixing with a wire whisk until smooth. Pour over the tops of the cakes and allow the glaze to drizzle down the sides.

Sheryl's notes:
-  she uses 2/3 cup each of sugar and lemon juice to make the syrup, noting that she uses Meyer lemons and if you use regular lemons that much syrup might be too sour - so I would leave the recipe alone if you are using regular lemons, increase the amounts if you have milder Meyer lemons.
- she removes the cakes from the pans and sets on a rack covered with aluminum foil to let the cake absorb all the syrup instead of having it run off.
- for the glaze, she decreases the amount of lemon juice to 3T to thicken it a bit.


Ok, now my mouth is watering from thinking about lemons and this cake...enjoy!


Tuesday, April 30, 2019

Pill Box Travel Container

originally posted 11/30/15 (over three years later I still carry this in my backpack and use it all the time; I don't only use it while traveling - it's an every day thing!) ~


I saw this on a camping blog and thought it was a very good idea. We just went on a road trip and I tried it out - much more compact and easier to use than other ways I've tried to organize meds in the past (especially when I would just put them all randomly together in a small baggie haha!).  Each day of the week is holding a different pill (aspirin, tylenol, benedryl, etc.) or vitamin, to remember what's what I put a piece of paper in the bottom of each compartment and wrote the name of the med on the underside. When packing for a short trip I don't need the whole bottle, this way I just have a few in case I need them and they are all organized together in one place. A little mini medicine chest!


Monday, April 29, 2019

Cork Trivet

originally posted 12/3/15:

Looking for a quick/cute/fun/practical gift for a wine lover or cook (or wine loving cook) on your Christmas list? I made this cork trivet today and it turned out great - you should make one!


I was walking thru Home Depot with a friend and spotted this 4" duct clamp -  I remembered seeing a wine cork trivet in a catalog somewhere made with one of these and thought I'd give it a try. The clamp cost less than 2 bucks so figured I wasn't out much if it didn't work...I just so happen to have a bag or two of wine corks on hand (ok, ok, I have like 5 bags of wine corks - whatever...ha!) - if you don't have any you can buy them at a craft store (or maybe a kitchen store?), hit up a friend who collects corks, or ask a restaurant if they have any to give you. 


I cut out two circles, one from cardstock paper (as the base of the trivet under the corks) and one from felt (just so the bottom looked more finished) the same dimension as the clamp.

Arrange wine corks in the clamp, fitting in as many as possible. 


After you have the clamp filled, tighten the screw on the side of the clamp until the corks are very tightly wedged together and don't fall out when you pick the trivet up.


 Turn the corks over and glue first the cardstock and then the felt to the bottom.

There you go - cute wine cork trivet! Easy :)