Wednesday, September 4, 2019

Chocolate Cupcakes with Peanut Butter Cream Cheese Frosting

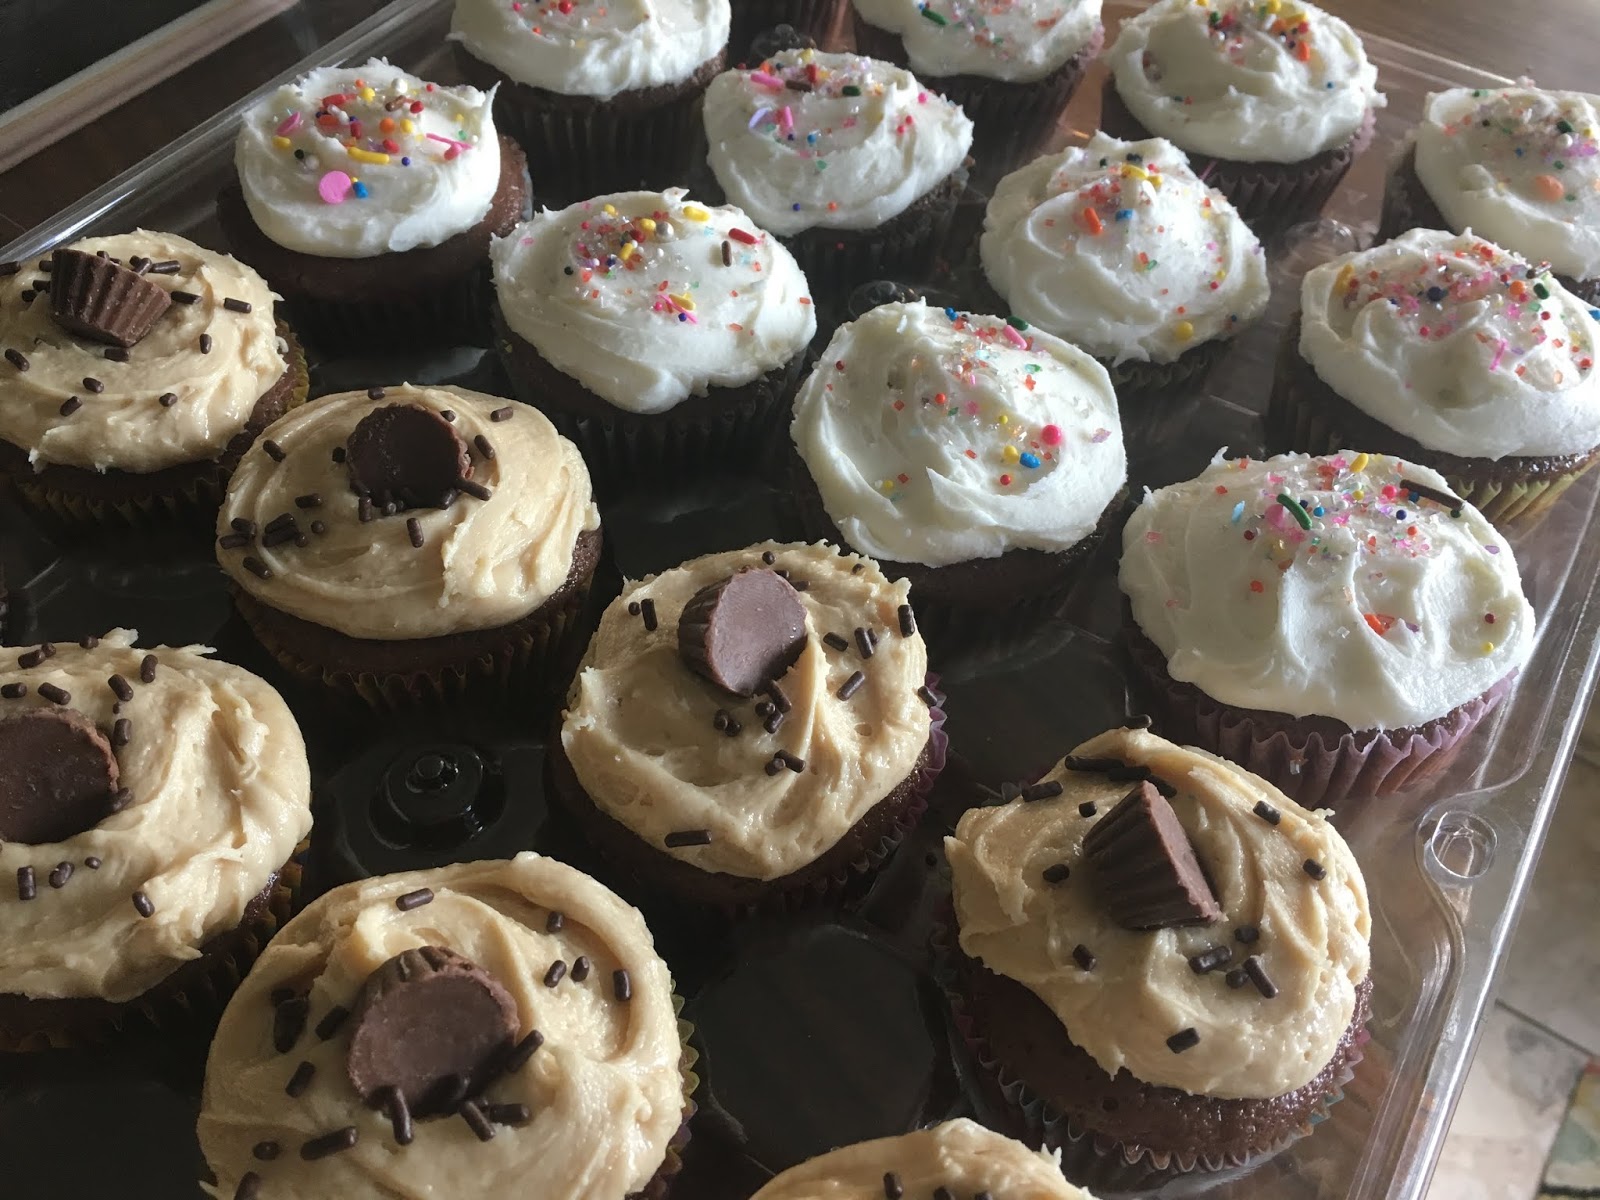
Brooke had a very specific request for her birthday dessert - chocolate cupcakes with peanut butter cream cheese frosting. I've never heard of peanut butter cream cheese frosting but figured I'd wing it - how bad could it be? Actually, it's very very good. Like delicious. Just about the perfect cupcake. I don't know if she thought the idea up herself or saw it somewhere, but turned out to be a great call.


I made 24 chocolate doctored cupcakes (add an additional egg, substitute melted butter for the oil and milk instead of water, add a teaspoon of vanilla, and a scoop of sour cream); for 12 of them I spooned 2 tablespoons of batter into cupcake liners, put a mini reese's peanut butter cup in the center, topped with another tablespoon of batter. For the other 12 I left out the reese's and went with straight chocolate cake.

For the frosting - the 12 plain chocolate cupcakes were frosted with a big scoop of vanilla buttercream frosting (side note: did you see yesterday's tip for clear vanilla? It's the way to go for white frosting); the 12 that have the reese's baked in got frosted with this peanut butter cream cheese frosting, garnished with another reese's mini cup and some chocolate sprinkles. Yum.


Peanut Butter Cream Cheese Frosting:

6 oz. cream cheese, room temperature
1/2 cup smooth peanut butter
3 1/2 cups powdered sugar
1 t. vanilla
2-3 tablespoons whip cream (or milk)
pinch of salt

Beat the cream cheese and peanut butter together until smooth. Add the vanilla and salt. Alternate adding powdered sugar and whip cream (or milk) until you get the correct consistency for spreading.

Note: this frosting was firm when I frosted the cupcakes but after being out for a while in a warm room it got soft and wanted to slide off the cupcakes! Next time I'll keep them chilled until it's time to serve them - not the best choice for sitting out for hours.


Tuesday, September 3, 2019

Tip-sy Tuesday: Clear Vanilla

This is a super quick tip - those are the best tho, right? In case you haven't seen it, and I don't have a picture of the bottle to show you but you'll just have to trust me, clear vanilla is a thing and you want to get some. It keeps white frosting whiter, white cake whiter, use it for anything you're baking that you want to keep as white as possible.

Note: I have no idea if this is considered authentic proper vanilla and if it's frowned upon in the real baking world but I'm telling ya - it tastes the same to me and I've never made whiter frosting! Sweet.

cupcakes for Brooke's birthday - the ones on the right are made with clear vanilla
(I'll post the recipe for the terrific ones on the left tomorrow!)

Monday, September 2, 2019

Happy Labor Day '19


Summer isn't technically behind us for a couple weeks, but I am looking forward to fall so I'm posting this anyway :) Have a great last day of the holiday weekend - I'm off to celebrate Brooke's 16th birthday (will share what dessert she chose with you later this week, think peanut butter!) and then hopefully early to bed, I've been staying up waaaay too late and need to get some sleep hahah!! Bye!

Sunday, September 1, 2019

Around the Campfire 🔥 (week 35)

Dear Campers ~

Here's a quick recap in case you missed anything at camp this week:

Posts~
8/25: 🔥 (week 34)
8/26: giant crepe paper garland
8/27: Tip-sy Tuesday: wrapping paper holder
8/28: giant whoopie pie cake
8/29: spiral pull-apart pizza
8/30: card holder hack
8/31: braised short ribs

What's Cooking ~
  • leftover beef wellington, veggie tots, beet and goat cheese salad
  • Greek shrimp orzo bowls
  • chicken sausage, pasta with Alfredo sauce, caesar salad
  • antipasto pasta (recipe to follow)
  • grilled chicken, arugula and mushroom salad, roasted green beans
Miscellaneous stuff keeping me busy ~
  • read 'The Fallen', #4 of the Amos Decker series by Balducci ⭐️⭐️⭐️ not my favorite.
  • made chocolate chip ice cream sandwiches for Brooke's birthday this weekend; I just baked Tollhouse cookie dough cookies, after they cooled filled with vanilla ice cream and froze. Then put them in individual baggies and tossed in a few sprinkles, taped closed. 
Hope you're having a nice Labor Day weekend - we are camping and the weather is gorgeous here at the lake! See you next week, stop by often to see what's happening at MMDC :)

Sincerely ~


Jill
camp counselor and lake lover

Saturday, August 31, 2019

Braised Short Ribs

Al made these for dinner and we loved them. Dave had leftovers for lunch the next day and said they were even better than the night before! Al didn't love the thyme and rosemary but I didn't think it was too herby-strong and liked the flavor of the 'gravy'. The original recipe is courtesy of Ree Drummond on Food Network, she serves the short ribs over cheese grits which I'm sure is good,  Al made mashed potatoes and it was delicious.

Ingredients:

  • salt and pepper
  • 8 beef short ribs
  • 1/4 cup flour
  • 6 thin slices bacon, diced
  • 2 T. olive oil
  • 3 carrots, diced
  • 2 shallots, finely minced
  • 1 medium onion, diced
  • splash of red wine
  • 4 cups beef broth (enough to almost cover the ribs)
  • 2 sprigs fresh thyme
  • 2 sprigs fresh rosemary
  • cheese grits, regular grits, or mashed potatoes
Directions:

Preheat the oven 325'. Salt and pepper the ribs, then dredge in the flour. Set aside.

In a large Dutch oven, cook the bacon over medium heat until completely crispy and all the fat is rendered. Remove the bacon and set aside. Drain off any excess fat.

Add the olive oil to the pan with the bacon fat* and raise the heat to high. Brown the ribs on all sides, about 45 seconds per side. Remove the ribs and set aside.

Lower the heat to medium. Add the carrots, shallots, and onions to the pan and cook for 2 minutes. Splash in the wine and scrape the bottom of the pan to release all the flavorful bits. Add the broth, 1 teaspoon salt and plenty of black pepper and bring to a boil. Taste and add more salt if needed. Add the ribs to the liqu8id; they should be almost completely submerge3d. Add the thyme and rosemary sprigs (whole) to the liquid. Add the cooked bacon.

Put on a lid and transfer to the oven. Cook until the ribs are fork-tender and falling off the bone, 2 to 2 1/2 hours. Remove the pan from the oven and allow to sit for at least 20 minutes with the lid on before serving. At the last minute, skim the fat off the top of the liquid (you can also refrigerate the mixture, then remove the solid fat from the top).

For each serving, arrange 2 ribs on a bed of grits or potatoes, spooning a little juice over the top.

*note: the directions are a bit confusing regarding the bacon fat - first it says to drain off any excess fat, the next part says add the olive oil to the pan with the bacon fat. I didn't ask Al what he did but my guess is the directions mean that even tho you've drained off excess fat there will still be bacon grease left coating the pan since it doesn't say to wipe the pan out. So you're adding the olive oil to the residual fat leftover in the pan.

8.31.18: farmhouse projects
8.31.17: remoulade sauce
8.31.16: coconut cream filled cupcakes

Friday, August 30, 2019

Card Holder Hack

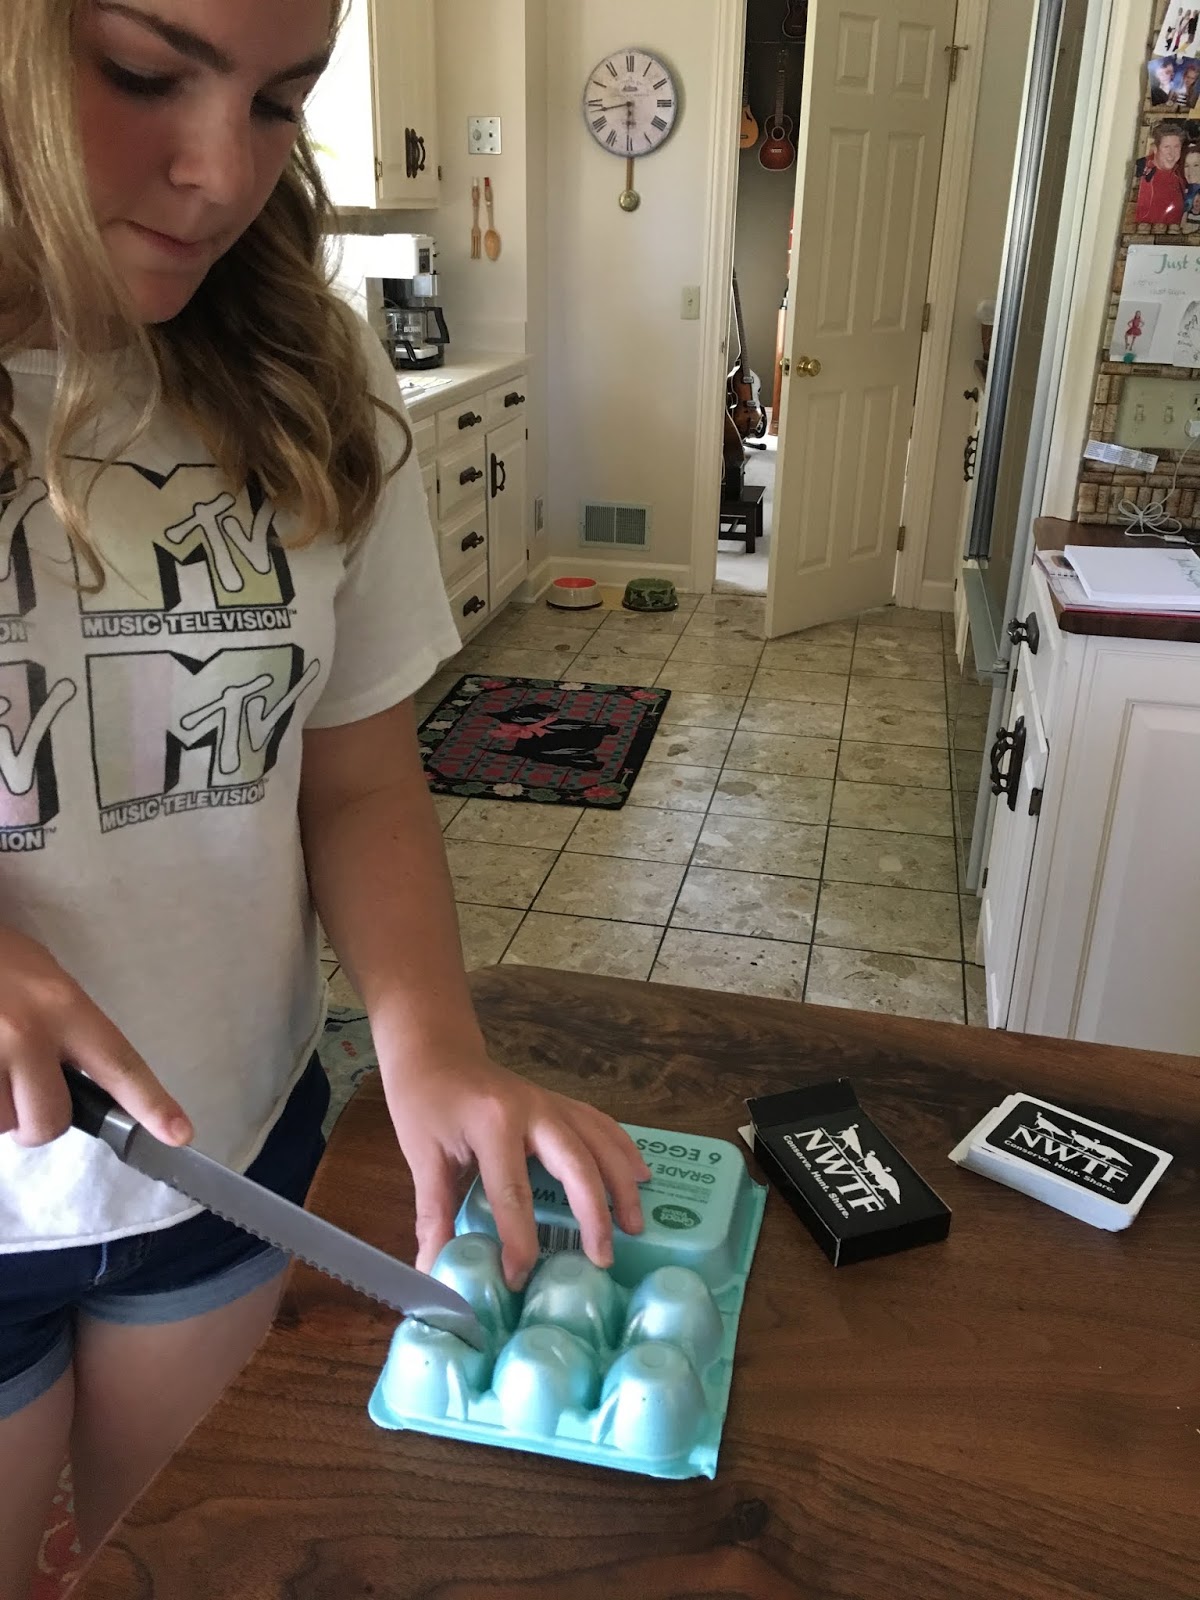
Here's a quick post from Brooke - yes, she did a few blogposts for me again! I've missed her kid friendly crafts :). This idea is super simple but creative and practical - especially for small hands trying to hold multiple playing cards. Simply turn a foam egg crate over and cut a slit in each of the egg holders, then slip a card into each slit. Smart!


Thursday, August 29, 2019

Spiral Pull-Apart Pizza

Shhhhhh...this was supposed to be for "my sis is hungry" review this week...but we ate them instead of giving to her! Don't tell hahahaha!


Really, do you even need the review? What's not to like about rolled-up pull-apart pizza? Nothing, there is nothing not to like LOL. Change up the fillings as you wish - so easy!

  • 1 tube refrigerated pizza dough
  • 1/2 cup pizza sauce
  • 1/2 cup shredded cheese, divided (I used a mozzarella blend)
  • 1 cup fresh baby spinach leaves 
  • chopped turkey pepperoni slices
  • italian spice blend
  • garlic salt
Heat oven to 400'. Unroll dough from tube, spread pizza sauce on top leaving a gap around the edges (don't put sauce all the way to the edges, it'll just squish out when you roll it up). 

Sprinkle with half of cheese and top with pepperoni and spinach. Season with italian spice blend as desired. Roll up, starting with the short end.


Sprinkle some italian spice blend and a little garlic salt in the bottom of a greased pie plate. Cut the rolled up pizza into 8 even pieces, then lay the pieces flat in the pan. Top with remaining cheese. Bake 22-25 minutes until golden brown.

sprinkle some seasoning in the bottom of the pan before adding the dough


Note: I cut both ends off to even up the roll before slicing into 8 equal sized pieces - put the little ends in the pan and bake so you have a couple little bite-size tasters!


Wednesday, August 28, 2019

Giant Whoopie Pie Cake

I don't have a great picture of this giant whoopee cake, so I'm just making the one pic I have super big for you to make up for it haha!! Picture might not be great, but the cake certainly is!


Cake Ingredients:
  • 1 1/2 cups butter, softened
  • 5 eggs
  • 1 T. unsweetened cocoa powder
  • 1 T. butter, melted
  • 1 1/4 cups unsweetened cocoa powder
  • 2 cups flour
  • 1/4 cup buttermilk powder
  • 1 t. baking powder
  • 1 t. salt
  • 1/2 t. baking soda
  • 2 1/2 cups packed brown sugar
  • 1 T. vanilla
  • 1/2 teaspoon instant coffee crystals
  • 1 cup water
  • marshmallow filling (recipe follows)
  • chocolate glaze (recipe follows)
Directions:

Allow the butter and eggs to stand at room temperature for 30 minutes. In a small bowl, make a paste of 1 T. cocoa powder and 1 T. melted butter. Coat 10" fluted tube pan with the paste; set aside. Preheat oven to 325'. 

For cake: In a medium bowl, stir together the 1 1/4 cups cocoa, flour, buttermilk powder, baking powder, salt and baking soda. Set aside. In a large mixing bowl, beat butter on medium to high speed for 30 seconds. Gradually add brown sugar, beating about 5 minutes or until light and fluffy. Beat in vanilla and coffee crystals. Add eggs, one at a time, beating 1 minute after each addition and scraping bowl frequently. Add one-third of the cocoa mixture and 1/2 cup of the water, beating on low speed just until combined. Repeat. Add remaining one-third of the cocoa mixture, beating about 30 seconds or until smooth. Spread batter in prepared pan.

Bake at 325' about 60 minutes or until a toothpick inserted near the center comes out clean. Cool in pan on wire rack for 10 minutes. Remove cake from pan; cool completely on wire rack. 

Split cake in half horizontally. Spread marshmallow filling on the bottom half of the cake, place top of cake over the filling. Drizzle chocolate glaze over the top of the cake. 

Makes 16 servings 

Marshmallow filling:

3/4 cup softened butter
7-oz. jar marshmallow creme
1 1/2 cups powdered sugar
1 1/2 t. vanilla.

In a large mixing bowl, beat all ingredients until smooth.

Chocolate Glaze:

1/4 cup whipping cream
1/3 cup semisweet chocolate pieces

In a small saucepan, heat cream over medium heat. Add chocolate pieces, heat and stir over low heat until melted and smooth.

NOTE: if you don't want to make the cake from scratch I'd just use your favorite chocolate cake mix! Also, I sprinkled chocolate chips on top of the glaze...just 'cuz. 


recipe from Midwest Living magazine 8/12

Tuesday, August 27, 2019

Tip-sy Tuesday: Wrapping Paper Holder

I love wrapping paper. Not that anyone cares (especially my sister, she loves to mock my gift wrapping obsession) but I'm putting it out there anyway - I love it. I have lots of rolls and have them hanging on peg board so I can easily see what I have; only problem is they tend to unroll and the paper gets messed up. In the past I've used rubber bands (that eventually break) and paper clips (which leave dents) to keep the rolls from unwrapping, then I learned this trick - simply cut a toilet paper or paper towel cardboard tube down the center and put it around the roll of paper. Great tip, right? You're not fooling anyone (looking at you sissy), you know you're gonna do this hahahaha!


Monday, August 26, 2019

Giant Crepe Paper Garland

We had a surprise birthday celebration for my sister which kept me super busy the past couple weeks - I told you in a couple posts that I was making things I couldn't share yet (that's because we were trying to keep it a surprise!) but now that her day has come and gone (very successfully I might add!) I'm ready to share some of the things we did. First up is this giant crepe paper garland - I wasn't sure what we'd do with it but it's so pretty, fun, and party-ish that I made it figuring we'd find a way to use it. Ended up hanging it on my sis's golf cart for the day part of her party and she loved it. 


For no good reason, I had a difficult time trying to figure out the instructions to make this garland, it is totally not hard but I was on the struggle bus with it. After stapling and removing the staples twice (!) I came up with this - not sure if it's made like the inspiration one but whatever, it turned out great. I'll share the link where I found the garland directions, but here's how I did it:


You'll need big sheets of crepe paper, either in all one color or mix colors together. I ordered a 6 pack of multi colors from Amazon, each piece measures 20" wide by 8 feet long. It comes in rolls and reminds me of tissue paper but it's stretchy crepe paper material - I did not even know crepe paper comes in big sheets like this. I decided to use 3 different colors for her garland so that took 3 pieces of crepe paper each 20" by 8' long. Before you even unroll the paper, cut the rolls in half so each roll is two halves that are 10" wide each. Unroll the paper and stack the 10" sheets on top of each other, you'll have 6 sheets altogether stacked. Fold in half so your bundle is now 5" wide x 8' and staple along the long folded edge. After folding you'll have 12 sheets on top of each other. Make cuts almost to the fold, about 1" apart - this part reminds me of making a tie-blanket; you've just created an 8' fringed garland, folded and stapled on one side and fringed on the other. Make sense? Of course I forgot to take detailed pictures while I was doing it, so I simulated the steps with red paper (I'm saying that so you don't get confused why the garland was green, pink and orange, and is now red LOL!)


the top edge is the folded and stapled side, then fringe the loose edge

The next bit is time consuming but I stood at the counter doing it and reading my book at the same time - which is to say that it isn't hard at all and requires very little focus, it's just mindlessly working the fringed part of the paper. You need to pick up each piece of fringe individually and smooth it out - you know how crepe paper has that crinkly stretchy texture? Well if you gently pull it apart the crinkles stretch and smooth out and the fringe gets wider, fuller and fluffier. Continue with every. single. piece. of fringe - daunting I know but really it is simple, just watch tv or read or something while doing it and it goes much faster!


photo from the inspiration directions on cutting and smoothing out the fringe
Once the fringe has been smoothed out and fluffed, twist each fringe section and the stapled part turns almost into a rope-like core. At first it isn't pretty and you'll think "what the? this is not a pretty fun partyish garland at all" but give it time. The more you twist, I alternated twisting one way and then the other, the better it looks. Once you twist the entire length the garland holds its shape and doesn't unwind at all - I was a bit surprised about that actually! 


I love love how this garland turned out, so much so that (without asking my sis) I rescued it from the golf cart and squirreled it away when no one was looking - I'll be using this again in the future for sure!


click here for original source