Wednesday, April 20, 2016

Giant Donut Cake

I have this donut shaped pan in the drawer that I completely forgot I had, and now that I'm on my "tidying up" kick I'm going to use the pan and see if I like it - that'll determine if it brings me joy or has to go...


.

I just made a simple yellow boxed cake (follow the directions on the package) in the 2 donut shaped pans. After they cooled completely I made a channel in one of them and filled it with chocolate buttercream frosting and a layer of mini chocolate chips. Put the 2nd cake on top and drizzle with thinned out frosting - and don't forget the sprinkles!

scoop out some of the cake to make room for filling

 I filled with fluffy chocolate buttercream frosting and mini chocolate chips

don't know if the pan brought me joy but eating the leftover scraps of cake sure did :)

Verdict is that I kept the pan. If I don't end up using it more often then I'll donate it on the next kitchen cabinet clean out!


Tuesday, April 19, 2016

Trash Cup

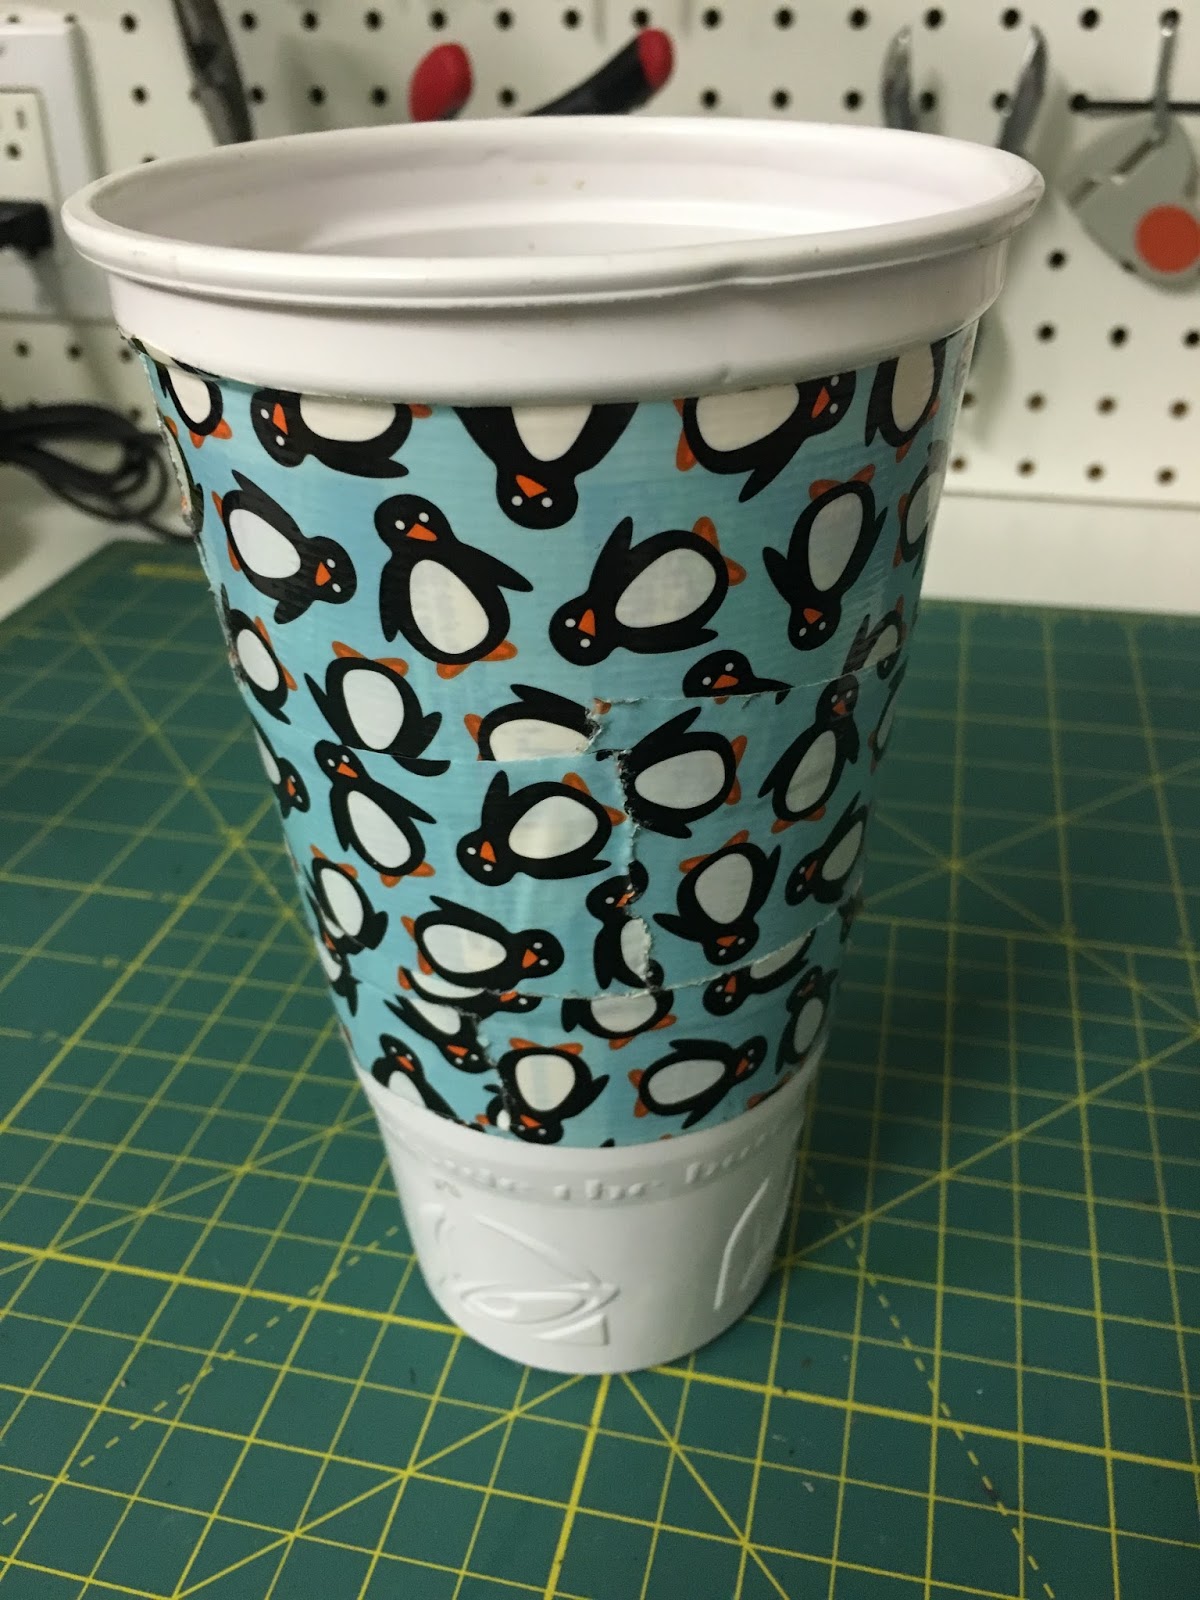
Here's a quick 5-minute 'craft' that anyone can do and everyone can use! I have been making these for years (and all my family members have received them as "presents" haha) - it's a decorated disposable drink cup that fits in your car drink holder for all the little bits of trash you accumulate in the car (gum wrappers, used gum, ticket stubs, etc.). Love this easy idea :)

use with or without a liner. I prefer a liner
 so gum doesn't get stuck to the cup!

Start with a clean plastic fast food drink cup, you could use styrofoam I guess but the flimsy paper cups aren't going to work as good or last very long. Whatever size you want that will fit in your cup holder.  Either cover the words that are on it with colored or patterned duct tape, or wrap scrapbooking paper around it and hold in place with double sided tape. I line it with a (clean, haha) doggie poop pickup bag (we have tons of them with Sarge around, you don't have to line yours but it'll last longer if you do) and hold it in place with a rubber band.

I covered the words on a Taco Bell cup with cute penguin duct tape...

another option is to cover it with patterned paper. trace the shape of the cup onto the back side of a piece of paper (hold a pencil where you want the paper to cover and roll the cup on the paper to get the correct line and arch). cut out and doublestick tape it in place. 


Monday, April 18, 2016

Hair Tie

Saw this simple pattern online for a "baby hair tie" and since I'm forever looking at headbands and things to do with my short hair I wanted to give it a try. Was very easy, minimal sewing, and turned out cute.


Since the pattern is baby-sized,
I added 5" in between the 2 pattern pieces to make each piece 18" long. Since I didn't have enough material to put this on the fold (that's what they intended, for the flat bottom piece to be placed on the fold, meaning there would be 2 long pieces total), I cut out 4 and sewed them together in the middle where the fold would have been. So I ended up with 2 (36") long pieces with a seam in the middle. Make sense?


Pin the 2 (36"long) pieces together with right sides facing each other and sew all around, leave a small gap so you can turn it right side out after sewing.

Feed it thru the small opening to invert it and have the right sides out, sew up the gap by hand or machine (I did it on the machine because you can't see it, I put the gap in the place where it gets knotted) and then iron it to get the edges crisp.

As I was making it I also thought this would be a great stuffed snake pattern - so if you don't want a head band, maybe give a snake toy a try! :)


click here for the pattern.


Sunday, April 17, 2016

Sunday Supper - Baeckeoffe

I saw Hubert Keller serve this to some contestants on Top Chef and was intrigued. I've never heard of this dish, cannot pronounce it even after I googled how to say it, and it has a rope of bread sealing the edges of the pan and lid while it bakes - that's a new technique for me. So I set about to make it for our Sunday Supper. It's great that my friends don't mind being guinea pigs and let me try out recipes on them!

marinate meat and veggies in wine
Click here for the recipe. It's a mixture of 3 kinds of meat (pork, beef, and lamb), you could easily use just one or two kinds though - I could hardly tell which was which after baking. I went to a local butcher for the meats and they were nice enough to cut them all up into bite sized cubes, that saved me a bunch of time but it isn't hard to do so don't let that stop you if you are going to cube it yourself. You marinade the meat in onions, leeks, herbs, carrots and a bottle of wine overnight. When you are ready to bake it, assemble the casserole by layering potatoes in the bottom of a large oven safe pot (note: you need a pot that has a lid with a vent hole in the top that can go in the oven), add the meat and vegetables, top with another layer of potatoes and the liquid from the marinade. Make a very simple bread dough from flour, water, and canola oil; shape it into a long rope that will go around your pot, put it around the edges of the pot and then push the lid down into the dough. Bake for at least 3.5 hours. I found the bread was getting too brown so put some foil over it about half way thru the cooking time. To serve, put the sealed casserole on the table and crack the bread seal open - then spoon into shallow bowls (or a plate).
make a bread rope the size of your pot
Notes for next time:
-it was still quite watery after baking for 4 hours. I will use less wine in the future.
-it could use a little more flavor - it needed much more salt and pepper than I put in. Also maybe more herbs.
-I added 4 carrots instead of the one that was called for, everyone wanted even more carrots.
-the bread is super crunchy and not really great to eat with the meal (although it is certainly edible), I would serve this with a nice loaf of crusty bread.


put it around the top of the pot and then push
the lid down on top, sealing the edge


I forgot to take a picture when it came out of the oven,
this is what the bread looked like baked on the pot though!


Saturday, April 16, 2016

Tidying Up Funny Follow Up!

After I posted the other day about decluttering, my friend sent me this picture she saw on FB - had to share...hahahah!


Friday, April 15, 2016

No Boring T-Shirts!


I just finished reading a book about decluttering and organizing and one of the things she talks about (alot) is that everything you own should be either useful and necessary, or spark joy in you. Everything. That's a daunting task but it's making me look at the things I come in contact with in my house and closet in a whole new light - so today I fixated on all my t-shirts. I imagine everyone is pretty much in the same boat - I have so many t-shirts that are just crammed on the shelf, I don't really think much about them and really...do they spark joy? Freebie t-shirts, old shlumpy t-shirts, t-shirts that I sleep in but wouldn't be caught dead going outside in? Nope, not joyful.


So I sorted them and tried to decide which ones made me happy (gotta say not many did haha), and then I had the idea that maybe if I jazzed them up I'd like them better. I've never been into cutting up t-shirts with fringe and ties, etc. but I saw someone do this the other day on tv and thought it seemed manageable and not too young.

If the neck is tight or uncomfortable (or unflattering) start by cutting it out. On this t-shirt it's fine so I left it. Lay the t-shirt face down and put something inside the t-shirt that you can cut on, I was being lazy so I grabbed a nearby thick shopping bag and figured I could cut on that without my rotary cutter going thru to the front of the t-shirt. 

Using either a rotary cutter or scissors make an arch shaped cut angling down a few inches below the collar, then an arch cut that angles up so the ends of the two cuts meet, remove the fabric piece in between the cuts. Repeat every few inches - I cut out 3 shapes.


Then take 3 inch pieces of soft washable ribbon and wrap them around the fabric that is left pinching the fabric together, sew in place. You could tie the ribbon on instead but I feel like then there will be hard knots if you want to sleep or work out in your shirt - I don't want to lay on the knots.


I think it turned out cute and while I'm still not feeling actual "joy" about it at least it's cuter than it was. Know what would be even cuter? If I wasn't lazy and put something harder than a shopping bag in between the t-shirt to cut on so the front of the t-shirt didn't end up with this big gash in it!!! Oops!!


A couple tips that I've learned after doing this one:
1) don't cut out pieces of fabric that are as big as mine, I would like it better if the holes weren't so big.
2) put something hard inside the t-shirt to cut on if you are using a rotary cutter, the shopping bag made it difficult to cut smoothly (and obviously wasn't thick enough!).
3) practice on a t-shirt that you don't like in case you mess up!

Sarge being helpful, as usual...

Thursday, April 14, 2016

How To Repair An Ironing Board

The lever/rod thingy that operates the ironing board came off (with no obvious way to stick it back on) and while I dislike ironing a WHOLE lot I still need an ironing board...so the question was do I figure out how to fix it, or chuck it and buy a new one. I have a hard time spending money on things I don't care AT ALL about, plus it's stuck in the open position and I don't know how I'm going to discard it, so fix it I did!

I could not figure it out on my own though, so I did the obvious thing when I need an answer - googled it. I found a site that was helpful and using her pictures as a guide I got the lever back in it's correct place. I'll try to describe what I did as easily as possible, check out her directions here if you need additional help.

Here I'm holding the lever/rod thing that fell off, it has a couple bends in it with a small hook/bend at the end. I'm standing in front of the part of the ironing board where it's supposed to be attached. You are looking at 2 of the table legs attached to a big metal plate that is covering where the rod needs to go. 
This is the underside of the above picture,  I'm looking up at the pointy end of the ironing board. See the 2 holes with the small metal rectangle between them on the bar that goes across? The lever needs to go in the channel on top of them underneath the big metal plate that the legs are attached to. The long dark rod is attached to the small rectangle (which is a metal plate on top of a spring) and that is what makes the ironing board open and close. You could take a screwdriver and push that little rectangle metal plate down to make the thing work if you'd rather...


My finger is covering the right hole from the picture above. I'm pointing where the lever is being inserted into the channel - under the big metal plate the legs are attached to and above the small metal plate attached to the long dark rod.
You can see where the lever is laying in the channel now. I had to push and wiggle to get the lever in the right spot, the little hook/bend on the end of the lever goes around the long thin rod (the dark rod going up from my finger) and sets on the small rectangle metal plate. When you push the lever to open and close the ironing board it's pushing the small rectangle metal plate and the spring down which enables the board to open and close.


Using pliers I closed the channel a little bit so it won't come out so easily in the future (hopefully). There, saved some money and I don't have to figure out how to get rid of the old one!


My "laundry room" is just a big closet so I've tried to organize to get the most use out of it. In addition to laundry stuff I have some linen closet things in there and a small tote with cleaning supplies. There are hooks on the insides of both doors to hang a drying rack and the ironing board.

Yes, I've also decorated with removable wall stickers because...well, because if I gotta do chores this at least makes me happy so why not!


I put up a short tension rod between 2 of the shelf brackets to store hangers on, and hung the dreaded iron on the wall to save a little space.

Wednesday, April 13, 2016

Lemon Cream Pie

I love cream pies - not meringue, which I don't love, but cream...mmmmm... (except chocolate cream but that's another story). This recipe from Real Simple magazine for lemon cream pie has been in my file of recipes to try since April 2012 - 'bout time I tried it right? So glad I did, this turned out really good and I will definitely add this to my recipe book and make again. I used Meyer lemons from my friend Sheryl so the pie wasn't super tart lemon-y, everyone at dinner liked that it wasn't overly lemon-y tho...if you don't have Meyer lemons just use regular lemons and you'll probably get a stronger flavor that I bet is equally delish. My lemons were super juicy and it only took 3 of them to get 1/2 cup of juice.


I love the gingersnap crust, was tempted to just buy a graham cracker pre-made one but am really glad I didn't - the gingersnaps made an almost chewy/crisp crust that is SO good.

I crushed up the gingersnaps in a ziplock bag using a rolling pin to roll over the cookies till they became crumbs. These gingersnaps are seriously crunchy and it was harder to get them broken up than I expected. If you have a food processor I recommend using that instead of doing it yourself. It works doing it by hand but you'll have to keep at it for awhile - um, a little tip, make sure your ziplock bag doesn't break open while you're crushing it. Just sayin'. The crust got really brown in the oven during the first baking session (note I baked it for 15 minutes instead of the 16-18 called for), so I covered the edges with foil for the last 20 minutes of baking and it was perfect.

I just looked at the recipe and reviews onine (I made it from the magazine page and didn't check for the online recipe until  now so I can link it for you instead of typing it all out here!) and see that some people had issues with the crust. When I took it out of the oven after the first 15 minutes it was quite puffy and shrinking down on the sides a little bit - I carefully took the back of a spoon and patted it down and pushed it back up on the sides to shape it how I wanted. This worked just fine and after I put the lemon filling in it held it's shape for the final 20 minutes of baking.


Speaking of meringue - lemon meringue pie always makes me think of my grandmother and my brother. My grandparents were health nuts WAY before it was cool to be a health nut (I'm talking a lazy susan full of vitamins they took everyday, making her own yogurt, my grandpa walked miles everyday - people in town would say to me "oh, your grandpa is that walking man?"). We were visiting one day and my grandma offered us lemon meringue pie she had just made and my brother got super excited "oh boy, that's my favorite, I want a big piece please!" and took a huge bite. Did you guess where I'm going with this? Yep, she left out the sugar on purpose to make it "healthier". I can still see the look on his face - priceless. True story :)

 click here for the recipe - not my grandma's sugar free one, the yummy delicious cream version! Ha!


Tuesday, April 12, 2016

Tidying Up

I can actually see all my scarves now!
Well thanks to a book I just read on decluttering and organizing (written by a Japanese woman who is very popular right now and making the rounds) I am now inspired to surround myself with things I love and that "spark joy" in me. Sounds like a daunting task, right? But how great would it be to just have things that make you happy and you love? Of course I have to be a little practical - if I get rid of all the clothes that aren't joy inspiring I'm gonna need to do a whole lot of shopping cuz I'll have nothing to wear! Dave is really not going to like this hahaha. Anyway, I'm sharing this with you because rather than crafting something all I've been doing is tidying up my stuff :)

I was going to give you a sort of breakdown on how she recommends going about this whole decluttering and organizing thing, but that would be rewriting her book and take too long haha - if this kind of thing interests you maybe pick up the book for yourself (I'm a regular at the library) or borrow from a friend (thanks Sheryl for loaning me your copy!). I've talked to lots of people that just couldn't get into the idea, or don't care about doing it - I love this stuff though so I enjoyed reading it. I'm not going to do everything she says (for instance, when you discard an item you should thank it for it's service, for a job well done, or in the case of getting rid of something that's unflattering on you then thank it for teaching you what doesn't look good on you - uh yeah, if I start talking to my stuff D is seriously going to question my sanity! HA!) but the basic idea of only owning what makes you happy is appealing to me.

So far I've purged a bunch of vases and candles, scarves and t-shirts  - I'm enjoying having more space in those cupboards and drawers now and am looking forward to freeing up even more when I have time, after I've crafted some more of course!


Monday, April 11, 2016

Chair Back Covers

My kitchen and dining room have a lot of the same color wood (floor, cabinets, island, dining chairs) and I've been trying to come up with ways to break it up a bit - without having to re-stain or paint it! I have a rug under the table and that helps a little, now I'm thinking maybe if I had covers for the backs of the chairs it would help...

I found 2 ruffled linen table runners at Home Goods for $15 each - they are so pretty it took me a few days to get up the nerve to cut them! I don't have anywhere else to use them tho, so that made it easier for me to bite the bullet and just do it already.


 Initially I was going to cut each runner in 3 pieces because I have 6 chairs, but when I held up about 12" or so of material to get an idea of what it would look like,  it seemed like it was going to look like grandma doily chair covers or something, not cool. They weren't long enough that way - so I cut them in half and I'll either use 4 of them and leave 2 chairs plain, or I'll use 3 of them and do every other chair.

hemming the correct way...
After cutting in half I had 2 open ends to hem. For the first one I did it the "correct" way and turned the runner inside out, sewed the opening shut leaving a 2 inch gap, turned it right side out and stitched up the little opening. Wasn't hard at all and didn't take much time...then I realized that no one can see the end that I cut so why bother with all that! For the other 3 I just rolled the edge under twice and topstitched it. Just made an easy project that much easier!

and hemming the lazy way!


The finished project. Now I just have to decide if I like them tucked into the back of the chair or the front.