Thursday, December 10, 2020

MSIH: scalloped potatoes review

Yesterday I posted the new scalloped potato dish I made to go with our (never-ending and random not-a-holiday) ham - here's what my sis (and Brooke) has to say:

So I heated these in small servings because my sister gave me a giant pan (she is aware that the other kids are all grown and out of the house, right?).  Let me just say that Brooke tried a bite of her small scoop and before I could even try mine she said “we are going to need to heat some more”.  I laughed and she continued, “no really, gonna need more”.  LOL.


She then proceeded to gush about the amazingness of these for my “review”.  She gave all the reviewers words.  She gave it a 10 out of 10, they are amazing. She loves how thinly the potato’s were sliced and felt that is what gave them such great flavor (they could soak up the sauce.. haha).  I do have to say I agree with her!  That doesn’t happen often that I agree with the teen so this is newsworthy.  They could possibly be the best scalloped potato’s I have ever had.  If you have read my reviews you know that’s saying something.  Really delicious.  Didn’t need to cover with salt and pepper, just great as is.  A far cry from the old days of my old recipe with flour and milk or even the “newer” recipe of cream of mushroom soup.


Cant wait to see her recipe and see what it actually is!  Flour, milk and a pound of butter?? Really crossing my fingers that’s not the recipe because I fully intend to make these again.. and pass the recipe off as my own. ðŸ˜Š

Wednesday, December 9, 2020

Scalloped Potatoes

Is all the hysteria about 'what foods to stockpile for the pandemic' making you as cuckoo crazy as me? I mean c'mon, I'm getting daily emails from different sources offering up their lists of 'food you should hoard in case there's never any canned vegetables ever again'. Or 'things you should have a years supply of in case your neighbor buys it all before you'. Ok, maybe that's not exactly the list titles but that's what it feels like!! So when I went to the grocery store the other day on a hunt to see if I'd be able to buy meat and saw a big pile of spiral-cut hams randomly in the beginning of December I thought - gee, we don't usually eat a big ham for no good reason and it's not even a holiday but ok, I should get one. 

There's a point to all the above rambling. I bought a ham and you know what I think goes great with ham? Scalloped potatoes. See, I brought it around. 
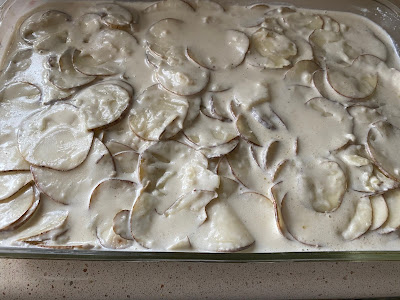
this is before baking, because of course I forgot
to take a photo after they baked for an hour!

I've always made scalloped potatoes the same way, I don't remember but I'm assuming it's how my mom made them (mom, is this what you do?). Layer thin cut potatoes with sliced onions, flour, salt and pepper, bits of butter, then another layer of potatoes, flour, s&p, butter, etc. Cover the entire thing with milk and bake. They are yummy but not creamy and there's no sauce to speak of. This time I googled for different ideas on making them just to change it up and found this inspiration recipe on Food Network. I did change it a bit, but not drastically, I'll give you what I did and you can go to their site if you want to see what I started with. 

Oh, by the way, these turned out great. I liked them so much that I made them for my sister the next day and will have her give her review without telling her my whole backstory and how delicious I think they are! Although I added leftover ham (cuz ham is like turkey, the leftovers are endless!) to hers and I bet they are even more amazing - if that's even possible. We'll see what she says in her review later. If you've read her past reviews you'll know she is bound to ask if these are healthy - let's hope she doesn't or I'll have to lie and tell her yes. Yes they are. LOL. Not. (click here for her review)

Here's what her potatoes with ham look like after baking -
I'm not always forgetful! These aren't as smooth on the top
because I stirred them often. You can always level them
back out if you're serving in the dish and want it prettier. 

  • 1/2 stick butter
  • 1 teaspoon minced garlic
  • 1/4 cup finely diced onion (I chopped it super small hoping Dave wouldn't notice hahaha. You can leave bigger pieces if you want, and feel free to add more if you like onion - they were good with 1/4 cup for us and no, he didn't say anything)
  • 4 cups half and half (you can mix together cream and milk if you have those on hand)
  • 3 pounds potatoes (I used russet and left the peels on. Peel if you want. You can also use Yukon gold potatoes if you have them, peel or don't - up to you. I have 10 pounds of russets because of a story very similar to the beginning of this post. You can imagine why I have 10 pounds of potatoes.) FYI if you don't have a food scale, 3 pounds equaled about 8 cups of sliced potatoes. 
  • pinch of nutmeg
  • coarse Kosher salt
  • pepper
  • 2 T. Flour (or Wondra)
1. Scrub the potatoes really good. Slice them very thin, about 1/8". I have a V-Slicer, or use a mandolin, or a sharp knife and slice them by hand trying to keep them consistently thin.


2. Rub butter all over a 13x9" baking dish. 
3. In a large saucepan add the rest of the butter, garlic, and onion; saute for a couple minutes until translucent. 
4. Stir a couple tablespoons of Wondra flour (I'm sure regular flour would work but I used Wondra) into the half and half, and then stir the half and half into the saucepan. Season with salt and pepper to taste. Bring to a boil, reduce heat to a simmer and cook for 5 minutes. Add the potatoes to the saucepan, try to separate the slices so they get nice and coated with the sauce. Let simmer for a couple minutes then turn into the baking dish. 


5. Put in a preheated 350' oven, bake for about an hour until the potatoes are tender. 


note: keep an eye on the potatoes while they are baking so the top doesn't get too brown. Stir them every so often to bring the sauce to the top and keep all the potatoes coated while they are baking. 

You can make a smaller 2-quart dish of these - same directions with these amounts:

2 T. butter
1 teaspoon minced garlic
1/4 cup or less of chopped onion
2 cups half and half
salt and pepper to taste
pinch of nutmeg
2 pounds thinly sliced potatoes (about 6 cups)


Tuesday, December 8, 2020

Tip-sy Tuesday: prosciutto

I made pears with Boursin cheese wrapped in prosciutto the other day and discovered an easy way to cut the prosciutto into strips. Let's back up a sec - have you worked with prosciutto before? It's Italian dry-cured ham usually sliced super thin and it's a great addition to a charcuterie board, you can crisp it and add to dishes, add it fresh to fruit salad or on top of bruschetta - lots of ways to eat and serve it. One of my favorite is to wrap thin strips of it around pears, it makes for a nice appetizer or snack. Well when it's sliced so thin and then packaged, it can stick together and it's soooooo hard to separate the slices - I love when it's packaged with thin sheets of plastic between the slices, it's easier to separate but still hard to handle. So when making these pears, or any time you want to slice the prosciutto, I've found that if I leave a slice on the plastic and then cut it with scissors before peeling it off the plastic, it's so much easier. 

If you buy prosciutto without anything between the slices, I wish you lots of luck ;) 


Only thing you have to be aware of is to remove all the plastic from the prosciutto before eating the prosciutto!


For the pear appetizer: Slice a washed pear in quarters, remove the core. I leave the peel on, feel free to remove if you prefer. Cut each quarter into 3 slices. Put a small teaspoon of soft, creamy Boursin cheese on each pear slice, don't spread it around just leave it in a ball in the middle of the pear slice. Cut each slice of prosciutto in 3 slices lengthwise. Carefully peel the prosciutto off the plastic and wrap around a cheese topped pear slice. Refrigerate until ready to serve. Note: the prosciutto is so thin that it'll still probably fall apart and that's fine, they tend to stick to each other so just wrap the pieces around the pear even if it's not one long strip. 

see the pears on the left and lower right sides of this
appetizer wreath originally posted 12/18. click here
to see how to put the wreath together. 


Monday, December 7, 2020

Decoupage Glass Plates

These are a fun and inexpensive gift idea for Christmas or anytime - have you ever decoupaged glass plates? When asked what I wanted to do for my birthday I said I'd like everyone to do a craft of my choosing (mostly just to annoy my non-craft loving sister LOL) and since I've never decoupaged a plate I thought we could try it - of course I had no idea what I was actually doing but didn't tell them that, I just winged it on the fly and fortunately the project was easy and turned out great. 


I hit the dollar store and the craft store, and also used supplies I have on hand. 

Supplies:

  • glass plates, try to find ones that don't have too much of a curve or deep rim. The dollar store had plates that were pretty smooth on the bottom (note: you'll be decoupaging the back of the plate)
  • assorted papers. We used decorative scrapbooking papers (I think cardstock would be too thick), you could also use wrapping paper, tissue paper, doilies - think thin paper. 
  • glitter, if desired
  • mod podge - note I wanted to find the dishwasher safe kind but wasn't able to, so I got the hard coat formula that says it's for furniture. 
  • foam brushes and scissors

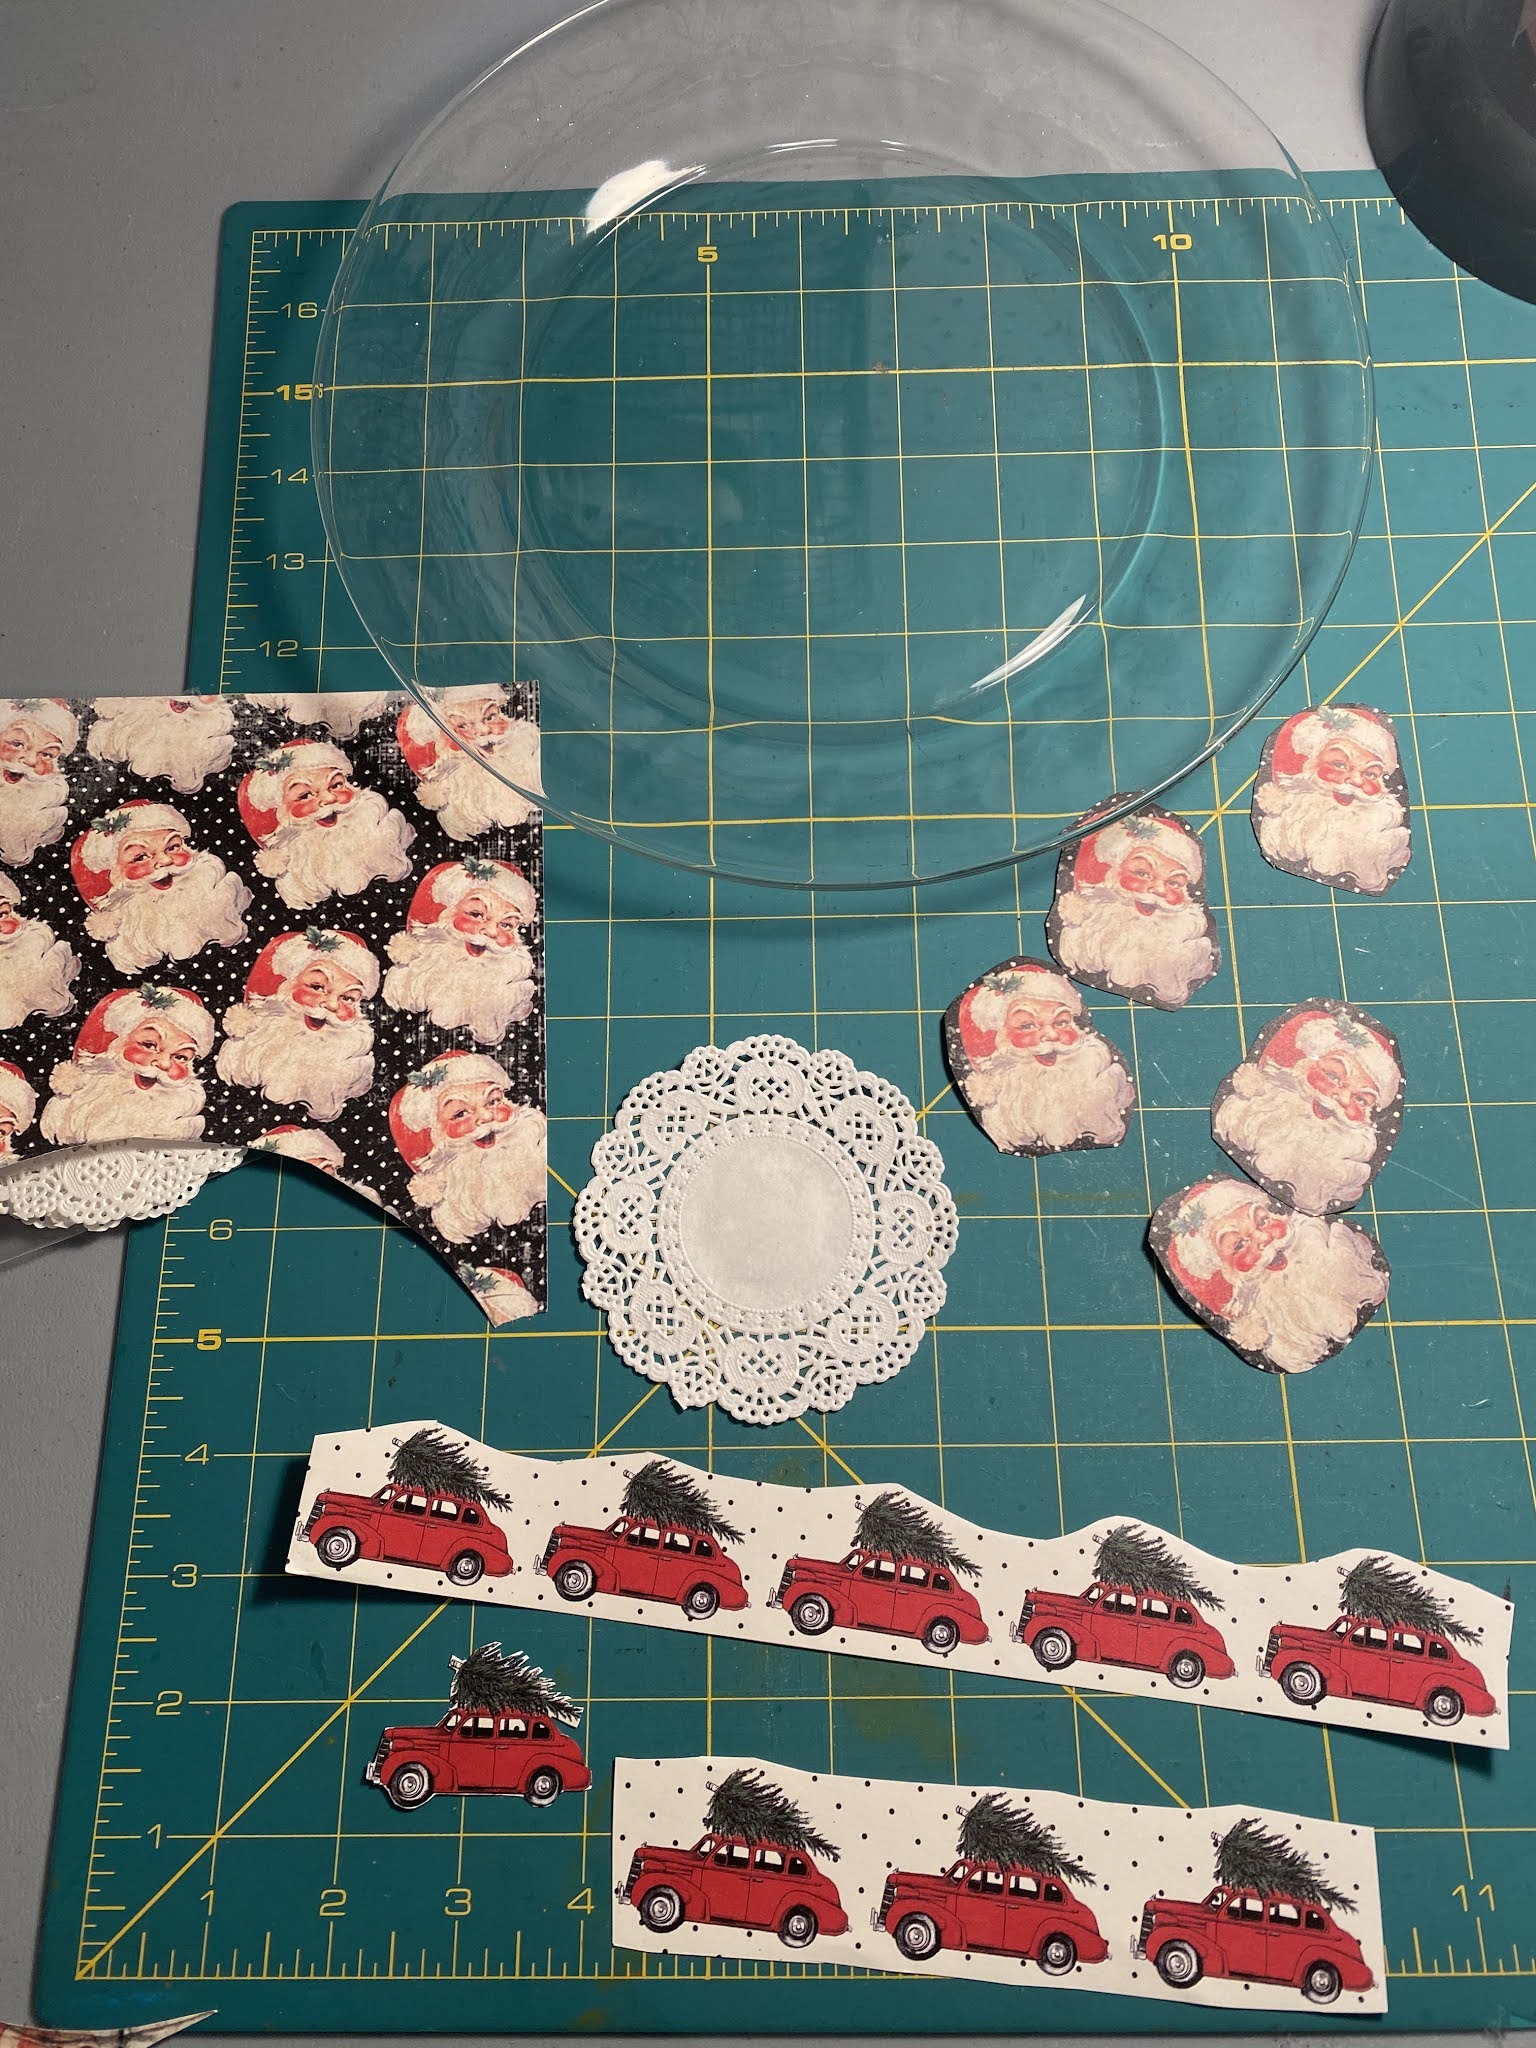
1. My plates have a slight ridge between the bottom and the rim so we decided to cut out a circle of paper for just the bottom portion of the plate instead of trying to fit paper over the ridge; you could do all small torn or cut pieces and layer them all over if you don't want a solid center. So for our plates we started by tracing the bottom circle of the plate onto scrapbook paper, cut it out and hold it up to plate to make sure it's the right size. 

2. Before gluing it in place, decide if you want to have glitter on your plate. If so, brush mod podge where you want the glitter on the clean glass plate (remember, glue on the backside of plate not the top), sprinkle glitter on top of the glue. Once that dries, add a thin coat of mod podge to the entire back of plate where the big piece of paper will go, lay down the paper in place and smooth to get rid of bubbles. Top with another layer of mod podge. 


3. Next decorate the rim of the (underside) of the plate, add glue to the rim and also to your decorations, then glue in place - some of us glued on cut out images from scrapbook paper, some added more stripes of glitter, you could also copy and print images from the computer if you don't have what you want on hand - let your imagination fly!


Little side story - I had a couple friends and my sister making these with me and it took forever to think of what we wanted to do...looking the papers over and over, changing our minds, talking it thru, goodness knows we didn't want to mess up LOL. In fact, I couldn't decide and ended up not even finishing my plate! So then Brooke and a girlfriend stop by and want to make a plate - they are back in literally 20 minutes having just sat down and designed their plates with no second- and over-thinking at all and their plates turned out great! There's a lesson here - it's a dollar store plate, paper and glue. Just do it already hahahaha. 


4. Add another coat of mod podge over the entire back of plate. Let it dry. There are directions on the bottle of mod podge, follow them from here for how many coats to do and sanding in between if there are rough edges. 


This would be fun to do on other glass things too - coffee cups or glasses, vases, small plates or larger platters. Also it's a great kid craft - they could just rip up papers and stick them on willy-nilly! 


Sunday, December 6, 2020

🔥Around the Campfire (week 49)

 Dear Campers ~

Here's a quick recap in case you missed anything at camp last week:

Posts ~

11/29: 🔥week 48

11/30: penne alla vodka

12/1: tip-sy tuesday: how to make turkey stock

12/2: Brooke makes popsicle snowmen 

12/3: crockpot chicken stroganoff

12/4: how to make tiny bows

12/5: Christmas wreath veggie tray

What's Cooking ~

  • grilled chicken sausages, white beans baked in marinara, wilted spinach
  • penne alla vodka, green salad
  • grilled thin cut chicken breast, roasted broccoli, carba-nada noodles (low carb)
  • pork roast (marinaded in root beer), butternut squash spirals, wilted spinach
  • steak, caesar salad
  • grilled tuna, greek salad (tomatoes, cukes, feta cheese), roasted garbanzo beans
  • chicken stroganoff, roasted green beans
Miscellaneous stuff keeping me busy (other than cyber shopping):
  • read "The Sentinel" by Lee Child; it took me about a month to get it from the library and I was super excited to read a new Jack Reacher adventure but this fell short. Lots about cyber crimes and most of that technical stuff went over my head. Oh well. I still love Jack Reacher and have high hopes for the next book! ⭐️⭐️⭐️ 3 stars because it's Reacher. 2 1/2 if it's any other lead character hahahaha. 
That's all for this week - stop back next week for more crafts, recipes, tips, whatever else I can think of to make at camp! Bye! Stay healthy :)

Sincerely ~


Jill
camp counselor

Saturday, December 5, 2020

Christmas Wreath Veggie Tray

I've made food wreaths before (click here for an appetizer wreath) but not like this one - my sis sent me this idea and it's so pretty and looks easy so I thought I'd share. I will be making this at some point this month but in the meantime I wanted you to see the picture so you have the idea in your back pocket if the occasion calls for a veggie tray and you want to do something different!


On a round platter or plate put a small bowl of the dip of your choice in the center. Lay down sliced cucumbers around the edge, then pile on broccoli flowerets (raw or you could lightly blanch them for a couple minutes if you want a softer texture) to make up the bulk of the wreath, sprinkle on cherry tomatoes. Finish with a ribbon bow at the 'bottom'. Easy, quick, and cute!

Of course you could change up the cukes and broccoli for any green veggies (celery, asparagus, and green pepper come to mind), or do a mixture of whatever green vegetables you can think of...


Friday, December 4, 2020

Making Tiny Bows

Oh my gosh I love this little trick to make tiny bows! I have had this in my file since 10/14, I just came across it again and immediately made one to see how hard it'd be (gotta say the original instructions found on Pinterest were a little confusing) and it isn't difficult at all! I took lots of one-handed pictures to break down the steps but I promise this is easy to do, and way easier than trying to tie 1" bows by hand. It seems like many steps but stay with me and you'll see how simple it is to make a little bow using a fork.


1. Cut a piece of ribbon about 6" long. At first I used curly ribbon which worked ok but once the bow was made it came undone, I think the ribbon is too slippery. So I used thin fabric ribbon and it worked beautifully. I'm not sure how wide your ribbon could be for this to work, mine is 3/8" and I'm sure 1/4" would be good too. I'll have to experiment with wider and see what happens. 

2. Lay your fork in the center of the ribbon:


3. cross the left side over the front of the fork, then cross the right side tail over top of the left tail and feed it down thru the middle tine of the fork:


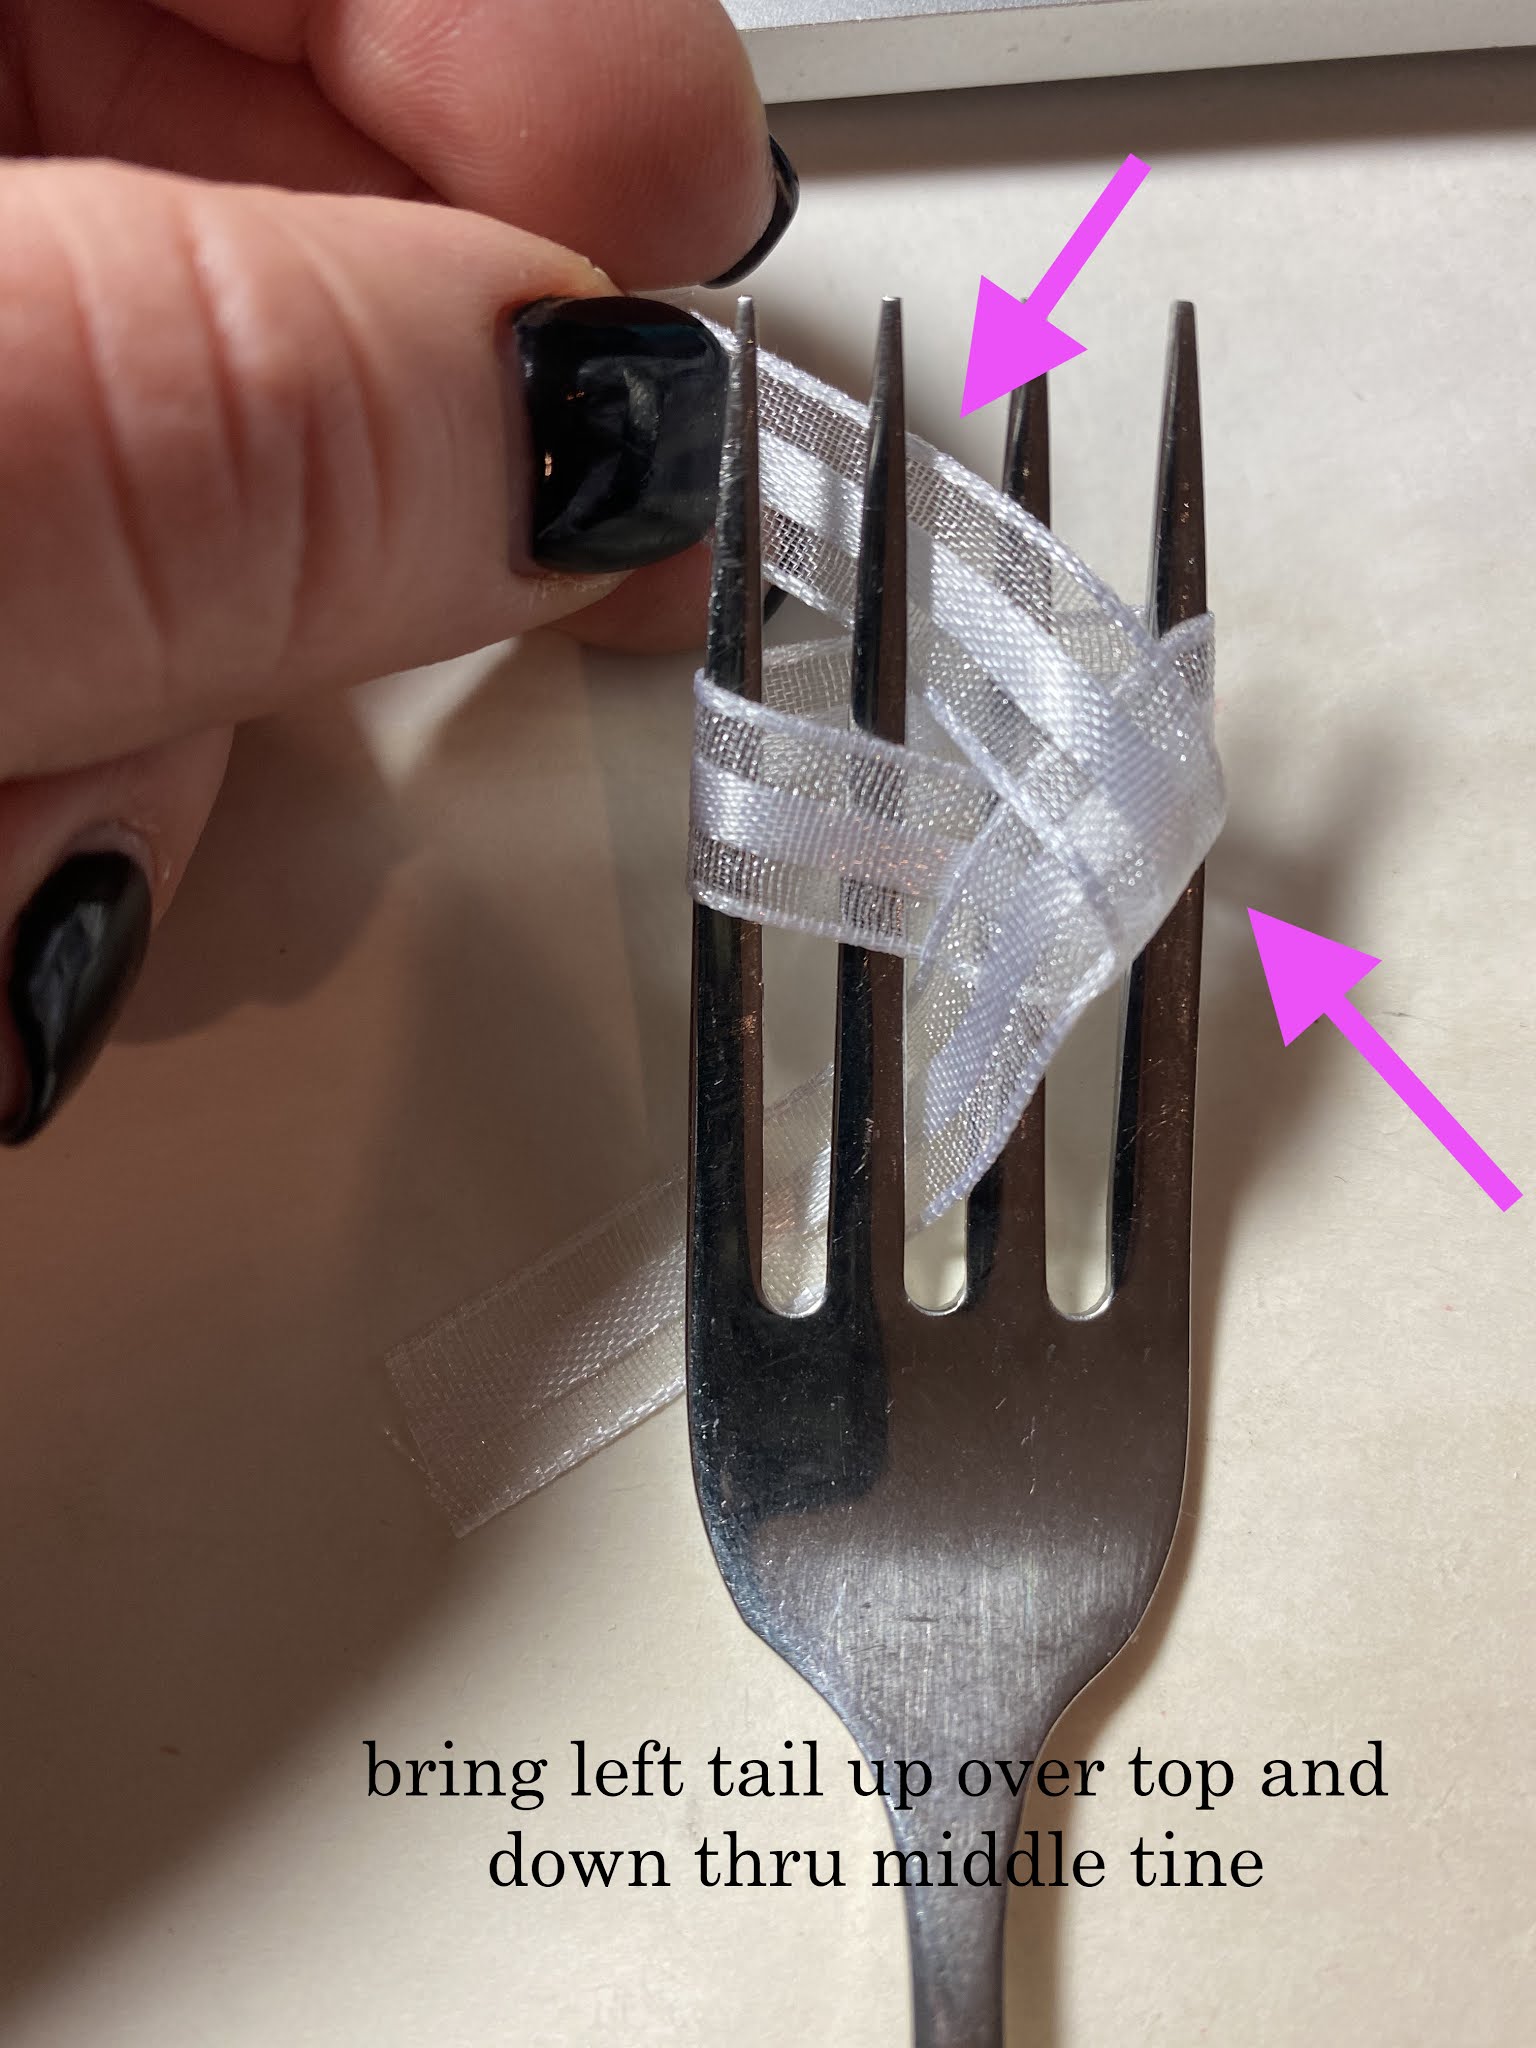
4. bring what was originally the left tail (now it's on the right) up over the top and feed down thru the middle tine. Now both tails are at the back of the fork:


5. pull both tails to tighten, you can see the bow taking shape:


6. turn the fork over and tie the tails in a tight knot:


7. Here's what it looks from the front of the fork after tying the tails:


8. slip the bow off the fork:


9: to finish, fold the end of the tail in half lengthwise and cut on a diagonal - leave as much length as you like, I cut mine tails short so it lays right underneath the bow:


I guess you could change the size of the bow depending how wide your fork is! My regular dinner fork created a 1" bow. 


FYI I just made one with 5/8" grosgrain ribbon and while it worked it's not as cute in my opinion. Maybe if I left the tails longer it'd look better. You can only use ribbon that is thin enough to weave thru the tines of your fork, if you have long forks you'll be able to use wider ribbon. 


Thursday, December 3, 2020

MSIH: Crockpot Chicken Stroganoff

Here's a 'my sis is hungry' recipe and review of crockpot chicken stroganoff - I've never heard of chicken instead of beef and wanted to try it, did not think Dave would like it so I figured I'd have my sister be the guinea pig hahaha! Funny thing - turns out Dave was game to try it and ended up liking it better than anyone else, his review is that it's really good and he'd definitely eat this again :) Here's what my sis had to say:

My gosh.. its been so long since my sister has cooked for me the title should no longer be that her sister is hungry- her sister is now STARVING.

Ok enough whining. 

Let me just say I’m thrilled to try anything she cooks us.  I get VERY excited when she says for me not to make dinner- as does the Teen. HAHA.  So this time we are having Chicken Stroganoff.

The husband and teen LOVE Beef Stroganoff (I tolerate it).. so this version was very similar.  The chunks of mushrooms were my favorite part, but the family prefers the “sauce”.  Not the meat, not the mushrooms, just the “sauce” on top of noodles.  

This one they weren’t sure they liked as much as traditional beef. They deemed it “ok”.  Since my sister is a fantastic cook I am sure she wont love the review of “ok”.  Honestly I think they just prefer the flavor the simmering in beef that it gives the sauce.  The chicken flavor made it less flavorful- a little more bland.  It was still good, just “different”.  I am not tasting onions, and I do love that flavor in traditional beef stroganoff as well. So maybe was missing that. The sauce itself was a little runny, so I preferred to eat mine as more of a soup (I don’t love egg noodles).  The family liked theirs on the noodles so neither liked how runny the sauce was.  Brooke also wanted me to add to my review that I didn’t cook the noodles long enough so that brings her review score down as well. Whatever. So that said if your family doesn’t love that strong beef flavor of traditional beef stroganoff and doesn’t mind the sauce runny they may love this. 


  • 2 pounds skinless, boneless chicken breast halves and/or thighs
  • 1 cup chopped onion
  • 2 (10.75 oz.) cans condensed cream of mushroom soup with roasted garlic
  • 1/3 cup water
  • 12 oz. dried wide egg noodles
  • 1 (8 oz) carton sour cream
  1. Cut chicken into 1" pieces. In a 3-1/2 or 4 quart slow cooker, combine chicken pieces and onion. In a medium bowl stir together the soup and water. Pour over chicken and onion.
  2. Cover and cook on low heat for 6-7 hours or on high heat for 3-3 1/2 hours.
  3. Cook noodles according to package direction. Drain. Just before serving, stir sour cream into mixture in cooker. To serve, spoon stroganoff mixture over hot cooked noodles. Season with pepper if desired. 
original recipe found here

Jills note: I mostly followed this recipe except I added a package of freshly sautéed mushrooms when serving - my favorite part of stroganoff is also the mushrooms! I only did 1/2 cup onion very finely diced because Dave doesn't like onion so I was trying to hide it hahah. I didn't have mushroom soup with roasted garlic so just sprinkled in some dried garlic. And I agree, the sauce is quite runny - maybe cut back on the water. Oh, and once again I forgot to take a picture and have to ask you to use your imagination! This is an overall plain-looking dish, serve it on a colorful plate if all the whiteness is boring to you hahaha. Or add a green vegetable to the plate to add some interest. It's white sauce with white chicken over white noodles. 


Wednesday, December 2, 2020

Popsicle Stick Snowmen...by Brooke

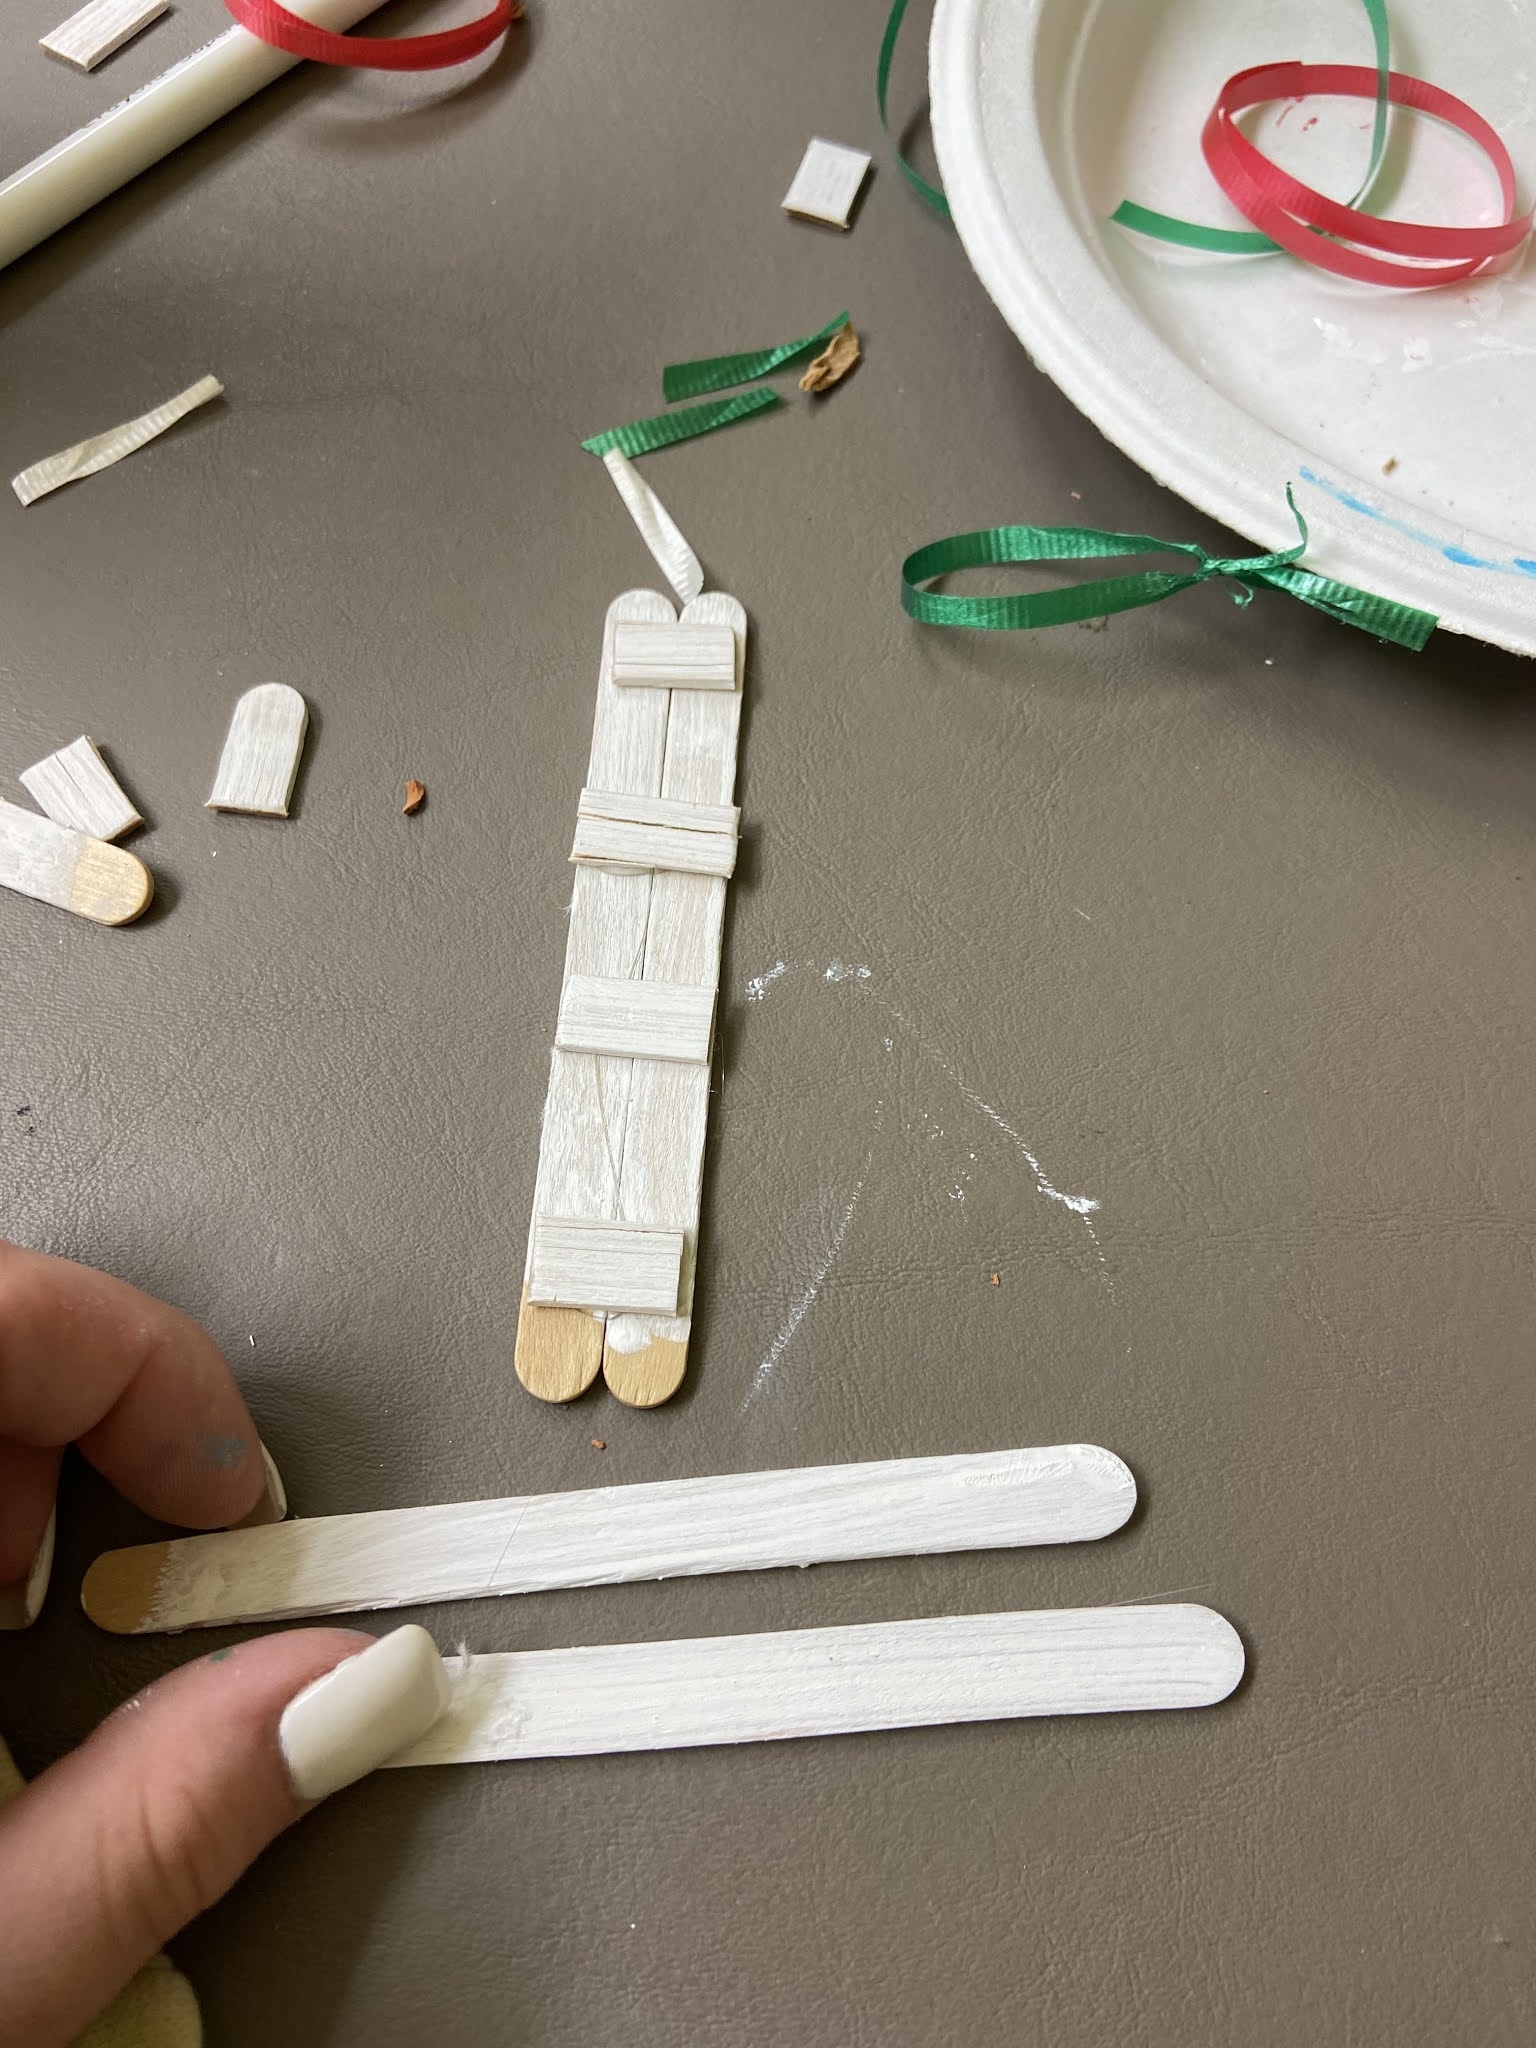
Hey guys! I made a super easy kids craft today! I painted wood sticks white and glued 2 of them together,  then glue small pieces of popsicle sticks crosswise across the back to make sure it stayed together. Then I glued ribbon around to make it look like a scarf and drew on a little face, hat and buttons with markers. Then I glued a ribbon on the back so I could hang it on the tree!!


Tuesday, December 1, 2020

Tip-sy Tuesday: making turkey stock

First day of December and it's really cold here. And even tho I'm always a soup lover today I'm especially thinking of having something to warm me up - so when I opened the fridge and saw the big bag holding the turkey bones from last weeks feast I thought aha! I should make stock! So I'm writing this and then I'm off to do just that. 

If you still have the leftover turkey bones on hand I can easily help you make stock - it's simple. Put the carcass along with some veggies in a large pot - halved onions, carrot chunks (no need to peel), and celery stalks are all good choices. Add a tablespoon or two of whole black peppercorns, herbs if you have them on hand  (I don't and that's fine). Cover the whole mess with water and bring to a boil, then turn down to simmer for about 3 hours until the liquid is reduced by half.


Set a fine mesh strainer over a large bowl or glass measuring bowl, pull out the bones and big chunks of veggies using tongs and set in the strainer, then pour the rest of the liquid into the strainer. If you want the stock even clearer, rinse out the strainer and then line it with a piece of cheesecloth and pour the strained stock back thru. 

Divide the stock into smaller containers (unless you are going to make soup or use it right away) and cool completely. Store in the fridge for a week, or freeze it for later. 

I'm posting this before finishing, I'll update with photos when I'm done!