Saturday, November 10, 2018

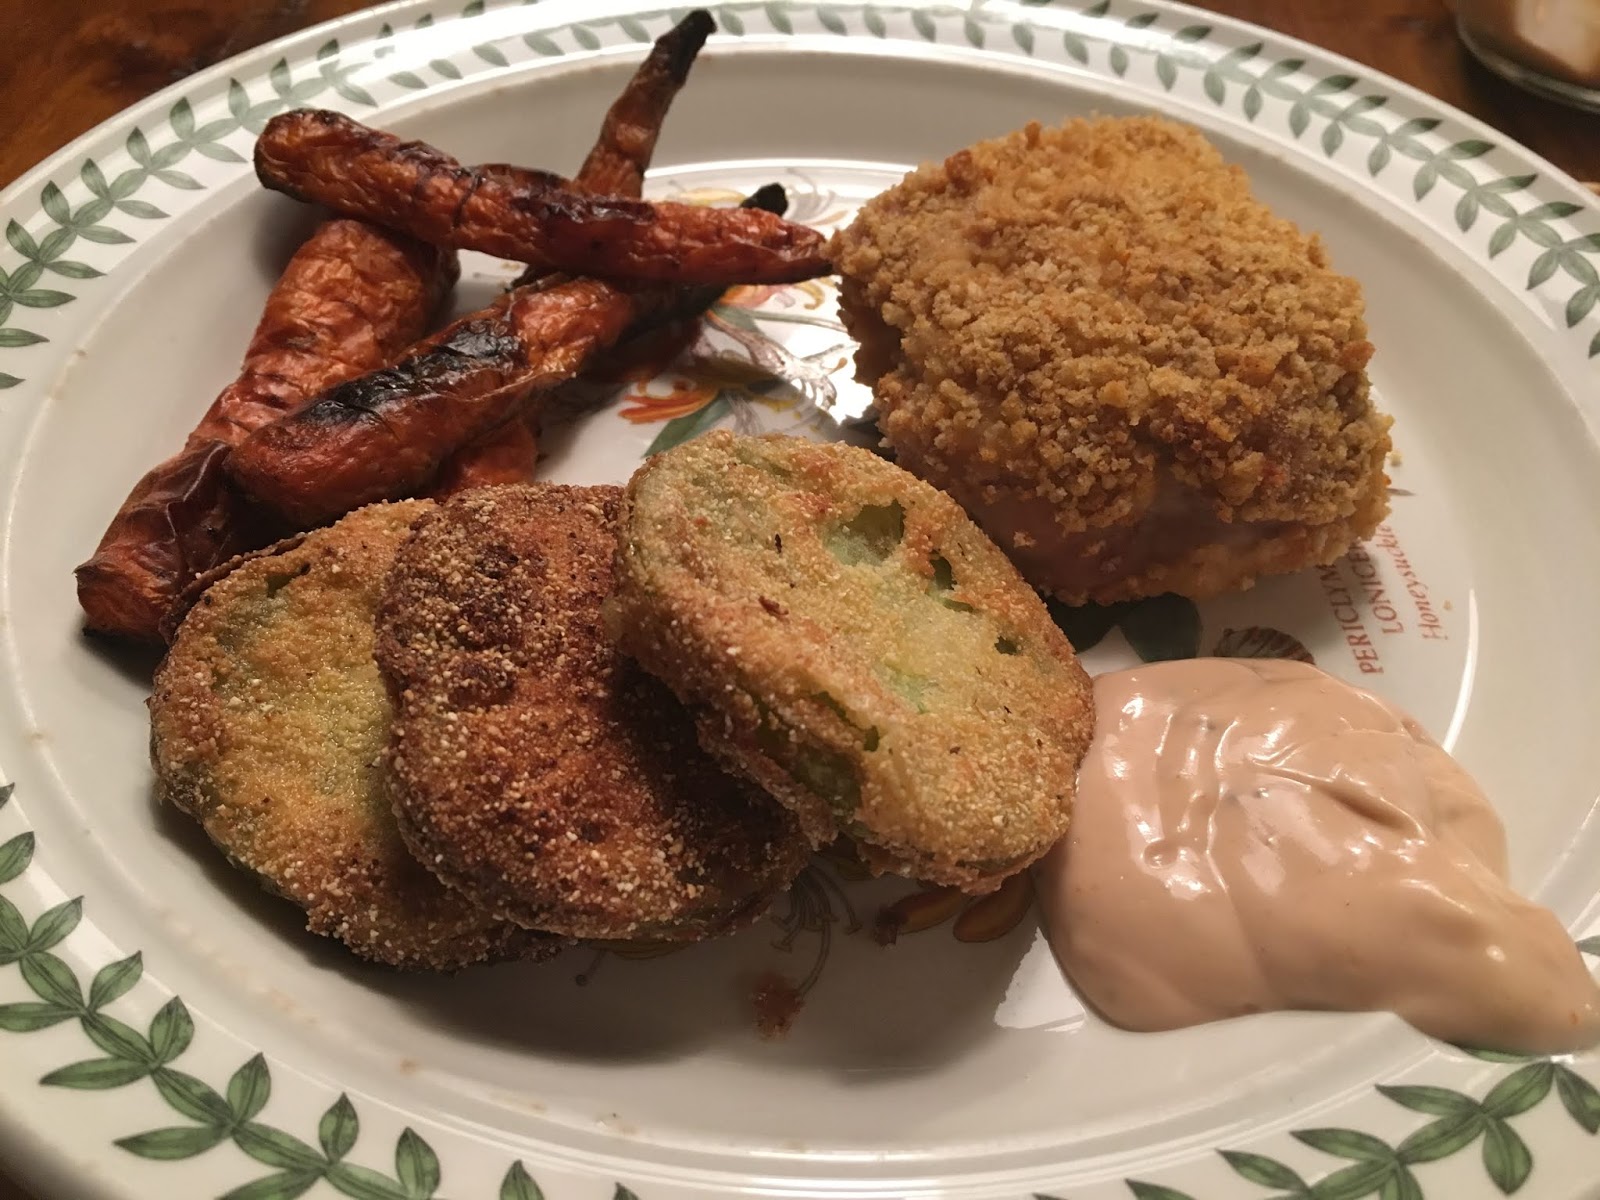
Fried Green Tomatoes

I have never had fried green tomatoes, let alone made fried green tomatoes - quite frankly I wasn't really interested in trying them 'cuz (a) I try to not eat fried foods, (b) we live in Michigan and it's not really a thing, and (3) I've never had an abundance of big green tomatoes that I was trying to use up before! Well, as you've seen this past week (green tomato soup, muffins, jam) I had lots to spare and thought I'd give frying them a try. Know what? They are SO SO good, I'm a believer now and this will be a repeat for sure. Yes they are fried and I don't do that often, but these are not greasy at all and it still seemed like I was eating a vegetable - I love fried green beans but really, they don't taste like beans, they taste like fried batter! These aren't like that, promise. If you see green tomatoes at the grocery store or farmers market you really really want to buy a couple and make this recipe - you won't regret it!


I read a bunch of recipes before it occurred to me that my mom lives in the south and is a great cook, so I bet she knows how to make them (side thought: why is this a southern thing? why don't we eat them in the north? not like we don't get - obviously - green tomatoes here!) -  why wasn't I just asking her instead of googling random recipes? Sure enough, she gave me lots of tips that I hadn't read about, and the proof is in the pudding (or in the tomatoes) that she knew what she was talking about :) Thanks mom!

A big key is that you want the tomatoes dry...really dry...so they don't fry up mushy. Slice the tomatoes into about 1/4" round slices (slice sideways thru the tomato, not top down - that's obvious, right?) and lay them out on paper towels. Sprinkle with salt to draw out some of the juices and let them set 30 minutes (you can go longer if you have time).  Blot really, really well so they are as dry as you can get them. Set up 3 plates (I use old pie tins) for your dipping assembly line;  in the first one put 1/2 cup flour seasoned with salt, pepper, and cayenne pepper; second one whisk an egg or two with a little milk; third one mix together 1/2 cup cornmeal with a couple tablespoons of flour, season with salt and pepper and red pepper flakes.


When you are ready to fry them - note: you want to make these right before eating them, they aren't going to hold very good - put oil (I used canola) in a large frypan, I did about 1/2" deep, and heat over medium-high. Once the oil is hot but not smoking, dredge each slice into the flour, shake lightly to remove the excess flour, then the egg mixture, then lastly in the cornmeal. For each step make sure you are coating both sides and the edges. Carefully place a few slices in the hot oil - don't crowd the slices in the pan - and fry for 2-3 minutes until golden brown, flip and cook for another couple minutes until the other side is golden brown. Don't leave them in the oil longer than necessary, soggy mushy slices are not going to taste as good! Remove from the pan with a slotted spatula, transfer to dry paper towels to blot the oil a bit, repeat with remaining slices.


Mom likes these with bacon jam (click here for a recipe) but I didn't have that so made a quick sauce out of mayo, ketchup, lemon juice, and pepper.

I'm telling ya' - these are fantastic!!! Light, flaky crust and the tomatoes are still firm and flavorful - oh man, I wish I had more green tomatoes so I could make this again right now!!!


Friday, November 9, 2018

Green Tomato Jam


Still using up all those green tomatoes left over from my garden - hope you're still with me? Couple more to finish out the week and we'll move on!!

This recipe for green tomato jam is the same one I used back in September with red tomatoes and I must say, I think it's even better than the summer one - and the summer one is delicious! I did everything the same except this time I needed to put it in the food processor to break up the big pieces...I love it!! This is very easy to do, I hope you'll try it?!

Click here for the recipe.


Thursday, November 8, 2018

Green Tomato Muffins

Yep, you read that title right - green tomato muffins! I used my zucchini bread recipe (which is slightly different but really similar to the zucchini cake/bread recipe I posted here) and substituted 2 cups of chopped green tomatoes for the zucchini and guess what - these look and taste almost exactly like zucchini muffins. Seriously I bet if you didn't know it's green tomato you'd say it's zucchini. Soooo, why not just make zucchini you ask? Fair question - but if you've been following my green tomato posts this week then you'll know why...'cuz I've got about 10 pounds of green tomatoes to find ways to use up!

If you don't have my green tomato problem of course go ahead and use zucchini and they'll be just as delicious. The cinnamon and nutmeg give lots of flavor, and they're fluffy and moist - note I usually leave out the nuts so Dave can eat them, and I'm not a big raisin lover so I tend to omit those too...and the muffins are still great.

Abundance of green tomatoes? Give this a try and let me know what you think!

Zucchini (or Green Tomato) Bread

Ingredients

3 eggs
1 cup vegetable oil
2 cups sugar
2 cups grated zucchini (or chopped green tomatoes - I pulsed them in my food processor)
2 teaspoons vanilla
1/2 cup walnuts (optional)
1 cup raisins (optional)
3 cups flour
3 teaspoons cinnamon
1 teaspoon nutmeg
1 teaspoon baking soda
1 teaspoon salt
1/2 teaspoon baking powder

Directions:
Preheat oven 325'. Grease and flour 2 bread loaf pans (or spray with non-stick baking spray).
Beat eggs, mix in oil and sugar until smooth. Add zucchini (or green tomatoes) and vanilla until incorporated.
In a separate bowl combine all the dry ingredients. Stir into egg mixture until just combined.

Bake 60-65 minutes until lightly brown on top and toothpick inserted in the middle comes out with a few crumbs.

note: for muffins I used paper liners and lightly sprayed them with non-stick baking spray. This recipe made 32 muffins and took about 20 minutes to bake.


Wednesday, November 7, 2018

Green Tomato Pasta Sauce

This isn't an actual recipe, and I've sort of posted this technique a few times now because I'm obsessed with roasting tomatoes...but this one I did using predominately green end-of-season tomatoes and it turned out so good I thought I'd share.

Put halved cherry tomatoes in a baking pan, drizzle with olive oil, sprinkle with salt, pepper, and italian seasoning. Slow roast for at least an hour in a 350' oven until the tomatoes have really cooked down and carmelized. After they cool scrape all of it (get all the little cooked on bits and seeds, that's the best part) into a freezer bag, squeeze out all of the air and pop in the freezer - you'll have the yummiest, simplest, pasta sauce in the middle of winter :) Or just put it over pasta right away if you can't wait!


 PS: save a little of the hot water after you drain the pasta you are going to put this sauce over - add as needed to the tomato sauce if it isn't liquid enough (you could also drizzle a little more olive oil if it needs it).

Tuesday, November 6, 2018

Green Tomato Soup

It's obviously too late here in Michigan to be waiting for green tomatoes to ripen (!) so I pulled them all off before putting the garden away for the year. I had so many of them that I didn't want to throw them out, and set about finding some different ways to use them. There are lots of recipes online; I picked a few to try and first up is this green tomato soup. I love tomato soup, and this turned out really good...my only problem with it is that my mind couldn't get past the "green" part! It has a thick chunky texture and with every bite I took my brain thought it should be split pea. And it's totally not split pea. Maybe if I would have strained this so it's smoother I wouldn't have confused myself so much - I used mostly green cherry tomatoes so there are lots of skins - once again, it tastes really good though so I'm definitely sharing this recipe and will make it again next year! Oh, and this is even good cold so will make it in the hot days of summer too.

Ingredients:

  • 1 T. olive oil
  • small onion, chopped
  • 1 garlic clove, minced
  • 2 pounds chopped green tomatoes
  • 1 cups chicken broth
  • 2 cups water
  • 1/2 teaspoon salt
  • 1/4 teaspoon pepper
  • pinch red pepper flakes
  • 1 bay leaf
Directions:
Heat the oil in a pot over medium heat, add the onion and garlic and cook until wilted and translucent (watch it, it burns quickly). Add the remaining ingredients, simmer until the tomatoes are tender - about 20 minutes. Discard the bay leaf. In a food processor (or using one of those immersion blender things) puree the soup until as smooth as you want. Or just leave chunky in the broth if you prefer.

Note: I was heavy handed with the red pepper flakes and it was a little spicier than I like - a spoonful of sour cream helped cool down the heat (and made it taste even better!). 


Monday, November 5, 2018

Crock Pot Beef Stew

It was chilly and sprinkling yesterday and beef stew was calling my name - popped all the ingredients in the crockpot and my wish was answered.

I didn't have any peas which bummed me a
bit cuz that are great in this recipe, but it's still
delicious! Browned sliced mushrooms would
also be a great addition if you like them. 
  • 4 lbs bottom round, trimmed, cut into 2" pieces
  • 1 cup flour
  • 1/3 cup olive oil
  • 2 onions, diced
  • 6 oz. can tomato paste
  • 1 cup red wine
  • 1 lb. potatoes, cut into 2" pieces
  • 1/2 lb. baby carrots
  • 1 Tablespoon salt, or to taste
  • 1 teaspoon thyme
  • 1 bay leaf
  • 1 cup frozen peas

Coat beef in flour. Heat some oil over med-high, brown meat on all sides. Put in 4 to 6 quart crock pot. Add onions to skillet, cook 10 minutes Stir in tomato paste, transfer to cooker. Pour wine into skillet, deglaze the pan, add to cooker. Stir in all remaining ingredients except peas; cover and cook on low heat 7 1/2 hours or high for 4 hours. Add peas and heat thru.

Makes 8-10 servings
recipe from Real Simple 3/04


11.5.2017: pot roast with tomato sauce
11.5.2016: sweet dill pickles
11.5.2015: corn husk wrapped candles


Sunday, November 4, 2018

Around The Campfire (week 44)

Dear Campers ~

Here's a quick recap of what happened at "camp" this week!

Posts you might have missed ~

10/28: around the campfire (week 43)
10/29: bloodshot eyeball cheese appetizer 
10/30: mummy calzone
10/31: hulless pumpkin seeds by Jenny
11/1: pumpkin snowman by Jenny
11/2: pineapple upside-down cupcakes
11/3: candied bacon

What's Cooking ~
  • bbq baby back ribs (oven), sweet kale salad (kit - I'm obsessed with this salad!)
  • grilled chicken, roasted baby potatoes, greek salad
  • baked pork chops, butternut squash ravioli, roasted asparagus
  • chicken fingers, homemade applesauce (Halloween night, we were in a time crunch!)
  • baked salmon, sticky rice, steamed spinach
  • lasagna, caesar salad
  • grilled chicken, spinach ravioli with pesto, chopped green salad
Miscellaneous stuff keeping me busy but not interesting enough for an entire post ~

  • went on a couple dog walks around the neighborhood this week and collected pine cones. At first I was filling my pockets (Dave refused to carry any hahaha, he does not appreciate my foraging while we are dog walking!) but then realized I had handy bags with me (ok, ok - yes they are meant to pick up dog poop but whatever, I used clean ones!). I have lots of pinecone crafts coming up :)
  • after almost 6 years of refusing to play fetch (Sarge's favorite game is picking up the ball and running, and then we chase him) I have found the secret to training him to bring the ball back - I put a small treat in one hand and hold my other hand out palm up. He wants the treat so bad that he's willing to bring me the ball - not always exactly into my palm but close enough for me to reach! So cute! I've tried bribing him in the past of course, but he's finally food motivated enough to work for cookies. 
Hope you'll check out the blog this week and see a few things I made from all the green tomatoes I pulled off the plants before cleaning out the garden and putting everything away...there's green tomato soup, green tomato muffins, green tomato jam, and of course fried green tomatoes! Have a great Sunday!

Sincerely ~


Jill, your camp counselor

Saturday, November 3, 2018

Candied Bacon

Cathy's neighbor, Jane, brought this bacon candy ("crack bacon" might be a better name tho!) to a party and I'm not ashamed to say I'm in love. Not with Jane, although she seems like a perfectly lovely lady, but with this bacon baked in sugar and spices, then drizzled with maple syrup. Swoon. I can't even. No words. Just make this and thank me. Or make it for me...whatever. I'll pass your thanks on to Jane, promise.


Ingredients:
  • 1/4 cup rosemary
  • 3 Tablespoons brown sugar
  • 1 1/2 teaspoons black pepper
  • 16 thick bacon slices
  • 2 Tablespoons maple syrup
Directions:
  1. Preheat oven to 400'.
  2. Combine rosemary, brown sugar, and black pepper in a shallow dish. Dredge bacon slices in the mix, shaking off excess. Place half of bacon in a single layer on a lightly greased wire rack in a jelly-roll pan. Repeat procedure with remaining bacon on a separate pan.
  3. Bake for 40 to 45 minutes or until browned and crisp. Towards last 10 minutes of browning, drizzle maple syrup over bacon and finish in the oven.

I don't know who Ryan Scott is, but he's a genius. 

11.3.2017: make a button bouquet


11.3.2016: fall paper chain garland


11.3.2015: fall wreath


Friday, November 2, 2018

Pineapple Upside Down Cupcakes

Made these for my niece's birthday (she's not a traditional cake or frosting lover, and usually requests pineapple upside down cake - click here for the bundt cake I made her last year); used my normal recipe but turned them into little mini cakes. So easy, pretty, moist - they transport really well, and having them mini makes it seem like you aren't eating as much (unless you eat 3 of them, ahem Macey).


Pineapple Upside Down cake recipe:
  • 1/2 cup butter (1 stick)
  • 1/2 cup packed brown sugar
  • 1 20 oz. can pineapple rings, juice reserved 
  • 16 stemless maraschino cherries
  • 1 box yellow cake mix
  • 1 small box instant vanilla pudding (omit if you use cake mix that has pudding already in it)
  • 3 eggs
  • 1/3 cup oil
  • milk
Preheat oven to 350'. Thoroughly spray a bundt pan with non-stick cooking spray making sure to coat every surface. Drain pineapple juice into a 1 cup measuring bowl and add enough milk to make 1 cup of liquid.

To make in a bundt pan: While the oven is warming up I put the stick of butter (cut up into chunks) in the bottom of the bundt pan and stick in oven to melt. Once it melts remove from oven and evenly sprinkle the brown sugar over top. Arrange 16 1/2 slices of pineapple around the bundt pan, and put a cherry between the slices.

Mix together the cake mix, instant pudding, eggs, oil, and reserved pineapple juice/milk. Spoon on top of the arranged pineapple slices and cherries. Bake for approx 40 minutes until the cake is done. Let cool in the pan 10 minutes, then turn out onto a serving dish.

To make in a 13x9 cake pan: melt the butter and sugar as above, then arrange whole pineapple rings evenly over top, put a cherry in the center of pineapple, and adjust the time according to the package directions.

To make cupcakes: I melted the butter in a small bowl in the microwave then stirred in the brown sugar until incorporated. Then spoon a little more than a teaspoon into each cupcake mold that I sprayed first with non-stick backing spray. For the top ones I cut pineapple rings into quarters and put them in the bottom of the cupcake tin around cherries, for the bottom one I used crushed pineapple with one cherry in the center. The crushed pineapple look better (in my opinion) but they taste the same so do what you want. After I filled up 24 cupcake spaces I used the remaining batter and pineapple to make 2 small 5" cakes.

These take about as much time to bake as regular cupcakes, check them at about 15 minutes and add on time accordingly.

PS:  I made the 5" cakes in little springform pans that leaked butter all over my oven (hello rolling smoke out of the oven when I opened the door!), put them on a rimmed cookie sheet if you make them like that! The cupcakes didn't do that thank goodness.


Thursday, November 1, 2018

Pumpkin...Snowman?...by Jen

*Jill here - this post is from my sissy...I'm ignoring her whole begging-for-stuff-hints by the way... it's such a cute idea!


So sometimes I like to just send my sister ideas for her blog.  Things I have seen, a craft I would like her to make for me, food I want her to make for me (you get the theme, right?)..

Anyway I saw this picture online for what to do with leftover pumpkins.  LEFTOVER PUMPKINS? A SNOWMAN?  As in, make this in the winter? 


So I’m a little curious on this one.  If I have the pumpkins at the beginning of October before Halloween, it sits on my porch all month, and then assuming some brat faced neighbor kid doesn’t smash it, you are going to make a snowman out of it a solid 2 months later?  I realize I am no crafter (or gardener, or decorator) but ummm… is there a post that goes with this that tells me how to keep a pumpkin from rotting in a 3 month span?

If my sister finds the secret though I would be happy for her to make it FOR ME. ðŸ˜Š


*Jill again - I'm thinking instead of trying to do this with fresh "leftover" pumpkins, we should buy the fake ones on super sale now that Halloween is over and make a snowman out of those! No rotting, no brat faced neighbor smashing it ;) 

I'm going to make one and will show you how it turns out! Don't tell my sis tho, she'll want it (obviously)...

PS: I've been seeing lots of online info on preserving those little decorative pumpkins and gourds by soaking them in bleach and then rubbing vaseline all over...just fyi. If you're so inclined. I'm totally going with the fakes. 

11.1.2017: pumpkin applesauce muffins
11.1.2016: make a wine cork pumpkin
11.1.2015: pumpkin gingersnap trifle


I did end up making her a mini pumpkin snowman, posted 12/7/18 click here to see how it turned out!