Showing posts with label DIY jewelry. Show all posts

Thursday, March 16, 2017

Tassel Earrings


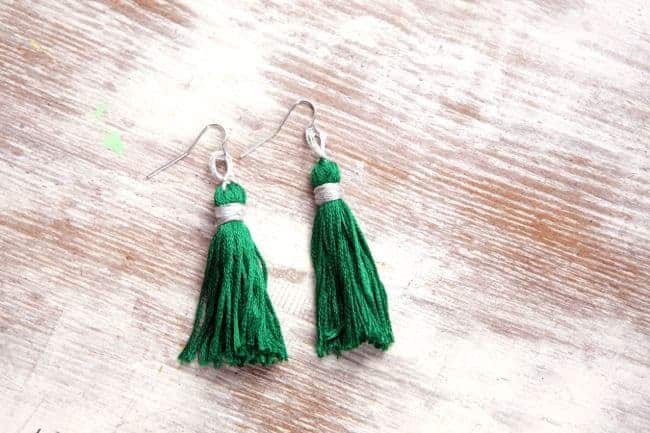
Here is a very easy last minute idea to make a pair of earrings (well it's last minute if you have all of the supplies on hand, we'll talk about that in a minute....) - make 2 small tassels out of embroidery thread and attach them to earring hooks. This is super fast and pretty cute - I made green ones for St. Patrick's Day but think of the possibilities! Easy, cheap, quick jewelry for every holiday :)


For the earrings you will need:


  • 2 6-foot pieces of emerald green embroidery thread 
  • 4 pieces of thread in a complimentary color (I used a silvery metallic). 2 6-inch pieces and 2 12-inch pieces.
  • A credit card
  • 2 earring hooks

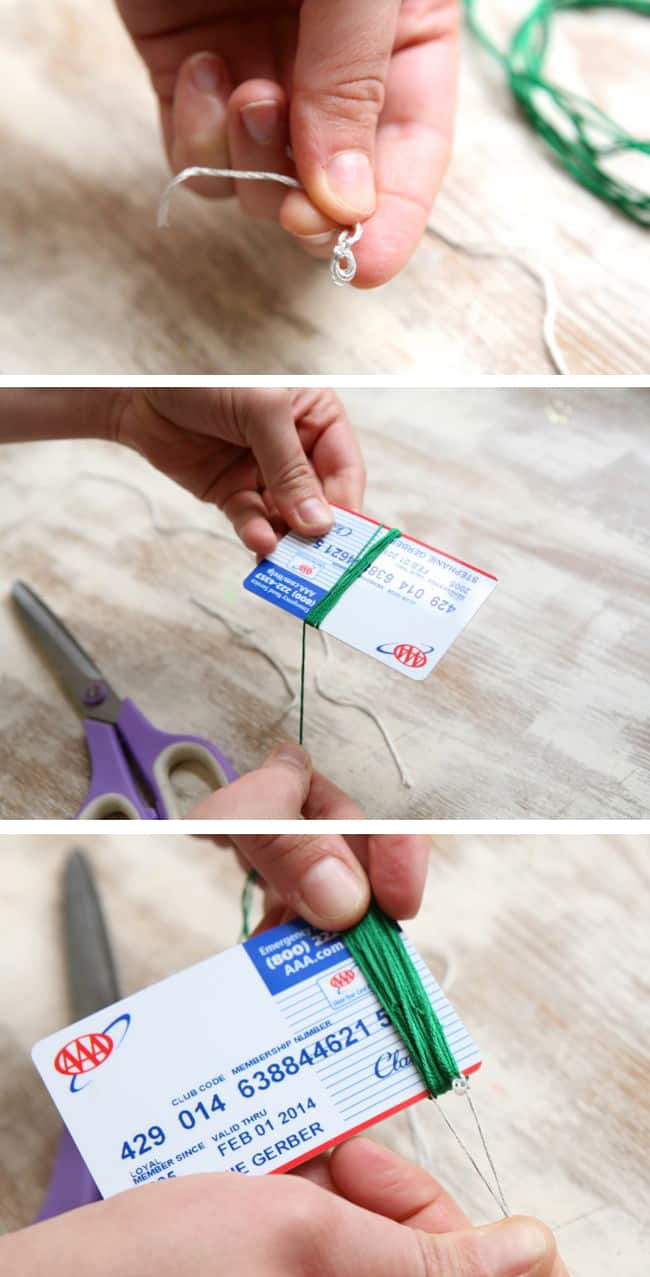
1. Take your 6-inch piece of thread and make a knot that keeps a small loop. Set aside.


2. Then wrap your emerald thread around the card as shown.
3. Feed the 6-inch piece of thread under the wrapped thread and tie a double knot. Then slide the green thread off the card.
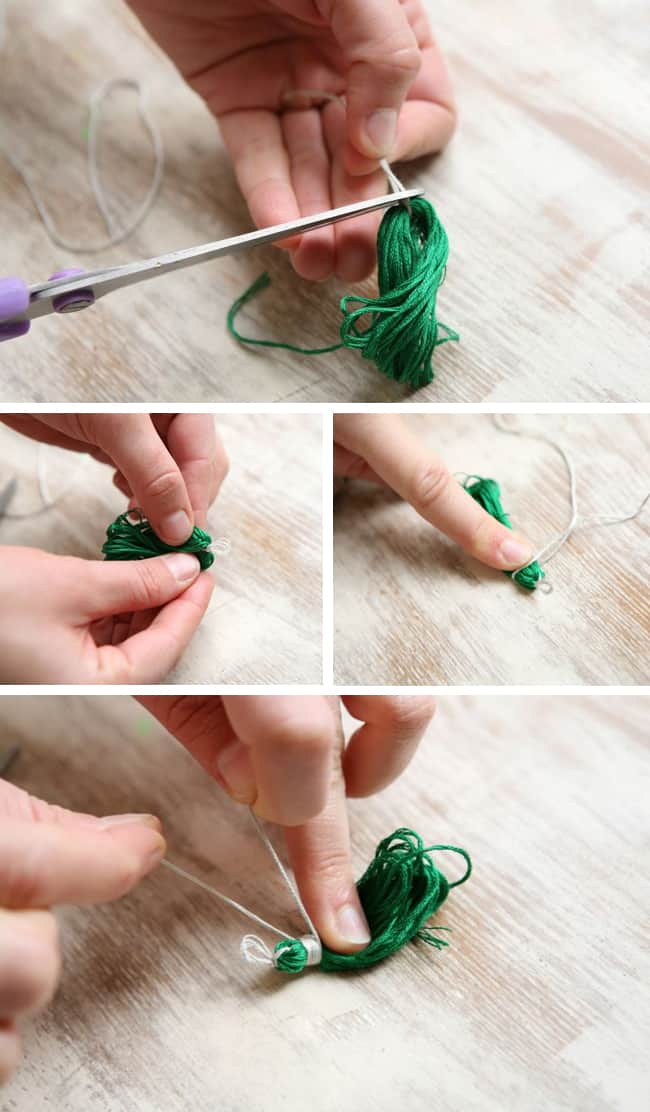
4. Snip the ends of the thread you just knotted, keeping the small loop at the very top.
5. Now take your 12-inch piece of thread and wrap it around the top of the tassel. Make a knot and snip the ends.
6. Now take your scissors and cut the ends of the tassel. Snip a bit more to even the length.
7. Attach the earring hook to the small loop at the top. You may need to open and close it with your fingers or round nose pliers.
8. Repeat for the second earring. 


Normally I wouldn't post a unfinished project (!) but I wanted you to be able to make these for St. Patrick's Day if you don't have anything green to wear! I thought I had earring hooks and I don't - so for now I have 2 pretty green tassels but no way to wear them. I will fix that tomorrow with a quick run to the craft store. The other problem with this post is that I used embroidery thread that I had wound on a card (I keep all of my threads on those little cards and filed in a box - know what I mean? If not I will show you!) so the thread has kinks. Not a problem when you are doing embroidery but it is a little problem when making anything else! I am working on a quick solution to get them straightened out, assuming if I get them damp and flatten out with my hand or something heavy it'll be fine. How cute and easy! Just make sure you have all of the materials on hand before you start if you actually want to wear these haha!


Click here to see where I found these directions and more pictures if you want them. 

Monday, February 27, 2017

Beaded Bauble Ring

St. Patrick's Day is right around the corner - heart stuff from Valentine's Day is put away and now it's time for all things green, shamrocked, and lucky :)

Was inspired by a green beaded ring I saw here, mine is way different of course but that's what I think crafting and inspiration should be...get ideas and then make them your own! Plus I didn't have the inspiration picture or directions with me when playing in the craft room and I just winged it hahaha.

This is super simple - twist some sort of heavy weight jewelry wire around something that is the size of the ring you want. (Remember when Janis and I tried to make wire wrapped rings, click here for that post, and they didn't turn out so good? Well I bought a ring sizer tool thing back then so I used that for this ring). I used 20 gauge copper wire for this ring since that's what I have on hand. Wrap the wire around a few times, I did 8 or 9, beginning and ending at the same place. Twist the two ends around to hold, thread a bead on each end and then loop the wire ends under the beads so they don't poke you and you can't see them. Then take a long piece of thinner gauge wire, wrap one end in between the two beads to hold it, string a couple beads on and wrap around wherever looks good to you. Make sure the beads stay on the top of the ring and aren't underneath the band, and don't pull too tight or the ring will get smaller. Keep wrapping and adding a couple beads at a time until it looks how you want, cut off the wire you aren't using and twist the end around and underneath the beads so it doesn't poke you and you can't see it - that's sort of a no-brainer I know, why would you leave the ends sticking up or out to poke yourself? Just start wrapping and these instructions will make sense I think! Give me a holler if you can't figure out what I did and need some help :)

I used green beads so I'll have green jewelry for St. Paddy's Day, make yours whatever color you want!

wrap wire around something that's the size you want the ring, then twist the ends around each other to hold

put a bead on each end and then wrap the end under the bead to hide it and hold the bead in place. 

wrap thinner wire between the two beads, add a couple beads and continue wrapping around the ring placing the beads where they look best. don't pull too tight or the ring will get smaller. 


side view


what the back looks like...obviously ;)

Thursday, January 14, 2016

Make a Fringe Necklace

This has been in my idea folder since 2011 and I finally got around to making one. Wasn't hard to make at all, and it turned out really cute - I'm going to wear this a lot!

The directions weren't exactly right, they said to sew 6" fringe to 8" of chain and then slip over your head. Simple, right? Except I don't have a very large head and there's no way a 14" necklace that isn't stretchy is going to fit over my head! I measured and the necklace would need to be more like 22" for that to happen. I modified the original directions a bit to make it work for me. If you have a 14" head then the original directions will be fine for you :)

1. I used a 14" length of chain, pull about an inch of fringe thru one end of chain.
2. fold the fringe back on itself and sew in place.
3. repeat on the other side of the chain.
fringe comes with string on the bottom to keep it together,
 just pull the strings off to release the bottom of the fringe. 
4. I then took out the middle link from chain so there is about 6.5" on each side.
5. using about 20" of thin black ribbon put it thru both ends of the chain, put the necklace over your  head and then tie the ribbon closed (I'll double knot it to make sure it stays on). 


here it is under a blouse...
and over a t-shirt. Play with it to see how you like it!


This idea came from InStyle Magazine, Feb. 2011

Monday, January 11, 2016

Make a Wrapped Wire Ring

I bought a wrapped wire ring the other day, and after really looking at it I thought "well I can make that"...and with my friend Janis's help we tried to recreate it. I might need to file this under "bloopers" or something though - what seemed like a super simple project ended up taking us a couple hours and we never really did figure it out. We used 20 gauge copper wire, wrapped it around a ring sizer a few times, threaded the end of the wire up thru the whole thing and twisted it around to finished it. Sounds easy right? We wound and unwound the wire a bunch of times and just couldn't get it to look like the "real" one - I decided I had enough of trying to make it work and will play with it some more in the future. In the meantime, here's a look at what we did and if you decide to try it let me know if you have better luck with the finished product!
and back.
front of the original ring I bought...


wrap wire around a few times


thread ends of wire thru the stack


twist to hold in place


the finished product - back and front