Showing posts with label christmas gift. Show all posts

Saturday, December 21, 2019

Santa Baby Gift Enclosure

Janis sent me these photos in 2017, and like I have been saying SO often lately - I forgot about it! How cute is this little Santa baby gift holder? Check out the funny little butt flap, that's where you'll insert the gift - candy, small trinket things, whatever (what you can fit depends on how big you make the onsie).


To make these cutie gift holders you'll need red felt, 6 small white buttons, scissors, and a sewing machine or needle and thread. 

Cut out 2 'onesie' shaped pieces of felt. Sew buttons on what will be the front of the onesie. On the other piece cut a hole in the backside; then cut a piece of felt that will cover the hole, sew it in place just across the top of the flap, and sew a button on each side. Then simply sew the two pieces together, all the way around - the only opening between the 2 pieces of felt is underneath the flap in the back. Look at the photos, they are pretty self-explanatory!

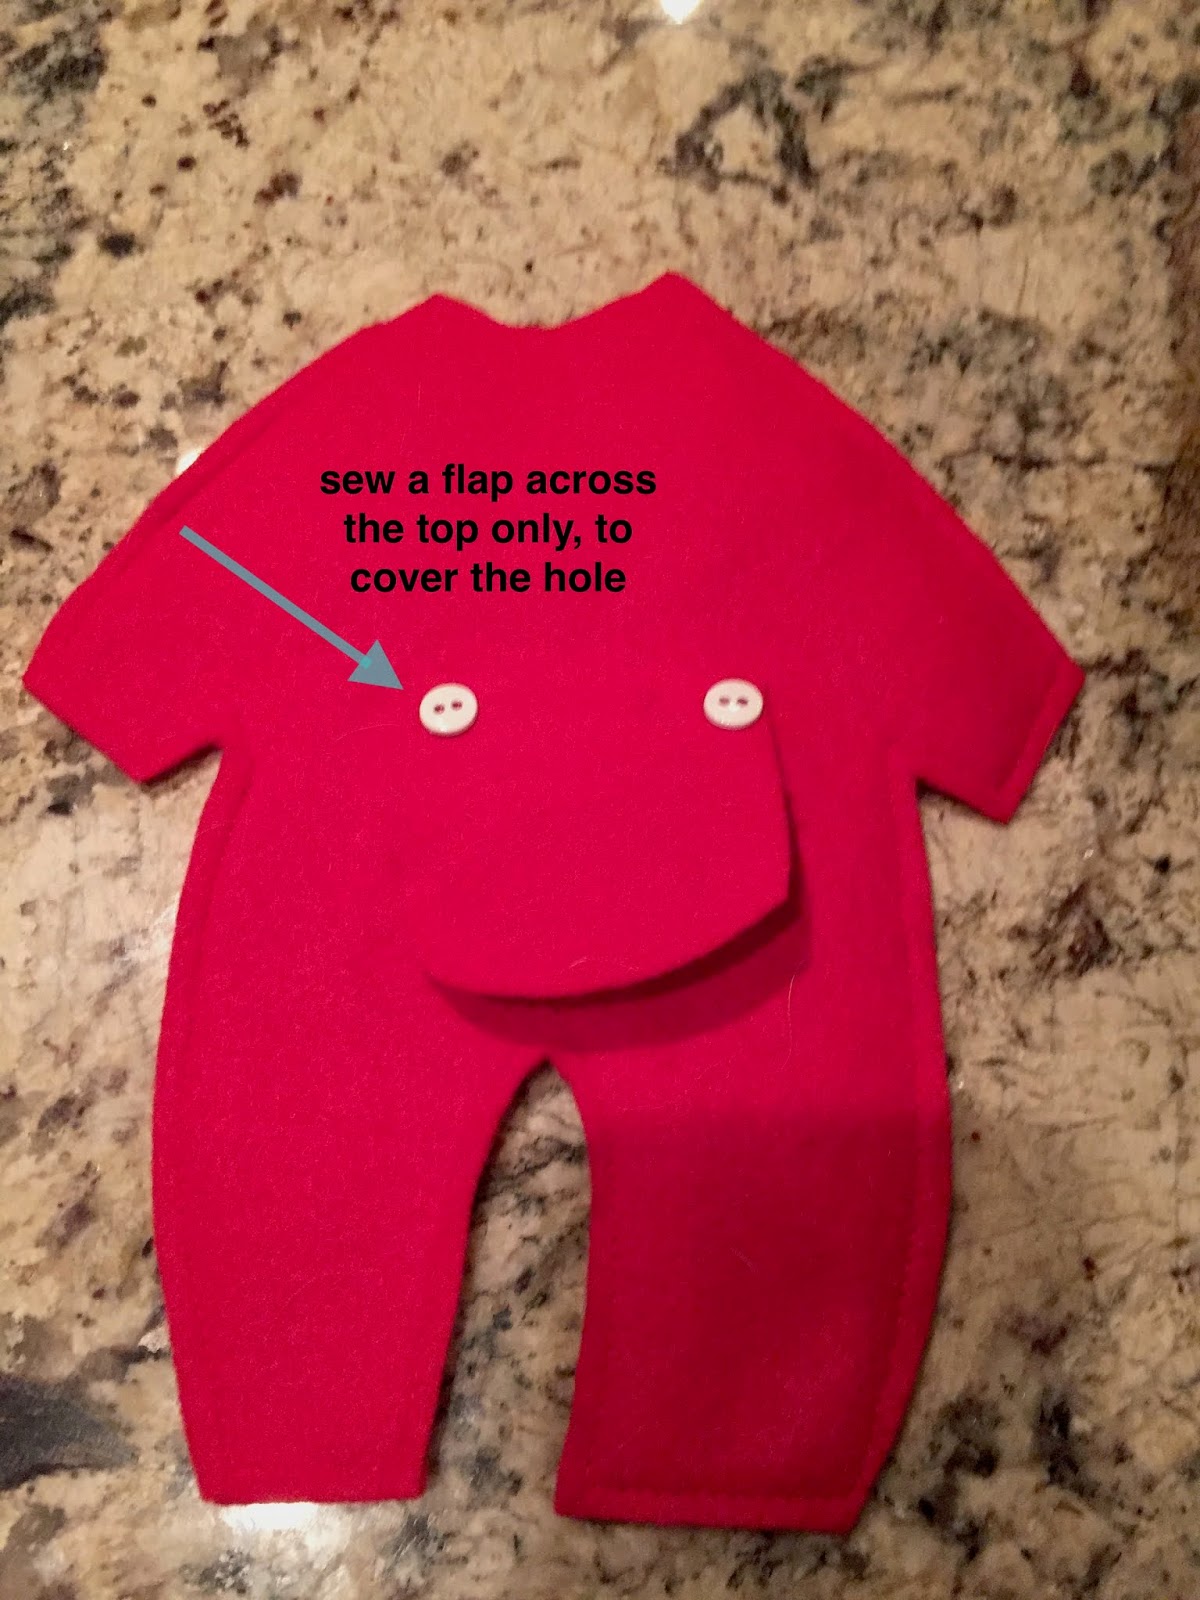


*everyone knows what a onesie is, right? The all in one thing babies wear, slip their arms and legs into it then snap or button up the front. Onesie = all in one outfit.

Oh, and I'm thinking if you don't want to sew these I'd try glueing...don't see why it wouldn't work? Or maybe even try it out of red paper?


12.21.18: chocolate fudge wreath
12.21.17: Nat's Christmas sugar cookies
12.21.16: focaccia bread tiles
12.21.15: framed wifi password


Monday, December 16, 2019

Felt Poinsettia Napkin Rings


As many of you know, I've volunteered in our local elementary school for years and years - my niece P was in the second grade when I started and she is now 23. I loved 2nd grade, and her teacher Mrs. Whitmore, so much that I just kept repeating 2nd grade over and over! I kind of borrowed (ok, ok, I stole it - whatever) this Christmas craft from Mrs. Whitmore - this is a simple project she had the kids make for parent and grandparent gifts (I can't tell you how many poinsettia outlines I drew on felt squares for the kids to cut out and assemble). They are fun, kid-friendly, simple and quick - all things you need with a roomful of 2nd graders haha, but also perfect for bigger crafters too (like me!).

I was 'savvy' enough (is that the right word? hmmm) to keep a template of these poinsettia napkin rings so I could share them with you like 15 years later - I did google them and there are lots of free templates online if you don't want to just look at mine and freehand them yourself. There is 2 different sizes of the same 4 petal shape - you need red and green felt to make 1 large green, 1 large red, 1 small red, and one red middle post piece that holds it all together. We didn't add sequins on the petal tips back in 2nd grade, but as a grown-up who doesn't know when to quit I attached some with a bit of elmers glue after assembling the napkin rings.  The photos are pretty self-explanatory I think:

trace the template onto red and green felt

cut out the shapes - one large red and green, one small red, and one middle red piece

layer the 3 petal shapes on top of each other, smallest red piece on top

cut a small slit thru the middle of all 3 pieces 


feed the 2 ends of the middle post piece thru the slit to create the napkin ring


add sequins if ya want! and of course you want - cuz...sequins! 

feed a napkin thru the circle created by the middle post piece. 

12.16.18: 🔥week 50
12.16.17: reindeer cupcakes
12.16.16: candy cane mice
12.16.15: sea salt body scrub

Monday, December 9, 2019

Felt Mitten Gift Tag Clip

"Felt Mitten Gift Tag Clip". Hmmm...that's an odd name, I know. But it's what it is and I can't think of a better way to describe these! Very simple and easy, but sooooo cute - and a fun addition to your Christmas gift wrapping.

I bet I don't even have to explain how to make these other than you can't see the little clothespin on the back of the mitten - now you know all you need to know to whip a few of these out!


Still want info? Ok, seriously just cut out little mitten shapes from whatever color felt you want, add on a few decorations like mini pompoms, sequins, beads, trims, feathers..., then glue to a mini clothespin. Then clip to your gifts - you can clip it to a tag, the top of a bag,  or just clipped to a ribbon/bow. Done. Easy!


12.9.18: 🔥week 49

12.9.17: elf gift tags

12.9.16: k-cup snowman lighted garland


12.9.15: paper Christmas lights garland


Thursday, July 27, 2017

Mug Cozy

You've heard of the whole "Christmas in July" thing, right? Getting a head start on Christmas gifts, especially if you are planning to give homemade gifts, is a great idea - one that I rarely plan ahead for and end up frantically crocheting at the last minute! Not this year...I'm determined to get going with plenty of time to spare (we'll see how long that lasts haha).

I crocheted these easy mug cozies after seeing them on our trip to Ireland - I purchased the cute sheep on a stick there, but the crochet part of the cozy is so simple there was no way I was going to spend like $15 on one! This was a super quick project, just a matter of minutes to crochet a rectangle long enough to wrap around a mug - then hold it closed with the stick. I like this better than the more fitted cozies I've seen because it's adjustable to many different sized mugs - clever.

Now since I only bought 2 of the sheep, I don't have more of the stick things here and I'm either going to have to figure out how to make them, or use something else as the closure. A large pin would work and be pretty cute actually, or I'll find little things to hot glue to the top of a short dowel.

For the crocheted body I played with different yarns and simple stitches - all single crochet, all double, all half-double, creating a pattern with single and double...it really doesn't matter. Just crochet whatever looks pretty to you!


I'm thinking big safety pins like these would make good closures too...I'll let you know what I make or find to keep the cozy on the mug!