Monday, July 8, 2019

Beaded Hoop Earrings

Made these pretty beaded earrings at the campground table, they came together really quickly and will go with pretty much everything in my closet.

You'll need 2 wire hoops, a couple lengths of thin wire (thin enough that you can wrap it around the hoop by hand), and approx. 40 beads in your choice of colors - mine are clear, gray, and black and I used silver wire but there are lots of different wire colors available. Wrap wire around the earring hoop a few times, then add a bead and wrap the wire around, add another bead and wrap again. Continue adding beads and wrapping the wire for as long as you want, then wrap the wire around a few times to finish and hold the beads in place. Easy!

The technique is similar to the beaded ring I posted in '17, click here to see more on how to make wire wrapped jewelry.


7.8.18: gazpacho
7.8.17: 3-ingredient sangria
7.8.16: mushroom rice

Sunday, July 7, 2019

Around the Campfire 🔥 (week 27)


Dear Campers ~

Here's a recap of what happened this week at camp (in case you missed anything):

Posts ~

6.30: 🔥 (week 26)
7.1: mosaic stepping stone
7.2: Tip-sy Tuesday: storing ribbons
7.3: mini fruit pies
7.4: Fourth of July
7.5: Lego Scottie
7.6: propagating plumeria

What's cooking ~

  • crock pot bbq shredded chicken, sweet potato cornbread (both recipes to follow), roasted green beans
  • grilled pork tenderloin, butternut squash spiral salad
  • marinated chicken, mashed potatoes, mexican street corn salad (recipe to follow)
  • grilled tuna, greek salad, roasted garbanzo beans
  • grilled chicken sausages, sweet kale salad, potato salad, mexican street corn salad 
  • steak, black bean salad with corn, tomatoes, avocado in vinaigrette 


Miscellaneous things keeping me busy in addition to the above, but not worth a whole post ~
  • I'm writing this from the campground, it's such a gorgeous day! Brought a couple crafty things with me to make, but first I'm being lazy enjoying sitting outside under the umbrella catching up on the blog. 
  • read "Before We Were Yours" by Lisa Wingate and loved it. Cathy recommended, it's a historical fiction based on a true story of a woman who runs an orphanage in the 20-50's. Really good, couldn't put it down ⭐️⭐️⭐️⭐️⭐️. Also read "Memory Man" by David Balducci, also recommended by Cathy - loved it too, in a very different way than the historical fiction one! Memory Man is quite the thriller, while reading it I kept thinking "am I reading the correct Memory Man? Does Cathy like these creepy suspenseful thrillers?" Yes she does, and it's a good one. ⭐️⭐️⭐️⭐️⭐️
  • picked about 4 meals worth of green beans this week, things are happening in the garden! Tomatoes are still green but they're coming...I'm feeling another 'tomato week' in my near future. 
Hope you had a great week and a happy 4th long weekend. Check back this week to see what fun things and recipes happen at camp! 

Sincerely ~


Jill
camp counselor and lazy camper


Saturday, July 6, 2019

Propagating Plumeria

Back in the first part of May you might remember I planted a plumeria cutting to see if I can turn it into a new plant  ~ I mentioned that I was giving it a try in week 18 Around the Campfire, here's the picture from back then, and yes they are exactly what it looks like - 2 planted sticks:)


Backstory - Dave came home a few days before we were getting ready to make our spring migration back to Michigan with this big ol' stick,  said a friend of his gave it to him and I "needed to plant it and it'll become a tree". Um, ok - what kind of tree? And how am I going to do this with our leaving? Am I taking the stick to Michigan? He thought it's plumeria, after doing a little research it is indeed plumeria and I set about learning what the heck to do with it. Turns out it is pretty easy - I made three cuttings from the one large cutting, let it dry for a few days, dipped the end in rooting powder and planted it in a fast draining mixture of soil and perlite - and guys, guess what? It's working! Well, at least one of the cuttings is...


You can see the new growth on the front cutting, the back one hasn't rooted yet and I'm thinking it's not going to,  but I set it outside to get more sunlight and warmth and we'll see.


Now that it's producing leaves I repotted it into a larger pot to give it room to grow. I mixed the same 1/3 lightweight potting soil with 2/3 perlite to plant it in, plumeria doesn't like to sit in water so the soil needs to drain quickly - adding that much perlite will keep the soil airy and loose and help promote drainage. It needs to dry out in between waterings - I put it outside but we have been getting an insane amount of rain this spring and I might have to bring it inside. Here in Michigan the plumeria will be an inside plant, but I'm putting it outside while the days are sunny and warm.


On a side note - the insane amount of rain has made my garden seriously flourish! I cannot believe how big everything is already - I planted 6 different tomato plants, bush and pole green beans, bush and pole sugar peas, and climbing sweet peas.


Lucy is so cute when I bring her in some fresh-picked peas, she literally grabs them from me she is so excited to eat them. 

Friday, July 5, 2019

Lego Scottie and Hydrant

Yes, I'm a grown up. Yes, I have other things to do. No, I haven't given away the Legos yet. 

That's all I'm gonna say. Bam - shortest post ever. 


Thursday, July 4, 2019

Fourth of July, 2019

You've seen this post before - but it says all the things I want to say again this year so...why reinvent the wheel hahahah!


HAPPY INDEPENDENCE DAY!!

cheers to

~Stars and Stripes~
~Freedom~
~Sparklers~
~Parades~
~Liberty~

and food, fireworks, family, and friends

ENJOY YOUR DAY!


A note from the dog:

Guys! I usually like loud noises and want to go check out what's happening but seriously...fireworks are scary so please read these tips my mom found. She also turns on the tv which I appreciate...I know she's just trying to distract me from the loud noises outside but since I LOVE to watch tv and bark at anything that moves on the screen it makes the fireworks a little bit easier to take. They are fun for people, but not for me and my friends. Just sayin'. Now go have fun and save me some hot dog.

Love, The Sarge

Wednesday, July 3, 2019

Patriotic 2-bite Mini Fruit Pies

I thought I posted these in the past but can't find, so at the risk of another repeat here's how to make these easy mini bite-sized pies for your Fourth of July celebrations - you can easily change the flavors (click here to see one post I found for different flavors) but blueberry and cherry are color perfect for a red, white, and blue kind of day!

One big reason they are so easy is I totally "cheat" and use refrigerated pie dough (like the Pillsbury kind rolled up in a box) and canned pie filling! And I do not feel guilty about using these shortcuts, they are great - everyone loves them, so why make this harder than it needs to be?

Sprinkle your counter with a little flour, lay out one sheet of dough and roll it out so it's a little thinner. Using a small glass or biscuit cutter, cut out circles about 2.25" that will fit into a mini-cupcake sized pan sprayed with non-stick baking spray.


Using my small cookie dough scoop I fill the cups about 3/4th full, too full and they'll bubble over (which makes a mess in the oven, trust me). Bake at 400' for approx 12 minutes until the edges of the crust are browned. Cool for a few minutes in the pan and then carefully remove to a cooling rack (I use a small knife to help lift them out).


Even not filling them too full you might get a little run-over. I lay pieces of aluminum foil on a shelf rack below the pans to catch any drips. Easier clean up.

You could finish with a drizzle of icing if you want - in a small bowl mix together powdered sugar with a little milk; then either put the mixture in a small baggie and snip one end, or dip the tines of a fork in the mixture and drizzle over the pies. You might want to put something under to catch the icing drips or you'll have a very messy counter.


Tuesday, July 2, 2019

Tip-sy Tuesday: Storing Ribbon and Trims

Last week I showed you the pretty wire basket with ribbons (click here for that post), did you notice how I store random bits of ribbon that don't have a spool? I've found that empty paper towel holders make the perfect way to organize the ribbon and trims - just wind around the paper towel holder and secure with either tape or straight pins. Makes it so much easier to find what you're looking for!


cuz this is what it looks like if I don't keep them all nice and organized! yikes. 


Monday, July 1, 2019

Mosaic Stepping Stone

I've had this kit hanging around for a couple years now, tried to get Brooke to make it with me last summer but we never got around to it; my plan is to use this at the campground to hold down the rug that keeps flapping around. I've never made a mosaic stepping stone before, I followed the directions closely and it went pretty much according to the instructions although I do have a couple more tips to share.


1. In addition to the supplies they provided in the box - which amounted to the cement mix, a wooden writing tool (I laughed at that one, it's a popsicle stick!), a wooden mixing paddle (basically a paint stir stick), broken bits of colored glass, and the plastic mold - I used a 5 quart bucket, disposable gloves, and wore an apron to protect my shirt in case this project ended up being messy. After reading the warnings to avoid breathing in the cement dust I tied a bandana around my face and wore my glasses just in case. Really, all the warnings were making me a little nervous but this is supposed to be a kid friendly project so I just protected myself the best I could as a precaution. Also, you'll want to put down some paper to protect your surface.

2. The directions say to stir in 2 cups of water, then adjust the water as necessary for the mixture to be the consistency of cookie batter. Well that confused me - like what kind of batter are we talking because there are many different cookie batter consistencies! HA!. Turns out I think I might have went with a drier cookie batter and the cement started setting up before I realized it. But it still turned out so I'm good.


3. Before mixing the cement I wanted to make sure I knew exactly what I was going to do with the glass bits. First, I traced the shape of the stepping stone mold on some cardboard, then played around with where I wanted the glass mosaic pieces to go. That of course took a long time because I couldn't decide what pattern I wanted to make! Once I had what I thought looked good I mixed the cement and poured it into the mold as directed. So far so good.


4. Didn't really think about how I was going to transfer the pieces from my mock-up to the actual stone. Fortunately I took a picture of the practice piece - that helped give me an idea where I wanted the spirals to go but when moving them to the stone the angles got changed and all the sudden it wasn't like I practiced! That's when I realized the mix was setting up - uh oh!

5. To place the pieces on the cement without getting the mix all over my hands I wore a disposable glove on my left hand, picked up a piece with my left hand and placed in on the mix then using my right hand and the "writing tool" (aka: popsicle stick) I guided the piece in place (having a glove on my right hand was too hard using the stick).

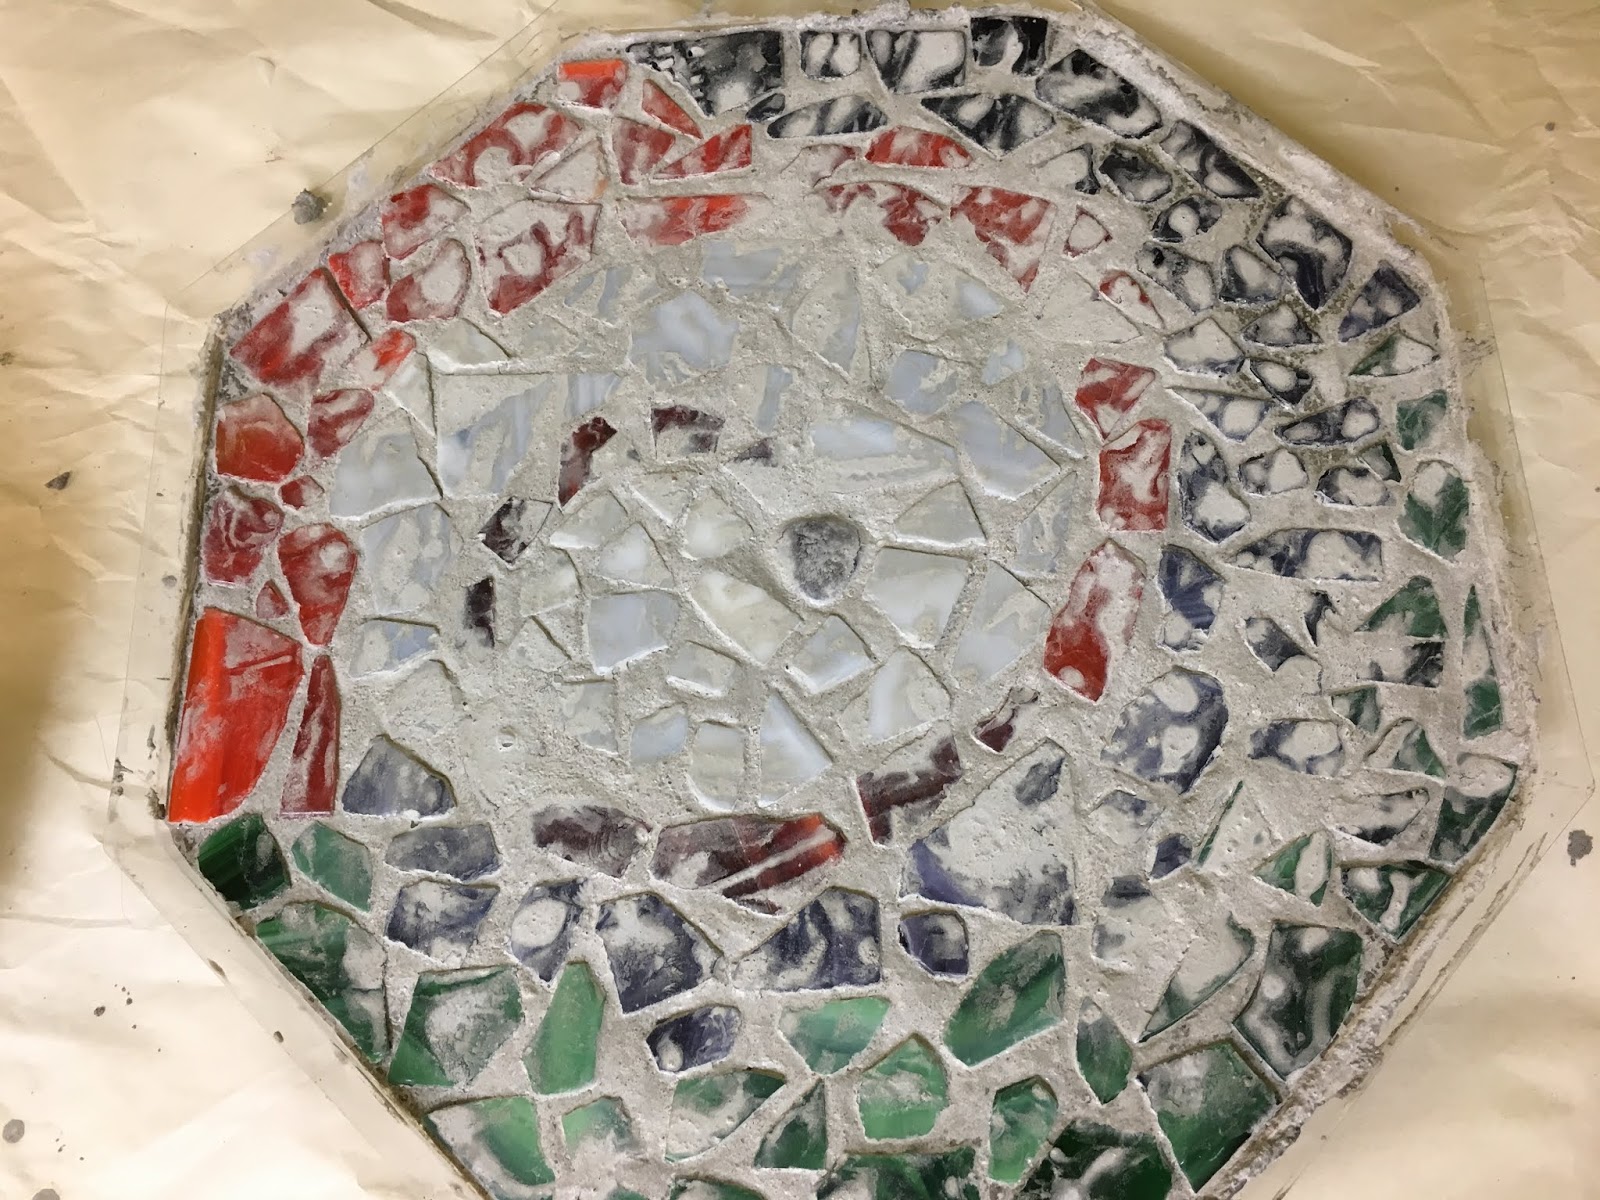
6. Once I had all the pieces transferred from the mock-up cardboard to the stone there were some little spaces where I added small bits of glass to fill in. Once the glass pieces are all in place I put on both gloves and pressed the pieces down into the mix - that released some liquid from the mix but it's ok, once it dries you wipe it off with water.


after drying overnight, use an old toothbrush and water to clean the front surface.
Don't remove from the mold for 24 hours.

after 24 hours, remove from the mold and wash with dish soap

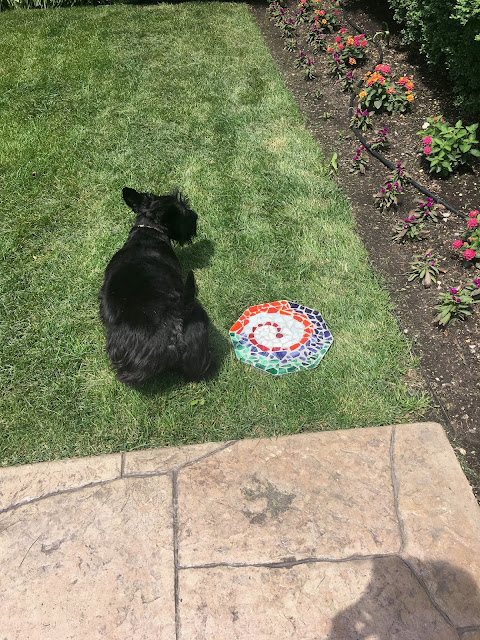
That dog! I'm pretty sure he was going to pee on my new stone,
but at the last minute he lifted his left leg on the grass instead - insert eye roll


Sunday, June 30, 2019

Around the Campfire 🔥 (week 26)

Dear Campers ~

Here's a recap of what happened at camp this week in case you missed anything:

Posts ~

6.23: 🔥 (week 25)
6.24: woven wire basket
6.25: tip-sy Tuesday: gardening tip
6.26: cherry pie cookies
6.27: my sis is hungry: chicken and wild rice casserole
6.28: flag door hanger
6.29: 3-D paper stars

What's cooking ~
  • grilled tuna, greek salad, roasted garbanzo beans
  • grilled chicken thighs, salad, roasted asparagus
  • marinated pork tenderloin, veggie tots, sweet kale salad
  • steak, sautéed mushrooms, wedge salad
  • smoked brisket at Al and Cathy's, baked beans, corn, coleslaw
  • grilled chicken caprese, roasted asparagus
from June '16 - donut holes dipped in melted chocolate with sprinkles
click here to see how to make them

Miscellaneous stuff keeping me busy in addition to the above ~
  • made deviled eggs using this tip that I posted back in '16 and once again, perfect success even with a brand new carton of eggs. Seriously, all 12 eggs peeled flawlessly - yay!
  • got to hang out with Brooke, she made a few posts for me that I'll be sharing in the near future (hint: she also enjoyed the Legos!). 
  • My sis went out of town so missed out on her "my sis is hungry" dinner and review - good news tho, I have a "my niece is hungry" review on the blog this week from Macey.
  • read "Fifty Things That Aren't My Fault" by Cathy Guisewite ⭐️⭐️ I got tired of reading it, it's cute and light but couldn't stay with it. If I had 1/2 star emoji then I'd give it 2 1/2. Also finished "Valley of Horses" ⭐️⭐️⭐️⭐️⭐️. Now waiting for #3 in the Clan of the Cavebear series from the library.
Hope you had a great week - any plans for the 4th? Man it's coming up fast! I like celebrating Independence day - in addition to the obvious reason we have to celebrate (hello, let freedom ring!) I love flags, fireworks, sparklers (although not gonna lie, sparklers freak me out a tiny bit having shooting sparks landing on everything!), the cookouts and berry desserts, hanging with friends and family 🇱🇷

Check back this week to see some more fun projects, recipes, and whatever else I can think of to make! 

Sincerely ~


Jill
Camp counselor and 4th of July lover


6.30.18: strawberry collins
6.30.17: make a flag luminary
6.30.16: make a red white and blue headband

Saturday, June 29, 2019

DIY 3-D Paper Stars


I just learned how to make these 3-D paper stars, they are very easy so you can whip some out before the Fourth of July (which is coming up so quickly!) no problem - all you need is paper and scissors. I did find that regular paper is easier to fold than cardstock, practice on paper before you start folding your good paper. When I did them out of cardstock I used a bone folder to get a nice crisp crease.


Wouldn't these be cute if you hole-punched them and added a little hanger (twine, jute, yarn, thread, whatever); then hang around the house, as a garland, in the windows, off a table...options are endless! I'm going to remember these at Christmas time and make some in either Christmas-y papers or silver and gold - it'll be so pretty! Oh, or as a gift topper? I think that'd work. Anyway - I took lots of pictures and also made a little video to show you how to do this; as always I struggle with describing how to do it hahaha - it's much easier to do then I make it look!

step 1: fold an 8.5 x 11" piece of paper in half, lay the paper down with the fold at the top away from you:


step 2: bring the top left corner to the middle of the right side of the paper and crease smooth:


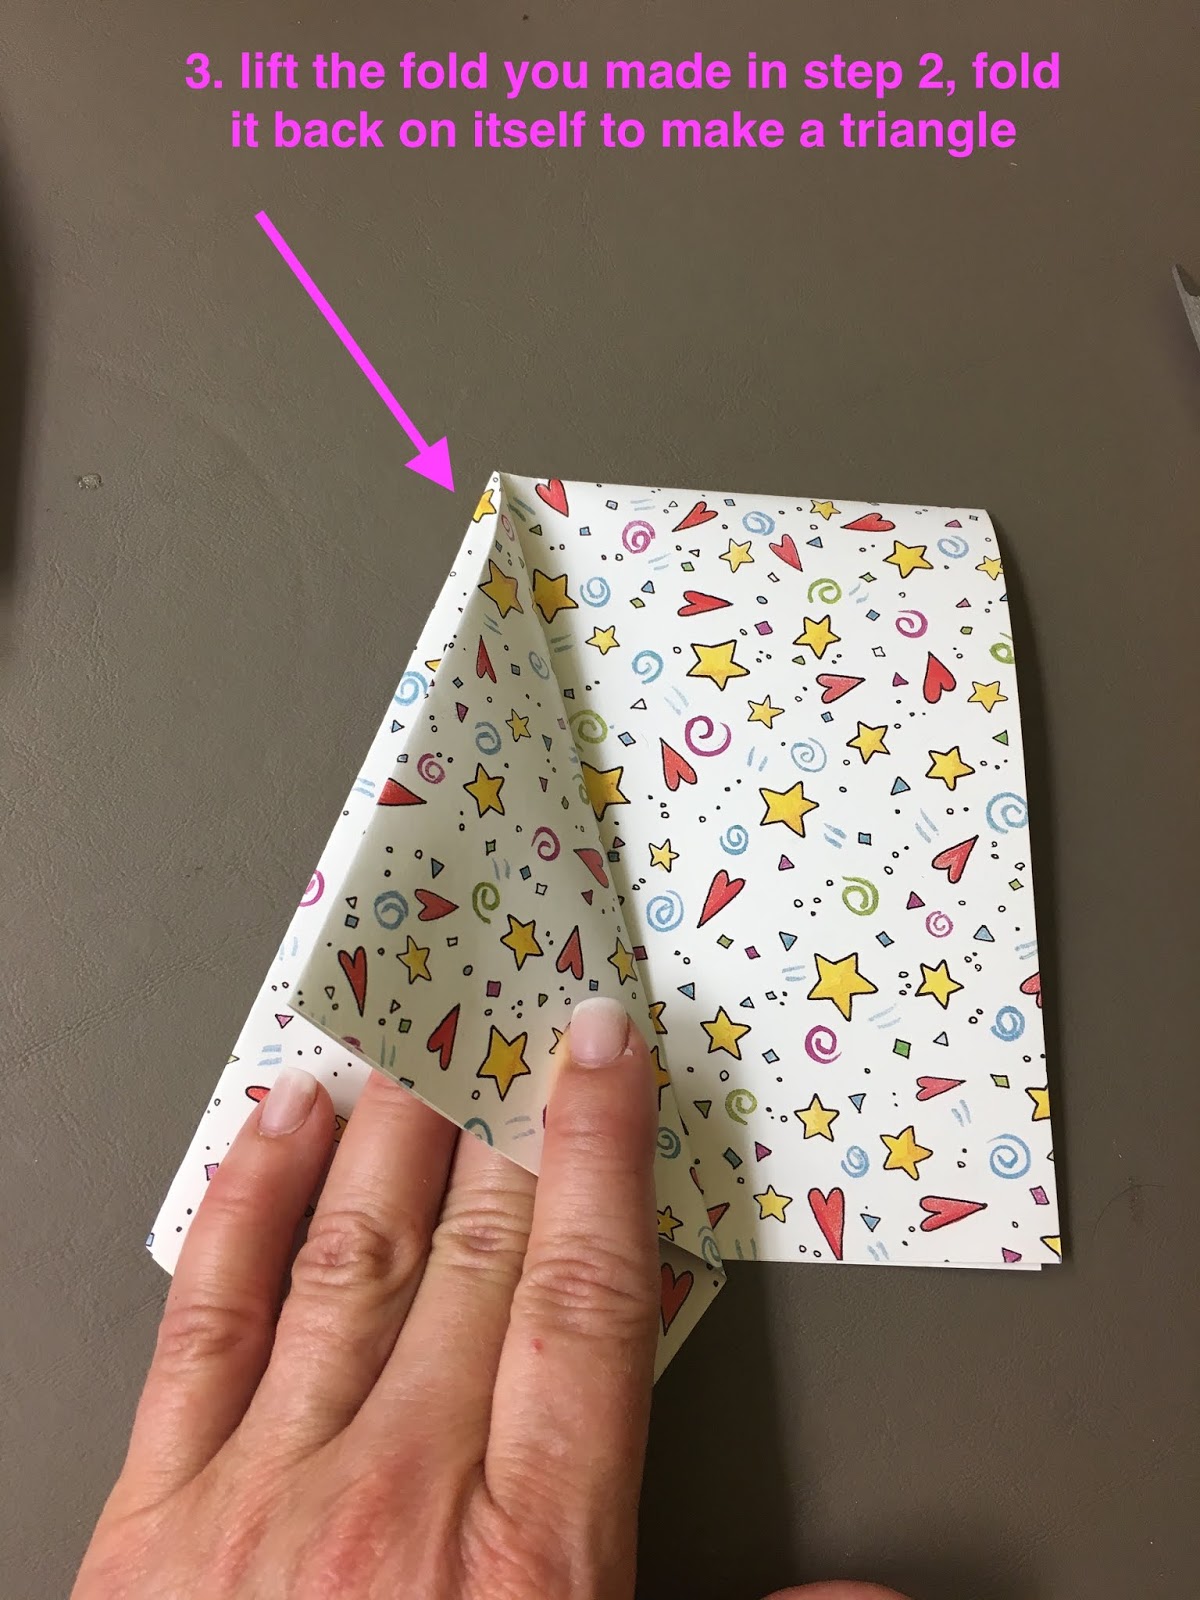
step 3: lift the fold you just made (originally it was the top left corner) and fold it back on itself following the line of the paper underneath. It'll make a triangle shape:

. 


 step 4: fold the right side of the paper over the triangle you made in step 3, crease along the edge:


step 5: when you folded the right side of the paper over the triangle in step 4 there is a piece overhanging what is underneath, fold the overhang back on itself following the edge of the paper underneath:


step 6: see the bottom edge of the folded part in the middle above? You are now going to cut above that edge all the way across, snipping off the top of the folded package. Follow the edge of the bottom to know what angle to cut at (follow the arrows in the next 2 photos):


step 7: unfold the small part you just cut off, there's your star! Now you just need to re-fold the creases so the ones on the long points (the star arms) are creased up, and the folds on the star sides are down (note when you unfold the star some of the creases aren't in the correct position as shown in the picture below):


 after you crease the long points up and the sides down, you have a 3-D star:


You can change the size of the stars by using different pieces of paper, or cutting the top off closer to the point. Have fun!

click here for original source

6.29.18: Lisa's button flag art
6.29.17: make a red, white, and blue windsock
6.29.16: patriotic potato salad

Happy moment ~ watched a turtle dig a hole in the dirt and lay her eggs, so cool!