Thursday, October 13, 2016

Making Babies

Hello, everyone...I'm Jill's friend, Candy.  And her guest blogger, for today, while she is out taking a break and having some fun!  I'm not really crafty, but I do love gardening and decorating! So here we go: A couple of winters ago, we lost our huge boxwoods along the side of the garage. What to do with that space? Then, I remembered my  Hydrangea shrub, that loves having babies!! She gave me 3 babies a few years back, and I'll bet she can do it again! 


this is the mama

 This is her big baby on the other side of our house -
You just take a branch that is growing low, on the shrub, and just pin it to the ground, with a piece of a hanger:


So you let it root. Then in the fall, you can cut it from the mother plant. 
But leave it there, until spring,  then dig it up, and plant it, where it can get lots of water (which makes alot of sense, since hydra is in it's name), and give it shade and/or sun - they like either. 


 Here are her 6 last year's offspring: Easy peasy! (Their mama is in the background, of this row)        
  Happy Gardening!

Wednesday, October 12, 2016

Cassandra's Chewy No-Bake Cookies

I was whining that I don't like to make no-bake cookies cuz it's always a crap shoot if they'll turn out - I seem to either get runny and not set or hard and dry (does this happen to you too?). Maybe out of pity, maybe to be nice, or maybe to shut me up Cassandra gave me the recipe she always uses - says they are her dad's favorite - so I figured I'd make them and see if I could get them right for once. These are different from any no-bake I've had - chewy and gooey, more cookie-like than traditional no-bakes, and they are really really good. I am SO happy she gave me this recipe! Thanks Cassandra!

In a saucepan put 2 cups of sugar, 1 stick butter, 2/3 cup cocoa, 2/3 cup milk. Boil for 1 and 1/2 minutes, turn off and add 1 Tablespoon vanilla and 2/3 cup peanut butter. Stir until the peanut butter is melted, then add 3 to 3 1/2 cups of oatmeal and mix well. Drop by spoonfuls onto wax or parchment paper.

Notes: I didn't have regular whole milk so I used 1/3 cup cream and 1/3 cup skim milk - maybe that's why they turned out SO good?  I don't know how long it took them to set up, I scooped them onto parchment using a 2 tablespoon cookie scoop and walked away for a couple hours. When I checked they were done, and sort of addicting - I just wanted to try a bite of one but couldn't stop eating...and they're especially good with a glass of milk! Made 28 cookies.


Let me know how they turn out if you make them, I need to know if I just got lucky this once or if it's a no-fail recipe! Enjoy!

Tuesday, October 11, 2016

Toilet Lever Repair

I don't do very many household repair posts, but Dave actually fixed the toilet and I was so surprised I took pics and had to share with you. He is not generally the handiest person, so if he can do it (and there were no bad words uttered and no blood) I'm pretty sure you can too...;).

The lever thingy that's attached to the handle broke off the back (inside the top tank). He got a repair kit at the hardware store, removed the old lever and all the bits that had broken and rusted off the back of it that were in the bottom of the tank, and attached the new lever and handle - apparently you just get a new handle with the repair kit instead of reusing the old one, fortunately it looks just fine so it doesn't matter. It only took a few minutes and there are instructions on the back of the package. He even replaced the rubber float thing at the same time since he just had to fix a different one of those on another toilet last week - I think he's gone a little crazy and is on a toilet repair roll. Whatever - I'm very impressed and happy he did this!

the repair kit and old parts
remove the old handle
new lever and float
new handle


Monday, October 10, 2016

Ghost Garland Lights


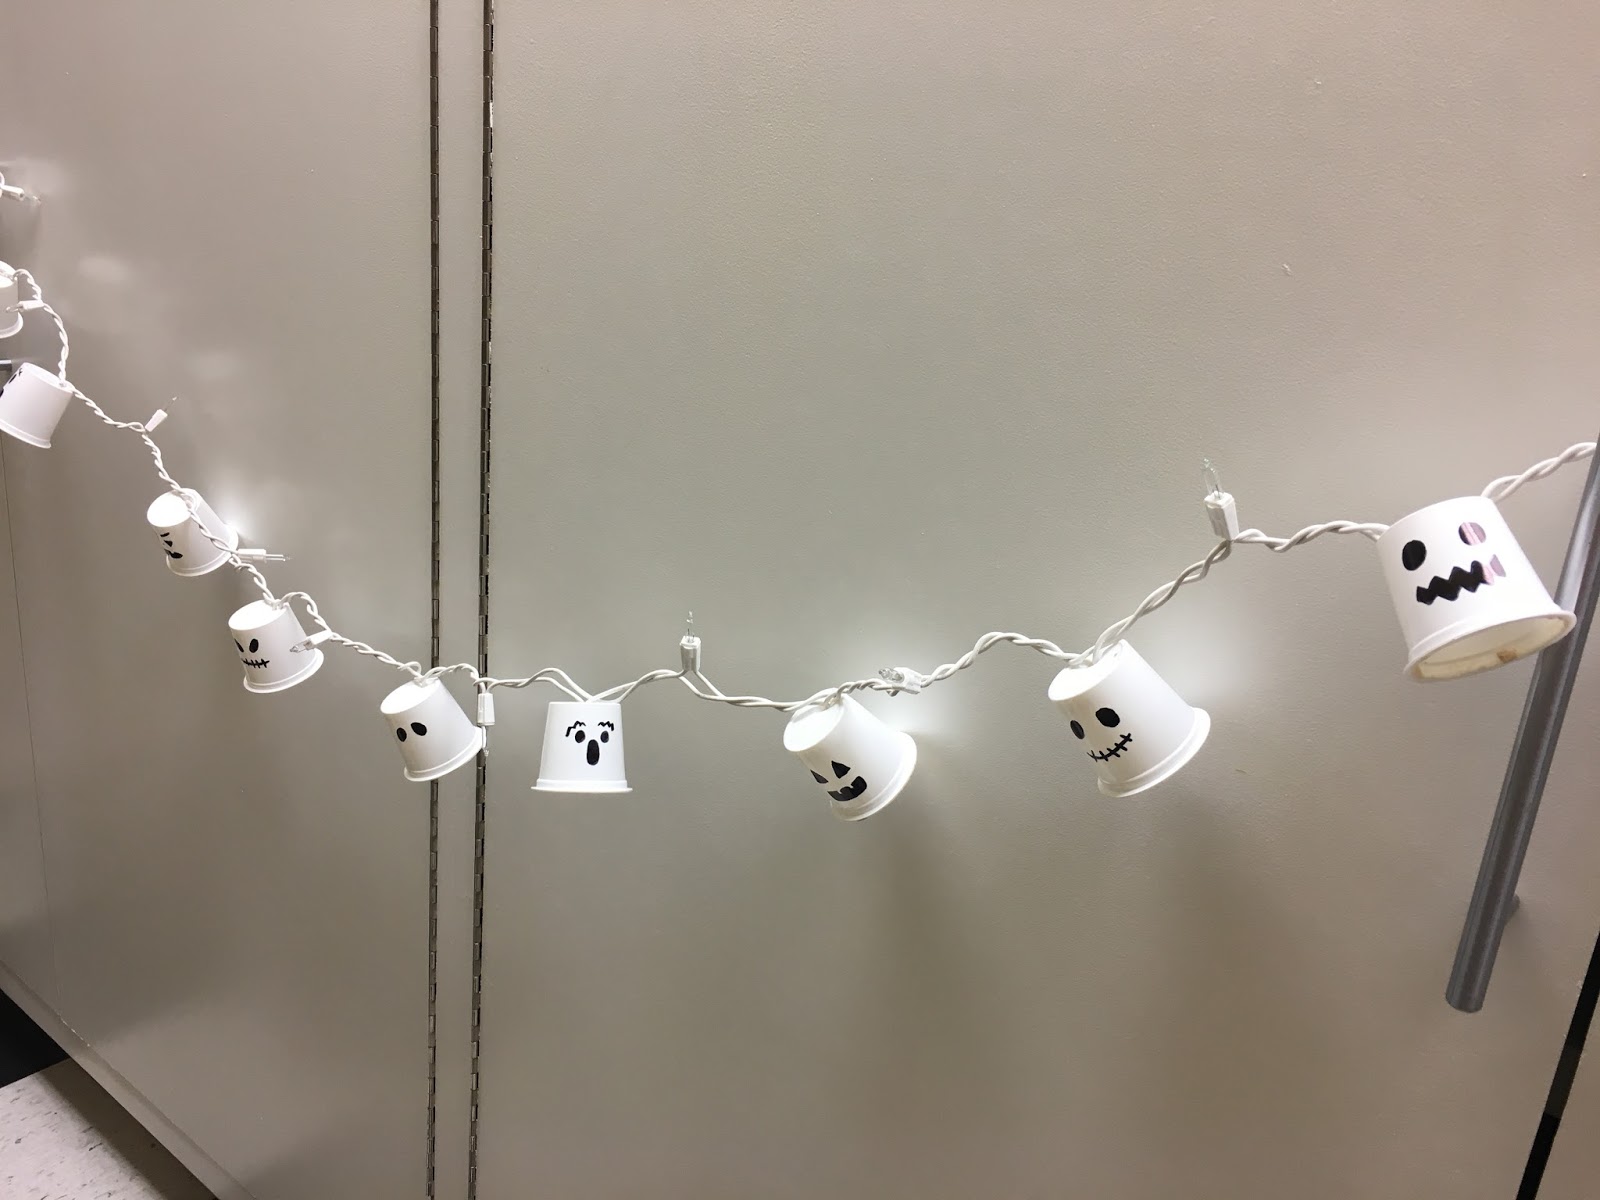
Start saving your k-cups!! I saw this idea on Pinterest (along with tons of other cute things to make with used k-cups - I'm sure I'll be making more things with them in the future) and immediately started saving the cups every morning. (In case you don't know, K-cups are the coffee pod things that go inside a Keurig one cup coffee maker.) They are just little white plastic cups, with a filter attached inside holding coffee grounds - after you've made your coffee just peel of the foil top and remove the filter and grounds, then rinse and dry the cup. After you've saved up a few of them you'll be able to make this super cute ghost garland in time for Halloween.


So easy - I just drew faces on the cups using a fat sharpie marker. Cut a few little slits around the hole that gets poked into the bottom of the k-cup when you make your coffee and stick a mini light strand bulb inside - continue for as long as your light strand is, or however long you want it. I did every other light bulb and it looks great... how cute is this idea?


Sunday, October 9, 2016

Baked Crab Cakes


I've never made crab cakes but love them and have been wanting to try...yay they turned out SO good. I combined a couple recipes and got lucky - this is a keeper and I will definitely be making them often now.


Mix together in a bowl: 1 tablespoon lemon juice, 1/2 cup mayonnaise, 2 eggs, a big handful of plain breadcrumbs, 1 teaspoon dijon mustard, 1 teaspoon Old Bay seasoning, and a dash of worcestershire sauce. Gently fold in 1 pound crab meat pieces (note: I bought 2 containers of 8 oz crab meat located in front of the meat and seafood counter). Form into 6 big patties using just a little shy of 1/2 cup each (or you can make little appetizer sized ones by scooping 1 tablespoon of the mixture into 16 mini muffin cups) and place on a baking sheet sprayed with non-stick spray. Bake at 350' for about 30 minutes until crispy and browned.


I served this with my version of a remoulade - I have no idea if this is actually remoulade sauce but it's what we've always called it! In a small bowl mix together some ketchup and creamed horseradish (that makes cocktail sauce by the way, in case you didn't know), then add equal parts mayo and sour cream (you can use all mayo or all sour cream if you want) and mix well.


Saturday, October 8, 2016

My Crafty Sister

Asked my sister if she would like to guest blog for me this week...remember when she did a few days when I was on the river cruise? (click here to see one of her posts and get a good drink recipe using coco lopez) So you remember that she is really not crafty, really really not crafty. Well, this is what I got as her answer and I told her I was gonna blog it - everyone needs a laugh right?


Friday, October 7, 2016

Funky Pumpkin Decorating...starring Brooke

Lisa sent me inspiration pictures for this project, she found cute crazy funky decorated pumpkins in a store and thought of me - love that, thanks Lisa! She sent a few examples and Brooke loved the idea so much she wanted to make one - watch the cutie show you how she did it:


I have been helping out my friend Ronda at her Stampin' Up studio (lots of punching, using the Big Shot die cut maker thingy, stamping, etc.)  - she has the idea for me to work on setting up a "seasonal display" area in her shop so I've been busy thinking about fun crafts to use in the display. This pumpkin turned out so cute I want to include it but Brooke used old paper that I've had forever to make her pumpkin and since this will be in the Stampin' Up studio I wanted to use current scrapbook papers so quickly remade the pumpkin...also full disclosure, the tape Brooke used didn't hold the buttons on the pumpkin and they fell off! You can still make it using her directions but use a different form of glue for any heavier things. This is my finished product:

I bought a standing flat wood pumpkin at the craft store for about $3. Trace the pumpkin shape onto whatever paper you want the base to be, and glue it to the pumpkin form. I randomly cut a triangle for the nose and a jaggedy mouth, make whatever shapes you want. I reused the stacked buttons held together with twine that Brooke made, and for the right eye I glued a large flat bottomed marble over a different piece of paper. Burlap ribbon is tied on the top to finish. Super fast and easy - maybe took 10 minutes top. Gotta like that :)


Thursday, October 6, 2016

Dog In The Blog...Biscuits!

what's a guy gotta do to get a biscuit?
Hey guys, it's Sarge..the dog. Guess what? I lost weight!! I am starving all the time tho and have learned this new technique of sitting right in front of the sink and staring pitifully at anyone who comes near, and if that doesn't get me something to eat then I go stare at my bowl hoping someone will get the hint. The vet (I like him a tiny bit better after this) said that I could have a few more kibble in addition to green beans and baby carrots, but I'm still hungry! So mom decided to make me some healthy biscuits and I gotta say - they are delicious. The recipe came from Gramma (don't tell her I call her that, I'm not sure she'd be happy!) who totally made it up for her dogs - she's a genius, these things are good.

Here's the recipe, you should make these for your dogs so they'll have a healthier treat sometimes - hopefully they aren't as hungry as me tho, it's sad really.  Gotta go stare at my bowl now...Sarge out.

Gramma's  Sweet Potato Dog Biscuits

Mix together in a big bowl:
cooked mashed sweet potatoes
2 eggs
peanut butter
shredded cheese
oatmeal
cream of wheat
whole wheat flour
chicken boullion cube mashed up with a little water

Roll into small balls and put on an ungreased cookie sheet, flatten with a fork,  bake 350' for 30 minutes or until crunchy.

Jill's note: I didn't have whole wheat flour, cream of wheat, or boullion in the house - and my mom didn't give me amounts for each ingredient so I just dumped a bunch of things in the bowl...2 sweet potatoes, big scoop of peanut butter, handful of oatmeal, handful of plain breadcrumbs, handful of light shredded cheddar. I scooped it out with my small 1 Tablespoon cookie scoop and baked for 30 minutes but they didn't get super crunchy - they are very firm though and Sarge definitely loves them! I'll just store in the fridge since they are a bit soft and don't want them to spoil.

Oh, and he totally stares at his bowl like he's hoping food will magically appear, not sure where he picked that up!

Click here for Sarge's first post about having to go on a diet :)


Wednesday, October 5, 2016

M&M Cookie Bars

I bought a large bag of M&M's for another project (I planned to fill the base of a candy bouquet, click here to see what I ended up doing) and didn't use them - so instead of running the risk of my eating the entire bag I found this recipe for M&M Cookie bars and they turned out really good! Whew, crisis averted haha.


Ingredients:
2 1/4 cup all purpose flour
1/2 teaspoon salt
1/2 teaspoon baking soda
12 Tablespoons melted butter
1 cup light brown sugar, packed
1/2 cup granulated sugar
1 large egg, room temp
1 large egg yolk, room temp
1 Tablespoon vanilla extract
1 1/2 cups M&M's


Directions:
1. Preheat oven to 325' with rack on lower middle position. Line a 13x9" baking pan with foil, with enough overhang on either side to make a sling (for ease of removal after baking). Grease foil and set aside.
2. In a bowl, whisk together the flour, salt, and baking soda.
3. In another bowl, stir together the melted butter and both sugars. Stir in the egg, extra egg yolk and vanilla.
4. Using a rubber spatula, fold together the dry mixture into the wet mixture, just until incorporated. Do not overmix. Fold in 1 cup of the M&M's. Reserve the rest for pressing on top.
5. Using slightly wet fingers, press dough into an even layer in the greased and foiled pan, making sure to get an even thickness throughout. Press remaining M&M's on top of dough.
6. Bake 25-28 minutes or just until it's puffy and golden brown. It may seem a bit undercooked, but go ahead and take it out. It will set nicely upon cooling.
7. Let cool completely at room temp before removing with the foil sling. Remove entire dessert with the fold sling and place on a cutting board. Cut into squares. Leftovers will keep for days at room temp in an airtight container.

*this recipe came from chew out loud, click here for the original post.


Tuesday, October 4, 2016

Photo Coasters

I had these made for Mary's birthday - I didn't make them myself but since it took me hours to come up with the perfect pictures to use I feel like I can count this as a craft project and show you how they turned out and maybe give you a cute idea for gifts :) Usually I make her bracelets for some reason, this year she gets something different!

I had them done on Shutterfly but there are numerous sites online that do this - really the hardest part was choosing the pics and then editing them to fit. I love this idea, hopefully she does too!