Thursday, December 10, 2015

Wine Glass Snow Globes

I had my doubts about this one, turning upside down wine glasses into snow globes seemed a little cheesy homemade in my head - but they actually turned out super cute and were very easy to put together. I picked up some different shaped wine glasses and fake snow at the dollar store, and little things to put inside the "globes" from the craft store - right now all the Christmas stuff is on sale so I got things pretty cheap.


I used the lid to a mason jar for the stemmed glass, and found a jar lid that fit the stemless glass. You could also cut a cardboard circle to use for the base. Play with how you want the figurines, trees, etc. to fit on the lid (make sure the wine glass will fit over top of them) and when you are happy with the arrangement hot glue them in place.


Put some snow in the upright glass - you don't need very much, my first one looked like the church had been in an avalanche! Run a bead of hot glue around the lid where it will fit on the glass and then turn the lid upside down and fit it into the glass. After the glue dries turn the glass over and shake the snow into place.


I think these turned out cute and will be on the lookout for small figurines, etc for future wine glass snow globe projects!

You can also put a candle on top of the stemmed glass (see my top picture) - I think a few of these in different shapes and heights with candles on them would be a very pretty table, mantle, or coffee table decoration.

Wednesday, December 9, 2015

Paper Christmas Lights Garland

Shout out to my friend LeDonna for this cute idea - she saw it and sent a picture to me, and I agree with her that it's a fun easy Christmas craft for young and old alike :). Thanks L!


Because I'm a little bit of a perfectionist I didn't want to just wing it if there was someone who had actually figured out exactly how to make these somewhere online, so of course I googled and found a few different ones. I followed these directions and they worked perfectly.

Supplies are few:
- cardstock in a few different colors for the lights, and gray for the tops
- hole punch
-ruler and scorer (scoring isn't necessary but it did make the tops fold easily and look neat)
-glue stick or adhesive of your choice (I used my Stampin' Up rolling glue thingy)
- thick twine to string the lights on, I used about 48"


Directions:
Cut gray cardstock into 1 1/4"x  4" strips
Cut colored cardstock into 1" x 8 1/2" strips
(note I made 15 lights, so I cut 15 gray strips and 15 assorted colors strips).


Score the gray cardstock every 1/2". You could also just fold it neatly every 1/2" and run your fingernail along the edge to give it a sharp crease if you don't have a scorer. 

Make a dot at 1 1/4" and 2 3/4" in (that turns out to be in the middle of the 3rd space and the 6th space, see my picture - I stopped making a dot after the first couple and just eyeballed it). Hole punch on the marks. Fold the paper on the score lines, glue both ends 1/2" flap to each other making a circle.


To make the bulb: fold a colored strip in half. Pinch the two ends together and push on your palm or table to get a slight bend in the sides of the bulb. Holding the ends together hole punch thru both layers about 1/4" down in the center.


To string them into garland, put the top of a colored strip into a gray circle matching up the holes. Run twine thru all 4 holes. Then continuing adding the lights until you have it as long as you want, making sure to line up the bulbs with the glued gray part all facing the same way. Spread them evenly on the twine.


One thing I did I have a second of trouble with is the twine fraying and becoming hard to fit thru the holes - I wrapped a small piece of tape around the end and that solved the problem. 


Tuesday, December 8, 2015

Glitter Words

Glitter and glue. Glitter and glue. I do love those words :). I also love this very simple decorating idea of tracing on some letters and glittering them up! You can obviously use whatever word you want (as long as you can fit it on your paper), choose your color, font and frame - totally up to you.

I did "NOEL", mostly because it's short and less work haha. I guess JOY might have been even easier...I also played with "MERRY" but didn't like how I traced the letters on the paper so didn't finish that one. Am using it though to show you some of the process.


Supplies needed:
- frame
- 1 piece of letter size cardstock, cut to fit in the frame
- chunky glitter, craft paint, marker (I did the same color for all of those)
- foam or small paintbrush
- craft glue (I used white glue that dries clear)


Print out the word you want to display using a bold font, size them to fit on the paper (mine is 8x10). Cut out the letters, play with them on the cardstock to see how they look best then trace around the letters with a marker. Either lightly paint in the letters (don't make it too thick or the paper will buckle) or color in with a marker. Spread glue very thinly over all of the letters, all the way to the edge trying not to leave any gaps - then sprinkle on the coarse glitter. If you do have any gaps in the glitter just dab in more glue and sprinkle some more. I sprinkled it on very thickly then tapped it off into a pie pan to catch and reuse the glitter that didn't stick.


Let it dry and place carefully in your frame, try not to move it too much before getting the frame together because the glitter will spread around on the picture - I tried for no glitter anywhere except in the letters to give it a clean look.


For "MERRY" I traced the letters with a green marker and planned to fill in with green and green glitter but then decided I didn't love my placement....


"NOEL" turned out good all silver though!

Play around with this idea - I chose words to glitter and frame but you could do a symbol (star, candle, tree...), handprints for baby's first Christmas, paw print for puppy's first Christmas haha, use your imagination!
I am working on a little Christmas arrangement on a table
placed behind our couch. I like it so far...


Monday, December 7, 2015

Snowman Gift Box

This is another of the "make and takes" I got from my friend Ronda at a Stampin'Up meeting, remember I made the jack o'lantern one for Halloween? This snowman is SO cute, here he is on a pillow box but you could put him on lots of different things. This would make a cute gift card enclosure, or decorate a larger box/package, or on a card...very easy and fun. 


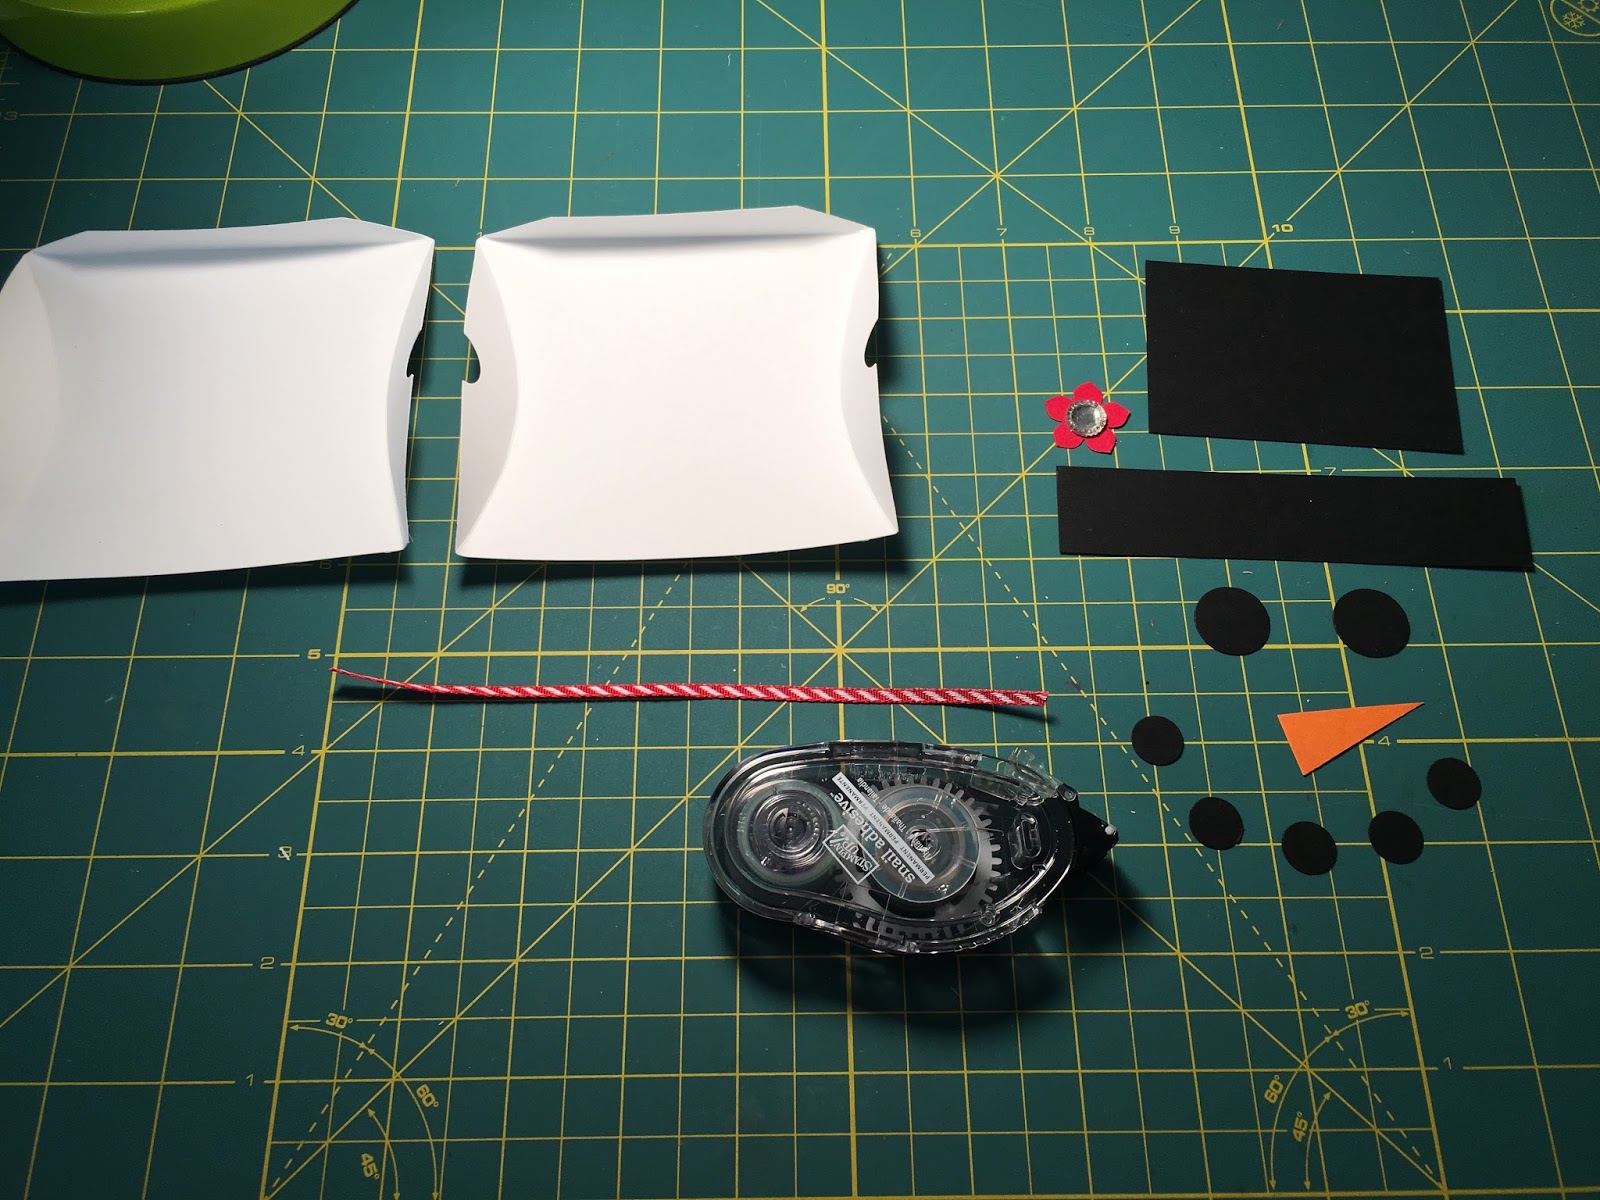
To make him you need 2 larger punched circles for eyes and 5 smaller punched circles for mouth from black card stock, 2 black rectangles to make his hat, an orange triangle, a piece of thin ribbon, and something to decorate his hat (here we used a punched flower with a crystal glued on). Oh, and some sort of adhesive to put it all in place - I used my Stampin' Up rolling adhesive thing and it worked perfect for this project. Adjust the size of these pieces for the size of what you are putting him on.

Arrange all of the pieces on a white base of your choosing and stick them down to make a snowman. That's it! Pretty self explanatory where everything goes...


Sunday, December 6, 2015

Rocky Road Cookies

I saw this recipe in a magazine - it's actually one dough that they made into 3 different cookies, what's not to like about a one dough with multiple options recipe? Well I was curious and wanted to try it...I had the ingredients on hand for the rocky road version so that's the only one of the 3 I tried - it's a basic dough so not much to talk about there, but after baking one sheet and taste testing (someone has to be the taste taster!) I thought they didn't have much flavor so decided to doctor the rest of the batch. 


I added a very big scoop of peanut butter,  a pinch of coarse salt, more marshmallows, and more chocolate chips. Oh, I should say that I didn't use chopped up dark chocolate - I had milk chocolate chips in the pantry so that's what I used, and I left out the nuts because I don't like nuts in cookies. Maybe the cookies would have been better with the ingredients called for instead of my substitution haha!! Anyway...adding the peanut butter to the batter made them taste much better.

 I drizzled them with chocolate chips melted with a tablespoon of shortening. You can drizzle by dunking a fork in the melted chocolate and flicking over the cookies, but I put it in a small ziplock baggie and cut a small corner off the tip and drizzled that way - much less messy and you can control the amount on each cookie easier I think.  They turned out really good - I will make these again with my changes for sure.  Note that on the website they aren't showing these as one dough for three cookies like they did in the magazine, the other 2 options are bourbon cranberry walnut, and caramel popcorn - both can be found on the website.


the batter is very crumbly but after scooping into balls it comes together and holds its shape... 

put the melted chocolate in a small baggie and snip a small corner off

then drizzle over cookies
2/2024 UPDATE: going back thru some of my old posts and when I click the link for the recipe it isn't found anymore. I hate that I didn't provide the recipes sometimes back in my olden days, this has happened to me before - only providing the link to the recipe was an oversight on my part. I can't find the original recipe, here is one from Wilton that seems pretty basic and looks similar to my finished cookie. Read the notes up top though that I really doctored the basic recipe - chances are I'd do the same with this recipe haha! 

  • 2-1/4 cups all-purpose flour

  • 3/4 teaspoon baking soda

  • 1/2 teaspoon salt

  • 1 cup butter, softened

  • 1/2 cup granulated sugar

  • 1 egg

  • 1 teaspoon Clear Imitation Vanilla Extract, 2 oz.

  • 1/2 cup firmly packed dark brown sugar

  • 1 cup semi-sweet chocolate chunks

  • 1 cup almonds

  • 1 cup mini marshmallows


  • Preheat oven to 350ºF.

  • In medium bowl, combine flour, baking soda, and salt. In large bowl, beat butter and sugars with electric mixer until light and fluffy. Add egg and vanilla; mix well. Add flour mixture to butter mixture; mix well. Stir in chocolate chunks, almonds and mini mallow bits. Drop by rounded tablespoonfuls onto ungreased cookie pan.

  • Bake 11-13 minutes or until edges are golden brown. Cool 3 minutes on pan; remove and cool completely on cooling grid.


Saturday, December 5, 2015

Hand Painted Wine Glasses

My niece Macey painted these wine glasses for me and I love them! This is a cute creative gift you can personalize for anyone one your list - she made me a set of 4 but you could make as many or few as you want.


She found stemless glasses at a dollar store, you could do it with any type of clear glass (doesn't have to be a wine glass!). Since she knows me so well she designed them with a dog theme - each one is different ("walk with a friend", "learn new tricks", "wag more bark less", and a paw). Paint your design on clean glasses using glass paint; when you are happy with how they look let the glasses air dry for 24 hours and then bake according to the directions on the paint to fully cure them.

The directions say they are dishwasher safe on the top rack but I don't want to risk it and just wash them by hand. Aren't they cute? She did good :)

Friday, December 4, 2015

Contact Paper Dog House

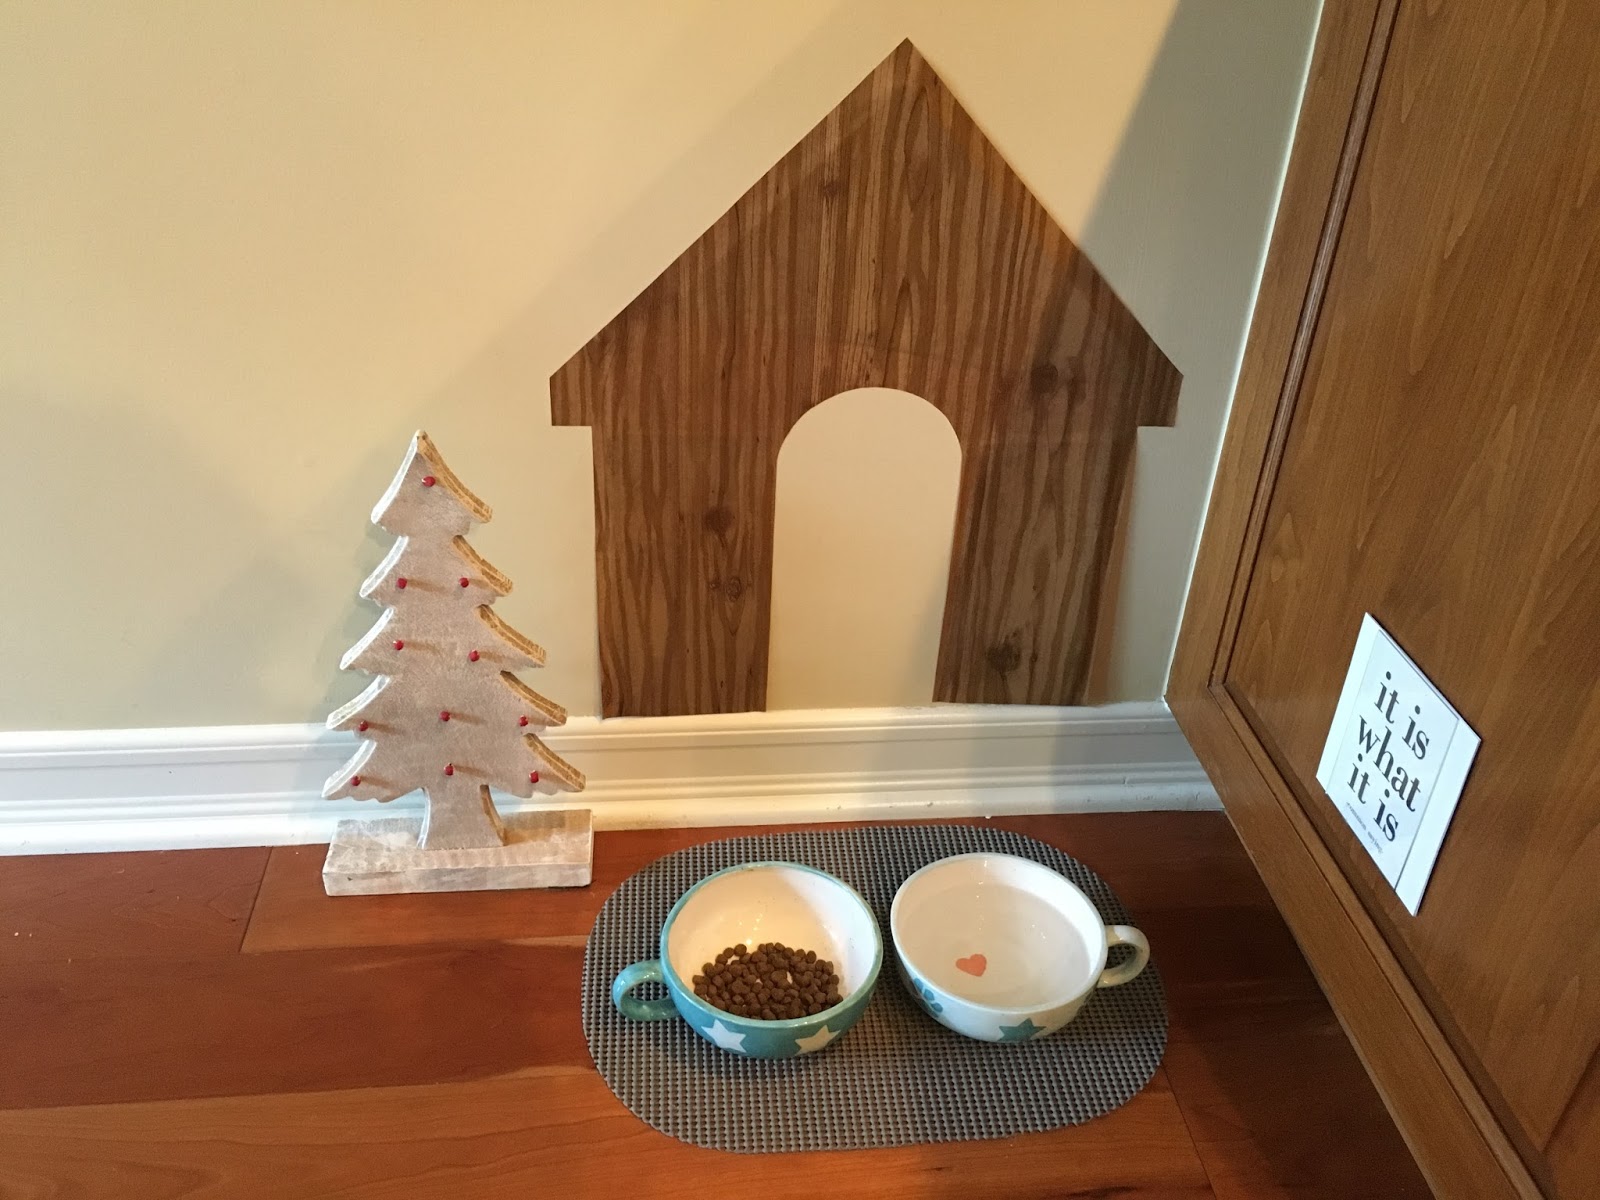
Had an idea to decorate the area in the kitchen around Sarge's food and water bowls by making him a "dog house" out of wood patterned contact paper stuck to the wall - just trace the shape you want on the back of the paper and cut it out, piecing it together where you need to. I hung a plastic frame on the side of the cabinet using a removable command strip so he has a picture or words to think about while eating haha :),  and then since it's December he got his own little Christmas tree...


Sure this is silly, but it makes me laugh and Sarge doesn't mind - so why not?!

Thursday, December 3, 2015

Wine Cork Trivet

Looking for a quick/cute/fun/practical gift for a wine lover or cook (or wine loving cook) on your Christmas list? I made this cork trivet today and it turned out great - you should make one!


I was walking thru Home Depot with a friend and spotted this 4" duct clamp -  I remembered seeing a wine cork trivet in a catalog somewhere made with one of these and thought I'd give it a try. The clamp cost less than 2 bucks so figured I wasn't out much if it didn't work...I just so happen to have a bag or two of wine corks on hand (ok, ok, I have like 5 bags of wine corks - whatever...ha!) - if you don't have any you can buy them at a craft store (or maybe a kitchen store?), hit up a friend who collects corks, or ask a restaurant if they have any to give you. 


I cut out two circles, one from cardstock paper (as the base of the trivet under the corks) and one from felt (just so the bottom looked more finished) the same dimension as the clamp.

Arrange wine corks in the clamp, fitting in as many as possible. 


After you have the clamp filled, tighten the screw on the side of the clamp until the corks are very tightly wedged together and don't fall out when you pick the trivet up.


 Turn the corks over and glue first the cardstock and then the felt to the bottom.

There you go - cute wine cork trivet! Easy :)

Wednesday, December 2, 2015

DIY Bell Bottom Jeans

Not exactly sure why, but I decided I needed to make myself some super flare bell bottom jeans - did a little research online to see if anyone had good suggestions on how to do this and ended up combining a few ideas to come up with these.


Starting with a pair of straight leg jeans, I ripped out the outside seams up to the knee and took out the hem.


Next I cut a triangle out of leftover fabric scraps to fit into the opening I just made in the jeans - I made my triangle pretty wide since I was going for a super flare, it could be much narrower if you don't want them quite so flared.


Pin the triangle in place and sew from the top of triangle down to the hem on both sides. I sewed the hem of the jeans where I wanted the length to be but left the fabric un-hemmed with a little fray on the bottom.


Wore these to dinner and had a funky bald motorcycle-looking dude come up and say how much he liked my jeans, asked if I made them myself and said "right on, I have a few pairs I made for myself too"....hahahaha, well at least there's 2 of us out there that enjoy this look!! Get your groove on and give it a try (please. please make some so it's not just me and the bald guy rocking these).


Tuesday, December 1, 2015

Snowman Ornament


December 1st! Time to start thinking Christmas decorations :) My niece Mickey and I made these adorable snowman ornaments out of a few simple supplies, easy and inexpensive.

All you need are plain clear ornaments (easy to find right now at the craft store), white paper, craft paint for face, and maybe some pretty ribbon to tie on the top if you want.

We painted black eyes, dark red dots for mouth, and an orange glittery "carrot" nose. Cut the paper into long thin strips (ours are 3/4" x 11" but you can do any size you want), roll the strips up into tight coils and insert into the top of the ornament (remove the hanger part first obviously). Shake the ornament around a bit to loosen the strips if they don't on their own, keep adding strips until it looks good to you. Put the hanger back on and tie a big pretty ribbon thru the hanger loop (or just hang up as is!). So cute!