Thursday, February 20, 2020

TBT: French Dressing

According to my new/old cookbook, the source for this week's throw-back recipe, "there are three kinds of salad dressing which are the foundation for practically all others used: French dressing, mayonnaise dressing, and boiled dressing".


I mentioned a couple weeks ago when I made the 'Alligator Pear Salad' (click to see that post) that it called for French dressing which is nothing like what we call French today (which is a creamy ketchupy based dressing); here's what the cookbook has to say:

"French dressing, made from oil and acid, is the most widely used dressing. Vinegar is the acid generally used with the oil in vegetable and meat salads, while in fruit salads the juice of lemons, grapefruit, or oranges is used. The choice of oils to be used in dressing is an individual matter. Olive oil has the most distinct flavor. With cottonseed or corn oil the amount of condiments used may be slightly increased if desired. Serve French dressing with chicken, fish, meat, vegetable and fruit salads."

So way-back-when, French dressing is basically oil and vinegar dressing (or vinaigrette). The base recipe is below, the book lists lots of variations such as changing the vinegar to tarragon; omitting mustard, sugar and paprika; use 1/4 cup each of lemon or lime and orange juice in place of half the vinegar; add chopped mint; add 4 Tablespoons grated parmesan, among many other variations.

  • 1 clove garlic (optional)
  • 1 cup vinegar
  • 2 teaspoons dry mustard
  • 1 Tablespoon sugar
  • 1 Tabelspoon salt
  • 1 teaspoon paprika
  • 1/2 teaspoon pepper
  • 2 cups salad oil
If using garlic, soak it in vinegar 1/2 hour before mixing the dressing. Mix dry ingredients together and place in a covered jar or bottle. Remove garlic from vinegar and add vinegar to dry ingredients. Pour in the oil slowly. Place in refrigerator until ready for use. Just before serving, shake vigorously for 2 minutes. Makes 3 cups dressing. (my notes: I omitted the garlic, used olive oil and white vinegar, and cut the recipe in half - good ol' basic vinaigrette.)

A couple other recipes are included as well as the variations given above:

Lemon French Dressing
  • 1/2 cup lemon juice
  • 1/2 cup salad oil
  • 1 teaspoon salt
  • 1 teaspoon paprika
  • 2 Tablespoons sugar or honey.
Combine ingredients, shake well. If a clear dressing is desired, omit paprika and substitute a dash of pepper.

Hawaii French Dressing (for use with mixed fruit salads)
  • 1/4 cup pineapple juice
  • 2 Tablespoons lemon juice
  • 1/2 cup salad oil
  • 1 teaspoon sugar
  • 1/2 teaspoon salt
  • 1/2 teaspoon paprika
Combine ingredients, chill. Shake before serving. 

Wednesday, February 19, 2020

Double Chocolate Mousse Torte

You guys!!  This mousse torte thing is amazing! I saw the recipe at melskitchencafe.com and didn't change a thing - and after making it I'm not sure there's even anything that you'd want to change, it's kinda perfect. I made it for our "Pal-entine's" dinner thinking it'd be safe because I don't like chocolate therefore I wouldn't be tempted - but after trying a tiny little sliver I might be changing my mind about chocolate hahahah. I have a little leftover in the fridge and it took all my willpower to not eat it for breakfast. You want to make this, I promise.


DOUBLE CHOCOLATE MOUSSE TORTE

CAKE:

  •  8 ounces bittersweet or semisweet chocolate, chopped (see note)
  •  1 cup (8 ounces, 2 sticks) butter
  •  1 cup (7.5 ounces) granulated sugar
  •  5 large eggs
  •  1 tablespoon vanilla extract
  •  1/4 teaspoon salt
  •  1/4 cup (1.25 ounces) all-purpose flour

MOUSSE:

  •  2 tablespoons unsweetened natural or Dutch-process cocoa powder
  •  5 tablespoons hot water
  •  8 ounces bittersweet or semisweet chocolate , chopped fine
  •  1 tablespoon butter
  •  1 1/2 cups cold heavy cream
  •  1 to 4 tablespoons granulated sugar, depending on desired sweetness
  •  1/2 teaspoon vanilla extract
  •  pinch of table salt

WHIPPED CREAM TOPPING:

  •  3/4 cup cold heavy cream
  •  2 tablespoons powdered sugar
  •  Grated chocolate, for garnish (optional)
  •  2 cups fresh raspberries (or other fresh fruit)

INSTRUCTIONS

  1. For the cake: preheat the oven to 325°F.
  2. Lightly grease a 9- or 10-inch springform pan; dust with sugar (optional).
  3. Combine the chocolate and butter in a saucepan or in a microwave-safe bowl. Melt over low heat (on the stovetop) or on 50% power in the microwave at 1-minute increments, stirring in between.
  4. Cool the mixture to lukewarm. Whisk in the sugar to combine.
  5. Add the eggs one at a time, blending well after each addition. Mix in the vanilla and salt. Add the flour and mix until just combined.
  6. Pour the batter into the springform pan. Bake until the cake just rises in center (a tester inserted into center will not come out clean) and springs back lightly to the touch, 30-35 minutes.
  7. Cool completely in the pan (the center of the cake may fall slightly). Cover and chill while making mousse.

  1. For the mousse: whisk together the cocoa powder and hot water in a small bowl; set aside.
  2. Melt the chocolate and butter together in a microwave-safe bowl on 50% power, stirring often, until smooth (don't overheat!). Whisk the cocoa/water mixture into the melted chocolate until smooth (if there are little lumps, you can press the mixture through a fine mesh strainer into a clean bowl). Let it cool to room temperature (just slightly lukewarm is fine, too, as long as it isn't warm or hot).
  3. In a medium bowl with an electric mixer, whip the cream, granulated sugar, vanilla, and salt at medium speed until the mixture begins to thicken, about 30 seconds. Increase the speed to high and whip until soft peaks form when beaters are lifted (I often use my Blendtec blender to whip cream - only takes a few seconds).
  4. Using a rubber spatula, fold 1/3 of the whipped cream into chocolate mixture to lighten. Fold in the remaining whipped cream until no white streaks remain.
  5. Spoon the mousse over the cooled cake. Cover and refrigerate for at least 6 hours or up to 1 day.
  6. Run a sharp knife around the edge of the pan to loosen the torte if it hasn't pulled away from the sides of the pan while cooling.
  7. Release the springform pan sides. Transfer the torte to a platter, if desired (often, I just leave it on the base of the springform pan).

  1. For the whipped cream topping, using an electric mixer, beat the cream and powdered sugar in a medium bowl until soft peaks form. Spread the whipped cream over the torte. Dust with grated chocolate, if desired.
  2. Top with raspberries. Chill for up to an hour or serve immediately.

click here for original source

2.19.19: tt: deviled egg cover 
2.19.18: macrame wall hanging (and Sarge "helping me")
2.19.16: kid craft - decorate notebooks

Tuesday, February 18, 2020

Tip-sy Tuesday: How To Change a Sewing Machine Needle

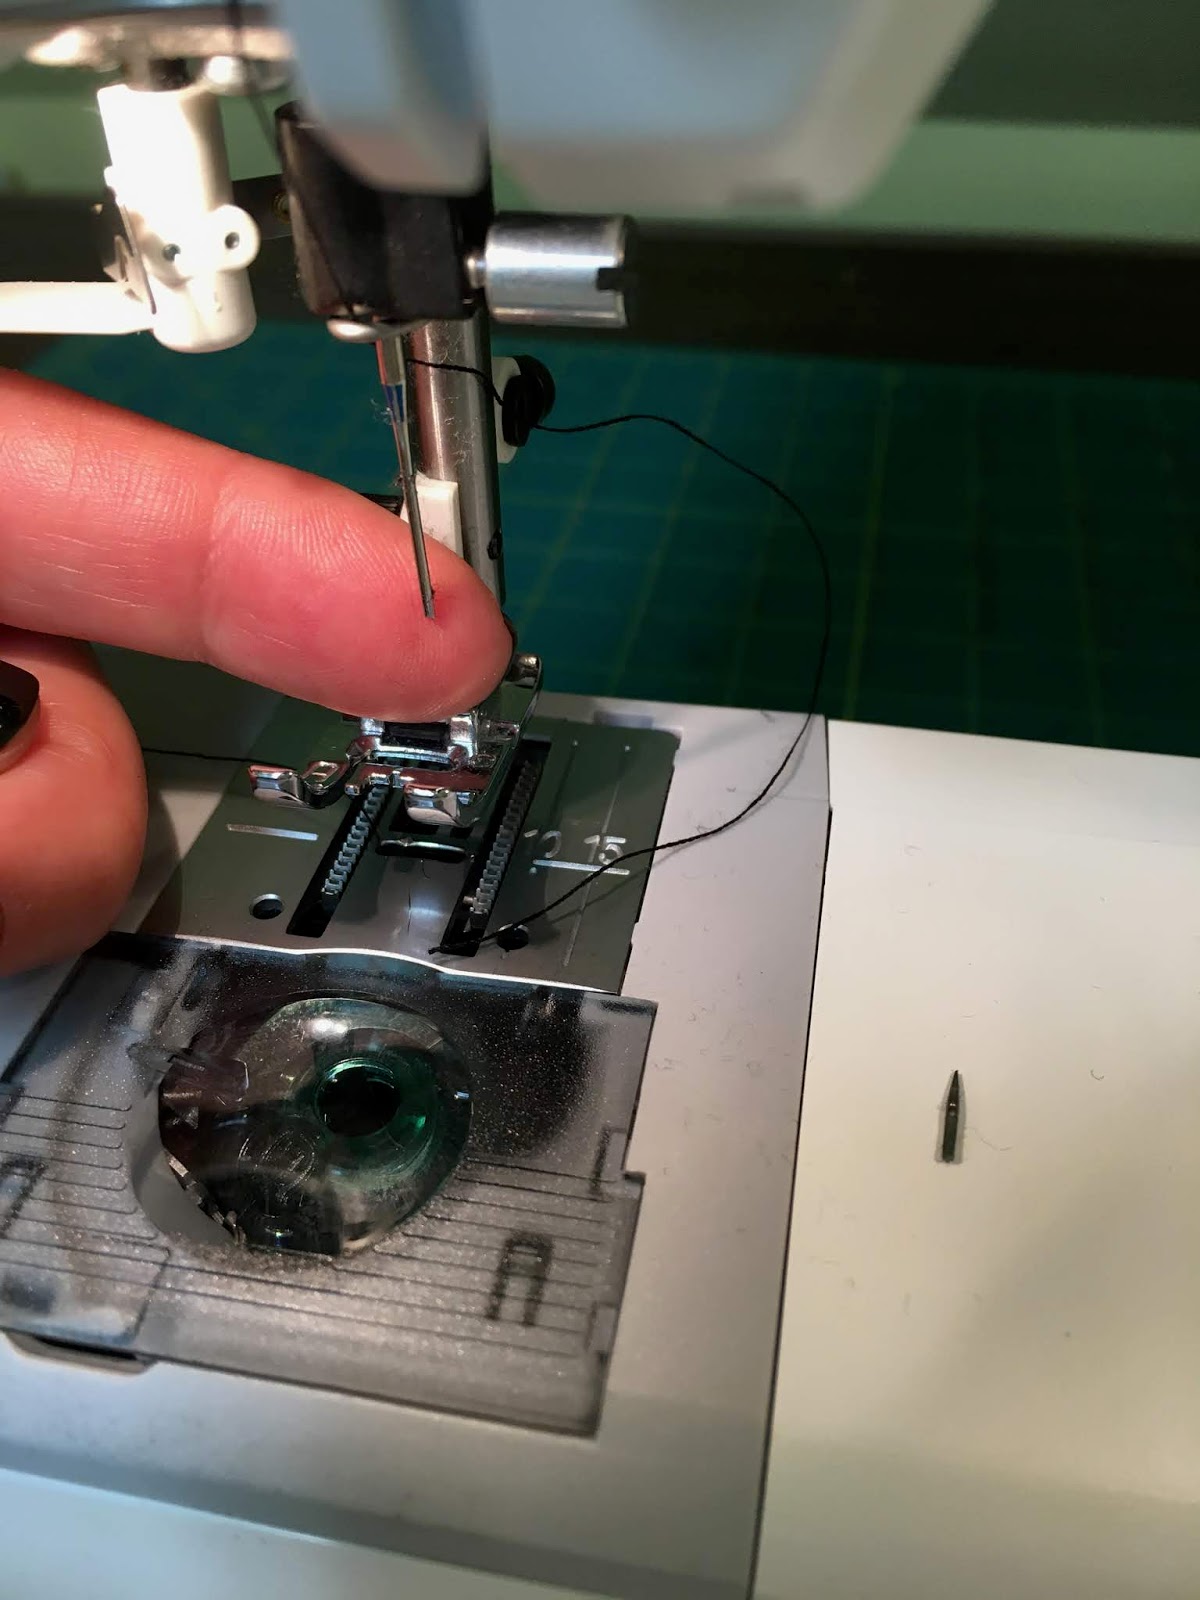
Oops, I tried to sew thru something thick and my needle wasn't up to the task and broke off in the machine. If this happens to you, don't fret - it's a very easy fix (well it's easy if you have the extra needles that probably came with your machine - if not, you'll need to get yourself some new needles before continuing!). It's also helpful to know (and a reminder to myself) that they make assorted sized needles for different tasks - follow the instructions below to change to the appropriate needle that works for the material you are sewing on...or don't, and risk breaking one like me! 


First you need to remove the broken needle: loosen the screw that's right above the needle, either with a small screwdriver if there's a slot or turn it by hand - I have two machines and one turns with a screwdriver and the other by hand - until the needle is loose enough to pull out; then slide the new needle up into place - most likely the head of the needle is flat on the backside and curved on the front, make sure you put it in so it fits correctly in the space (curved side facing you and the eye of the needle in front), then tighten the screw back up. Done. 


Note on needles: my case indicates which needle is used based on the weight and texture of the fabric - this case includes needles for thick jeans, stretchy material, a wing needle used for hemstitching, and universal 'all-purpose' needles used for most fabrics. 


All the sewing machines I've ever had work like this, sorry if yours is different and this is no help to you at all!


Monday, February 17, 2020

Make a Paper Gift Box

I saw Ronda Wade live on FB the other day making these little paper boxes and I immediately went to my craft room and made 7 of them to give for Valentine's day filled with pretzel hugs. Obviously they aren't only good for Valentine's day - change the colors to give as holiday, birthday, or seasonal gifts. Very easy to make since Ronda worked out all the kinks before sharing how to make them... she had a helpful video, I just took lots of pictures and hope you can follow along - don't be alarmed at all my words and photos,  promise these are quick and easy to make!


Start with an 8.5" square piece of cardstock.

Score one side at 2", 6", and 8"

Rotate and score the other side at 2", 4", 6", and 8"


Fold along all the score lines.


Turn over so your square matches the picture below. Cut along the score lines 2" up to where the 2"x4" rectangles are, see arrows. Leave the center 8.5"x 4" part intact. Those cuts make the top and bottom flaps of the box. Also remove the 2" x 1/2" flaps, leaving the 2" x 4" flap in the center, see arrows.


Look at the picture below to make sure you are removing the correct bits in this next part; Cut out the top left 2" square, cut off the 1/2" flap from squares #2 and #4, leaving square #3 intact with it's flap still attached. 


To decorate the front of the box before assembling it, you'll need 4 pieces of decorative paper 3 3/4" x 1 3/4" (one for each side of the box). Glue them on each of the 4 rectangles, making sure to put them in the right direction depending on the pattern - the top of the box is the side that has 3 squares and one flap.


Assemble the box: put a strip of tear away tape (or another kind of adhesive like glue stick) on the 1/2" flap that is on the right in the above picture. Shape the 4 rectangles into a box shape. Remove the paper from the tape and attach the flap to the inside of the last rectangle creating the box.
Turn the box upside down, fold in 3 squares, attach tear away tape or glue stick the 3rd square before folding down the last square - that makes the bottom of the box.


Lastly, trim a little wedge off each side of the top flap; fold in the two side squares and the last square with the flap will easily tuck into the top of the box.


2.17.19: 🔥
2.17.18: nail art
2.17.17: coincidentally, it's how to do ombre nail art!
2.17.16: making paper crowns


Sunday, February 16, 2020

Around the Campfire 🔥 (week 7)

Dear Campers ~

Here's a quick recap in case you missed anything at MMDC last week:

Posts ~
2/9: 🔥week 6
2/10: fabric pins
2/11: origami paper heart
2/12: yarn heart
2/13: hotdog heart
2/14: wine glass lamp shade
2/15: tuna artichoke salad

What's Cooking ~

I was gone for a few days and pretty much ate out the whole time. Meanwhile,  Dave was on his own  and made himself a couple good dinners:
  • grilled lamb chops, creamed spinach
  • grilled chicken breast, caesar salad
  • swordfish tacos with kale salad
Once I got back we had:
  • Lasagna (thanks Janis!)
  • grilled chicken, spaghetti squash 'mac and cheese' (recipe soon!), roasted broccoli
Miscellaneous things keeping me busy ~
  • all of my flights were a nightmare which led me to having lots and lots of time to read and watch movies. I watched 'Judy' (⭐️⭐️⭐️⭐️⭐️ Renee Zelwegger did a great job!); 'Maleficent 2' (⭐️⭐️⭐️⭐️ I didn't see the first one but thought the 2nd was really good); 'Blink of an eye' (⭐️⭐️⭐️⭐️⭐️ racing moving centering on Dale Earnhart and Michael Waltrip, I loved it and it made me cry - and I'm not a fan of either one so that says something haha); and 'Western Stars' (⭐️⭐️⭐️ Bruce Springsteen movie/live concert in a barn which was pretty cool, music good, I fast forwarded thru the slow parts - it was just ok)
  • I read 'Room to Breathe' by Liz Talley without realizing it's contemporary romance which is not my favorite, but I liked it ⭐️⭐️⭐️⭐️; 'Lost Hills' by Lee Goldberg, thriller with gruesome murders and lots of blood, not super suspenseful but a good read ⭐️⭐️⭐️⭐️; and 'The Deserter' by Nelson and Alex DeMille about a pair of Army investigators tracking a deserter thru Venezuela and the jungle, and not knowing who to trust. I liked it ⭐️⭐️⭐️⭐️.
A couple pics from Tennessee:


Know that feeling of being watched? Who thought it was a good idea to have this bear looking into the guest bedroom? Every. Single. Time. it caught my eye I jumped.

My sis and I split what seemed like an interesting lunch - 'steak and fries salad'. Who thought it was a good idea to put steak and fries on top of salad? It was bad. Really bad. And I'm a steak, fries, and salad lover - but never all together ever again!

Gotta run - the Daytona 500 starts in a bit and I've got to get ready to spend the rest of the day watching tv LOL, no time to craft (although I am working on crocheting an afghan so I'll probably do that to at least feel like I'm accomplishing something today!). Hope you had a great week!

Sincerely ~


Jill
camp counselor and Nascar lover (who misses Dale Jr!) 

Saturday, February 15, 2020

Tuna-Artichoke Salad

I made this salad for lunch out of ingredients I had on hand, and it turned out so good I want to share:

  • chopped kale salad blend (or whatever lettuce mix you like)
  • canned tuna, drain and flake
  • canned artichoke hearts, drain
  • feta cheese crumbles
  • chopped cukes
  • chopped avocado
  • mustard vinaigrette
  • salt and pepper

Simple and delicious!

Friday, February 14, 2020

Wine Glass Lamp Shade

Yep, made a paper shade that slips over a wine glass - and I'm loving this fun idea. Think I'll make a couple more and use them as table decorations for our 'Palentine's Day' dinner. Saw it somewhere, didn't think of it myself, can't remember where. Which also means I couldn't remember if there were directions so I winged it.


Cut a strip of paper long enough to wrap around the glass with some extra length to spare and wide enough to cover the glass leaving the stem uncovered, I started with paper 12" x 5". Trim one end dipping down slightly, trim the other to match (see photo) - it needs to be curved a bit to fit the glass.


Wrap around the glass and adjust to hang the way you want, I kept trimming off more and more to get it just right. Once you've got it, glue to hold - I used glue dots but any craft glue will work. Add a battery operated tea light to the glass and hang the shade over the top.


2.14.19: dark chocolate granola (copycat recipe)
2.14.18: dried cranberry and chocolate cookies
2.14.17: flower heart
2.14.16: tuna over nice (basically Nicoise salad)

Thursday, February 13, 2020

Hotdog Heart

I've been doing throw-back Thursday lately with recipes from my new/old cookbook, but my sis sent me this and it's too funny and kinda genius so I have to share. And since it's a hot dog and what is clearly boxed mac and cheese I think we can safely call this a throw-back recipe hahah! (no I'm not being judgy - I love boxed mac and cheese!)

You know you're thinking that you want to make this for Valentine's day tomorrow...


2.13.19: asian style meatballs with sweet chili sauce
2.13.18: shrimp cocktail in a wine glass
2.13.17: heart suncatcher
2.13.16: Valentine's day wine bottle labels

Wednesday, February 12, 2020

Yarn Heart

This took me literally 5 minutes to make and turned out very cute - cuter than I expected actually! Perfect kid craft, but as always I'm not waiting for a kid to come make stuff with me and I just made it anyway ;) All you need is a cardboard heart, a piece of tape, and some yarn.

Don't have cardboard? When I'm searching for a thin piece (not thick like a box is made of) I'll raid anything - cereal or cracker boxes, the back of a notepad, etc. Dave doesn't even ask anymore why the bag of crackers is in the pantry not in a box hahahaha. Hey, you do what you have to do in the name of crafting.

So, trace and cut out a heart from a thin piece of cardboard - whatever size you want. Tape one end of the yarn to the heart to hold it in place and then start wrapping. And wrapping. And wrapping. Keep on going any which way to cover the cardboard completely. I found that in the beginning the yarn wanted to slip off the edges but as the heart got more and more covered it was easier to keep it in place. One thing I was thinking as I was trying to get all the cardboard covered so you couldn't see it, is that if you colored the cardboard the same color as the yarn then you could get away with tiny holes in the yarn wrapping.


Once the heart was completely covered and I liked how the yarn looked, cut the yarn from the rest of the skein and tuck the loose end in underneath the wrapped yarn. I pushed it in with the end of some not-sharp scissors to make sure the end was good and buried and wouldn't pull out. Then I attached a length of yarn to the top in order to hang it. Cute, right?


2.12.17: goat cheese tart
2.12.16: Brooke and Sydney make 'cootie catchers'

Tuesday, February 11, 2020

Tip-sy Tuesday: How to make an Origami Heart


I made this out of a square of patterned paper, but it'd also be super cute to fold cocktail napkins like this for Valentine's day dinner fun. I'm thinking table decor, place setting, place card (write names on the front of each); a fun little surprise in a lunchbox; or there is a little pocket on the back that you could tuck in a little gift or candy - so cute! And very very easy:

Start with a square piece of paper or napkin - my example is 5.75" square, you can make these as big as you want as long as it's square.


1. Fold in half lengthwise, unfold, the fold in half the other direction.


2. Place that fold at the bottom closest to you:


3. Fold the right side in on an angle with the folded point being at about the halfway mark, fold so the edge of the paper (the bottom right corner before you folded the angle) stops short of the top edge by about 1/2":


4. Fold the left side up to overlap the right side:


5.  Glue the left side in place:


Turn it over and there is a little pocket on the backside if you want to add a little gift or candy:


2.11.19: make an ear crawler
2.11.18: confetti heart picks
2.11.17: blueberry jilly's jam
2.11.16: valentine nail art