Monday, April 8, 2019

Mug Rug


Before putting away the sewing machine mess in the dining room (from making bowl cozies, silverware pouches, and the small fabric wallet - I was on a roll!), I made a couple "mug rugs" with some of the leftover scraps - I totally winged it after seeing a few examples online because quite truthfully I didn't know if I actually needed a rug for my mug and didn't want to spend a lot of time on it. Of course I had to rip out the binding about 18 times because I'm a dummy and an almost-perfectionist and kept sewing it wrong, so it ended up taking much longer than it should have! These are very simple, I just kept messing up...

The mug rug can be whatever size you want - I made one about 8x5" and another 6x4", really it's just a padded coaster to set your mug (and a couple cookies) on - make it whatever size you feel like.
The back is a solid piece of fabric, the front/top side is strips of 2" material sewn together, and it's bound together with self-made bias tape.


After sewing the 2" strips together, press the seams flat. Cut a piece of batting the same size as the top and bottom fabric piece, sandwich it between the two outer pieces with their right sides facing out (so lay the bottom piece on your work surface with the right side down and the wrong side facing up, add the batting, then put the top piece on the batting with the right side up). Sew the sandwich together by sewing along each of the strips (or you could do a pattern like if you were quilting) to hold all three pieces in place.


Unfold the bias tape and lay it on top of the sandwich as shown in the picture below. Starting in the middle of one side, sew "in the ditch", which means along the fold line about 1/2" from the edge. 


About 1/4" from the corner, turn the fabric and sew on an angle to the corner. Cut the threads and remove from the sewing machine.


Fold the strip up following the angled line you just sewed. 


 Then fold it back on itself and line it up with the next side, continue sewing in the ditch until you reach the next corner, repeat until you have all 4 corners done.


After sewing all 4 corners you need to sew the two ends of the bias tape together. To do that, fold one edge back about 1/2" and lay the other edge on top. Sew across both ends. 


the right side of where you joined the two
ends of the bias tape together. 
 Turn the coaster over and pin the other side of the bias tape in place. See the photos for how to fold the corners:


 Sew around the entire coaster and you're done!


4.8.18: ham pasta salad
4.8.17: coleslaw dressing


Happy moment ~ reaching the top of the hill

Sunday, April 7, 2019

Around the Campfire 🔥 (week 14)

Dear Campers ~

Here's a quick recap of what happened at camp this week (in addition to having Tesha and Kayleigh visit for a few days!):

Posts ~

3.31: around the campfire (week 13)
4.1:   microwaveable bowl cozy
4.2:   tip-sy tuesday: stringing beads
4.3:   sheet pan pork chops and broccoli
4.4:   thousand island dressing
4.5:   how to retouch photos
4.6:   vodka bolognese pasta

What's cooking ~
  • grilled make-your-own pizzas, tossed salad
  • grilled steak, roasted baby potatoes, roasted broccoli
  • chicken enchilada suizas
  • marinated pork tenderloin, cauliflower and sweet potato rice, sweet kale salad
  • grilled chicken breast, roasted garbanzo beans, cucumber salad
Miscellaneous other stuff keeping me busy ~
  • read 1/2 of "Crossing to Safety" by Wallace Stegner but ran out of time and had to return to the library. It's back on my hold list and I'll finish it as soon as I get it this time. Read "What Alice Forgot" by Liane Moriarty and loved it, also read "How to Stop Time" by Matt Haig and loved that one too! I had a good reading week :)
That's it ~ hope everyone had a great week!

Sincerely ~


Jill
camp counselor and reading fanatic

Saturday, April 6, 2019

Vodka Bolognese Pasta

Yes, vodka is in the title. But don't let that scare you off this recipe - you don't have to use vodka if you don't drink or the thought of adding vodka to a dish you want to serve the kids just seems wrong; if you prefer to not cook with alcohol just replace it with chicken or beef broth (although it simmers for so long all the alcohol is cooked out so no one is getting drunk eating this delish pasta sauce, it's even ok for kids to eat it!).

I adapted this recipe from the original found here.

Ingredients:
  • 2 T. olive oil
  • 2 shallots or 1 small onion, chopped
  • 3 carrots, chopped
  • 2 celery stalks, chopped
  • 1 pound lean ground beef
  • 3/4 pound ground Italian sausage (mild or spicy)
  • salt and pepper
  • 1 can (28 oz.) chopped tomatoes
  • 1/4 cup tomato paste
  • 2 teaspoons dried oregano
  • 2 teaspoons dried basil
  • 2 sprigs fresh thyme (leaves only, remove from stem)
  • 2 bay leaves 
  • 1 cup whole milk
  • 3/4 cup vodka
  • 1 parmesan rind, plus grated parmesan for serving
  • 1 pound pasta, cooked according to the package. I used tagliatelle noodles.
Directions:

Heat the olive oil in a large Dutch oven or soup pot over medium heat. Add the shallot, carrots, and celery, season with salt and pepper. Cook 5 minutes until the onion is translucent and starting to brown. Add the beef and sausage, brown all over, breaking up the meat as you go so there's no big clumps, about 10 minutes.
Add the tomatoes, tomato paste, spices, milk, vodka, and the parmesan rind. Season with salt and pepper. Stir to combine; cover and cook over medium-low heat for 2 to 3 hours, stirring occasionally. 
Let the sauce cool, then spoon off any grease that is sitting on the top - NOTE: I had quite a bit of grease from the sausage, next time I will drain it off after browning the meat before moving on to adding the tomatoes, etc. Using a spoon I scooped up the obvious pools of grease. You can now refrigerate the sauce and then reheat it about 1/2 hour before serving time, or if you are eating it right away just put it back on the stove top and reheat the sauce.

Remove the parmesan rind. If the sauce is soupy, cook an extra 20-30 minutes uncovered.


To serve, divide the pasta among bowls or plates and ladle the bolognese over top. Serve with additional parmesan cheese. 

Friday, April 5, 2019

How To Retouch Photos

Did you know that you can easily erase or retouch photos (in Mac photos)? I do this quite a bit now and it's such a handy little tool - here's one example: 


When I posted about making this 3 strand morse code bracelet, I eliminated the words that are printed  over the morse code dots and dashes. Another example:


 I posted how to make this gift card holder, but didn't want to show the numbers on the card - so I removed them:

Here's how to do it:

Double click on the photo you want to edit, then click edit in the top right corner:


Choose the arrow next to the "retouch" button (it's below "light", "color", "black & white") and click on the paintbrush symbol:


You'll get a small round open circle instead of your arrow cursor, you can make the circle bigger or smaller by changing the size shown right next to the paintbrush symbol: 


 Put the circle over whatever you want to remove:


 click and whatever is in the circle will be erased (or blurred out):


If you have a larger section to do, like removing the numbers or letters from my first examples, hold down the click button and drag the circle over the area you want to remove like you are using an eraser. When you release the click button, the white eraser marks go away, and the image will be gone/blurred. If it doesn't all go away just keep going over it with the eraser and eventually it'll all blend in:


Cool, right?! I'm also a little obsessed with adding pink arrows now :) see how here. 


Thursday, April 4, 2019

Thousand Island Dressing

We like thousand island dressing but don't eat it that often so I don't usually keep it on hand - it takes us forever to go thru a whole bottle of store-bought and I end up having to pitch it.  I make this easy homemade version for the times we do want it - like on grilled reuben sandwiches and leftover corned beef salad, or just 'cuz it sounds good.
  • 1/2 cup mayo (I use light, gotta save where I can!)
  • 2 tablespoons ketchup
  • 2 tablespoons dill pickle relish
  • 1 teaspoon vinegar
  • 1 teaspoon sugar
  • pinch of minced onion or onion powder
  • pinch of garlic powder
  • pinch of coarse salt
  • a couple dashes of Tabasco, to taste,  if you want the dressing a little spicier
Mix all the ingredients together in a bowl, adjust seasonings as desired. Cover and refrigerate for an hour or so before serving. 


a grilled rueben (corned beef, sauerkraut, swiss cheese
on rye bread) needs thousand island in my book!
any leftover corned beef and sauerkraut from the sandwiches
becomes a delicious salad with the addition of baby greens, shredded swiss cheese,
 and chopped dill pickles, drizzled with homemade thousand island dressing. 


Wednesday, April 3, 2019

Sheet Pan Dinner: Breaded Pork Chops with Broccoli

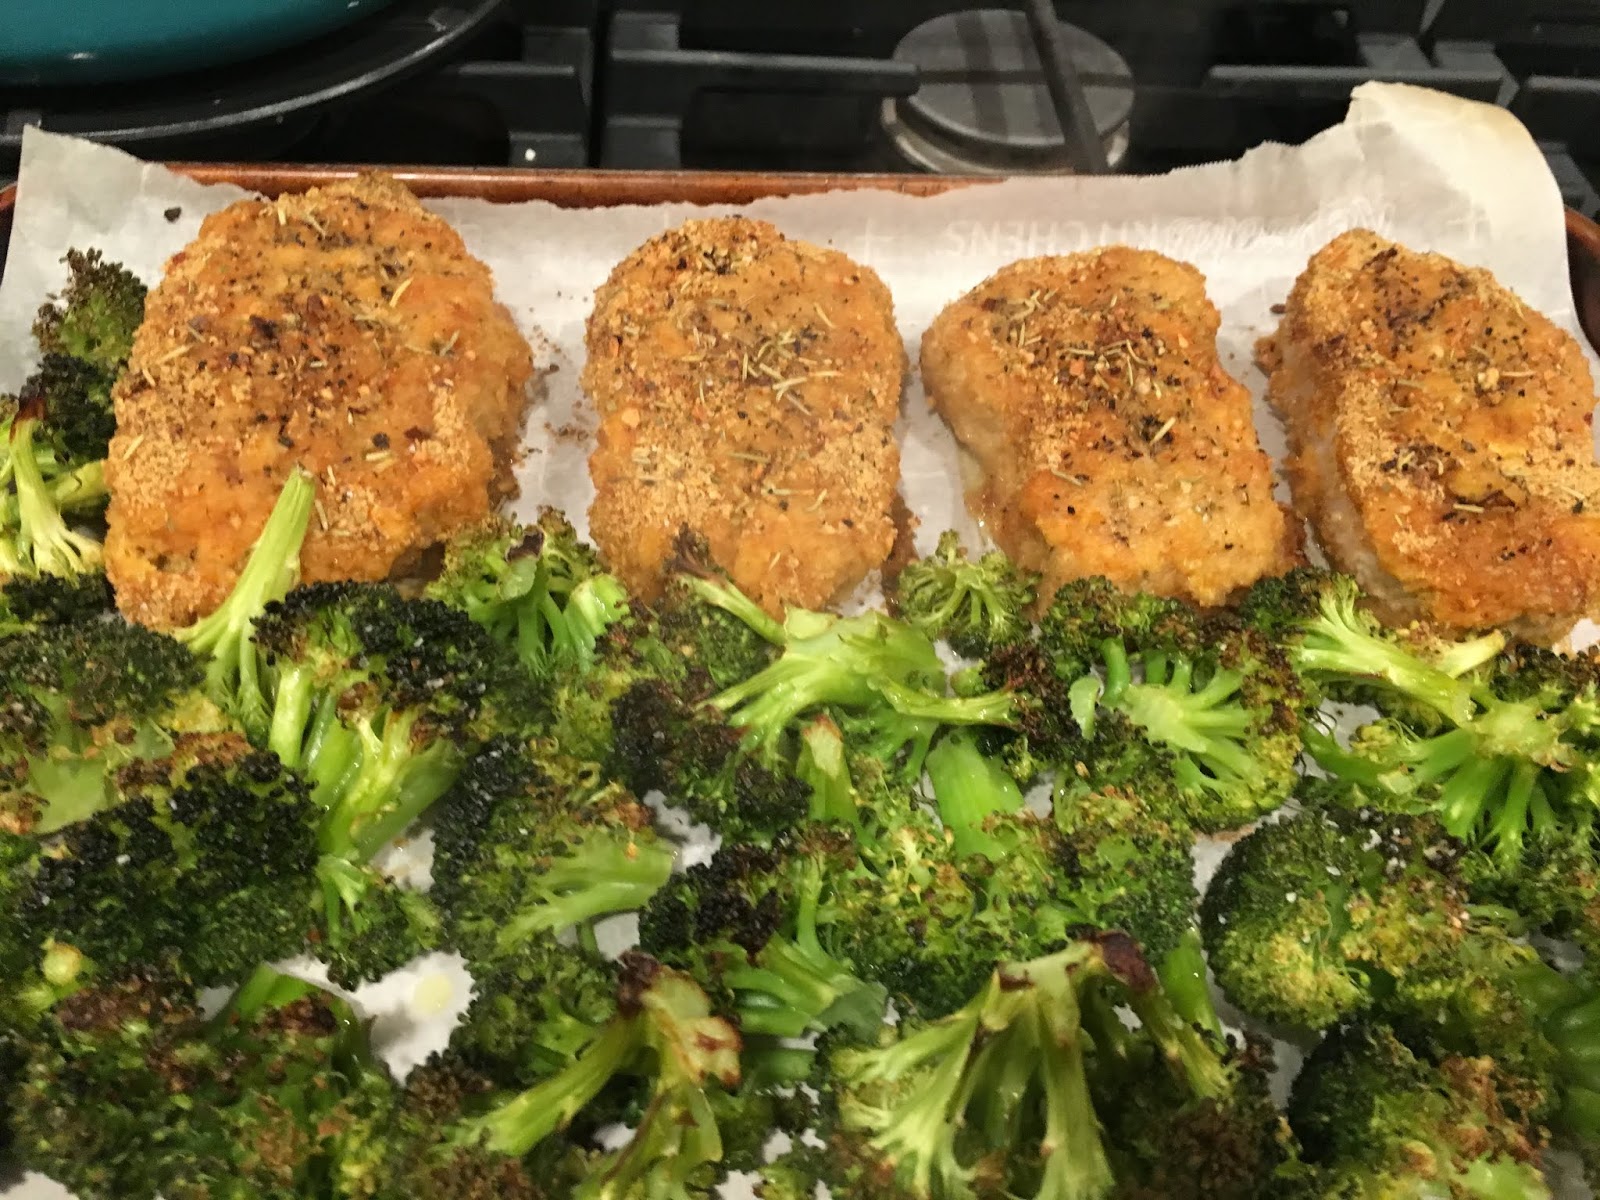
I know Shake and Bake is meant to just be that - shake and bake it, but I like to doctor it up sometimes. I made this yummy easy version and Dave said I should blog it (of course he also should have reminded me to take a picture of this plated instead of still on the baking sheet! oh well...) - so here it is, on his recommendation:

make my day camp Jill Pasant doctored up shake and bake with parmesan cheese and Italian seasoning, rub pork chops with mustard and dip in the seasoned mix. Roast on a sheet pan with broccoli florets for a one dish meal.

Mix together one envelope of shake and bake seasoning, some grated parmesan cheese, and coarse Italian seasoning (I have a grinder mixed blend, if you don't have that add some oregano, rosemary, thyme, basil, black pepper - whatever!); I put it in a pie pan or a big plate. Spread some kind of mustard all over boneless pork chops - here I'm using a homemade mustard sauce but I also like dijon - then dip the chops in the seasoning mix so it's coated on all sides. I sprinkle additional Italian seasoning on top, mostly because it's pretty. Place on one side of a parchment lined baking sheet (makes for easy clean up) and put chopped raw broccoli florets on the other, drizzle a little olive oil over the broccoli and sprinkle with coarse salt; bake at 375' until chops are cooked thru and the broccoli is tender, about 25 minutes depending on how thick your chops are.


Tuesday, April 2, 2019

Tip-sy Tuesday: Stringing Beads

I can't tell you how many times I've left strands of beads not knotted off yet on my desk that I've then picked up like a dummy and all the beads slide off (and usually go all over the floor)! Ugh I hate when that happens. So here's what I try to do when I leave a bead project before it's done - put a binder clip on the end of the string/wire/cord so the beads can't slip off. Such an easy solution that has taken me years to figure out!


It's especially helpful when working with multi-strand pieces, sometimes I don't want to finish a strand until I see how it'll look with the other strands - and no matter how many times I tell myself to not pick the project up I do anyway! Head slap. Now I put a clip on the open strands until I'm ready to finish them.


4.2.18: make a spring wreath
4.2.17: BBQ chicken stuffed sweet potatoes
4.2.16: cleaning glassware


Happy moment ~ laughing on the kiddie rides with a 5 year old


Monday, April 1, 2019

Microwaveable Bowl Cozy

My sis asked what I was up to and I replied "making bowl cozies". After a few minutes of silence she responded "I do not know what that is...is it a sweater for a bowl?"


It's more like a potholder that fits around a bowl in the microwave so you can lift and hold the hot bowl without burning your hands - it also works for holding a freezing cold bowl. I found a pattern on Pinterest that looked easy enough so Janis and I had craft day and made a few of them.

One thing you have to be very cautious about is making sure all of the materials are 100% cotton - even the thread, or it could melt and burn up in the microwave. The woman cutting my fabrics at Jo-Ann's recommended Pellon Wrap N Zap for the batting, it's made for going in the microwave - I would not have known to look for that, thanks for the heads up Jo-Ann lady.


These are easy once you get the hang of where to make the 4 pleats that give the cozy it's bowl shape, I messed up a couple times and put them in the wrong place! I took lots of pictures to help, and you can click on the link below to see more pictures from the site I followed to make these.

You need:

2 10" squares of 100% cotton fabric
2 10" squares of 100% cotton batting (Wrap N Zap)
cotton thread
ruler and scissors, a marking pen if you have one (I didn't so we used a regular pen - our fabrics were dark enough that you couldn't see the ink thru the fabric so it worked just fine).


Put 1 square of batting behind 1 square of fabric and sew together with a big X across the front. Repeat with the second fabric square and batting.


This is the tricky pleat part - it's easy after I made one... fold one square in half with right sides together, on the backside make a dot 1" in from the fold, another dot 2 inches down on the fold and draw a line between the dots. Sew along the line. Repeat at the bottom edge.


Now fold the square in half the other way and repeat sewing the two lines on the fold edge of the square. This is where I messed up - I made the lines on the free edge of the square instead of along the fold.


Trim the excess away so it won't be so bulky:

left one hasn't been trimmed yet - right one is trimmed.
see how the squares are bowl shaped now?


Repeat with the second square. Each square will have 4 pleats.

Put the two squares right sides together and sew all around the edges, leaving a small gap to invert the cozy.


Once sewn, turn it right sides out thru the gap - I use a skewer to get the corners turned out as sharp as possible.


 Iron. Then top stitch around the entire cozy, including the gap.


You can change the size by cutting smaller squares, in the above picture the dotted fabric is made with 8" squares and it's perfect for a small 4 inch bowl.

You can also make the cozy more or less curved (depending on the type of bowls you have) by making the pleats deeper than 1". Example:


In the above photo, the white bowl is deeper and has straighter sides so I made the cozy with deeper pleats - instead of marking 1" in from the fold I did 1.5". The green bowl is more open so the 1" pleat is perfect for that style of bowl. Another example of what I mean:


You might not think you need a sweater for your bowls, but I'm telling ya - these cozies are so handy we use them on a daily basis!

click here for original source