Thursday, June 20, 2019

My Sister is Hungry: Chipotle Sweet Potato Vegan Posole

Irish Stew?  Is that what my sister said this was called?  Whatever its called we loved it.

First of all I didnt tell the husband “stew”.  He likes soup.  So when he said “oh yay! Soup!” I didn’t correct him.  As he started giving his feedback though I realized I should have told him because his first comment was that there wasn’t very much broth.  Nope.. not a lot of broth in stew.  HAHHAHAHA..  his second comment was that she should have cut the carrots up smaller.  Nope, not carrots.  Those are sweet potato chunks buddy.  (insert eye roll here).  Again I didn’t correct him.  If I said sweet potato he would have immediately said he didn’t like it (like a small child).  So ok.  Note to Jill- those carrots were in too big of chunks. Haha.
Overall we loved this.  It was thick enough that it felt like an actual meal (which is what I don’t like about soup). I like to chew my food.  I also loved how spicy this was.  Just enough.  Some folks might have thought too spicy but for us was just right. 

This stew with a piece of bread was a perfect delicious meal.  It also was just as delicious reheated the next day- love that also.


*Jill here: No, it isn't Irish Stew - I guess I need to make her that so she knows what it is haha. I didn't tell her it's actually "Posole" because I don't know what that is so she sure isn't going to - ok, I just googled it and it means traditional Mexican soup. I just learned something!

Ingredients:
  • 2 tablespoons olive oil
  • 1 medium onion, diced
  • 1 medium poblano pepper, seeded and diced
  • 3 garlic cloves, minced
  • 3 cups vegetable broth
  • 1 (14 oz.) can fire roasted tomatoes
  • 1 (14 oz.) can pinto beans, drained and rinsed
  • 1 (14 oz.) can hominy, drained
  • 2 teaspoons ground cumin
  • 1 teaspoon dried oregano
  • 1/2 teaspoon chipotle chile powder (or to taste)
  • 1 small sweet potato, peeled and diced (about 2 cups)
  • salt and pepper to taste
for serving (optional):
  • lime wedges
  • fresh cilantro
Directions:
  1. Coat the bottom of a large pot with olive oil and place over medium heat. When the oil is hot, add the onion and poblano pepper. Saute for about 5 minutes, until the onion is soft and translucent. Add the garlic and saute for about 1 minute more, until very fragrant.
  2. Stir in the broth, tomatoes, beans, hominy, cumin, oregano, chipotle chile powder, and sweet potato. Raise the heat and bring to a simmer, then lower the heat and simmer, uncovered, until the sweet potato is tender, about 20 minutes. 
  3. Remove from heat and season with salt and pepper.
  4. Ladle into bowls and serve with cilantro and lime wedges (if using).
4 servings
per serving: calories 378, fat 9.8g, carb 58.5g, pro 15.7g

Notes: I had canned chipotle peppers in adobo sauce left over from making the Honey-Chipotle Chicken Pasta Salad so I substituted that instead of using a poblano pepper and chile powder as called for in this recipe. I also substituted chicken broth for the veggie broth - which obviously makes it not vegan now,  but since I'm not vegan I'm ok with that. 


found at www.connoisseurusveg.com

Wednesday, June 19, 2019

Owl Pull-Apart Cupcake Cake

I absolutely love how this pull-apart cupcake cake turned out, and it wasn't hard to make at all (bonus).  There are lots of inspiration photos online, this is how I made mine and I think he's adorable. You could easily change the colors and candies that you decorate with tho if you want him to be different - use your imagination! I will say that I think the extra individual owls are a little scary looking, I might not make them in the future - or maybe decorate them another way LOL. 


Bake whatever flavor cupcakes you want, the owl as shown took 14. Make a batch of buttercream frosting (see below) - spoon out a small portion to leave white for 4 cupcakes making the eyes and feet, and tint another small portion orange for the 3 cupcakes in the center of his body. Add cocoa powder to the remaining frosting and frost the rest of the cupcakes. Arrange the cupcakes on a large tray like in the picture above:
top row - 2 white cupcakes
second row - 1 chocolate, 1 orange, 1 chocolate
third row - 1 chocolate, 2 orange, 1 chocolate
fourth row - 3 chocolate
bottom row - 2 white

Put the cupcakes tightly together, then blend all the edges adding more frosting as needed to fill in gaps around the cupcakes - making it look more like a whole cake instead of individual cupcakes.

To decorate as shown:
  •  chocolate wafer cookies for the wings, base of eyes, half pieces for the eyebrows
  • gummy life savors for the second part of eyes, topped with an M&M
  • cut an orange gummy candy into triangles for the beak, and yellow gummy candy into strips for the feet. 
  • sprinkle coconut and mini chocolate chips over the body. 

The remaining baked cupcakes can be turned into individual owls as shown by using half pieces of wafer cookies for wings and smaller pieces for the eyebrows, smaller triangles of orange gummy for the beaks, skip the feet. Or if you don't need that many owls you can always freeze the unfrosted cupcakes for later!

Buttercream Frosting:
-1 stick soft unsalted butter
-4 cups confectioners sugar
-1 teaspoon vanilla extract
-pinch of coarse salt
-milk or cream (a couple tablespoons, add a little at
a time until you get the right consistency)
cream the butter until smooth, add the
remaining ingredients and beat until smooth
and fluffy.

6/19/17: how to distress jeans
6/19/16: gnocchi with tomatoes and snap peas


Tuesday, June 18, 2019

Tip-sy Tuesday: how to make Balsamic Reduction

Have you tried balsamic reduction? I'm addicted and put it on everything - it's great drizzled over salads, vegetables, around grilled halibut stacks; another one of my favorite things is to slice an avocado in half and fill the cavity with halved cherry tomatoes, then fill up the hole with balsamic reduction - yum!


You can purchase balsamic already reduced into a thick tangy syrupy glaze but it's simple to make at home: put some balsamic vinegar in a small saucepan, bring to a boil over medium-high heat, reduce to a simmer and let it cook down until it's reduced by at least half. That's it!

Just thinking about this is making my mouth water - really, ya' gotta try it!


one year ago: halibut stacked with potatoes and spinach
two years ago: meatloaf


Monday, June 17, 2019

Paper Tropical Flowers


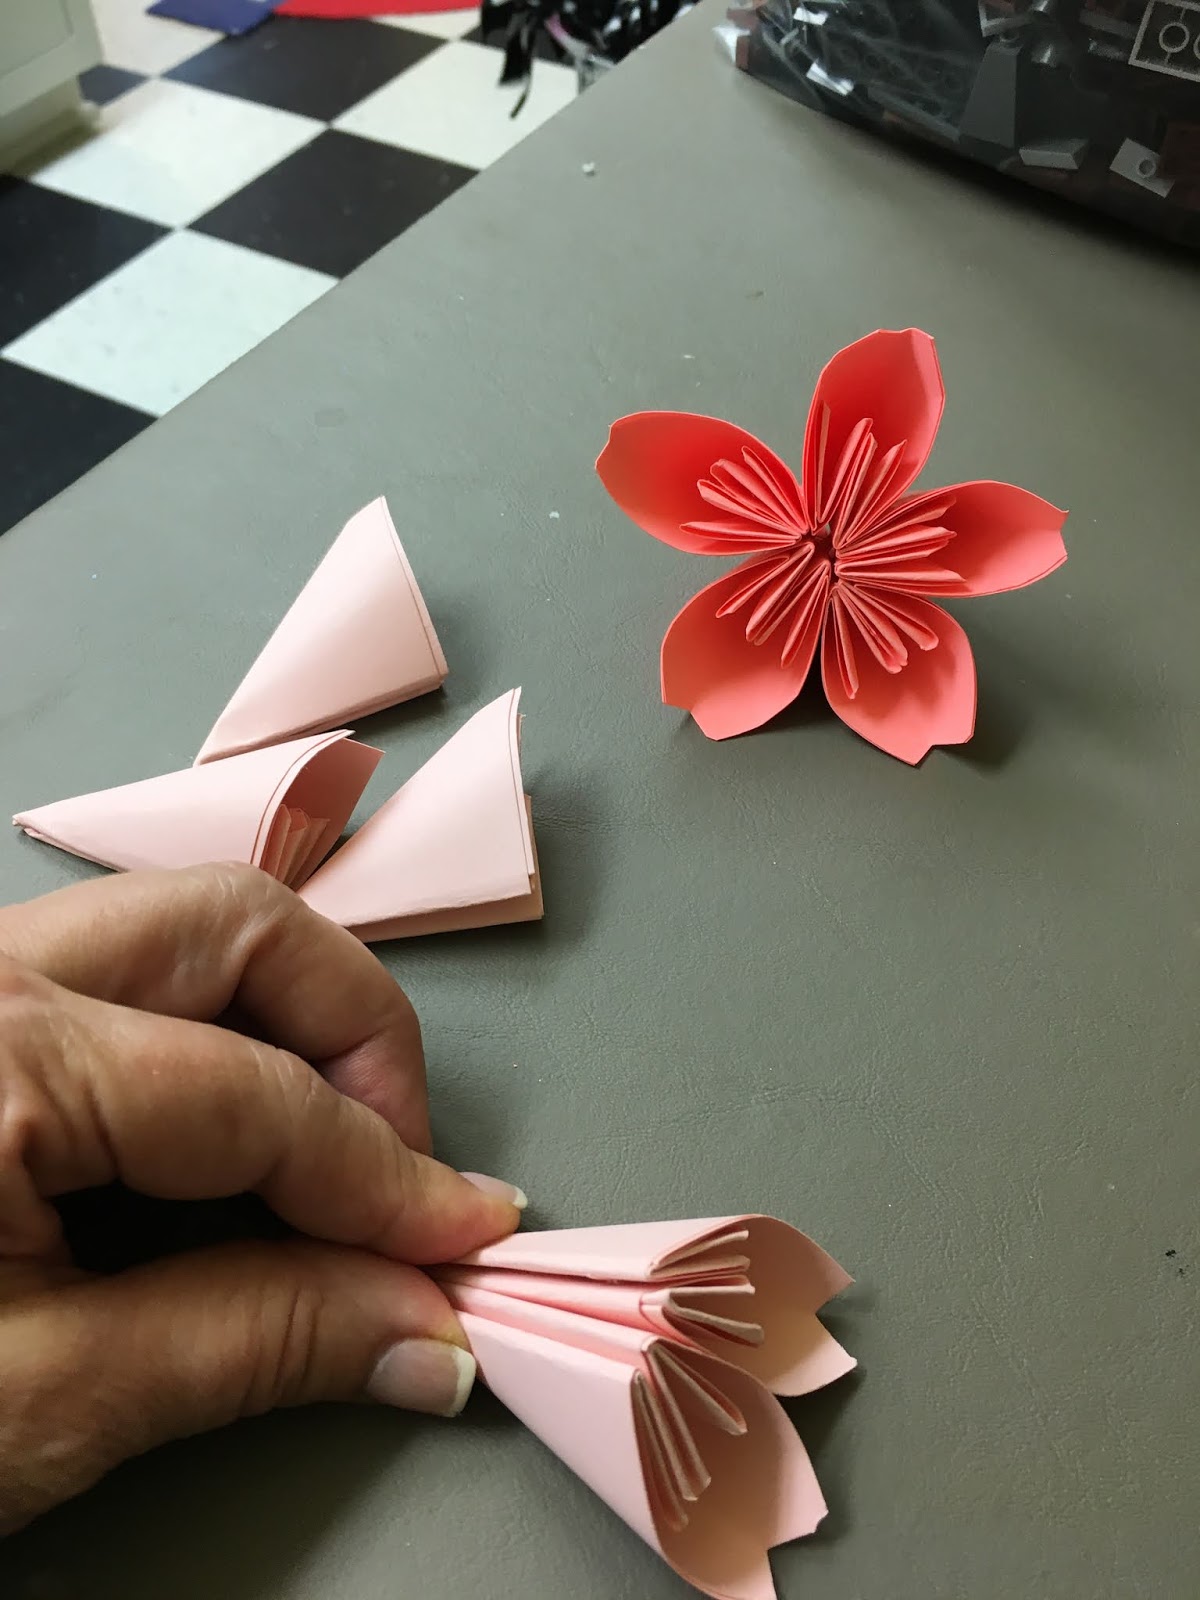
While looking for Lego crafts I came across a video - it had nothing to do with Legos but popped up and caught my eye - on how to make a paper flower ball. I've made a few paper flowers (as you might recall, click here and here for a couple of them) but never any like this, so after practicing with a piece of white paper to make sure it was going to work and not waste my cardstock I moved on from looking at Lego crafts to making tropical flowers. The original idea made a round flower ball which takes 12 flowers, but I'm still dealing with tendonitis in my hand from moving furniture like a month ago, so I quit after making 4 flowers - I think they're very pretty even if I didn't make a ball!

Here's how:

Cut 4" paper squares, 5 per flower.

1. fold a square into a triangle


 2. fold the sides in to meet in the middle, creating a square shape


 3. unfold the side triangles you just made


 4. insert a finger into the side triangles and flatten them like in this next photo


5. fold the side tips down


6. fold the side triangles in half


 7. fold but don't crease the two edges to meet each other


 8. snip off the top tip


 9. glue the edges together to form the petal - I used glue dots


10. after making 5 petals, glue them all together to make a flower - note the glue dots didn't hold all the petals together so I switched to hot glue. Add something to the very center, I wanted to use sticky back Stampin' Up gem embellishments but couldn't get them to hold so switched to a mini pompom. The original inspiration video used pearls. 


11. glue however many flowers you want together in a bundle. I made a couple leaves following the above directions but didn't snip the tips off - seems more "leaf-like" to me - and glued them to the flowers before gluing the flowers into a bundle. 


I made a short video on how to fold the petals in case my description above doesn't make sense!


original source found here


one year ago: coincidentally it's a different paper flower.
two years ago: for real, it's another paper flower! I honestly had no idea and did not do this on purpose!
three years ago: rock photo stand. whew, 3 years of paper flowers woulda been super weird timing.


Sunday, June 16, 2019

Around the Campfire 🔥 (week 24)

Dear Campers ~

Here's a the weekly roundup of what happened at camp this week in case you missed anything:

Posts ~

6.9: 🔥 (week 23)
6.10: wine cork flower wreath
6.11: tip-sy Tuesday: organizing extra buttons and thread
6.12: potato, squash, and goat cheese gratin (healthier!)
6.13: my sis is hungry: mini calzones
6.14: DIY ice packs
6.15: Jenny's new "mantra"

What's Cooking ~

  • grilled tuna, sticky rice, creamed spinach
  • meatloaf, mashed potatoes, mixed veggies
  • grilled chicken tenderloins, steamed broccoli, kale salad
  • grilled halibut stacks
  • steak, caesar salad, potato salad, sautéed mushrooms
  • pork chops, butternut squash salad

Miscellaneous things keeping me busy but not blog-worthy ~
  • read 'Clock Dance' by Anne Tyler - easy, light, pretty entertaining. I'd say ⭐️⭐️⭐️⭐️ out of 5
  • Cathy gave me a big box of legos her grandkids don't play with anymore, I don't have kids or grandkids to play with but I'm not passing up a box of Legos LOL! I love Legos... I got a little carried away sorting them (once I started I couldn't stop!) and after I get done making a few things I'm passing them on to Mickey for her school office.


Hope you have a great week, check back often to see lots more projects, recipes, and whatever else I can think of to make!

Sincerely ~


Jill
camp counselor and compulsive Lego organizer

Saturday, June 15, 2019

My New "Mantra" ...by Jenny

This isn’t actually a blog post so my sister probably wont give me credit, but every once in a while I feel I should try a little harder to be more like my Sissy.  I stumbled across my new mantra:

 I'm working on being more organized.

Not like "alphabetize the pantry" organized, 
just like "stop buying the gift on the way to 
the party and wrapping it in the car" organized. 


Yes. My sister has her pantry alphabetized.. and labeled.  Aye yi yi..


Jill here: I do not have my pantry alphabetized ~ although it is labeled for sure. I do have my spice drawer alphabetized, but doesn't everyone?

Friday, June 14, 2019

DIY Ice Packs

Check out this super easy, super fast, super cute, and most importantly - super practical idea: Wrap duct tape around a snack baggie; wet a sponge and freeze it; insert the frozen sponge into the baggie. DIY Ice pack! Keep lunches cold, use as a compress, whatever. Wrapping in duct tape helps insulate the baggie, plus it's cute ;) Took me longer to write this than it did to make it!


click here for original source

Thursday, June 13, 2019

My Sister is Hungry: Mini Calzones

Jill here - I didn't follow a recipe for these little calzones and am pleasantly surprised they turned out so good. Dave was really bummed that I gave them away, I didn't think he'd want them for dinner so I gave them to my sis for this week's My Sister is Hungry review - oops, guess I should have asked! They're so easy and quick to make, I'll make him another batch and he'll get over it haha. Here's what she has to say:


So its looking to be a very busy week.  So that said, instead of dinner this week we got a “snack”.  “Little mini calzones”.   This sounds great to me.  I love snacks.  So in my mind I am envisioning something roughly the size of a large pizza roll.  When I get these first of all they are not a large pizza roll.  These are meal sized.  Like the size of an oddly shaped “uncrustable”. (ever had those?  lazy people’s peanut butter and jelly?-  a story for a different time).  Anyway - they were big enough for a meal.  Not sure what kind of “snacking” people do at her house but these were a meal.  Add in a salad and I’d be done. BOOM.  Hey... I just have a great idea for dinner tonight.. 

So these looked fantastic first of all.  Really pretty.  They had a beautiful crust.  Dusted with something yummy, almost cheesy looking. I don’t know if she made it from scratch but it was great. Tasted exactly like I’m describing.  Little pockets of pizza goodness. Inside it was cheesy and delicious.  Not sure what was in it besides cheese and mushrooms.  Husband thought ham- I don’t love ham so I didn’t peel it apart to see what was inside.  Just decided to eat it and enjoy.  He thought it was so good could have been served in a restaurant. 

One thought I had was I should have reheated in the oven instead of the microwave.  Microwaving didn’t leave it a crisp.  Another thought is she asked if I had pizza sauce to dip into but really didn’t need it.  It had great flavor without it.  I also tried dipping in ranch - again not needed.  

Bottom line is these were fantastic. Hubby loved them - he gives it a solid 8 ½ and says this was his favorite meal she made so far…yes for us it was a meal - not a snack. ðŸ˜Š  So good we will have it for dinner again tonight!


Ingredients:

  • 1 tube pizza dough
  • canadian bacon, chopped
  • canned mushrooms, chopped
  • shredded cheese, I used Italian4-cheese blend
  • dried Italian seasoning
  • pizza sauce
  • egg, beaten
  • grated parmesan cheese
Directions:

Unroll the pizza dough and roll out to about 1/4" thickness. Using a 4 1/2" bowl as a guide, cut out circles of dough; reroll the scraps of dough and continue cutting out circles until you use all the dough - I got 8 pretty ones and 1 scraggly one from the end of the scraps.


Spoon about a tablespoon of pizza sauce onto each circle, spread around but leave a little space along the edge free of sauce. Sprinkle a little Italian seasoning over the sauce, then top with canadian bacon, mushrooms, and cheese. 


Fold the circle in half, brush the edges with the beaten egg, then seal using the tip of a fork pressed into the edges. 


Brush the tops with beaten egg, sprinkle with grated parmesan and coarse pepper. Bake at 400' for about 12 minutes until golden brown. Serve with additional pizza sauce (or ranch) if desired. 

Wednesday, June 12, 2019

Potato, Squash, and Goat Cheese Gratin

I made this easy gratin recipe as a simple side dish for grilled steak (along with roasted asparagus); just takes a couple minutes to throw together and doesn't have all the fat and calories I usually associate with a gratin, which is a big plus. Fresh, pretty, rustic, simple, fairly healthy...what's better than that?

  • 2 medium yellow summer squash (about 8 ounces total)
  • 4 small to medium red potatoes (about 1 pound total)
  • 3 tablespoons olive oil, plus more for the baking dish
  • 4 ounces fresh goat cheese, divided
  • salt and pepper
  • 1/4 cup whole milk
  • 1/3 cup grated parmesan
  • 1 tablespoon thinly sliced basil or thyme leaves, optional
  1. Heat the oven to 400'. Lightly grease a 1 1/2- to 2-quart baking dish with a drizzle of olive oil.
  2. Use a mandolin or chef's knife to slice the squash and potatoes into very thin slices, 1/8" thick or less. Place sliced vegetables and olive oil in a large bowl and toss to combine.
  3. Place 1/3 of the squash and potato slices in an even layer in the bottom of the baking dish, season with salt and pepper. Sprinkle with 1/2 of the goat cheese in large chunks. Repeat with another 1/3 of the vegetables, seasoning again with salt and pepper, top with the remaining goat cheese. Finish by layering on the remaining vegetables and seasoning with salt and pepper.
  4. Pour the milk evenly over the entire dish. Sprinkle with the parmesan. Cover tightly with aluminum foil. Bake for 30 minutes. Uncover and bake until the top browns, about 15 minutes more. Sprinkle with the fresh basil or thyme, if using.
6 servings. per serving: calories 252, fat 13g, carbs 25.9g, protein 9.6g

Store leftovers in an airtight container in the refrigerator for up to 5 days.


click here for original source

Tuesday, June 11, 2019

Tipsy-Tuesday: Organize Spare Buttons and Extra Thread

I keep a small photo album in my closet, the kind with clear slip in/open end pockets, to help organize all the extra buttons and threads that would normally either get tossed in a drawer, thrown out, or misplaced. This has been my system for years and I'm telling ya - it totally works and only requires minimal effort to keep up. After removing the tags, buttons and thread/yarn from a new piece of clothing, I jot down on an index card what item the button, etc. goes with (or if the tag says what the clothing piece is I'll just use that) and slip it along with the buttons, etc. into an album pocket. That way when I lose a button or need to make a small repair I easily flip thru the album looking for the correct pieces.