Tuesday, December 10, 2019

Tip-sy Tuesday: How to Make a Wrapping Paper Gift Bag

Not sure if this is a tip, more like a useful helpful wrapping idea perfect for this time of year. I use this technique ALL the time, year round. Originally posted 12/15 but worth knowing and worth a repeat:


Have you ever made a gift bag from wrapping paper? I recently learned and love this -  no more having a gift that won't fit a store bought bag (and no more having to run to the store for a bag - just make your own!). It's a little hard to take pictures while folding the paper haha - I need a third hand sometimes. I took a bunch trying to capture what it is I'm doing exactly...


This is an especially good idea if you need a wider bottom bag or are wrapping something that has an odd shape, you can make the bag whatever size you need.


1. Start with a length of wrapping paper that will fit your item. Lay the paper on a flat surface wrong side up.


2. Fold the sides in, overlapping slightly, and tape.


3. Fold up the bottom as wide as you want the base of your bag to be (mine is approx 4").


4. This next part is hard for me to describe, but it isn't hard to do - open up the bottom part you just folded up and fold the sides that have the crease in them towards the center of the bag creating a diamond shape.


5.Then fold the top and bottom points in towards the center of the diamond, overlapping about 1/2" and tape.

6. cut off the top of the bag to however tall you want it to be


7. open up the bag and shape until the bottom is flat


8. put your gift inside and roll down the top to close. 

There - no more buying bags or putting your presents in garbage bags cuz they won't fit in your store bought bag! I guess I should point out that you can only make a bag as large as your wrapping paper - I'm not sure I could make one as big as a garbage bag haha...hmmm, maybe I'll go try. See ya!


Monday, December 9, 2019

Felt Mitten Gift Tag Clip

"Felt Mitten Gift Tag Clip". Hmmm...that's an odd name, I know. But it's what it is and I can't think of a better way to describe these! Very simple and easy, but sooooo cute - and a fun addition to your Christmas gift wrapping.

I bet I don't even have to explain how to make these other than you can't see the little clothespin on the back of the mitten - now you know all you need to know to whip a few of these out!


Still want info? Ok, seriously just cut out little mitten shapes from whatever color felt you want, add on a few decorations like mini pompoms, sequins, beads, trims, feathers..., then glue to a mini clothespin. Then clip to your gifts - you can clip it to a tag, the top of a bag,  or just clipped to a ribbon/bow. Done. Easy!


12.9.18: 🔥week 49

12.9.17: elf gift tags

12.9.16: k-cup snowman lighted garland


12.9.15: paper Christmas lights garland


Sunday, December 8, 2019

Around the Campfire 🔥 (week 49)

Dear Campers ~

Here's a quick recap in case you missed anything at MMDC this past week:

Posts ~

12/1: 🔥week 48
12/2: poinsettia gift topper
12/3: tip-sy Tuesday: superglue on your fingers?
12/4: cranberry sauce hand pies
12/5: my sis is hungry: pumpkin oatmeal chocolate chip cookies
12/6: celery syrup
12/7: beef and beer stew

What's Cooking (on the road!)
  • I'm continuing to learn how to prep and cook for RV road trips; the day before we left Dave pre-grilled thin chicken breasts, I made 2 sides ahead of time - Israeli couscous with zucchini and tomatoes, and my favorite orzo salad - boiled pasta, tossed with a little olive oil to keep it from sticking, made meatloaf, and egg salad. All went into gallon ziplock baggies and we mixed and matched throughout the week. 
  • It's the first time I've made this Israeli couscous (big pearl couscous) dish and it's really good - it can be served warm, at room temp, or cold which is perfect for road tripping. To make it: heat 2 T. olive oil in a saucepan, add 1 cup couscous and toss around 3-5 minutes until it's a little browned. Slowly add 1 1/2 cups water; cover, lower heat, and simmer until the water is absorbed about 10 minutes. Remove from heat and stir in 1/2 cup pesto, 1/2 cup chopped zucchini, 1/2 cup chopped tomatoes. click here for original recipe source.
Miscellaneous stuff ~
  • I'm driving my car behind Dave in the RV this trip, and it's the first time I've borrowed audio books from my library app - I'd still rather read the book but what a great way to fill the long days. I mean, Sarge is with me and it's nice to have the company, but he pretty much just sleeps the whole time so...hahahha. I listened to "Thirteen Reasons Why" because I know the show has been very popular but I didn't love it. Teenager leaves tapes blaming a bunch of other people for adding to the reasons she commits suicide. Terrible topic, obviously, but I had a hard time with her reasoning. ⭐️⭐️. "Cleaning the Gold", a collaboration of Karin Slaughter and Lee Child starring their popular characters Will Trent and (one of my favorites) Jack Reacher. It was good and very 'listenable' but ended so abruptly I backed it up to make sure I didn't miss anything! I'm assuming because of the way it ended that there will be at least one more follow up and will be a series. ⭐️⭐️⭐️. "Wicked Appetite" by Janet Evanovich, a cute story that is super far fetched but great for a day of listening. ⭐️⭐️⭐️. 

Sarge’s new favorite campground is in Missouri, never seen so many squirrels! He sat in the chair watching them like it was tv - we called it the “squirrel show” 😂

Hope you had a great week, everyone have their Christmas stuff up? I won't be able to do it until next week since we are traveling - I'm already wondering if I want to do all the work for just a couple weeks? I'm sure I'll break down and want at least the tree! Stop by often next week to see what's going on at camp - I planned ahead and made a few things to post while we are traveling.

Sincerely ~


Jill
your grateful and thankful camp counselor 


Saturday, December 7, 2019

Beef and Beer Stew

My sissy and b-i-l came over for dinner the night before Thanksgiving - it was super windy and cold, and I wanted to make something completely different than the turkey meal everyone was having the next day; found this recipe in a Real Simple cookbook and pretty much followed the recipe until the end, although I added carrots to the stew because I like them. Oh, and they called for 4 onions thickly sliced but I knew Dave wasn't going to like that so I reduced it to just one onion and diced it pretty small.

I, naturally, forgot to take a picture of the stew when it was done,
this is day two leftovers and the thick gravy was soaked up by sitting
overnight in fridge -  still SO good!

My grocery store had both precut stew meat and bottom round, I asked the butcher which he would use and he said because the stew meat is a mixture of different kinds of beef he would go with the bottom round since that's what the recipe called for - side note, rump roast and bottom round are the same thing according the meat guy. I did not cut the roast up into bite-sized pieces, leaving them in big portions made the browning step very easy.


6 T. olive oil
4 slices bacon, diced
2 1/2 pounds rump roast or bottom round, cut into 6 equal portions, or 2 1/2 pounds precut stew meat
1/2 t. salt
1/4 t. pepper
1 small bag baby carrots
1 medium onion, chopped
1 t. garlic, minced
1 14.5oz. can diced tomatoes
1 12oz bottles dark beer (I used Guiness stout)
2 T. brown sugar
1 t. dried thyme
1 T. minced fresh rosemary
1 1/2 pounds baby gold potatoes, cut in half

1/2 stick butter
1/4 c. flour
2 cups beef broth

Heat oven to 350'. Place the oil and bacon in a Dutch oven over medium heat. Fry the bacon until crisp and transfer it to a paper towel-lined plate; set aside. Season the beef with salt and pepper. Add some of the beef to the pot, being careful not to crowd the pieces. Cook until browned on all sides. Transfer to the plate with the cooked bacon; set aside. Repeat with the remaining beef. Add the carrots, onions and garlic to the pot and cook until the onions are softened, about 5 minutes. Spoon off and discard any excess fat. Return the beef and bacon to the pot and add the tomatoes, beer, brown sugar, thyme, and rosemary. Bring to a simmer. Cover and transfer to the oven. Cook until the meat is falling apart, about 2 hours. Add the potatoes and cook until tender, about 30 minutes more.

notes: After 2 hours the meat was still in very large pieces so I carefully broke them up into smaller sized chunks and let it cook another 30 minutes before adding the potatoes. When the potatoes were done (at this point it baked for about 3 hours total and the meat was then falling apart, maybe I didn't need to make the big portions smaller) I removed the pot from the oven but didn't like the consistency - the broth was too thin and runny....this is a little bit of extra work but totally worth it so stay with me here :). I removed all the beef and veggies from the broth and set it aside. In a separate saucepan make a simple gravy by melting the butter, stir in the flour and cook for a couple minutes until it starts to turn a little brown. Slowly add the beef broth, stirring constantly, until it's thickened and bubbly. Put the Dutch oven with the stew broth over medium heat, once hot slowly whisk in the gravy. Add the beef and veggies back to the Dutch oven, turn the heat down to low and let simmer until ready to serve. Thickening the base up helped a ton and Dave said this was the best beef stew he's ever had!

Friday, December 6, 2019

Celery Syrup

Let me start by saying I don't love celery. I put it in tuna salad, soups, and stuffing but not much else -  it's healthy so I always think I'm going to eat it as a snack (filled with peanut butter or cream cheese - hmmmm, did I just say it's healthy?!) but then don't (because why eat stuffed celery sticks when I can just eat the peanut butter straight from the jar with a spoon?) so I end up throwing celery away quite often. This recipe for celery syrup caught my eye and it seemed like a good way to use up my leftover celery and I have to say - I actually like celery this way! Sure it's soaked in sugar water and that never hurts hahahaha...
Add a couple tablespoons to club soda for a light refreshing drink; or mix in a little gin to make it an interesting, festive, not-so-light and refreshing cocktail LOL. 


In a glass measuring bowl, stir together 2 cups chopped celery and leaves, 1 1/2 cups sugar, 1 cup water, and 1 tablespoon celery seeds. Let stand, stirring occasionally, until sugar dissolves. Chill, covered, 8 hours or overnight. Strain through a fine-mesh sieve. Transfer syrup to a lidded jar or bottle and store in the fridge up to 2 weeks. 


I couldn't get it to strain completely clear of the little celery seeds but it doesn't change the texture or flavor the club soda at all so I'm not worried about it. If you want it clear I'd try an even smaller mesh strainer or maybe cheesecloth to catch more of the seed residue. 


original recipe found here at midwestliving.com


Thursday, December 5, 2019

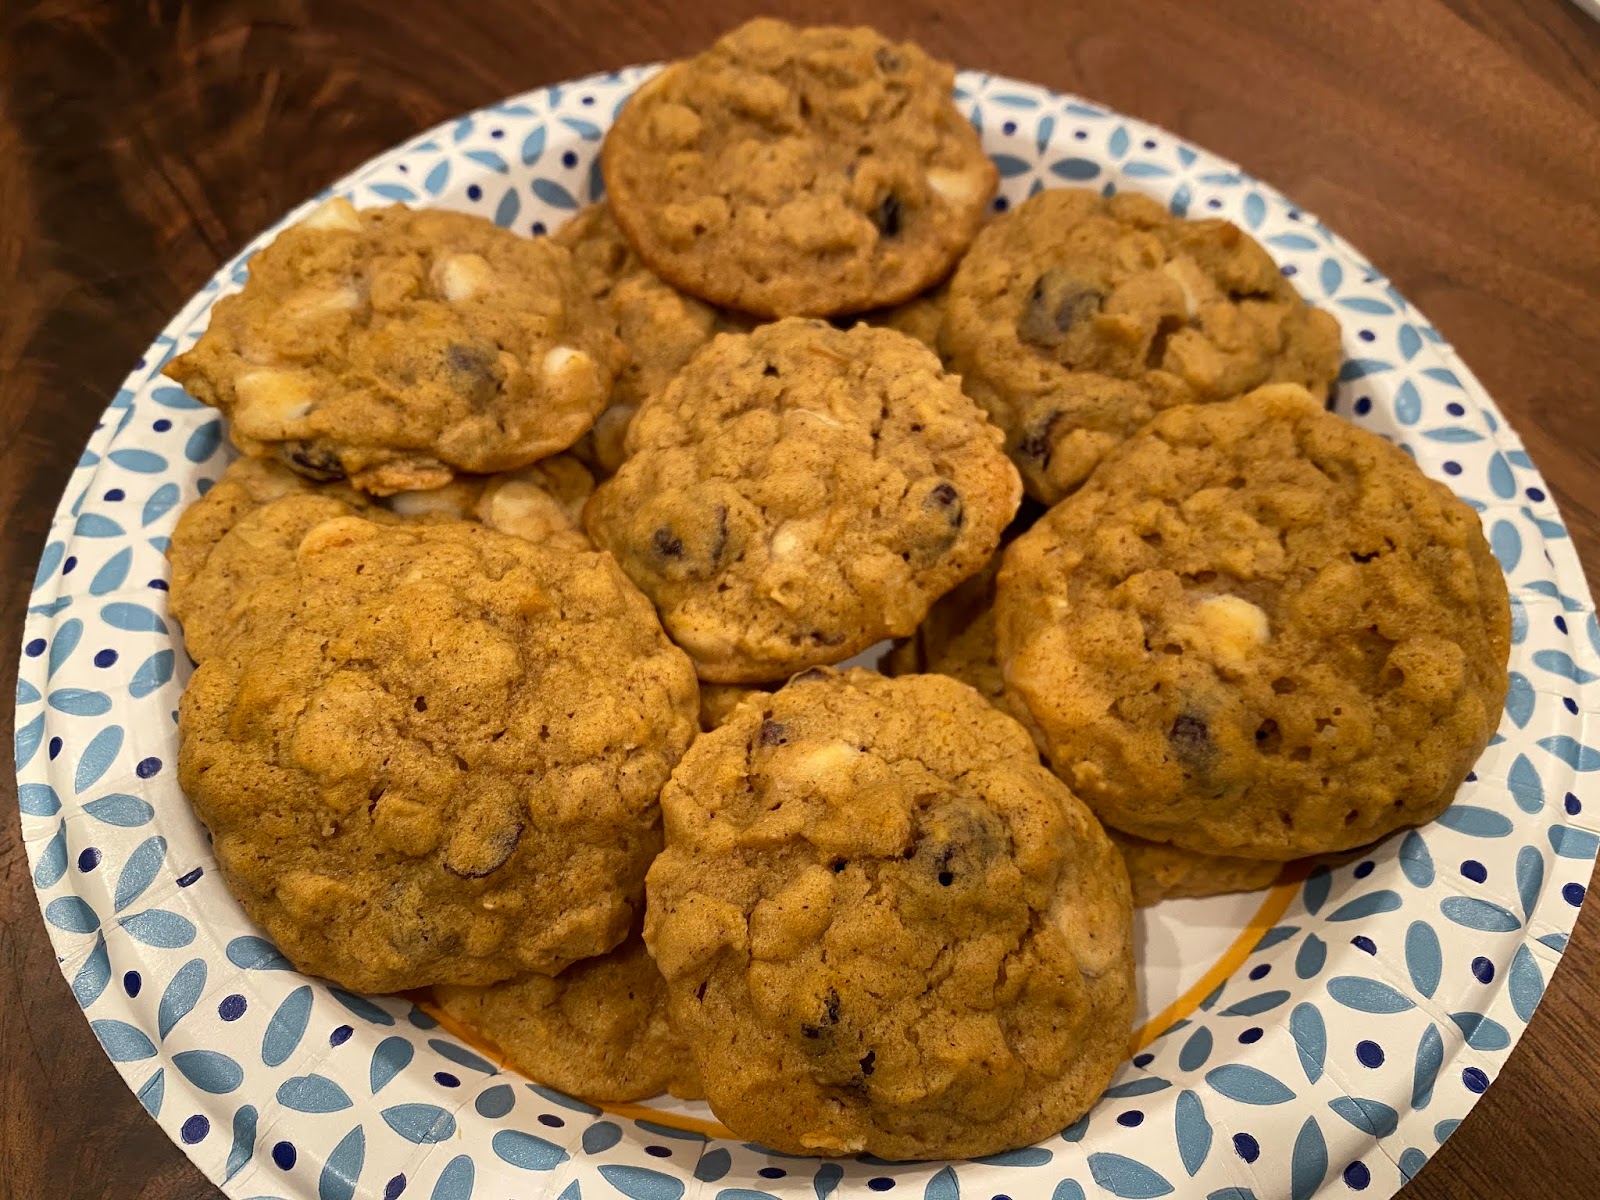
My Sis is Hungry: pumpkin oatmeal chocolate chip cookies

Wow. I don’t know what kind of cookies they are but wow.  
I have said before I don’t like cookies but I am taking it back for these.  So good. 
First of all I really only like chocolate chip but these have other “stuff” in them. Which I don’t usually like.. but man are these delicious.  Not too crunchy, perfect flavor.  So delicious.
Seems a lot like the perfect holiday cookie. Christmas potluck? Christmas Party dish to pass?  Can’t go wrong with these.
I cant say much more about these besides that everyone should make some.  Or get Jill to make you some. 
One of the best cookies I have ever had. 


PUMPKIN OATMEAL COOKIES

INGREDIENTS:

  • 2 cups flour
  • 1 1/2 cups old-fashioned oats
  • 1 t. baking soda
  • 1 1/2 t. cinnamon
  • 1 t. pumpkin pie spice
  • 1/2 t. salt
  • 1 cup (2 sticks) butter, softened
  • 1 cup packed brown sugar
  • 1 cup granulated sugar
  • 1 cup pure pumpkin puree (not pumpkin pie puree)
  • 1 large egg
  • 1 t. vanilla
  • 1 cup white chocoalte hcips
  • 1 cup dried cherries
DIRECTIONS:
1. Preheat oven to 350'. Line your baking sheets with parchment paper or a silicone mat.

2. Combine flour, oats, baking soda, cinnamon, pumpkin pie spice and salt in a medium bowl. In a separate large mixing bowl, beat butter and sugars until light and fluffy.

3. Add pumpkin, egg, and vanilla; mix well. Add flour mixture, combine until all ingredients are incorporated. Fold in white chocolate chips and dried cherries.

4. Drop by rounded tablespoons onto prepared baking sheets.

5. Bake for 11-13 minutes or until cookies are lightly browned. Cool on baking sheets for 2 minutes; remove to wire racks to cool completely.

makes 48 cookies. 


Jill here: these were a little crunchy and a little soft after they cooled, but after leaving them in an airtight container on the counter overnight they got very soft. I'll store them in the fridge next time!

Wednesday, December 4, 2019

Cranberry Sauce Hand Pies

I made the cranberry-orange sauce following this recipe for hand pies, what didn't get used for this dessert I served for Thanksgiving, it turned out quite tart but that isn't a bad review - it's because I reduced the sugar to 1/2 cup so it's my 'fault' it's so tart. I'm ok with the tart, but if you want a sweeter sauce I'd use the whole 3/4 cup called for. This is not my usual recipe and think any thick cranberry sauce would work. I used pre-made Pillsbury pie dough and added blueberries along with raspberries and they turned out great - with the crust shortcut these are very quick and easy to make, they're pretty, and something a little different for dessert (or a snack if you're Dave and live in my house LOL). He said they're the best pop tarts ever - yep, they do look like pop tarts! You can easily change the shape, just make sure the top and bottom crusts are the same size (I almost did circles, maybe next time).

you'd think after 4 years I'd remember to take photos.
this is the last of the hand pies before I thought to take
a picture!

This is how I made them, if you want to see the inspiration recipe and make the crust from scratch I found it in a 11/19 Good Housekeeping magazine that came in the mail (I don't subscribe so not sure why I got this, but whatever - found a couple good recipes so thanks GH!).

1 box Pillsbury pie-dough (contains 2 rolled out crusts)
a handful of raspberries and blueberries
1/2 cup cranberry sauce (recipe below)
1 t. cornstarch
1 large egg, beaten
sugar for sprinkling
confectioners' sugar for glazing


1. roll out the crust so it's a little thinner, make both circles the same size. Trim the round edges so it makes more of a square shape, cut into 6 rectangles (or cut out whatever shapes you want, you'll need 2 pieces for each hand pie). Repeat with the other dough round for a total of 12 rectangles.

2. heat oven to 400'. Line a baking sheet with parchment paper. Arrange 6 rectangles on the baking sheet. Using a fork, prick holes in remaining 6.

3. in small bowl, toss berries and cranberry sauce with cornstarch. Spoon equally onto each of the 6 rectangles, leaving a 1/2" border around edges. Lightly brush border with beaten egg, top with pricked rectangle and press edges with a fork to seal. Refrigerate 10 minutes.

4. brush tops of hand pies with remaining egg and sprinkle with sugar. Bake until golden brown, 12-15 minutes. Transfer to a wire rack too cool. If desired, whisk confectioners' sugar with a little cold milk or orange juice until drizzling consistency and drizzle over tops.


CRANBERRY-ORANGE SAUCE
1 pound cranberries, fresh or frozen
1 t. finely grated orange zest
1 cup fresh orange juice
3/4 cup sugar
1 T. grated peeled fresh ginger
1/4 t. ground allspice

1. In medium saucepan, combine all ingredients.

2. Bring to a boil, reduce heat and simmer vigorously, stirring occasionally until cranberries burst and sauce has thickened, 30-35 minutes. Serve warm or at room temperature. makes 2 cups


12.4.18: snowman wreath
12.4.17: wine cork Christmas trees
12.4.16: pasta with roasted tomatoes and sausage
12.4.15: contact paper dog house

Tuesday, December 3, 2019

Tip-sy Tuesday: remove superglue from fingers

This is a tip I haven't actually tried, but based on the fact that every single time I use super glue, no matter how careful I am, I get it all over my fingers 🤦‍♀️ I will be trying this method for removing it next time it happens - can't hurt, and I hate the feeling of dried super glue on my hands until it eventually wears off (and I don't even try peeling it off, I can't tell if it's glue or skin I'm peeling ugh!).  


According to Real Simple magazine, create a paste of equal parts coconut oil and baking soda, apply it to the skin and let it sit for 10-15 minutes. Gently rub your hands to loosen the glue, and wash with a moisturizing soap.

Sounds too easy to be true but I have coconut oil and baking soda so what the heck, I'll try it!


12.3.18: tea light snow people
12.3.17: broccoli beef
12.3.15: make a wine cork trivet

Monday, December 2, 2019

Poinsettia Gift Topper


Came across the instructions to make a pretty leather poinsettia gift topper on hobbylobby.com, and had to try it. Pretty much followed the directions but swapped green felt for the material they used, and changed the center. They said to dip a glue covered push pin into seed beads for a beaded center, so I did...and it was a mess and waste of my time! The beads came off after I pushed it thru the petals and leaves and was super annoying, the push pin doesn't want to easily go thru the leather so I tried making a little hole in the petals before inserting the beaded push pin - and then ended up liking the plain push pin head better than the beaded one. That led to me thinking that 3 push pins heads would look even better than 1 - here's what I ended up with and I think it's so pretty. I'm going to make more of these and attach them to the tops of gift boxes, it'll be 2 gifts in 1.


For each poinsettia you need faux leather material, green material, round head pushpins, beads and glue if you want to make a beaded center, scissors and template:

1. download the petal and leaf template here at Hobby Lobby - or free hand them!
2. cut out 5 petals from faux leather material, I found this 24"x8" on a roll in the ribbon section
3. cut out 3 leaves from green felt or other green material
4. if you want to make the beaded center, put E6000 or other glue on the head of a pushpin, roll in gold seed beads, let dry. Or just use the pushpins as is (which worked much better for me)
5. push the petals and leaves onto the pin, hot glue the back of the pins and leaves to keep in place.
6. before hot gluing, I added another 2 pushpins to the center for a total of 3.


12.2.18: 🔥 week 48
12.2.17: decorated the 'dog house'
12.2.16: kids Christmas party: gingerbread houses
12.2.15: DIY bell bottom jeans

Sunday, December 1, 2019

Around the Campfire 🔥 (week 48)

Dear Campers ~

Hope everyone had a great Thanksgiving; did y'all venture out black Friday shopping (and live to tell the tale hahaha)? I kept myself in check and haven't even online shopped yet, but I'm not bragging - it'll happen soon enough LOL! Macey sent me a funny image of a ton of amazon boxes stacked outside of a house with the caption "this woman saved all her amazon boxes for 6 months just to prank her husband", I wish I would have thought of that and freaked Dave out...

Here's a quick recap in case you missed anything at MMDC this week:

Posts ~
11/24: 🔥 week 47
11/25: cork turkeys
11/26: tip-sy Tuesday: aluminum foil
11/27: how to fold a turkey napkin
11/28: Thanksgiving '19
11/29: all the green veggies salad
11/30: margarita cupcakes


Check this photo out - driving thru the neighborhood I saw all these wild turkeys in my nieghbors driveway, look how their tails are all fanned out. Not the best photo (I had to back the car up and took this shot thru the window) - you can't really see there's 3 males strutting and showing off for the ladies...I've never seen this in person!

Miscellaneous ~

  • read "One False Move" by Alex Kava. Bad guy gets out of jail and does bad things. Not for the faint of heart, decent story and writing, not shocking and a little predictable but ok ⭐️⭐️⭐️
Gotta go, working on getting ready for road trip - stop by often to see what I'll decide to make this coming week at camp (if I can squeeze anything in between the work I'm 'supposed' to be doing - making stuff is way more fun than packing!). Bye!

Sincerely ~


Jill
camp counselor and packing procrastinator