Showing posts with label kitchen tip. Show all posts

Thursday, March 28, 2019

Silverware Pouches

Before I put away my sewing machine and ironing board that have been set up in the dining room for days and days, I looked around to see if there was anything else I wanted/needed to sew -  they don't make an appearance very often so now's the time! I have an extra set of silverware that I've been storing in plastic sandwich baggies and thought it'd be nice if they were in little pouches in the drawer instead of the ugly baggies, so whipped up a few fabric pockets to keep the extras in...very easy and looks so much better. 

Before.. the extra silverware is in the baggies to the left of the knives -
it actually looks neater in this picture than it does in person.

All I did was cut two long, narrow pieces of fabric and one shorter 
piece that is the same width as the two longer pieces.

Turn the top edge of the shorter piece under (making a hem) and sew to one of the longer pieces, similar to how I did the fabric wallet (click here for that post) only sewing around the three sides where the two pieces of fabric are joined together.

Put the two long pieces together, right sides touching, and sew them together leaving a gap for turning the pouch right side out. 

After turning them right side out and getting the corners as sharp as you can, top stitch around the entire pouch. I made different sizes for the different utensils - taller for knives, forks, and big spoons, and shorter for little forks and spoons.

After - this looks so much nicer!

3.28.18: spring flower upside down wreath
3.28.17: DIY mod podge
3.28.16: make a zipper bracelet

Friday, January 11, 2019

How to Clean your Yeti (or other stainless steel mugs)

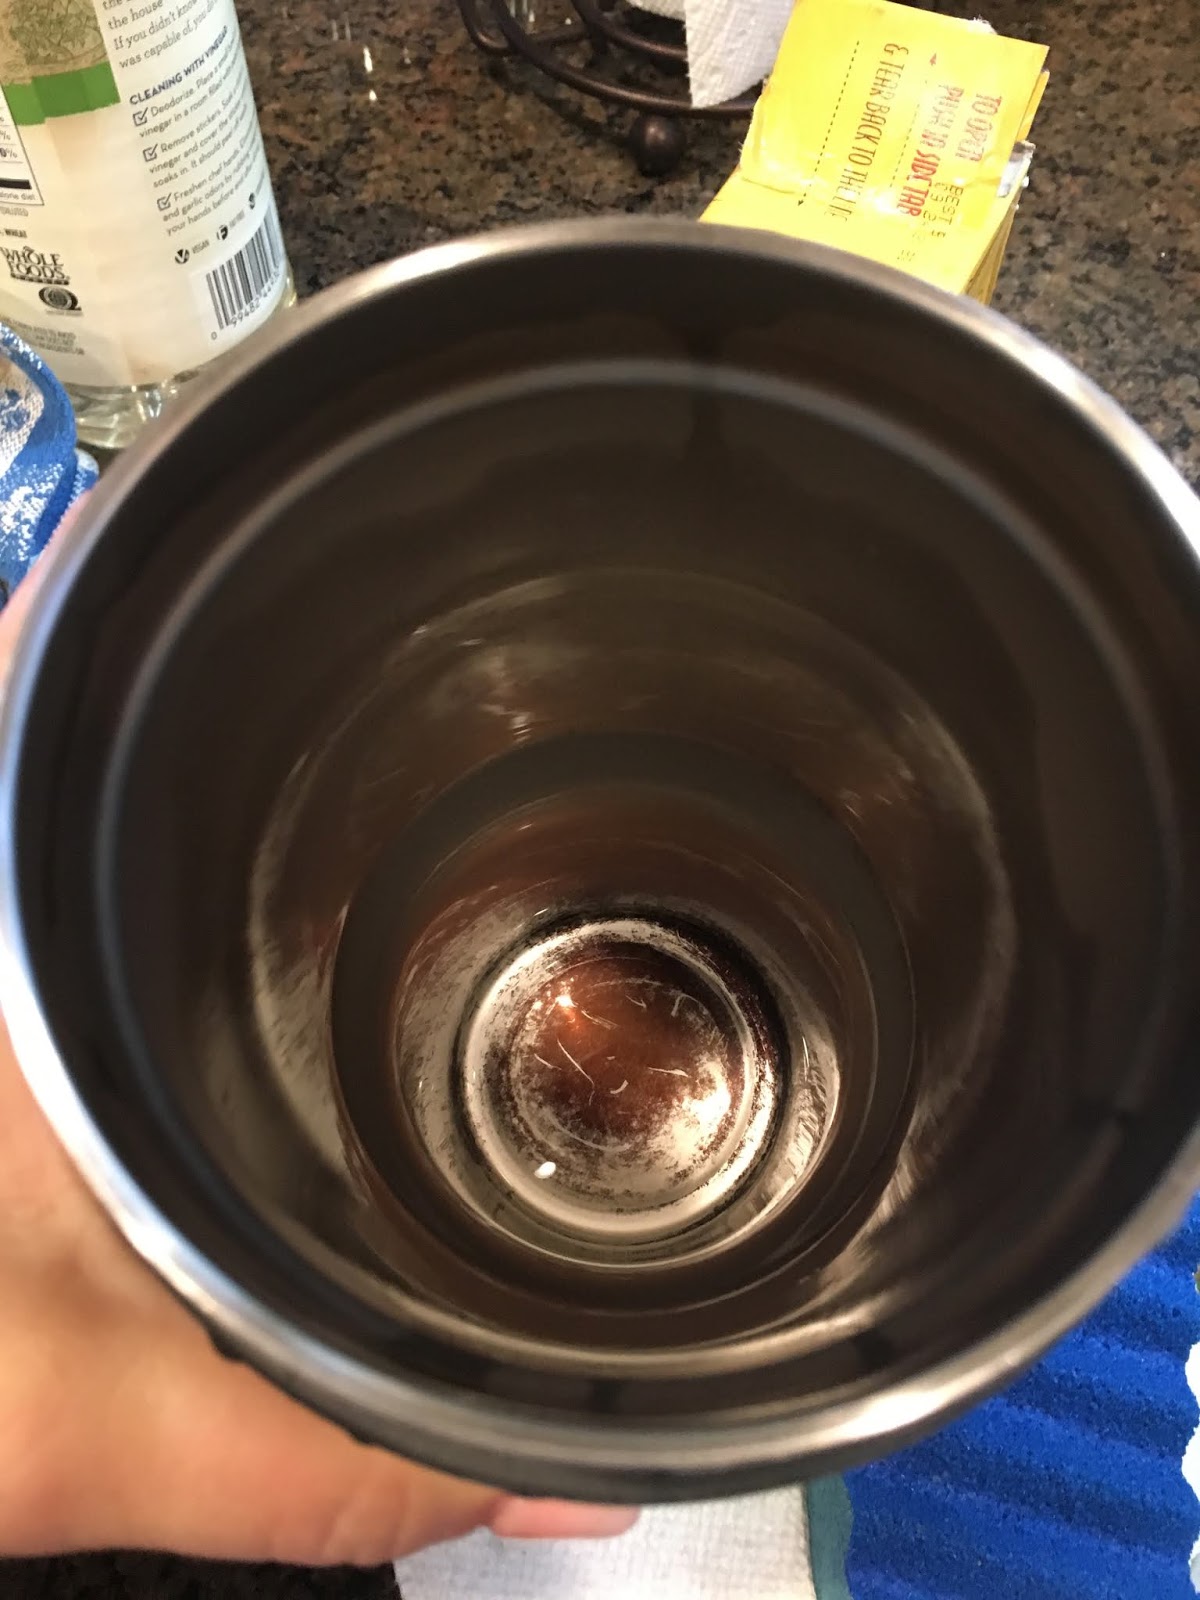
So Dave's Yeti that he uses daily as a coffee mug was super stained and I didn't know it - he thought putting it in the dishwasher would clean it but when I took it out of the washer the other day I noticed how bad it was! The entire thing was coffee-stained and looked gross. So I decided to see if I could remove the stains...and I did...and it was simple.

Put some white vinegar in the bottom of the mug; I used a blue sponge that has a scrubber side, put baking soda pretty heavily on the wet sponge so it makes a paste then dip in vinegar and start scrubbing. You need a little elbow grease but it didn't take long for the staining to come off. It's like a science experiment, the baking soda hitting the vinegar foams and bubbles which is pretty cool on it's own - but then I poured the vinegar out and rinsed and it was almost perfectly spotless! Just the very bottom still had a little stain, so I repeated the vinegar/baking soda/scrubbing and it all came out. Looks brand new!

Of course I didn't have high hopes for the vinegar/baking soda to work so didn't take a picture of the cup totally stained - I did take one of the remaining stain on the bottom tho so you have an idea of what the entire inside surface looked like.
Yuck, right?

Side note - I read that you are supposed to remove the black rubber ring from the top to clean it, didn't know that! Now his mug and top are just about as clean and sparkly as can be ;)


Happy Moment (see yesterday for an explanation) ~

the first sip of coffee in the morning. ahhhhhh.


Thursday, January 3, 2019

Quick Tip: removing old wax from candleholders

Super quick today - off to work but wanted to share this little handy tip that I tried while doing the 'after holiday cleanup'. This is not a new thing, but I'd never tried it and guess what? It totally works. I have a bunch of small votive holders that had old wax buildup in the bottoms - I'm always in too big of a hurry to clean it out so usually just put a fresh one on top of the old (I know, so lazy!). I put them in the freezer for a few minutes and sure enough, the wax just popped out! Who knew that all this time I could have had nice clean candleholders?! Later!


Thursday, July 5, 2018

Kitchen Tip - Greasing Bundt Pans

Bundt cakes are great to make because they look pretty without having to decorate them - unless of course you don't grease them well enough and the cake sticks, in which case the cake has chunks out of the top (if you've never had or made bundt cake before - after you bake the cake you invert it onto a plate so the bottom is actually the top!!) and isn't pretty. Here's how to make sure the pan is thoroughly greased - take a couple extra minutes to set yourself up for success :) Brush shortening all over the inside of the pan using a pastry brush; the brush lets you get into all the little nooks and crannies - some bundt pans are quite intricate and you really need to cover every speck. Then sprinkle some flour in the bottom and shake it around, turning the pan sideways and tap to get the flour all the way up to the top - you want shortening and dusted flour completely covering the inside. Turn the pan over the trashcan or sink and tap out the excess flour. Now you're ready to add the batter and bake. 


Speaking of bundt cakes ... click here for the berry bundt cake post that doesn't have a picture because  my sister has the memory of a squirrel. 


Wednesday, May 9, 2018

Kitchen Tip: Cleaning Shrimp

I love when I can buy nice big shrimp already split, peeled, and deveined - it isn't hard to do, but is time consuming. I wasn't sure how to do this when I first started cooking shrimp so am sharing this little tip to help if you need it. I should have done a video because I couldn't take pictures while actually doing a couple of the steps but I'll talk you thru the process. It's just cleaning shrimp, not rocket science ;)

Two different ways you can do this: 1) if you want to leave the shells on but still devein (say for peel and eat shrimp) cut a shallow slit down the backside of the shrimp thru the shell and a little way into the shrimp. This used to confuse me - which side is the back side? I guess common sense should have told me it's the curved part on the other side from the legs - in this picture my thumb is on the side that you need to devein.


Here I've made the slit along the backside using a paring knife. Next remove the long dark vein that is usually there, you'll find it just under the edge of the shrimp meat, running from head to tail. It's a thin almost string looking thing that isn't actually a vein (so why's it called "deveining"? don't know), it's the digestive tract and maybe it's fine to eat but that's kinda gross so I (and pretty much everyone) remove it.

This is what it looks like after the vein is removed - I rinse it away under
cold water but you can also pick it out with the tip of your knife
The other way to devein is if you are removing the shell before cooking, either leaving the tail on for presentation or removing the whole shell.  If removing the entire shell you can just peel the shell off and then make the shallow slit to devein; or if you want to keep the tails on I still make the slit thru the shell like in the above example which I find helps get the shells off easily while keeping the tails attached. 

To peel leaving the tail on, I firmly hold the shell where I want to keep the tail (so it doesn't get pulled off) and then pull down from one side of the shell where it's cut, up around to the other side in one solid piece. Hopefully you can see in this picture what I mean...make sense? If there is too much shell still remaining (like in the picture below) just hold the tail piece a little further down and peel off the shell until it's where you want - I'd say I usually leave about 1/2" attached. 


smoked paprika shrimp with tails on. check tomorrow for the recipe!

Saturday, February 10, 2018

Organizing...Food Containers

I'll tell you what drives me crazy....see if you have an issue with this too...you want to clean up after dinner and put the leftovers away, so you open the drawer and pull out the appropriate container and CANNOT find a lid that fits. Why does that happen? It's like 1 missing sock in the laundry - where do they go?????

To save a little sanity I went thru all of the containers and matched them up with a lid. If I had a container or a lid that didn't match up then out it went. This way I'm positive that every container in the drawer has a matching lid. Then I put the shapes together (bowls with bowls, etc.) and stacked them, odd sizes go in the back, and all of the lids (except the big ones that don't fit, they stay with their containers in the back) go in a large container. I've been doing it this way for a while now and I gotta say - the system works and saves tons of time (and frustration)!

Do you guys have a way to keep this area organized that you want to share?


Thursday, January 4, 2018

Cookie Sheet Hack

Not sure this is a "hack" but since it's another way to use something I'm calling it that...

A little side story - I'm on day 4 of a 30 day no-sugar challenge and for whatever reason decided that I really, really, wanted to make cookies. I'm not a super big sweet freak but I do love cookies. So of course that is what I'm gonna want to make when I cannot eat them. And can't lick the bowl.  And can't lick my hand that has excess cookie dough on it. Sigh.

I'll post the cookie recipe I ended up making tomorrow - I woke up dreaming about snickerdoodles (my favorite) but doubt I have the willpower to not eat one, and needed to find a different cookie to make that would be easier to resist!  I have no idea if these taste good until I get some feedback from the neighbors haha, but they look and smell delish.

So getting to the hack already - it's best to bake cookies on a flat rimless cookie sheet, and you want the sheet to be cool between batches...so if you only have one sheet (like me), it's not very convenient to wait for your one sheet to cool down. I do have a couple baking sheets with an edge all the way around (also known as a  'jelly roll pan') tho so my tip today is to just turn the baking sheets upside down and put your cookie dough (on top of parchment) on the bottom. You get a flat surface this way (I'm sure there is a scientific reason to not bake them in the pan versus on the bottom of the pan but I don't have that info - I just know that you are not supposed to put them IN the pan that has a lip..)

Voila - a second baking sheet!


one year ago: turkey rueben sandwich
two years ago: make a scrabble tile keychain 

Tuesday, August 22, 2017

DIY Chip Clip! ... by Brooke

so I saw this on Instagram and I wanted to try it out! it keeps your chip bag closed so they don't get stale! all you do is take two straws and make a slit in one side of one. then take the top of the chip bag and use the whole straw and roll the end of the bag on it. then once you have it all rolled up take the straw with the slit and slide it over the top! it stays on tight and its super cool! I don't know if that makes any sense but the pictures hopefully will! sorry this was short blog but I needed to share!


one year ago today: the directional sign I made for my sister - I still love this project, she has it "planted" in back of her house.

Tuesday, August 1, 2017

Microwave Corn Shortcut

Today it's a quickie kitchen tip for making corn if you don't already know this...


When you only need to cook a couple ears, wrap them individually in microwavable plastic wrap, poke a couple holes in them to vent, and microwave until done. I'll do 2 or 3 minutes and check them, add more time if needed. Super easy and no pot to wash :)


one year ago today: my awesome fish lure earrings! Not gonna lie, I did poke myself once when wearing these....but they're cute and it's worth the risk.

Tuesday, April 11, 2017

Freezing Avocados

Did you know you can freeze avocados? I recently read about it and thought I'd give it a try. Not much to it - quarter the avocado, remove the peel and pit, put in the freezer in a single layer until the quarters are frozen thru and then put them all in a baggie or freezer container. I learned by trial and error to freeze the quarters separately before combining them or they'll freeze together in a big ole avocado clump. The texture does change after thawing so use these for avocado toast or a spread - either take out a piece or two and put in the fridge to thaw overnight, or stick in the micro for a couple seconds to thaw it. I especially love this idea when avocados are on sale - I can get excited and buy too many like usual and now I'll freeze them if I don't eat them fast enough!

Thursday, February 23, 2017

Frozen Cooked Chicken

I just saw this idea and can't believe I haven't been doing it all along - cook boneless chicken breasts, chop up and freeze, then have cooked chicken available whenever you want it for salads or whatever. Simple and a really good idea.

I just boiled the chicken in a little water, poultry seasoning, pepper, and a handful of herbs (chives and thyme that I had in the fridge and needed to be used up) until the chicken was cooked thru. Let it cool, cut up into bite sized pieces, and freeze. I put the pieces on a paper plate in a single layer and put in the freezer for a few minutes until just frozen and then transferred to small baggies in case the chicken pieces stick together. Freezing them individually first should help to avoid them clumping together after frozen. When you are ready to use it just take out the amount you want and let it thaw for a bit and it's ready to go.

Tuesday, January 10, 2017

Kitchen Tip...date your Spices

When I open a new spice or seasoning jar I leave the little paper/cardboard seal attached on one edge and write the date the jar was opened on the paper with a sharpie. That way I know how long it's been open and if it's time to replace it with a fresh one.

I posted 3/1/16 how I arrange my spices - um, alphabetically of course haha - click here if you're interested.

Saturday, April 2, 2016

Ring Around the Glassware

I have no idea why this is happening to my glasses but they all have a ring around the edge that makes them look dirty - yet they're clean! Driving me crazy, I can't even remove it by wiping with a damp towel so I've just been apologizing to people when I hand them a glass that looks so bad.  I'm assuming it has to do with my water and the dishwasher?
This morning I decided to try soaking them in water mixed with vinegar and sure enough, that did the trick! Yay!

Put about an inch of cold water in a dish and pour in a big glug of white vinegar - do you like how exact my measurements are? -  then put the glasses upside down in the water and let them stand for a few minutes. Wipe with a sponge and rinse in fresh water. No more ugly ring.


 I can't even tell you how happy this makes me...!
before :(
after! ;)