Sunday, June 30, 2019

Around the Campfire 🔥 (week 26)

Dear Campers ~

Here's a recap of what happened at camp this week in case you missed anything:

Posts ~

6.23: 🔥 (week 25)
6.24: woven wire basket
6.25: tip-sy Tuesday: gardening tip
6.26: cherry pie cookies
6.27: my sis is hungry: chicken and wild rice casserole
6.28: flag door hanger
6.29: 3-D paper stars

What's cooking ~
  • grilled tuna, greek salad, roasted garbanzo beans
  • grilled chicken thighs, salad, roasted asparagus
  • marinated pork tenderloin, veggie tots, sweet kale salad
  • steak, sautéed mushrooms, wedge salad
  • smoked brisket at Al and Cathy's, baked beans, corn, coleslaw
  • grilled chicken caprese, roasted asparagus
from June '16 - donut holes dipped in melted chocolate with sprinkles
click here to see how to make them

Miscellaneous stuff keeping me busy in addition to the above ~
  • made deviled eggs using this tip that I posted back in '16 and once again, perfect success even with a brand new carton of eggs. Seriously, all 12 eggs peeled flawlessly - yay!
  • got to hang out with Brooke, she made a few posts for me that I'll be sharing in the near future (hint: she also enjoyed the Legos!). 
  • My sis went out of town so missed out on her "my sis is hungry" dinner and review - good news tho, I have a "my niece is hungry" review on the blog this week from Macey.
  • read "Fifty Things That Aren't My Fault" by Cathy Guisewite ⭐️⭐️ I got tired of reading it, it's cute and light but couldn't stay with it. If I had 1/2 star emoji then I'd give it 2 1/2. Also finished "Valley of Horses" ⭐️⭐️⭐️⭐️⭐️. Now waiting for #3 in the Clan of the Cavebear series from the library.
Hope you had a great week - any plans for the 4th? Man it's coming up fast! I like celebrating Independence day - in addition to the obvious reason we have to celebrate (hello, let freedom ring!) I love flags, fireworks, sparklers (although not gonna lie, sparklers freak me out a tiny bit having shooting sparks landing on everything!), the cookouts and berry desserts, hanging with friends and family 🇱🇷

Check back this week to see some more fun projects, recipes, and whatever else I can think of to make! 

Sincerely ~


Jill
Camp counselor and 4th of July lover


6.30.18: strawberry collins
6.30.17: make a flag luminary
6.30.16: make a red white and blue headband

Saturday, June 29, 2019

DIY 3-D Paper Stars


I just learned how to make these 3-D paper stars, they are very easy so you can whip some out before the Fourth of July (which is coming up so quickly!) no problem - all you need is paper and scissors. I did find that regular paper is easier to fold than cardstock, practice on paper before you start folding your good paper. When I did them out of cardstock I used a bone folder to get a nice crisp crease.


Wouldn't these be cute if you hole-punched them and added a little hanger (twine, jute, yarn, thread, whatever); then hang around the house, as a garland, in the windows, off a table...options are endless! I'm going to remember these at Christmas time and make some in either Christmas-y papers or silver and gold - it'll be so pretty! Oh, or as a gift topper? I think that'd work. Anyway - I took lots of pictures and also made a little video to show you how to do this; as always I struggle with describing how to do it hahaha - it's much easier to do then I make it look!

step 1: fold an 8.5 x 11" piece of paper in half, lay the paper down with the fold at the top away from you:

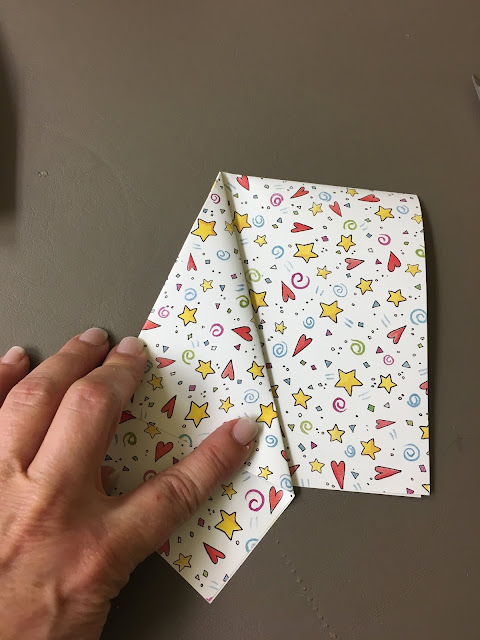
step 2: bring the top left corner to the middle of the right side of the paper and crease smooth:


step 3: lift the fold you just made (originally it was the top left corner) and fold it back on itself following the line of the paper underneath. It'll make a triangle shape:


 step 4: fold the right side of the paper over the triangle you made in step 3, crease along the edge:


step 5: when you folded the right side of the paper over the triangle in step 4 there is a piece overhanging what is underneath, fold the overhang back on itself following the edge of the paper underneath:


step 6: see the bottom edge of the folded part in the middle above? You are now going to cut above that edge all the way across, snipping off the top of the folded package. Follow the edge of the bottom to know what angle to cut at (follow the arrows in the next 2 photos):


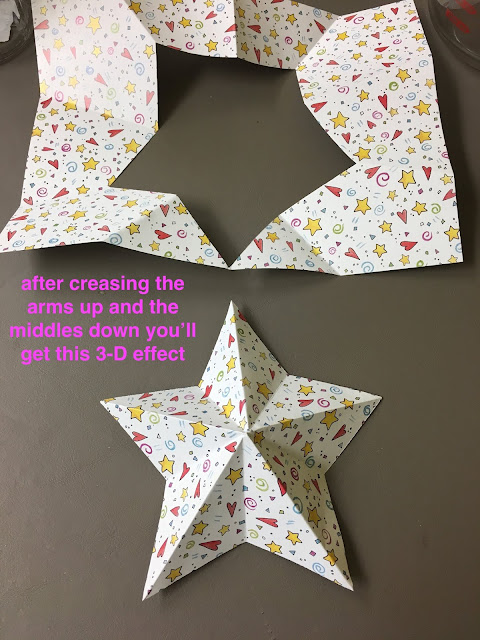
step 7: unfold the small part you just cut off, there's your star! Now you just need to re-fold the creases so the ones on the long points (the star arms) are creased up, and the folds on the star sides are down (note when you unfold the star some of the creases aren't in the correct position as shown in the picture below):


 after you crease the long points up and the sides down, you have a 3-D star:


In case that didn't make sense, I made a short video for you to follow:


You can change the size of the stars by using different pieces of paper, or cutting the top off closer to the point. Have fun!

click here for original source

6.29.18: Lisa's button flag art
6.29.17: make a red, white, and blue windsock
6.29.16: patriotic potato salad

Happy moment ~ watched a turtle dig a hole in the dirt and lay her eggs, so cool! 

Friday, June 28, 2019

Flag Door Hanger

I saw something like this online (probably Pinterest) and filed it away in the crafting part of my brain (which is about 95% of my brain haha) for a later date. Well, cleaning up my craft room I remembered I still have leftover material from my Patriotic Wreaths and this idea popped up in my mind. 


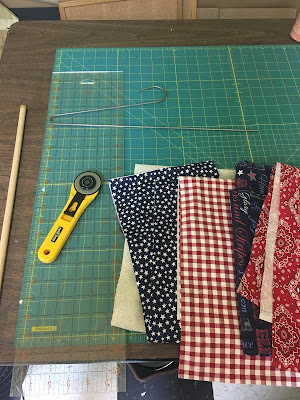
This came together so quickly - just cut 26" strips of red and white material and tie them to a hanger. Then cut 18" of blue material and tie in between the red and white strips on the left side.

I added some ribbon and pompom trim to finish it, but not sure it really needed it - you know me tho, never know when to quit haha! 

I hung it on the door going into the house from our garage where it'll be protected from the weather - hoping it doesn't fall off the hook...if it does I'll close up the hanging loop with pliers.

Thursday, June 27, 2019

My Sis is Hungry: Chicken and Wild Rice Casserole

AHHHHH.. my sister making me dinner.  How I love it.  When she didn’t make it for me one week the husband and teen both asked where the Sisters dinner was.  The problem is they asked this while in the process of eating the meal I created.  Rude people. 
Rude. 

Anyway, they were excited to have a meal to review (which turns out is different than the critique’s they give my meals on a daily basis).. insert eye roll here. Lets cut right to the ending.  This meal was delicious. It looked like tuna noodle casserole (aka ugly pile of mush) but was fantastic.  It got high reviews all across the board.


Brooke’s first initial bites got a typical teenager response of “kinda good” .  Which for a 15 year old is high praise.   She didn’t love that it had celery.  “too much celery” was her thoughts.  She wished it had broccoli instead.  I’m sure that would have been just as good.  She also wished it had cheese.  She then got up and added some cheese to it and decided it wasn’t necessary and was just as good without it.  I also tried it with the cheese just to test it and agree with her - not necessary because it was delicious without. 

The husband also liked it a lot.  He gave it a “pretty darn good”.  Again high praise.  After he ate 2 servings of it he commented that he hopes it was healthy.  If it's healthy he gives it an 8.  If not healthy that takes it down to a 7 ½.  He has to save those extra calories for his bag of dorito’s as snack later.  As a separate note, he doesn’t like rice but for some reason in this mush of sauce you honestly couldn’t really even pick out the rice.  It could have been pasta.  It was all just a serving of mixed flavors. 

All in all this was really good and we liked it all around.  It had plenty of sauce and seemed like something I could actually make for my family.  I’m sure if I made it though they would ask where the Sister meals were, but still worth a try.

CHICKEN AND WILD RICE CASSEROLE

Ingredients:
  • 1 6oz. package long grain and wild rice mix
  • 1 medium onion, chopped (1/2 cup)
  • 1 stalk celery, chopped (1/2 cup)
  • 2 Tablespoons butter
  • 1 10.5 oz. can condensed chicken with white and wild rice soup or cream of chicken soup
  • 1/2 cup sour cream
  • 1/3 cup dry white wine or chicken broth
  • 2 Tablespoons snipped fresh basil or 1/2 teaspoon dried basil, crushed
  • 2 cups shredded cooked chicken or turkey
  • 1/3 cup finely shredded parmesan cheese
Directions:
  1. Prepare rice mix according to package directions.
  2. Meanwhile, preheat oven to 350'F. In a large skillet, cook onion and celery in melted butter over medium heat until tender. Stir in soup, sour cream, wine, and basil. Stir in cooked rice and chicken.
  3. Transfer mixture to an ungreased 2-quart baking dish. Sprinkle with cheese. Bake, uncovered, about 35 minutes or until heated through.
Makes 4 servings. Per serving: 468 cal, 43 g. carb, 29 g. pro.

*Jill here - I used a 90-second microwavable bag of Uncle Ben's long grain and wild rice mix, low-fat cream of chicken soup, light sour cream, rotisserie chicken, 1/2 teaspoon Italian seasoning blend, and grated parmesan. It seemed a little bland (before baking) and since it's for my sis (and we know they like things not bland haha) I added a few dashes of Frank's hot sauce, coarse salt, and coarse pepper, oh - and I sprinkled some garlic powder on the onions and celery while they were cooking. 

original recipe found here. 

Wednesday, June 26, 2019

Cherry Pie Cookies

I bought cookies last week (gasp! shocking I know) because I was in a hurry and needed an easy quick dessert - "Michigan Cherry Pie Cookies" caught my eye; judging how quickly they were consumed I thought I'd try to recreate them myself this week. I looked at the list of ingredients on the label, but of course couldn't find a recipe that seemed right so I winged it and made this recipe up which I don't think I've ever done before...they didn't turn out at all like the store-bought ones hahaha but they do taste good and are fortunately totally edible.  What I'm not a fan of is the texture - they are quite cakey-soft and that's not my favorite cookie texture, but the flavor is good and so far no one has complained about them (and they would for sure!).  I think I added too much baking soda/baking powder -  I'll definitely experiment with this recipe again and shoot for more of a crunchy/chewy texture. For now tho I'll share what I did, mostly so I'll remember, and if you like soft cake-like cookies these might be for you!


Preheat oven to 375'

Beat until soft:
   1/2 cup butter, room temperature
   4 oz. softened cream cheese

Gradually add:
   1/2 cup white sugar
   1/2 cup brown sugar

Blend until light and creamy. Beat in:
   1 egg
   1/2 cup sour cream

Sift together in a separate bowl:
   1 1/2 cup flour
   1 teaspoon ground ginger
   3/4 teaspoon ground cinnamon
   1/2 teaspoon baking soda
   1/4 teaspoon baking powder

Add the sifted ingredients to the butter mixture and beat until smooth. Stir in:
   1 cup dried tart cherries (approximately, I used a small bag of mixed tart cherries)

Drop by small spoonfuls (I used my standard cookie scoop) onto a parchment lined baking sheet. Bake at 375' for about 8 minutes until lightly browned on the bottom, remove to a baking rack to cool.

Makes about 40 small cookies.


Tuesday, June 25, 2019

Tip-sy Tuesday: Vegetable Gardening (tip to produce more fruit)

Saw this on Facebook so it must be true 😉


Mix together in a spray bottle: 1 teaspoon Epsom salt and 4 cups warm water. Spray on plant and then again 10 days later. If this actually works the claim is that the plants will produce more fruit due to the boost of magnesium, especially works for tomatoes, peppers, and roses.

I'll try it, shouldn't hurt anything and I'm all for producing more fruit!

Monday, June 24, 2019

Wire Basket with Ribbons

A $3 wire basket, a bunch of random ribbon and trims, and some hot glue turned into a fun project!


Bought the basket before I knew exactly what I was going to do - it might surprise you but I have a surplus of random ribbon...so...this happened:


Experimented with different ways to get the ribbon to hold - didn't like using liquid glue, and also didn't like seeing the underside of the ribbon when looking down into the basket. So I cut each ribbon long enough to go from side to side with extra to wrap the inside sides of the basket - make sense? By tucking the ends of the ribbon under the bottom and then weaving it thru the wire holes the ribbon stayed in place. When I finished weaving all the ribbons I went thru and hot glued the ends in place.

started with liquid glue but changed my mind...

This isn't hard to do - just weave ribbons thru vertically, then weave in more horizontally - play around with different trims and ribbon sizes. The number of spaces on the basket made it impossible to weave every row alternating under and over - so I just winged it (or wove it) the best I could.

this photo shows you a better example of what I mean by tucking
the ends under the inside of the basket, you can see one tail end by the above arrow
once you've woven all the ribbons go thru and hot glue the
ends down, trim off the extra if necessary

I finished by leaving the two horizontal row ribbons really long and tied them together in a big bow.

Sunday, June 23, 2019

Around the Campfire 🔥 (week 25)

Dear Campers ~

The what you missed recap, if you missed anything, at camp this past week:

Posts ~
6.16: 🔥 (week 24)
6.17: paper tropical flowers
6.18: tip-sy Tuesday: balsamic reduction
6.19: owl cupcake cake
6.20: my sis is hungry: posole
6.21: Lego key holder
6.22: Karen's layered taco dip

What's cooking ~
  • grilled chicken breast, cauliflower veggie tots, roasted asparagus
  • bbq ribs, kale salad, apple-raspberry pie
  • grilled steak, stuffed mushrooms, cauliflower veggie tots (twice this week, they're so good - find them in the freezer section), caesar salad
Miscellaneous things keeping me busy ~
  • camped for a couple of days at the beginning of the week, that's why we had pie one night - there is a tiny local store right by our campground and Mar, the owner, makes the best mini pies! I've never had apple-raspberry, yum. Dave says he is limited to one mini pie a week but is nice enough to give me a taste (of the filling, I'm not a crust fan) LOL. 
  • read "Furiously Happy" by Jenny Lawson who struggles with mental illness - this memoir is at turns very funny, very disturbing, a bit ridiculous, raunchy, kooky, and highly readable. ⭐️⭐️⭐️⭐️ Also started reading #2 in the Clan of the Cave Bear series The Valley of Horses. 
  • Forgot to tell you last week that I read "All We Ever Wanted" by Emily Giffin - interesting storyline but didn't love it, although I finished it so will give it ⭐️⭐️⭐️ unlike "Family Trust" by Kathy Wang that I couldn't even finish (which doesn't happen very often!) 
  • Took 'Nick' the fish camping with us - I thought he could hang out in a clear tupperware thing for a few days but he got all weird so we bought a small 1 gallon tank for him to camp and travel in...my .22 cent goldfish is now up to like $80 bucks in tanks, nets, cleaning stuff...always something. 
Check back next week for a couple crafts, a couple recipes, probably a review by my sis, and who knows what else! I'm still playing with my new-found, newly-organized Legos so we'll see if anything post-able happens :) Have a great week!

Sincerely ~


Jill
camp counselor and mini pie taster 

Saturday, June 22, 2019

Karen's Layered Taco Dip

Karen brought this to a party at my sister's and it's so good I asked if I could please have the recipe (oh yeah, and also if I could give to you guys too, promise I didn't even think about keeping this a secret just for myself haha). And to make it even better, she serves it in a wide, shallow dish that I'm obsessed with and on the hunt for one like it. I didn't take a great picture, it's a large round shallow ceramic sort-of pizza dish - love.


Mix together 8 oz. sour cream, 1/4 c. miracle whip, and taco seasoning.

Layer (in whatever dish you want but I'll say it again, her shallow dish is perfect):

  • refried beans
  • guacamole
  • sour cream mixture
  • shredded cheese
  • chopped tomatoes
  • chopped green onions
  • black olives
Serve with scoops. Mmmmm...


Friday, June 21, 2019

Lego Key Holder

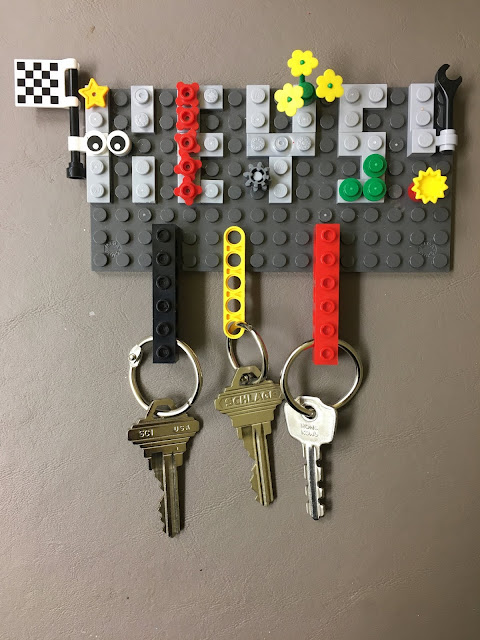
Well, well, well...apparently I really do have too much time on my hands. 'Cuz after organizing an entire large box of jumbled Legos from Cathy, I googled for things to make with them and found the idea for this simple key holder - and I have SO many right now that I'm pretty sure I can make anything I want. (Except for a unicorn I saw that needs white round legos that I don't have which bums me out but I'll get over it.) After following the example idea - which is cute as is and you could leave it alone right here - I had to bling it out...because hello, look at all the fun flowers, flags, and little bits of pieces parts I have!

copied the idea I saw here...

which is pretty cute...

...then I jazzed it up!


I've said it before - I can waste time like nobody's business 😉

Side story - showed my new key holder to Dave, he picked it up and one of the keychains fell off, he goes "uh oh, sorry I broke it". Ummmmm, no, they're Legos, just stick it back on - and he didn't know how!!! The poor deprived man has never played with Legos before! So sad...hahahahha

Thursday, June 20, 2019

My Sister is Hungry: Chipotle Sweet Potato Vegan Posole

Irish Stew?  Is that what my sister said this was called?  Whatever its called we loved it.

First of all I didnt tell the husband “stew”.  He likes soup.  So when he said “oh yay! Soup!” I didn’t correct him.  As he started giving his feedback though I realized I should have told him because his first comment was that there wasn’t very much broth.  Nope.. not a lot of broth in stew.  HAHHAHAHA..  his second comment was that she should have cut the carrots up smaller.  Nope, not carrots.  Those are sweet potato chunks buddy.  (insert eye roll here).  Again I didn’t correct him.  If I said sweet potato he would have immediately said he didn’t like it (like a small child).  So ok.  Note to Jill- those carrots were in too big of chunks. Haha.
Overall we loved this.  It was thick enough that it felt like an actual meal (which is what I don’t like about soup). I like to chew my food.  I also loved how spicy this was.  Just enough.  Some folks might have thought too spicy but for us was just right. 

This stew with a piece of bread was a perfect delicious meal.  It also was just as delicious reheated the next day- love that also.


*Jill here: No, it isn't Irish Stew - I guess I need to make her that so she knows what it is haha. I didn't tell her it's actually "Posole" because I don't know what that is so she sure isn't going to - ok, I just googled it and it means traditional Mexican soup. I just learned something!

Ingredients:
  • 2 tablespoons olive oil
  • 1 medium onion, diced
  • 1 medium poblano pepper, seeded and diced
  • 3 garlic cloves, minced
  • 3 cups vegetable broth
  • 1 (14 oz.) can fire roasted tomatoes
  • 1 (14 oz.) can pinto beans, drained and rinsed
  • 1 (14 oz.) can hominy, drained
  • 2 teaspoons ground cumin
  • 1 teaspoon dried oregano
  • 1/2 teaspoon chipotle chile powder (or to taste)
  • 1 small sweet potato, peeled and diced (about 2 cups)
  • salt and pepper to taste
for serving (optional):
  • lime wedges
  • fresh cilantro
Directions:
  1. Coat the bottom of a large pot with olive oil and place over medium heat. When the oil is hot, add the onion and poblano pepper. Saute for about 5 minutes, until the onion is soft and translucent. Add the garlic and saute for about 1 minute more, until very fragrant.
  2. Stir in the broth, tomatoes, beans, hominy, cumin, oregano, chipotle chile powder, and sweet potato. Raise the heat and bring to a simmer, then lower the heat and simmer, uncovered, until the sweet potato is tender, about 20 minutes. 
  3. Remove from heat and season with salt and pepper.
  4. Ladle into bowls and serve with cilantro and lime wedges (if using).
4 servings
per serving: calories 378, fat 9.8g, carb 58.5g, pro 15.7g

Notes: I had canned chipotle peppers in adobo sauce left over from making the Honey-Chipotle Chicken Pasta Salad so I substituted that instead of using a poblano pepper and chile powder as called for in this recipe. I also substituted chicken broth for the veggie broth - which obviously makes it not vegan now,  but since I'm not vegan I'm ok with that. 


found at www.connoisseurusveg.com

Wednesday, June 19, 2019

Owl Pull-Apart Cupcake Cake

I absolutely love how this pull-apart cupcake cake turned out, and it wasn't hard to make at all (bonus).  There are lots of inspiration photos online, this is how I made mine and I think he's adorable. You could easily change the colors and candies that you decorate with tho if you want him to be different - use your imagination! I will say that I think the extra individual owls are a little scary looking, I might not make them in the future - or maybe decorate them another way LOL. 


Bake whatever flavor cupcakes you want, the owl as shown took 14. Make a batch of buttercream frosting (see below) - spoon out a small portion to leave white for 4 cupcakes making the eyes and feet, and tint another small portion orange for the 3 cupcakes in the center of his body. Add cocoa powder to the remaining frosting and frost the rest of the cupcakes. Arrange the cupcakes on a large tray like in the picture above:
top row - 2 white cupcakes
second row - 1 chocolate, 1 orange, 1 chocolate
third row - 1 chocolate, 2 orange, 1 chocolate
fourth row - 3 chocolate
bottom row - 2 white

Put the cupcakes tightly together, then blend all the edges adding more frosting as needed to fill in gaps around the cupcakes - making it look more like a whole cake instead of individual cupcakes.

To decorate as shown:
  •  chocolate wafer cookies for the wings, base of eyes, half pieces for the eyebrows
  • gummy life savors for the second part of eyes, topped with an M&M
  • cut an orange gummy candy into triangles for the beak, and yellow gummy candy into strips for the feet. 
  • sprinkle coconut and mini chocolate chips over the body. 

The remaining baked cupcakes can be turned into individual owls as shown by using half pieces of wafer cookies for wings and smaller pieces for the eyebrows, smaller triangles of orange gummy for the beaks, skip the feet. Or if you don't need that many owls you can always freeze the unfrosted cupcakes for later!

Buttercream Frosting:
-1 stick soft unsalted butter
-4 cups confectioners sugar
-1 teaspoon vanilla extract
-pinch of coarse salt
-milk or cream (a couple tablespoons, add a little at
a time until you get the right consistency)
cream the butter until smooth, add the
remaining ingredients and beat until smooth
and fluffy.

6/19/17: how to distress jeans
6/19/16: gnocchi with tomatoes and snap peas


Tuesday, June 18, 2019

Tip-sy Tuesday: how to make Balsamic Reduction

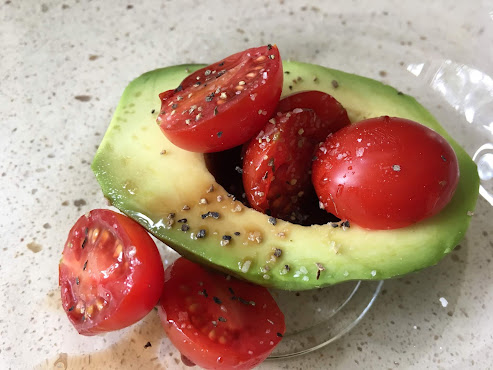
Have you tried balsamic reduction? I'm addicted and put it on everything - it's great drizzled over salads, vegetables, around grilled halibut stacks; another one of my favorite things is to slice an avocado in half and fill the cavity with halved cherry tomatoes, then fill up the hole with balsamic reduction - yum!


You can purchase balsamic already reduced into a thick tangy syrupy glaze but it's simple to make at home: put some balsamic vinegar in a small saucepan, bring to a boil over medium-high heat, reduce to a simmer and let it cook down until it's reduced by at least half. That's it!

Just thinking about this is making my mouth water - really, ya' gotta try it!


one year ago: halibut stacked with potatoes and spinach
two years ago: meatloaf


Monday, June 17, 2019

Paper Tropical Flowers


While looking for Lego crafts I came across a video - it had nothing to do with Legos but popped up and caught my eye - on how to make a paper flower ball. I've made a few paper flowers (as you might recall, click here and here for a couple of them) but never any like this, so after practicing with a piece of white paper to make sure it was going to work and not waste my cardstock I moved on from looking at Lego crafts to making tropical flowers. The original idea made a round flower ball which takes 12 flowers, but I'm still dealing with tendonitis in my hand from moving furniture like a month ago, so I quit after making 4 flowers - I think they're very pretty even if I didn't make a ball!

Here's how:

Cut 4" paper squares, 5 per flower.

1. fold a square into a triangle


 2. fold the sides in to meet in the middle, creating a square shape


 3. unfold the side triangles you just made


 4. insert a finger into the side triangles and flatten them like in this next photo


5. fold the side tips down


6. fold the side triangles in half


 7. fold but don't crease the two edges to meet each other


 8. snip off the top tip


 9. glue the edges together to form the petal - I used glue dots


10. after making 5 petals, glue them all together to make a flower - note the glue dots didn't hold all the petals together so I switched to hot glue. Add something to the very center, I wanted to use sticky back Stampin' Up gem embellishments but couldn't get them to hold so switched to a mini pompom. The original inspiration video used pearls. 


11. glue however many flowers you want together in a bundle. I made a couple leaves following the above directions but didn't snip the tips off - seems more "leaf-like" to me - and glued them to the flowers before gluing the flowers into a bundle. 


I made a short video on how to fold the petals in case my description above doesn't make sense!


original source found here


one year ago: coincidentally it's a different paper flower.
two years ago: for real, it's another paper flower! I honestly had no idea and did not do this on purpose!
three years ago: rock photo stand. whew, 3 years of paper flowers woulda been super weird timing.