Friday, December 28, 2018

Christmas Card Pillow Box

Do you save or toss the Christmas cards you receive every year? I have a big stack of those that are just too pretty, cute, or funny to pitch, but haven't done anything with them in a while so my stash is getting a bit out of control... time to turn them into something else! I posted 3 years ago about making them into little notebooks, a bird ornament, or gift tags (click here for that post), this year I'm making some different things like today's fairly easy and quick little pillow boxes for small gifts or gift cards.

I say "fairly easy" because it actually took me a couple tries to figure out the best way to make them. I followed one person's direction online that didn't work so good and I knew there had to be a better way! There are lots of different directions online and eventually I found instructions that worked for me - now that I know how, they are easy and quick and in my quest I've spared you some frustrating minutes (and wasted cards!) if you want to make these little boxes.

Now let's see if I can tell you how in a simple way that makes sense, I included lots of pictures for reference ...you'll need:
  • a Christmas card that's big enough to fold in half and still fit your gift, you just use the front of the card (so cut apart and toss the back) and think about what the box will look like after folding it - half of the card will be the top of the box, half the bottom, and the two ends will be folding in so you'll lose some of the design. Note the elephant card is one I made using the entire card and that didn't work as good as just using the top. 
  • scissors, glue stick, embossing tool to score the card (something with a blunt hard point, I used a thick craft needle), a cd or something round about that size to shape the ends - note I used the top of a coffee can at first but it was much easier with the cd.

Score one end of the card about 1/4" to 1/2" from the edge, fold it in creating a narrow flap that will eventually get glued to the other end of the card to hold it together, but don't glue it yet. Find the middle point of the card with the flap folded in and score. Fold the card in half so the edges meet. 


With the card folded, lay the cd along one end and trace the shape onto the card. Repeat with the other end, then trim away the edges to make the box rounded on both ends. 


Open the card, lay the cd on one of the 4 rounded ends and using the embossing tool, score the rounded shape onto the card mirroring the rounded end. You are sort of making an oval between the edge of the card and the scored curved line. Repeat with other 3 ends. Note in the picture below the card should be right-side down, you want to make the score lines on the side of the card that will be the inside of the box. I'm not sure why I took the picture like this!


You can cut a small bit of the ends away to create a finger hole if you want, I don't have a circle punch so used a heart on one box, and freehanded a half circle on another.


Close the card, apply glue to the flap and glue the edges together forming the top and bottom of the box, essentially making a loop with both ends open. 


 Once the glue is dried, gently squeeze the sides together and fold the box ends in overlapping each other. 


12.28.17: how to steam crab legs
12.28.15: how I store Christmas lights


Thursday, December 27, 2018

Sweet and Tangy Crockpot Meatballs

I made these to take to a party and they were a big hit - Dave had leftovers the next day (and this from a man that rarely eats leftovers), deemed them great and says definitely a keeper recipe. Throwing or going to a New Year's party? I can recommend these easy delish sweet and tangy meatballs that everyone loves!


I found the original recipe here and changed it a bit:

140 frozen meatballs
20 ounces grape jelly
36 oz. chili sauce (3 12 oz. bottles)
big squeeze of bbq sauce
1/4 cup brown sugar

Mix the sauce ingredients together in a saucepan over medium heat until combined. Add to the meatballs and stir to coat evenly. Put the meatballs and sauce in a slow cooker, cover, heat on low for 6 hours.

I like to use a liner to save on the cleanup but if you don't use one then I would spray the crockpot first. Another tip I learned the hard way: I put the meatballs in the crockpot and then poured the sauce over but it was a little hard to cover all the meatballs that way. Next time I'll mix them all together in a big bowl and then transfer to the crockpot - I was being lazy and didn't want to dirty another dish but it would have made things easier.

This recipe fit in my large oval crockpot (I think it's a 6 quart).  I used Italian style meatballs from Costco - you can make your own of course but 140 sounded like too many to make from scratch (read the above note about my being lazy hahaha).

one year ago: chocolate caramel tart

two years ago: peppermint sugar scrub

three years ago: bread pudding with salted whiskey sauce 


Boxing Day

I don't actually know what "Boxing Day" is - I thought it was an old English thing about packing up leftovers the day after Christmas to take to the downtrodden, but I randomly heard the other day it's  a custom (not sure where?) that the servants/housekeepers/maids/etc. who had to work on Christmas Day received boxes of food the day after...I didn't ask 'uncle Google' so I don't know what the definitive definition is. This is totally beside the point - I only titled this "Boxing Day" because it's the day after Christmas and I don't have anything else to post because I spent the entire day, repeat the entire day, cleaning the garage. Which is nothing to blog about.


It kept me busy and was quite the chore;  I'm super dirty and covered in glitter. Side note: if you don't know me and wonder why cleaning the garage makes me covered in glitter - (a) my craft room is in a corner of the garage, (b) when you are glittering something like a pinecone wreath and the garage door goes up mid-glittering, (c) glitter goes everywhere. Then (d) your husband asks repeatedly and in a very confused voice, "why is there glitter everywhere in the garage?", and (e) you realize that he rarely complains about the mess you make crafting ALL the time and you should probably (f) do your best to clean up said glitter. Whew, that was a lot of points to make - right?


Wish there was a picture to show you how much glitter I swept up. (PS: there's also a lot of dirt in the garage, it isn't only glitter. Just sayin'). So now it's nighttime, I'm tired and sweaty/glittery, and realize I didn't blog an actual thing today. Tomorrow for sure :).

Night Peeps!


Tuesday, December 25, 2018

Merry Christmas!

Merry Christmas everyone!! Hope you're having a great day full of peace, love, and happiness :) I'm off now to work on dinner for friends tonight - made "make ahead mashed potatoes" and cranberry bread yesterday, going to try making stuffing in my crock pot (fingers crossed) - and still need to wrap a few presents, set the table, brush the dog...tomorrow I'll be back to making and posting projects! Enjoy your day!


I love this M&M story and gift! 

Monday, December 24, 2018

Animal Gift Holder

This is going to be a short post today - it's Christmas Eve and I have tons of non-crafty stuff to do today getting ready for tomorrow (aka: chores)... but I have to share with you my new favorite way to give small gifts or gift cards in case you have last minute gift wrapping on your plate today. You might need a quick trip to the dollar store to find the animals, but after seeing how super super cute this idea is how can you help it? It makes me want to re-wrap some of the gifts I've already done, just to attach them to animals instead. I love this idea so much...


I made the very simple gift card holder from a piece of decorative paper folded to enclose the card then held shut with a "belly band" which is a strip of paper glued into a loop that slides over the gift holder.


I also made a paper box to hold another gift card following Ronda's instructions but adjusting the size of the box. Click here to see how to make a paper box.

I saw this online, but don't know who to credit as the original source. Great idea whoever you are.

one year ago: roasted turkey breast
two years ago: Christmas Eve and not making everything from scratch!
three years ago: pop-up gift wrap


Sunday, December 23, 2018

Around the Campfire (week 51)

Dear campers ~

A quick recap of what went on at camp last week! I can't believe it's week 51 - talk about time flying! There's still time to make last minute gifts - you should see the chaos in my craft room right now. Well, not just the craft room - kinda the whole house! I said to Dave "I've got a mess everywhere" and he said "yes, yes you do" I'm lucky that he doesn't care at all tho!

Posts you might have missed ~

12/16: around the campfire (week 50)
12/17: wine cork angels
12/18: melting snowman bark 
12/19: curled paper wreath
12/20: cheeseball wreath
12/21: fudge wreath
12/22: wine cork reindeer 

Miscellaneous stuff keeping me busy (other than blog things!) ~

  • re-read Harry Potter and the Prisoner of Azkaban - working my way thru the series as they become available thru the online library. Started "Where the Crawdads Sing" and am loving it.
  • finally back to helping in the office at Paul's Photo; also did my "wrap-master J" gift wrapping at the store gig.

Now I'm off to do the first "7 miles on the 7th day at 7am" hike this morning with the gang - wish me luck...it's still dark outside!

Have a great week, a very Merry Christmas, and come see what happens at camp this week!

Sincerely,


Jill, your camp counselor

Saturday, December 22, 2018

Wine Cork Reindeer Ornament

Another wine cork Christmas craft to go with the cutie angels (click here for that post) - this turned out so good I'm going to have a hard time parting with it...hmmmm, I tend to give away a lot of my projects but I'm thinkin' this one might need to stay home ;)


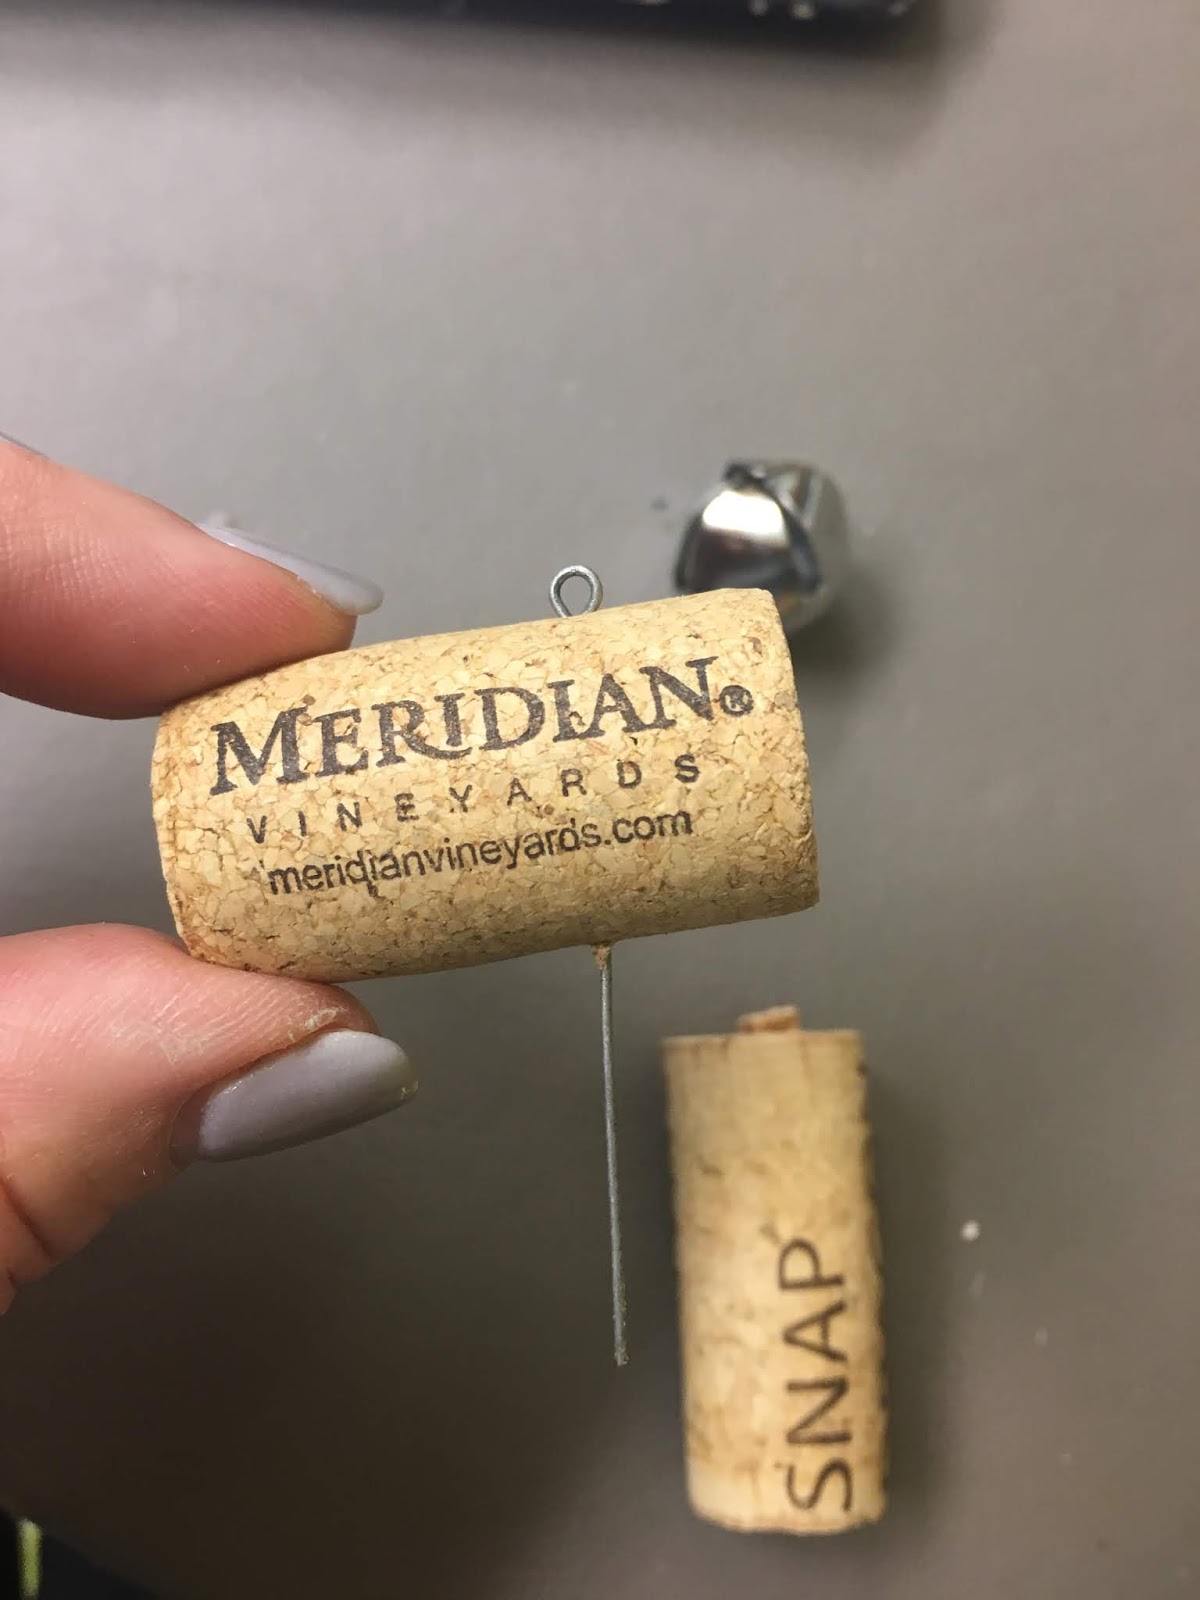
To build the base I stuck a long eyehook (stiff wire piece with a small loop at the top, used in jewelry making) thru two corks to hold them together. 


Then just hot glued some simple things in place to decorate and turn it into a "reindeer" - bell at bottom with a small piece of trim wrapped between the bell and the cork; a pompom nose and 2 black beads for eyes; curled decorative wire that has stars shooting off it that I had on hand - I planned to use a couple small twigs for antlers but went on a treasure hunt for different things I could use and found this shooty wire in my gift wrapping supplies and I love how it looks! Note: I use short pieces of the same wire on my Christmas tree which adds a nice tinselly shimmer to the tree. To finish I tied a thin glittery ribbon around it's neck and dangled a really small santa ornament from my mini-tree decorations from the ribbon.


I tied a small piece of twine to the eyehook to hang this ornament - I'm thinking around a wine bottle would be super cute but equally fun on the tree or tied to the top of a gift. 


three years ago: hot chocolate spoons


Friday, December 21, 2018

Fudge Wreath


Last wreath for the year (I'm pretty sure) - perfect for holiday parties, dessert buffet, to give neighbors or co-workers... and like most of the things I make it's quick and easy! Note to self: I should count how many times I used the words "quick and easy" this past year!

I used Rachel Ray's recipe for 5 minute fudge with a couple changes I'll note after her recipe:

1 (12 oz) package semi-sweet chocolate chips
9 oz butterscotch chips (3/4 of a 12 oz. bag)
1 (14 oz) can sweetened condensed milk
1 teaspoon vanilla
8 oz. walnut halves
1/2 cup currants or raisins
candied red and green cherries


8" cake pan, lightly greased with softened butter

1. Place a heavy pot on the stove and preheat it over low heat. Add chips and milk and stir until chips are melted and milk combined. Save the empty condensed milk can. Stir in vanilla and remove fudge from heat. Add nuts and currants and stir in immediately. 


2. Cover empty condensed milk can with plastic food wrap and center it in the greased cake pan. Spoon fudge into pan around can, making sure to recenter can if it drifts. 

3. The fudge will set up almost immediately. Garnish can only be added in the first minute or 2 the fudge is in the pan, so work quickly. Decorate your wreath with "holly" made from cut candied red and green cherries. A wreath left plain can be garnished with a pretty fabric bow when serving. Chill covered in the refrigerator and slice fudge very thin when ready to serve, a little goes a long way.

*My notes: I used the same donut-shaped cake pan from yesterday's cheeseball wreath sprayed with non-stick cooking spray. I substituted dried cranberries for the currant/raisins because I don't like raisins, and used walnut pieces instead of halves because I don't like big old bites of nuts, and I added  mini-marshmallows. My store only had green candied cherries so I just cut them in pieces to resemble leaves and made 3 little clusters on the wreath. This was a big hit at Dave's ukulele holiday party!

Thursday, December 20, 2018

Cheeseball Wreath

Looking for a fun, simple, easy Christmas appetizer? This wreath is it! Make whatever cheeseball recipe you like (I've posted a few, click here for a couple ideas, I'll share the easiest one below!), make it into a wreath shape, cover with herbs. See - easy!

I have a cake pan that is meant for making a donut shaped cake, but it also worked great for a wreath! If I didn't have this pan I would put a small round can or glass (covered with plastic wrap) in the center of an 8" round cake pan - or you could use a bundt pan if it's one of the smooth ones. Line whatever pan you use with a piece of plastic wrap (tip: leave enough of the wrap overhanging the sides of the pan to be able to bring it over top of the cheese) and then spoon the cheeseball mixture in spreading it evenly and smoothing the top. Fold the overhanging plastic wrap up to cover the cheese and put it in the fridge for at least an hour.


Unmold the wreath by removing the top layer of plastic wrap, put a serving plate upside down on top of the pan, and carefully flip the whole thing over. The cheese wreath should be out of the mold and on the plate at this point, if it isn't just gently tug the plastic wrap to transfer it. Remove the rest of the plastic wrap - the cheeseball looks cracky and wrinkly but you'll be covering it with herbs so it doesn't matter (unless there's big cracks in which case just smooth it together with a knife...or your very clean fingers).


Cover the wreath with finely chopped parsley and chives. To finish I sprinkled diced pimento (dry very well with paper towels first) over the top.


Cheeseball recipe:

2 (8 oz) packages cream cheese, at room temperature
2 cups shredded cheese (cheddar, colby, monterey jack...)
2 teaspoons worcestershire
1 teaspoon garlic powder
1 teaspoon onion powder
coarse salt and pepper to taste

Mix all together until fully incorporated and smooth (I use my food processor). Wrap up in plastic wrap forming a ball (or shape into the above wreath!) and refrigerate for at least an hour. 


Wednesday, December 19, 2018

Curled Paper Wreath

Is there enough time to make one more wreath before Christmas? There is, right? Even if you don't want (or think you have time) to display this hanging up somewhere, this would be really cute as a gift topper (like the rolled paper Christmas trees) instead of a bow! And you could easily scale this down to fit on smaller packages - if you aren't hanging it I'm thinking you could use a cardboard circle as the base instead of the foam wreath base used here and just attach the loops to the cardboard.

Super easy - cut a bunch of different papers (or what the heck, you could just make it one color or pattern - you do you, whatever you like!) in 1"x6" strips; coil each one tightly around a pencil and glue the ends together forming circles (note: this is how you make a paper circle garland by the way - interlocking the circles together before gluing the ends together!). Hot glue the circles all over the wreath base, just turn them every which way and squeeze them in - I've had enough hot glue burns lately to be justly afraid of the glue gun right now, so I used the eraser end of a pencil to hold the circle in place until it stayed put. If you're doing more than one pattern or color you can group them together like I did, or mix them together (not keeping the pattern/color separate) and glue randomly around the wreath base.


I happened to have a piece of patterned scrapbook paper that had the perfect sized medallion with words that fit in the middle of the wreath, so I cut the paper to fit and glued it to the back of the wreath before adding the curled paper circles - you can definitely just leave the middle open tho!


To finish - because I never know when to stop and I like the motto "less is not more. more is more" I added pieces of silver curly ribbon to the wreath, just glued in randomly here and there - and finished by tying on a long piece of curly ribbon to hang it with (skip that if you are laying it on the top of a gift!).

12.19.16: snowman shadowbox frame
12.19.15: melting snowman cocktail