Saturday, January 8, 2022

How to Make a Candy Bouquet (re-run)

This was originally posted 8/16, I haven't made one since and forgot about the idea - it's so fun I have to remember it for the next gift I need:

Brooke and I made this candy bouquet to take the birthday party last weekend (see here for the desserts we made) - it's a pretty easy project and makes a great, fun gift or centerpiece.


I found this flower pot at a dollar store, you want the container to be weighted or else it will tip over when you put the candy in it. I bought a small piece of floral foam that fit in the pot but you can fill it with whatever you can find that will hold the candy in place. Next time I will tape the foam down (criss cross tape across the top of foam and stick to the edge of the container), when I started adding the candy the foam wanted to pop out - I just kept shoving it back in and eventually it held. Cut up small squares (maybe 4" or so, does not have to be perfect cuz you're scrunching them up) of tissue paper, I sort of folded them and bunched them up so they are ruffly, and attach them to the foam around the edge of the pot. Note: I burned my finger bad doing this so be careful! I still have a blister on the whole top of my index finger - my advice is to use a skewer or something other than your finger to press the tissue squares in place!


Next attach the candy to bamboo skewers with clear packing tape - note for the rolos we just stuck individual ones onto the tip of the skewer. Place the largest candy in first -  this is just like if you're flower arranging, put in the green cover that covers the foam, add the eye-catching large blooms, then the medium flowers, and last fill in with the small filler - followed by the medium sized candy in wrappers and lastly I filled in with the shooty rolos. Isn't it cute?


Friday, January 7, 2022

Cauliflower Pizza (re-run)

This post is from 2016 -  funny that I'm trying to talk you into trying cauliflower pizza back in '16 and now it's such a common thing! By now you've probably tried pizza crust made out of cauliflower, but if not this is a great recipe I still follow. 

Here's the original post:

Ok, stay with me here - I love this and it's a much healthier version of pizza ... even if you aren't looking for a healthier version of pizza it's worth trying! I know it sounds weird but it's good - Dave will even eat it (when I won't let him order regular pizza!) and seems to like it - or doesn't complain about it if he doesn't haha :).  After baking the crust for a few minutes add whatever toppings you like (we like mushroom, canadian bacon and fresh tomatoes) - or you can top the crust with just cheese (no sauce) and bake it for a few more minutes, then cut into "breadsticks" which is also yummy and makes a good side dish. C'mon, try it :)

I follow this recipe (click here to see original post), but there are many recipes online if you want to check them out. Note: after microwaving the cauliflower I press paper towels on it to remove as much moisture as possible, I don't put it on a towel like the recipe says.


Ingredients: 
  • 1 head cauliflower, stalk removed
  • 1/2 cup shredded mozzarella
  • 1/4 cup grated Parmesan
  • 1/2 teaspoon dried oregano
  • 1/2 teaspoon kosher salt
  • 1/4 teaspoon garlic powder
  • 2 eggs, lightly beaten

Directions:

Preheat the oven to 400 degrees F. Line a baking sheet with parchment paper.
Break the cauliflower into florets and pulse in a food processor until fine. Steam in a steamer basket and drain well. (I like to put it on a towel to get all the moisture out.) Let cool.
In a bowl, combine the cauliflower with the mozzarella, Parmesan, oregano, salt, garlic powder and eggs. Transfer to the center of the baking sheet and spread into a circle, resembling a pizza crust. Bake for 20 minutes.
Add desired toppings and bake an additional 10 minutes.
Recipe courtesy of Katie Lee


Read more at: http://www.foodnetwork.com/recipes/katie-lee/cauliflower-pizza-crust.html?oc=linkback

1.7.21: no bake cookie bars by Brooke 

1.7.20: Tip-sy Tuesday: wrapping paper filler

1.7.19: the short-lived segment of Man-day Monday

1.7.18: breakfast egg muffins

1.7.17: grocery store bouquet

1.7.17: fruitcake squares (don't be afraid, they're good!)


Thursday, January 6, 2022

TBT: Alligator Pear Salad (re-run)

I originally posted this 'throw back Thursday' re-run recipe in 2020. I kind of forgot about making recipes from my super old cookbooks and want to start doing them again - like this one for 'alligator pear salad' they are fun to read the recipes and try to interpret what they intended for the dish to be hahah. 

Here's the post from 2/20: 

Alligator Pear? Are you, like me, wondering what the heck that is? Is it an old variety of pear we don't have now? 

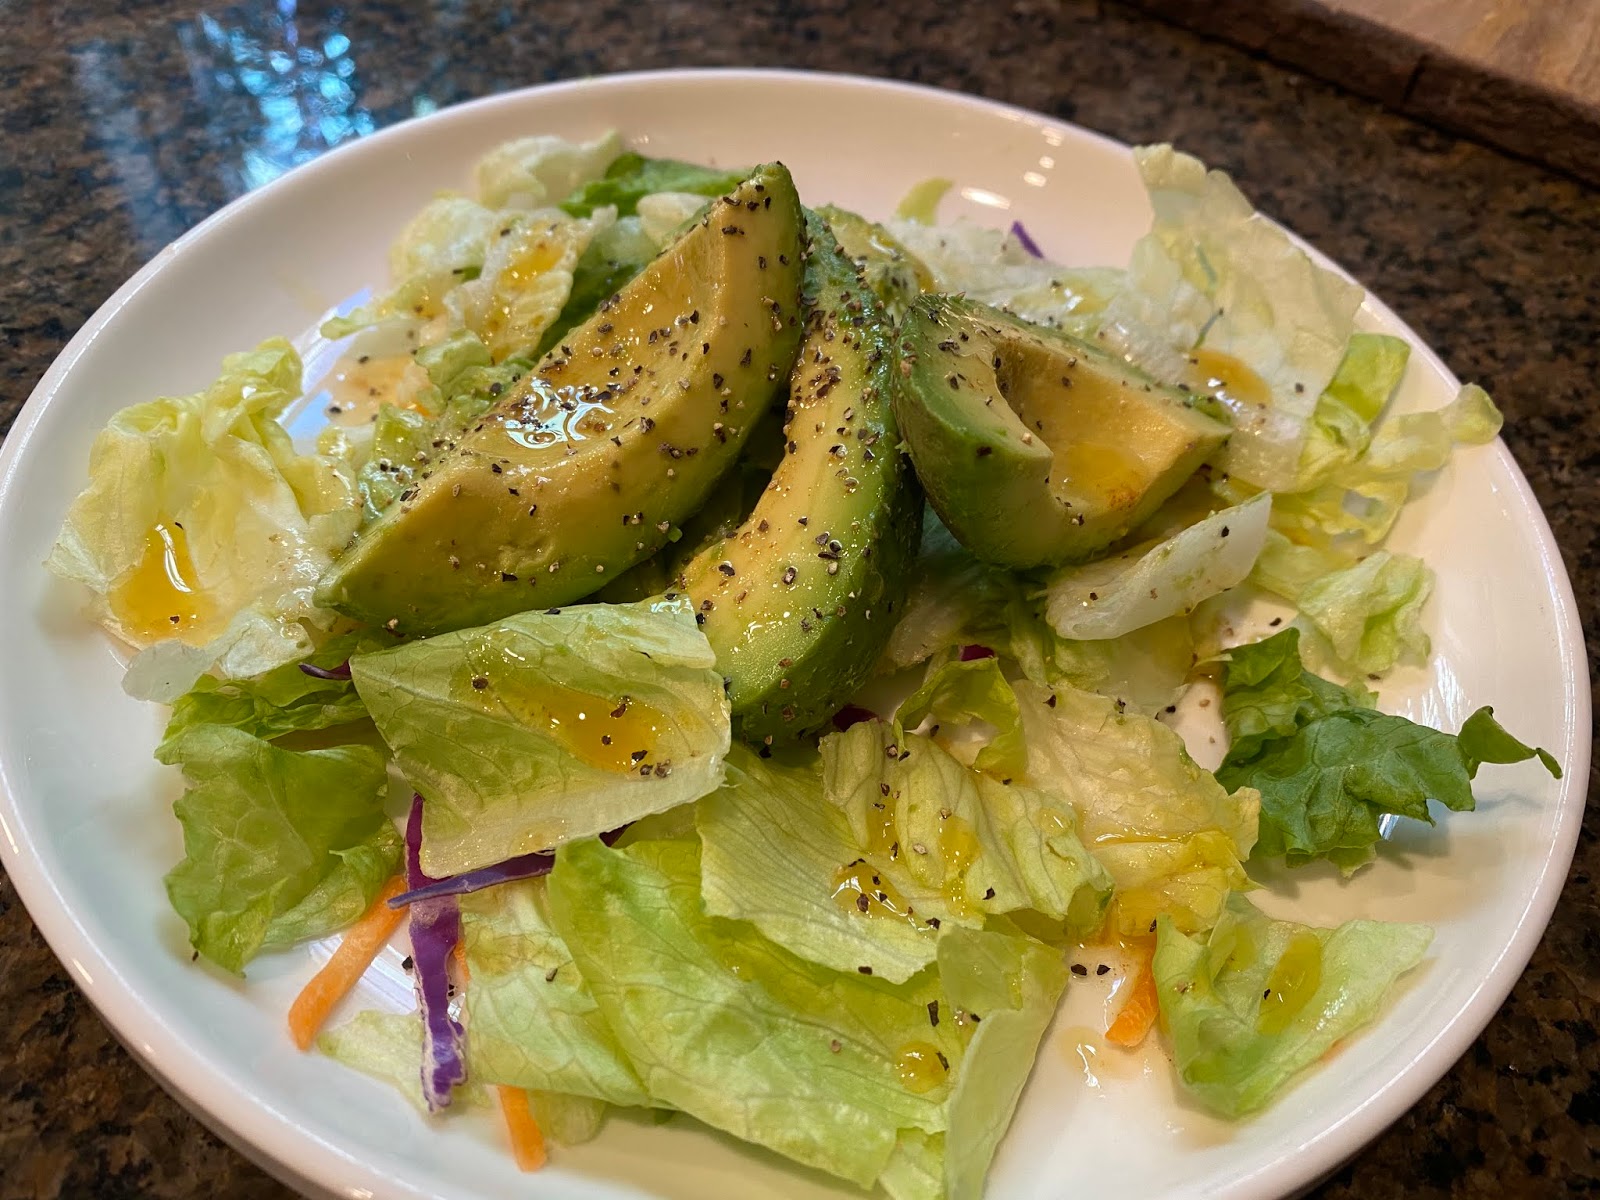
Nope - it's an avocado! Why they didn't just call it an avocado I cannot say - I guess an avocado does look like a pear with alligator hide haha. Whatever the reason, it's in my new/old cookbook and today's 'Throw-Back Thursday" recipe - alligator pear salad is just an avocado sliced into wedges, placed on top of lettuce leaves, drizzled with dressing. 

Tasty for sure - only thing I did different is used bagged salad so there's a little bit of carrot and radicchio in the mix, and I sprinkled on coarse salt and pepper. The recipe calls for French dressing which is not like our present day creamy ketchup-based French dressing - the one in the book is more oil and vinegar based (click the above link for the recipe). For now just top with whatever dressing you want (the current French dressing would also be good!).


Here's the official recipe as written in the cookbook:

ALLIGATOR PEAR SALAD

  • 2 alligator pears
  • lettuce leaves
  • french dressing

The alligator pear, or avocado, is now available in all markets at very reasonable prices throughout the greater part of the year. Cut each pear into six pieces, giving wedge-shaped sections, and if these are too large, cut each section again lengthwise. Peel and arrange wedges on beds of lettuce leaves. Either French dressing or Russian dressing may be used, but the fruit is so rich that French dressing is preferred by most people.

1.6.21: povitica (apple cinnamon bread)

1.6.20: crocheted cowl


Tuesday, January 4, 2022

Tip-sy Tuesday: past tips

Today's rerun is a few different Tip-sy Tuesday's from the past - tips you may or may not remember, may or may not find useful hahaha. I wonder if you've tried any of these?

Posts from this day thru the years:

Monday, January 3, 2022

How to Make a Hemp Dog Necklace

This is a rerun from 2018 - Sarge still wears the collar, and the tag still makes me laugh! My worst nightmare is a funny dog tag :) I don't call it a 'collar' cuz I'm way too paranoid to use this as anything other than a necklace for decorating the dog hahaha!! 


I bought this dog tag while in Tennessee last week because it made me laugh (and it's also very fitting!), when I added it to Sarge's collar tho he jingled like a cat and was driving me (and him) batty...so while camping I made him a hemp macrame collar to hang it from. And because one thing leads to another, I brought some letter beads with me to also add his name to the new collar (actually it's a necklace not a collar - just like the last one I made, click here for that post, there is no way this can function as his collar...it's just decorative).


This isn't hard to do at all and it comes together quickly. I didn't do any special knots or design, just square knots and you can google for instructions on how to make them. For a 14" collar I cut one piece of hemp (bought a ball of it at Walmart for like 5 bucks) approximately 36" long, and another one approx. 7 yards (I say approximately because I don't have a ruler in the RV so measured lengths by holding the end at my nose and stretching my arm out to the side as far as it'll go - I figure that's about 3 feet). Find the middle of each of the lengths and holding them together make a loop and knot it about an inch down. That's one end of the collar. I clip the loop to the top of a piece of cardboard (or a thin cutting board is what I used this time), and clip the 2 short ends to the bottom of the board - clipping the ends down makes it way easier to tie the knots. Then make square knots for 12 inches and finish by tying a big knot in the other end that will slip thru the loop at the beginning (the loop and knot are the closure). If you want to add beads or a charm, slide them onto the two short ends and make the knots around the beads with the long ends - I added them so they'd be at about the halfway point of the collar.


1.3.21: black-eyed pea jambalaya re-run

1.3.20: ornament storage

1.3.19: removing wax from candleholders

1.3.18: chocolate birthday cake for Noah

1.3.17: monthly bill log

1.3.16: black-eyed pea jambalaya

Sunday, January 2, 2022

🔥 Around the Campfire (week 1)

Dear Campers ~

Here's a quick recap in case you missed anything at camp last week:

Posts ~

12/26: 🔥 week 52

12/27: bbq chicken sliders

12/28: creamy chicken ranch sliders

12/29: witty wednesday - wreath

12/30: wonton sausage cups

12/31: reverse sear standing rib roast

1/1: happy new year!

Keeping it super short and simple this week - I gotta keep moving! Hectic around here, we are going camping in Florida for a couple weeks and I'm working on putting away Christmas stuff, cleaning the house, making food and packing the RV simultaneously. In fact, it's just occurred to me that I should take a little holiday blog break - no time to make anything interesting right now anyway and I don't know what our situation will look like at the campground (wifi? craft time/space? camp cooking?).  I will schedule a few days of re-runs unless I can talk someone into guest blogging for me. Anyone willing hahaha? If not, I'll be back in a few with new things to show you! 

See you soon ~

Sincerely, 


Jill

camp counselor

1.2.21: hot buttered rum (re-run)

1.2.20: dear resolution...

1.2.19: diaper fold gift holder

1.2.18: resolutions

1.2.17: storing gift wrap

1.2.16: hot buttered rum


Saturday, January 1, 2022

Happy New Years Day 1.1.22

Happy New Years! Cheers to 2022 being amazing, peaceful and calm, bountiful, healthy, and joyous! 

source: zazzle


Here's a look back at other January 1st posts:

1.1.21

1.1.20

1.1.19

1.1.18

1.1.17

1.1.16


Friday, December 31, 2021

Reverse Sear Standing Rib Roast

I'm not much of a prime rib fan so when Dave brought home a standing rib roast (aka prime rib) I wasn't super enthused and had no idea what to do with it...he goes 'my mom just put olive oil, salt and pepper and rosemary all over it and baked at 350' for 1 1/2 hours'. I looked at him like he was a stranger, rolled my eyes and said that I'd google what to do. 

Side note - Dave has never made a roast in his life, has no idea what temp to bake at (one time he called me while I was golfing to ask how to turn on the oven. true story.), or how long to cook anything other than meat on the grill. Just sayin'. 

I talked to Al, who is a great cook, and asked how he does it and he told me about the 'reverse sear' method which I'd never heard of. Traditionally you start hot to get a sear on the outside and then turn the oven down and let it roast until cooked to your preferred temp - this creates a roast that is more done on the ends and rarer in the center. So with the reverse sear you bake at a very low temperature until the internal temperature of the roast is 118' (or to your preferred doneness), remove from the oven and let rest for 30 minutes, then crank the oven temp to 500' and cook for 10-15 minutes. The result is the roast is evenly cooked throughout and has an amazing crispy flavorful crust. 

Al advised me to look at some youtube videos to see it done in action - I found one by Alton Brown that was pretty much exactly what Al told me to do; I followed it other than the internal temp, I roasted mine to 125' before pulling it out to rest, and I did not dry-age for the week beforehand, mostly because I didn't get the recipe until the morning I made it!

Click here to watch Alton in action, and I'll post the recipe below.


My prime rib turned out SO GOOD!!! Oh my gosh - thank you so much Al! I actually ate an entire piece which never happens hahha. YUM. 

PS: I learned from Alton that prime rib is actually mislabeled - it's a standing rib roast, they are rarely 'prime' grade. 

Here's the recipe I copied and pasted, click the above link to see how Alton dry ages and makes yorkshire pudding, and if want more info:

  • When you’re ready to cookretrieve the roast from the refrigerator, and rub roast with the oil. Remember to rub the bones with oil, as well. Once the roast is completely coated with oil, cover the roast with kosher salt, using about 2 teaspoons per bone, and the pepper. Let sit at room temperature for 1 hour.
  • Place a probe thermometer into the center of the roast and set its alarm for 118°F. Set the roast on the lower middle rack in a cold oven and turn the oven to 250°F. Let roast until the meat hits its target temperature, about 3 hours for a 3-bone roast or up to about 4 hours for a 4-bone roast. (It is more important to keep an eye on the temperature than the time here; your times may vary depending on the exact weight and shape of the roast.)
  • When the thermometer alarm goes off, remove the roast from the oven, transfer to a cutting board, cover with foil, and let rest while preparing the pudding. (The roast’s internal temperature should rise up to around 130°F, then very slowly start to fall.) Pour off the drippings from the sheet pan into a heat-proof liquid measuring cup. Let the roast rest for 30 minutes. Hang on to the sheet pan and rack; you’ll use it again later.
  • After 30 minutes, return the roast to the rack and sheet pan, then return to the oven. Crank the oven up as high as it will go; ideally 550°F, but 500°F will also work, and cook until the exterior of the roast is browned, 10 to 15 minutes, depending on how hot you can get your oven to run.

Another note: I don't have a probe thermometer so kept checking the roast with an instant thermometer until it reached the temp I was shooting for (125' -130'). I found this temperature guide on another youtube video:

120-125' = rare

125-130' = medium-rare

130-135' = medium

135-140' = medium well

140+ = well done


12.31.20: New Years Eve


Thursday, December 30, 2021

Wonton Sausage Cups

Here's the delish appetizer I mentioned yesterday - my sis made them for our family Christmas and they were a big hit and devoured quickly! She made the original recipe as written, and made a second 'healthier' version - I'll give you both of them.


Original version of Aunt Debs Sausage Cups:

  • 1 lb. Bob Evans Sausage
  • 1 package wonton wrappers
  • 1 cup Monterey Jack Cheese
  • 1 cup shredded cheese (Jen used colby/jack)
  • 1/2 cup ranch dressing
Preheat oven to 350'. Cook sausage (out of casing) until browned thru, drain off grease. Spray regular size muffin tins with non-stick cooking spray; insert wonton wrappers to form a cup. Bake 5 minutes. 

Meanwhile, mix together the cooked sausage, cheeses, and ranch. Fill cups. Bake 10 minutes or until bubbly. 

Note: Jen made 12, not sure if she had extra filling or if she evenly divided it between the 12 cups. 


For the healthier version:
  • 1 lb. turkey sausage
  • wonton wrappers
  • chopped red and orange peppers
  • chopped spinach
  • 1 cup shredded cheese
  • 1/2 block (4 oz.) cream cheese
Prepare the same way as original recipe. 


12.30.20: borchers breakfast pie (rerun) 

12.30.19: crostini appetizers

12.30.18: ðŸ”¥week 52

12.30.17: elf place cards

12.30.16: pimento cheese spread aka: yummy cheese!

12.30.15: breakfast pie