Saturday, October 31, 2015

Witch Hat Cupcakes

Happy Halloween! For my last post this month I decided to make witch hat cupcakes for my niece's soccer game today - probably not the most practical treat at a soccer game but they are so cute I'm doing it anyway :) Girls are going to love them!

I just made regular white cupcakes from a mix and frosted with white store bought vanilla frosting (left over from Halloween gingerbread houses) whipped with some cocoa to make it light brown and fluffy. My sister heard a tip somewhere that if you whip the store bought frosting with a mixer it gets light and fluffier and it worked! Giving the non-baking sister credit for that baking tip of the day ;).

For the witch hats: melt black candy melts in the microwave according to directions on the bag (I added a little bit of shortening to it to make it a little runnier, maybe a tablespoon), then using a pastry brush I brushed small sugar cones with the melted candy and set them on a parchment lined baking sheet to dry - it doesn't take long to set up.


 For the brim I cut small (about 1 1/4")  holes in patterned cupcake liners and slid them over the top of the cones. Set on top of frosted cupcakes at a slight angle so you can see some of the frosting underneath.


This idea came from Country Living Magazine , click here for the article.

Friday, October 30, 2015

Spider Lantern

Saw this quick last minute Halloween decoration on Pinterest, and since I have all the supplies on hand I put it together very quickly - will be cute on the porch or in a window for trick or treaters.


All you need is a glass jar, spider web or cotton balls, battery powered mini string of lights or a small flameless candle, and a fake spider (or two).

I used a string of lights and spider web. Spread the spider web or cotton ball apart, wrap around the string of lights and place it in the jar so you can't see any of the bulbs or cord, add spider. If you are using a flameless candle that would be even easier - just put the web around the candle.

That's it!


Thursday, October 29, 2015

Skeleton Pretzels


Woooooooo (spooky noise) - look how cute these skeleton pretzels turned out! I made these in 20 minutes start to finish with very quick clean up. What a fun Halloween treat! Check out how easy these are to make:
  • place white yogurt pretzels on a parchment lined baking sheet
  • microwave some candy melts (any color, I had orange and black left over from another project), spoon into a small ziplock baggie and snip a small hole off one corner. 
  • fill in the eyes as shown with melted candy, before it sets up add sprinkles or small candies for the pupils. 
  • put them in the fridge until they harden (although mine were setting up really quickly and didn't need time in the fridge). 

I saw this idea in a magazine but of course can't remember which one, so can't link their page for you...

Wednesday, October 28, 2015

Tissue Paper Flowers

I love to make tissue paper flowers to put on top of gifts instead of bows - since it's October and almost Halloween I used black, orange and black/white patterned tissue papers to decorate the top of my niece Macey's birthday present. I wrapped her present in zebra so it's a little hard to see where the bottom of the flower starts tho!


For this one I cut tissue paper into 10"x20" sheets (2 patterned, 4 black, 4 orange) and stacked them. In this picture the flower that is done was stacked 4 black on the bottom, then 2 patterned, and 4 orange on top. For the flower that is on the present above I did 2 patterned, then alternated 2 black, 2 orange, 2 black, 2 orange. Fold the stack in about 1" pleats  back and forth like making a fan, tie something tight around the middle, and either round the edges or cut them into points.
Then carefully separate the layers (do one side at a time) and gently pull them up to shape into a "flower".  In this picture I've separated one side but the other is still in the fan stage.

You can make them any size you want (up to the size of your sheet of tissue paper of course). These are also nice if you are mailing a gift, the tissue paper still looks good if it gets a little crumpled.


Tuesday, October 27, 2015

Mummy Meatballs

I had a busy week and got a little behind making stuff this week - so you get a repeat of one of my favorite Halloween recipes originally posted 10/27/15 (an oldie but goodie!):


Saw this idea a few places online, they are too cute and I had to try them. Not only are they a super cute idea, they taste and smell really good! My husband came into the kitchen as I was finishing putting the eyeballs on and started eating them - in between bites he said "I feel guilty eating them, they're so cute", but he managed to eat the whole plate so I guess he didn't feel THAT bad haha!


I bought turkey meatballs in the freezer section and 1 can of refrigerated low-fat crescent roll dough (turkey and lite dough - I'm trying to make them a little healthier!). Remove the dough from the tube, press the triangles all together, don't separate them; cut into 4 rectangles. With a pizza cutter or knife, cut each rectangle lengthwise into narrow strips. Wrap dough around each meatball to look like mummy bandages, leaving a place open for the mummy eyes, and bake. 


To make the eyes I sliced a mozzarella cheese stick into thin rounds (less than 1/4"), cut out small rounds with a large straw (this is the white eye part), then cut a smaller hole in that with a little straw and inserted a black peppercorn. Use anything you can find that will fit in the small hole that you have around - pieces of black olives would work,  mini chocolate chips (might not taste great haha but you just need a dark center for the eye), just look around and you'll find something. The recipe I followed dotted on mustard or ketchup for eyes but I like the white eye with something dark in it.


You could serve these many different ways - use your imagination! Could be with spaghetti for dinner, dipped in marinara as dinner or appetizers, standing at the counter inhaling them like someone I know, whatever you want. They taste good, are easy to make, come together quickly - all good! I'm going to take the 2 that I hid from my husband for my lunch tomorrow - I think they'll even taste good cold :)

Original recipe (I only changed the eyes):
  • 1 can (8 oz) refrigerated crescent dinner rolls 
  • 20 frozen cooked meatballs, thawed
  • Ketchup or mustard, if desired
  • Marinara sauce, as desired
Heat oven to 375°F. Line work surface with cooking parchment paper. On parchment-lined surface, unroll dough and press perforations to seal; cut into 4 rectangles.

With knife or pizza cutter, cut each rectangle lengthwise into 10 pieces, making a total of 40 pieces of dough.

Wrap 2 pieces of dough around each meatball to look like "bandages," stretching dough slightly to cover meatballs.

Separate "bandages" near 1 end to show meatball "face." On ungreased large cookie sheet, place wrapped meatballs.

Bake 13 to 17 minutes or until dough is light golden brown and meatballs are hot. With ketchup and mustard, draw "eyes" on mummy bites. Serve with warm marinara sauce.

Sponsor recipe courtesy of © 2015 ®/™ General Mills All Rights Reserved
Advertisement
© 2015 Television Food Network, G.P. All Rights Reserved.


Monday, October 26, 2015

No Sew Trick or Treat Pillowcase Tote


I saw a few cute ideas for trick or treat bags but couldn't find the one I had pictured in my mind - more like a backpack tote that could be carried easily and the candy will stay inside if there are races between houses - so I figured I'd try to make it up myself.

I started with a pillowcase (classic halloween tote!) and 62" of soft rope/cord that is sort of like clothesline. Cut 2 holes thru both layers 11" down from the top, about 6" apart and thread the rope thru with the middle of the rope centered in the front (I tied a knot in the center to keep it in place). Then cut a small hole in each bottom corner, run the end thru the hole and tie a knot. That just formed the backpack straps.

There will be 2 ropes running thru the center of the bag on the inside, but there is plenty of room to put candy around them into the bag (even if someone is passing out full size candy bars!!). I wore the backpack around the house with 4 pounds of candy in it just to test it out (my husband didn't even ask what I was doing, apparently he isn't fazed anymore by some of my actions!) and it held fine without reinforcing the rope holes or making special knots in the bottom - good news!


I rolled down the top of the pillowcase to just above where the rope is in the front and hot glued it in place all the way around. Then I ruffled 2 pieces of ribbon (folding it back and forth every couple of inches to create the ruffles) and hot glued them on top of the rolled down part to decorate it.


To finish I printed off a bat template from my computer and traced around it with silver fabric paint, then I took a little brush and smudged the paint so it wasn't a hard line. Let it dry for a couple of hours and you're done.

Sunday, October 25, 2015

Cinnamon Roasted Chicken with Pumpkin Polenta

Saw this recipe on BHG and thought it sounded good... yep, it's a keeper! I modified it a little - the original recipe called for grits but after I googled the difference between grits (which I couldn't find in the grocery store) and polenta (which I already have in my cupboard) and found it's just a matter of how coarse the cornmeal is ground I decided it's now "pumpkin polenta". I used bigger pieces of chicken so increased the spices and baking time a bit, made more polenta than called for, and added parmesan in addition to the cheddar cheese (click here for my version). Served with roasted asparagus - delish Sunday Supper.

I forgot to take a picture of the polenta with the
roasted chicken...the chicken basically just looked
like chicken though, you get the idea :)


If you haven't made polenta before, give it a try - it's very easy and quick. You can buy it in a container and measure out the cornmeal to add to liquid, or buy it in a tube ready to slice or add liquid to it if you want it creamy and softer. Great both ways.


a few of the ingredients...

Saturday, October 24, 2015

"App" Halloween Costume


My niece and some friends are dressing up for Halloween as "Apps" - I didn't really understand this idea at first but it's what they came up and asked for my help so I went with it :) Turned out cute!

Brooke was a big help and did most of the work actually - how nice! She found the images online, sized them accordingly and reversed the image before printing them out onto fabric transfer paper (instructions come with the transfer paper and it was very easy - I found the paper at Walmart). We then decided where to place them on t-shirts and I ironed them on.


She said "take my picture, I'm doing a
really good job cutting this one out"

They are finishing these costumes with store bought tutus and leggings - Brooke asked me to crochet her a beanie since it will probably be cold for trick or treating... my sister asked why we don't just buy a cheap one but B wants homemade - awwwwwww - how could I say no? So I'm sure in the next few days you'll be seeing a "crocheted beanie" post haha!

I used a yardstick to measure halfway
across and 4.5 inches down to get the
image centered. Then iron according to
directions.


If you need a quick easy last minute costume think about fabric transfers -  download an image and iron it on...the hard part is coming up with what you want to be!

Friday, October 23, 2015

Pumpkin Line-Up


Went to a local farm that grows tons of pumpkins, gourds, etc. and picked out a few to make my little creepy/cute row of pumpkins that I put outside on a bench - they are pretty simple and didn't take me very long to do.

Note: I didn't carve out the insides of any of these...

  •  for the "zombies" I hollowed out two openings and jammed ping pong balls in (painted with bloodshot eyes, I've had them a while but think they came from the Halloween Store - don't make the openings too big or the balls will fall into the pumpkin), then just cut a thin slit underneath for a mouth.
  • for the "vampire" I cut an opening just big enough to hold a set of plastic fangs (they come in a bag of approx 10, I've seen them lots of places - not hard to find)
  • for the one with the sewn shut looking mouth: I cut a small mouth opening and made 4 holes with a skewer across the top and bottom of mouth.  Then I cut the fluffy ends off of qtips, bent the sticks a little bit and stuck them into the little holes.
  • The middle one I just cut a slit for a mouth and used googly eye push pins. 
  • I also bought 2 cinderella pumpkins and gourds - I didn't notice that one of the pumpkins had a mushy spot in the top so I stuck a small rubber rat in the rotted hole and stacked the other on top of it. That was kinda gross actually - sticking the rat in the mushy hole...ewww! 

the whole little scene turned out cute!

Thursday, October 22, 2015

Halloween Nail Art


I don't do nail art on myself very often - my left hand is hopeless when it comes to drawing things! Was inspired though when I saw a picture of someone who painted googly eyes on her nails and I wondered if I could change the idea to just super gluing actual googly eyes on my nails... sure enough, it worked (and it's kind of funny). Surprisingly they stayed on for a few days but I have to admit, it felt kinda weird and I wanted them off.


So my next attempt at nail art is a little more "normal"; I just painted them different halloween colors and dotted on eyes instead (I used craft paint and the little round end of a paintbrush to make the dots), also tried a ghostly one based on the squash ghosts from a few days ago - wasn't hard to do on myself at all. This will be easier to live with I think...


Wednesday, October 21, 2015

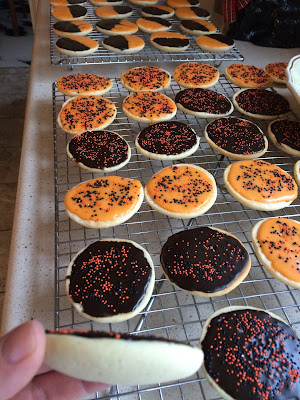
Black and Orange Cookies


Saw these in a Food Network magazine and thought I'd give them a try - I think I need to start a new category of "failed" recipes and projects! I will say that they taste really good, big fluffy almost cakey cookies - I will keep the recipe (click there for the magazine recipe) for that part. The problem is that the icing was too time consuming, tedious, and not very pretty to want to make them again. I changed technique after icing a dozen, gave up the 2 tone black and orange and just went with one color and sprinkles! Sprinkles fix everything...


The batter is not firm, I had doubts that they would end up as round cookies but they did...
One interesting thing is that you ice the bottom/flat side of the cookies, I've never done that before. This icing is very runny so if you put it on the domed/top part of the cookie it would run right off.


I might be a bit of a perfectionist it's true - I don't like that I couldn't get an even line down the center between the black and orange...I tried different ways of applying the icing - doing a few black and then going back to add the orange (not good, if the first color sets up too much it then cracks when you pick them up to apply the second), doing at the same time (not good, the colors run into each other and get blurry)...never found the answer.


I will say again though that they taste really good, Dave and some friends couldn't have cared less that the line between the colors wasn't "perfect"! I'm taking the sprinkle ones to my niece's soccer team practice and I'm betting they won't mind them either :)


Tuesday, October 20, 2015

A Boo-tiful Setting


We have a table by the front door that I usually display photos on that I decided to turn into a Halloween Table (a Boo-tiful Setting if you ask me haha!) and combine a few of my latest projects. I love how it looks all together! I added a giant furry spider, a couple of creepy rubber rats, spider webs, and some garland that I had in my Halloween decorating box...

Monday, October 19, 2015

halloween haunted gingerbread houses

Brooke and I had so much fun making these halloween gingerbread houses! It got a little silly (snacking on the building materials gave us both a sugar rush I'm sure) but in the end they turned out super cute. Watch her talking about the project...


We started with graham crackers and I thought we could just stick them together with frosting and shape our house, but that was a giant mess and it kept falling down (which made us laugh hard, seriously- there was frosting everywhere). Brooke asked if we couldn't just hot glue the crackers together and that gave us the idea to scrap the crackers and just build our houses out of cardboard and hot glue! We cut out 5 4" squares to make the walls and bottom, cut out 2 triangles for roof support and then B had the idea to use popsicle sticks for the roof. So having created sturdy houses that wouldn't fall over we continued on with frosting the entire thing in white, then stuck on lots of different candies to create our masterpieces. Of course because she is 12 it turned into a contest to see who made the better one, so on her video she is asking you to pick your favorite :) I had such a fun time doing this with her!

Sunday, October 18, 2015

Spinach Artichoke Spaghetti Squash

I saw this on Pinterest back in January and just got around to trying it, we LOVED it - it's so good, cheesy, and easy (what's not to like!).

I modified the recipe a little bit:

  • didn't use the onion and garlic
  • sautéed the artichokes to heat them up, sprinkled with garlic salt; then added the sour cream, neufchâtel cheese, and parmesan till creamy; added twice the amount of spinach and let it wilt down into the sauce. 
  • I pulled apart the spaghetti squash strands with a fork and added it to the sauce in the pan, combine all and add salt and pepper to taste.
  • put the mixture back into the squash shells, top with cheese and bake at 425' until melted about 10 minutes. 


I served this as a side to pork chops, but it would be really good with the addition of meat to the filling if you want. Ground sausage, chopped chicken...or just leave as a meatless meal - it's pretty hardy on its own. 

*note: if you haven't made spaghetti squash before give it a try, it's a nice substitute for pasta and very healthy. I cut off both ends and half it, remove the seeds, put cut side up in a covered microwaveable dish with a little water for about 10-12 minutes. Drain off the water; using a pair of tongs I stand the squash halves up in a large bowl and scrap the flesh with a fork into long strands. 


Saturday, October 17, 2015

Ravens on Sticks


Quick easy decorating idea - I've had these ravens for a while now and usually just set them out on a table or in the front windowsill, but this year I got some sticks from our yard and anchored them in a vase, and attached the crows to the branches - I used a short piece of black pipe cleaner to hold them in place-  and think it looks pretty cool. Maybe next year I'll make a "nevermore" sign to go with them...that'd make it even creepier.
I like to come up with different ways to use the things I already have - look around your house and see if you can change up your things to style them in a new fresh way - doesn't have to be birds and sticks but you get the idea!


Friday, October 16, 2015

Jack O'Lantern Gift Enclosure

I was invited to a Stampin Up meeting to check it out and see if I'd like to be a Demonstrator for them (yes, I am going to do this - so fun and I was VERY inspired after listening to all of the ideas and projects!), and my friend Ronda who ran the meeting was nice enough to send me home with four easy "make and take" projects. I didn't have time to make them while there but I was sure I would remember how to do them...have I told you what a terrible memory I have?! Well it's bad, so when I finally sat down this morning to put the jack o'lantern gift enclosure together and am faced with a little baggie full of bits, I wasn't sure what I was meant to do - I might not have done it exactly right but I guess that's what being creative is all about...do it however you want! Turned out great - don't know what I'll use it for but I'm thinking a little bag of candy inside would be cute. This was made with 2 pieces of cardstock, 3 black triangles, 1 half round circle, 3 punched out shapes for the stem, and thin twine. I will definitely be making more of these - it will be a good project for when my niece comes to craft day! Wish me luck putting the other projects together from "memory" ;)