Saturday, March 12, 2022

Pot O'Gold Cupcakes

I posted this on St. Patrick's Day last year, what good did that do you? Like you were going to have time to make them for dinner that night hahah?  I wrote to file it away for next year but if you're anything like me that gem of non-useful advice wasn't helpful hahahah. These turned out SO good, everyone raved over them, so it deserves a re-run post a few days before the actual holiday so you actually have time to make them before day-of! 

Here's the original post from 3/17/21:

Super last minute, I know - but maybe you're sitting there thinking you'd like to make a fun dessert for St. Patrick's Day but don't have any ideas and here I am to give you one hahaha! Or file this away for next year :) Or just switch out the shamrocks and gold sprinkles and change them to any other day of the year! 

I started with a dark chocolate fudge cake mix and doctored it a bit - not as much as usual but still a few additions:

  • 1 T. instant coffee granules
  • 1 t. vanilla 
  • 1 small box of instant vanilla pudding
  • 1/2 cup sour cream
  • big handful of mini chocolate chips
Bake as directed on the box - I made 48 mini cupcakes. Cool.

Once completely cool, insert the big end of a piping tip into the center of a cupcake, twist and pull out a small plug of cake (the tip is probably about 1/2" diameter, use anything you can think of you don't have a piping tip - even a small spoon to scoop some cake out will work). Spoon about 1/2 t. sprinkles into the hole and replace the cake plug back into the hole to smooth out the top of the cupcake. You might need to remove a smidge of cake from the underside of the plug if it won't fit back into the hole. Once you frost the top you won't see where you made the hole. 


For the frosting ~ I made my standard buttercream but added a couple big spoonfuls of caramel ice cream topping. And let me tell you, it is SO good!!! 

1 stick of unsalted butter, room temperature
4-5 cups powdered sugar
5-6 T. cream or milk
1 t. vanilla
pinch of salt
caramel topping to taste

Cream the butter until smooth. Gradually add the powdered sugar (if you add it all at once it's gonna fly out of the bowl all over the place - trust me hahah) and the other ingredients, blend until everything is incorporated and is smooth and fluffy. 


To finish the pot's of gold - sprinkle gold sprinkles on top of the caramel frosting, add a big gold chocolate ball if you can find them; if not I'd do maybe a candy gold coin or just do the gold sprinkles. Or do more of the shamrock sprinkles. Or heck, just leave them plain - they still taste great! 


3.12.21: kid craft: paper leprechaun by Brooke


3.12.20:  TBT: St. Patrick's day luncheon and Green Pea Soup recipe

3.12.19: TT: single cupcake container

3.12.18: make a layered paper shamrock using decorative patterned paper


3.12.17: blueberry chutney (delish with pork tenderloin!)

3.12.16: copycat shamrock shake

Friday, March 11, 2022

Leather Feather Earrings

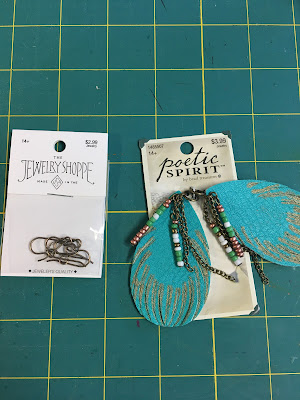
Why do I feel like buying charms and beads already put together and attaching them to earring hooks is a craft-cheat? Hahahaha! Check out how easy it is to make your own super simple foolproof earrings!


I found these charms and hooks at Hobby Lobby but I see similar items everywhere (even Walmart!). Simply open the loop at the bottom of the earring hook, I use 2 tweezers to open it just enough to slip on the charm - push one end away and pull one end of the loop towards you, trying not to twist it out of shape; that way to close the loop back together you just reverse the movement with the tweezers. Done!

Tell me, do you feel like this is cheating at jewelry making? And if so, do we care? Cuz look how cute they turned out and it took me like 30 seconds to 'make' them. 

3.11.21: shamrock pretzels


3.11.20: grilled scallops with chili-lime cream sauce

3.11.19: carpet freshener

3.11.18: instant pot love (and a creamy chicken pasta recipe) by Jenny

3.11.17: create a baking center

3.11.16: shamrock garland


Thursday, March 10, 2022

MSIH: Peanut Butter Dream Bars

Jen gave me the recipe for these peanut butter dream bars that she saw on FB - and yum, they looked and sounded great so I thought I'd surprise her with them. Here's her review, recipe follows:


It’s not my birthday but today I felt like It was.  Every year I request some variation of Peanut Butter Pie, Home-made Reese’s, Buckeye’s, etc. - to be clear, I love all things chocolate/peanut butter (including smearing peanut butter on my ice cream).  This is honestly though one of the best I’ve tasted.  It comes second to only my sister’s home-made Reese’s squares.  I’m sure that recipe is on this blog somewhere so if you haven’t tried that one go look it up.  It’s like a buckeye in a pan. (Jill here, I don't find that recipe on the blog, I'll try to remember to share it soon!) 

Anyway- back to this amazing dessert. The ratio of chocolate to peanut butter was perfect, the crust wasn’t overpowering the filling, the chips on the top tied it all together.  It was awesome.  Like a candy bar that I could eat with a fork/spoon.  So good. 


Looking at it seemed like it would be too sweet but for me it really wasn’t.  It also wasn’t too rich.  It really was just delicious.   As a side note – I feel like layered in a tiramisu bowl it would be beautiful with no crust at all and it could be ate like pudding, or piled together in a dip bowl it would be great with graham crackers dipped in it. This just seems very versatile to me and I would tend to vary it depending what I needed the dessert for (pie, pudding, dip).  She also told me I could freeze half but not sure if that will work out for me. hmmmm.. maybe good frozen?  That will be my next experiment. Yum.


Not sure how much work it was for her to make but I will for sure be reading this recipe to see if its easy enough to be in my skill set.


Now I need to go- I have more goodness to go eat- then I probably should go for a run. ðŸ˜‰


crust:
16 oz. package peanut butter sandwich cookies, crushed (reserve a couple Tablespoons for topping)
8 Tablespoons (1 stick) unsalted butter, melted

pudding layer:
1 1/2 cups milk
1 small box instant chocolate pudding

peanut butter layer:
4 oz. cream cheese, softened
1/2 cup confectioners sugar
1/2 cup smooth peanut butter

topping:
8 oz. tub whipped topping
milk chocolate chips
peanut butter chips
reserved crushed peanut butter sandwich cookies

Directions:
 
Preheat oven to 350'. Spray an 8" square pan with non-stick spray. Mix the crushed sandwich cookies and melted butter together, press evenly into the bottom of the pan. Bake for 10 minutes, cool completely. 

Whisk the pudding and milk together for a couple minutes until smooth and thick. Spread it evenly over the cooled crust. Refrigerate while making the peanut butter mixture.

Beat the cream cheese until smooth. Add the confectioners sugar and peanut butter, mix until completely blended. Spread over the pudding layer. Top with whipped topping, then add chocolate chips, peanut butter chips, and reserved crushed cookies til you're happy with how it looks. 

Notes: you can freeze this, and Jen said later it tastes even better eating it frozen. I used Nutter Butter peanut butter sandwich cookies, light cool whip and cream cheese, and 2% milk. 

recipe found here

3.10.21: crock pot corned beef (my favorite way to make St. Patrick's Day meal)


Wednesday, March 9, 2022

Shanghai Salmon

My neighbor Midge posted this copycat recipe for Shanghai Salmon that I've had in my file for quite some time and finally got around to making it - you might remember that I don't love salmon, here's the couple ways we usually prepare it (salmon 2 ways) - so I'm happy to say that this recipe is a keeper! We both really liked it. I hesitated buying hoisin and mirin sauces, what if I didn't like the recipe and then I'd have to find other uses for the rest of the sauces hahaha - fortunately that won't be a problem now that we've tried this salmon. 


Here's the recipe Midge posted, I changed a couple things and will put my notes after the recipe. Midge also changed a couple things, so obviously you can play around with this one!

SHANGAI SALMON
  • 4 serving size salmon filets, skinless
  • 2 bags of fresh spinach
  • 1/2 cup soy sauce
  • 1 cup water
  • 1/2 cup mirin
  • 1 T. hoisin
  • 1 t. garlic puree
  • 1 green onion, sliced
  • 1/2 t. sesame oil
  • 3 T. canola or light oil
  • 1 T. sugar
  • 1/2 t. sesame seeds
  • salt and pepper
  • rice, cooked according to package directions)
Coat the salmon with oil, sprinkle with salt and pepper. Grill to medium or your preferred doneness. 

Meanwhile, saute the spinach in a pan with a little oil until wilted and the moisture is evaporated. Season with salt and pepper to taste. In a sauce pan, combine the soy sauce, water, mirin, hoisin, garlic puree, green onions, sesame oil, canola oil, sugar, and sesame seeds; bring to a boil, then reduce to a simmer until the sauce slightly thickens. 

To serve: layer cooked rice, wilted spinach, and salmon in a bowl. Spoon sauce over the salmon. Garnish with additional green onion slices. Serves 4

Midge noted that she did not put oil on the salmon, she cooked it in the microwave, added fresh ginger slices to the sauce, and omitted the pepper. 

My changes: I cut the sauce ingredients in half since I was only making 2 servings, omitted the garlic puree and green onions, used toasted sesame oil and olive oil; I microwaved baby spinach without oil; and I baked a piece of salmon on a foil lined baking sheet until cooked thru (I don't like medium, it has to be cooked thru for me to eat it), then cut it into individual portions to serve. 

I've never bought mirin before - the only bottle I could find at my grocery store that was close says 'aji-mirin' by Kikkoman. I googled it and that seems like the right thing, other substitutes include rice wine vinegar, dry white wine, or sherry if you can't find mirin. 


3.9.21: TT shamrock plant

Tuesday, March 8, 2022

Tip-sy Tuesday: freezing asparagus

True story: 

Dave: I'm going to Costco, do you want me to get anything?

Me: Yes, we need a green veg for dinner. I have asparagus so maybe grab some green beans or broccoli. 

A while later he returns from Costco with a giant bag of asparagus. Insert eyeroll. 

As much as I like asparagus there is no way we are going to eat it all before it goes bad - because hello, Costco asparagus is A LOT OF ASPARAGUS. And I already had asparagus. Sigh. 

Point of this post is that I froze it. And it's very easy to do so I'm sharing with you in case your helpful significant other brings home a crap ton of it and you panic. 

Cut the asparagus into pieces (or leave whole spears, I'm sure that works too); blanch in boiling water for a couple minutes, remove from the hot water and put straight into an ice bath to stop the cooking. An ice bath is just a big bowl of ice and water you have ready before blanching the asparagus. Drain and dry the asparagus before putting in freezer baggies and popping into the freezer. Crisis adverted. 


3.8.20: ðŸ”¥week 10
3.8.19: sew a fabric wallet (fyi - I still use this all the time, so handy)


Monday, March 7, 2022

Peanut Butter Chocolate Chip Cookies

Tesha asked her son-in-law what his favorite cookies are and he said 'peanut butter chocolate chip' which she'd never heard of (me either!) and we were talking over the different options on how she'd make them - crisscross the top with a fork (regular peanut butter cookies), roll them in sugar (like peanut butter blossom cookies), add chocolate chips to traditional peanut butter cookie batter? This is what she ended up doing and her notes: 

This is a recipe from an old church cookbook. I just added chocolate chips to the recipe and ended up dropping them on like the recipe said. Bake them at 350' for 9 to 10 minutes - pretty easy. Ray says they're a 10. 

PEANUT BUTTER COOKIES

  • 1 cup butter
  • 1 cup brown sugar
  • 1 cup white sugar
  • 2 well beaten eggs
  • 1 cup peanut butter
  • 1 t. vanilla
  • 1 t. baking soda
  • 2 1/4 cups flour
Mix the same as for any cookies making the batter stiff enough for drop cookies. Place on cookie sheet and bake.


3.7.21: 🔥 week 10

Sunday, March 6, 2022

🔥 Around the Campfire (week 10)

Dear Campers ~

Here's a quick weekly recap in case you missed anything at camp last week: 

2/27: 🔥week 9

2/28: tater tot sausage breakfast casserole

3/1: TT microwaving potatoes

3/2: ribbon mask leash

3/3: leprechaun gnomes

3/4: blueberry muffins

3/5: turkey forestiere

What's Cooking ~

Well, we are camping and haven't had any interesting dinners yet! Here's some ideas that sound good to me if only I had a kitchen hahaha:

That's all for now, hope everyone had a great week! Stop back often to see more projects, crafts, recipes (once I get a crockpot LOL), whatever I can think of to make at MMDC while camping! Bye!

Sincerely ~

Jill
camp counselor

3.6.21: double barley posole


Saturday, March 5, 2022

Turkey Forestière

Another standby recipe from my 'Gourmet on the Run' cookbook, the first cookbook I ever used as a grown-up and I still make things from it - like this very quick turkey dish that is perfect for a weeknight meal. (click here for another recipe from the book for penne alla vodka) I haven't made this in quite some time, when we had it for dinner Dave was all 'this is so good, you should definitely make it again' and then laughed when I said that we've been eating it for years but apparently it'd been a while haha! 


  • 4 turkey cutlets (about 1 lb. total)
  • flour
  • 1 T. olive or vegetable oil
  • 1 T. butter
  • 3 scallions, cut into thin slivers
  • 1 carrot, julienned (cut into matchstick-thin strips)
  • 1/2 lb. sliced mushrooms (about 1 cup)
  • 1 tomato, diced
  • 1 t. dry rosemary, crumbled
  • 1 c. dry vermouth (you can substitute wine, white wine vinegar, sherry)
  • 1 c. chicken broth
  • 1/2 t. salt
  • 1/8 t. pepper
  • 1/4 cup heavy cream
Lightly coat turkey cutlets with flour. In large skillet over medium-high heat, heat oil and butter. Sauté turkey until golden, about 2 minutes on each side. Add remaining ingredients except cream. Cover; simmer 7 to 9 minutes, until tender. Remove turkey and vegetables; keep warm. Rapidly boil sauce, reducing to about 1 cup. Stir in cream. Pour over turkey, top with vegetables. Serves 4

Serve with your favorite rice mix if desired. 


Note: our store didn't have turkey cutlets so I bought tenderloins, sliced in half, put between plastic wrap and pounded until thin.

cutting and pounding the turkey thin makes it super quick to cook thru

add the veggies, herbs, vermouth and broth

once veggies are cooked remove from the liquid in the pan and keep warm

reduce the liquid, add cream 

 I put turkey and veggies back in the sauce, recipe says to pour the sauce overtop of turkey. I
really like the sauce so I like to coat everything with it, then add more once plated if desired. 


3.5.21: green wreath

Friday, March 4, 2022

Blueberry Muffins

Dave bought a big thing of blueberries at Costco (or course it was a big thing, there are no small things at Costco hahahah) and for the first time ever they just didn't taste great and I thought 'great, we have to eat these all week to get rid of them and they don't even taste good' and then I had an 'aha!' moment... 


In May '20 I posted about being on an email chain for swapping recipes during quarantine (click here for that post); the one from Sheryl for blueberry muffins popped into my head because it calls for 1 1/2 cups of berries and that seemed like the perfect thing to use up a lot of my berries. I'm so glad I remembered having this recipe - they turned out so good! Having so many berries in each muffin made them juicy and flavorful, and even tho they weren't great raw they made up for it baked in the muffins. 


Thanks again Sheryl for sharing this one, it's a keeper :)

  • 5 T. unsalted butter
  • 1/2 cup sugar
  • finely grated zest from 1/2 a lemon
  • 3/4 cup plain unsweetened yogurt or sour cream
  • 1 large egg
  • 1 1/2 t. baking powder
  • 1/4 t. baking soda
  • 1/4 t. salt
  • 1 1/2 cups flour
  • 1 1/4 to 1 1/2 cup fresh or frozen blueberries
  • 3 T. turbinado (raw) sugar for the tops
Heat oven to 375°F. Line a muffin tin with 9 paper liners or spray each cup with a nonstick spray. Melt butter in the bottom of a large bowl and whisk in sugar, zest, yogurt and egg until smooth. Whisk in baking powder, baking soda and salt until fully combined, then lightly fold in flour and berries. Batter will be very thick, like a cookie dough. Divide between prepared muffin cups and sprinkle each with 1 teaspoon turbinado sugar, which will seem over-the-top but I promise, will be the perfect crunchy lid at the end. Bake for 25 to 30 minutes, until tops are golden and a tester inserted into the center of muffins comes out clean (you know, except for blueberry goo). Let cool in pan for 10 minutes then the rest of the way on a rack. 


recipe from smittenkitchen.com

Thursday, March 3, 2022

St. Patrick's Day Gnome

I mentioned when posting the Valentine gnome that I was pretty sure there was a leprechaun gnome in my future - and here they are! I did it a little different this time - I saw the inspiration on a dollar store website but they didn't have all the same supplies so I winged it as usual. Aren't they cute?


The original inspo project called for a styrofoam cone, tall socks, themed headband, and a feather boa (all dollar store supplies). I only found the socks and boa, no cones or headbands so I changed it up with what I had on hand. Here's what I did:

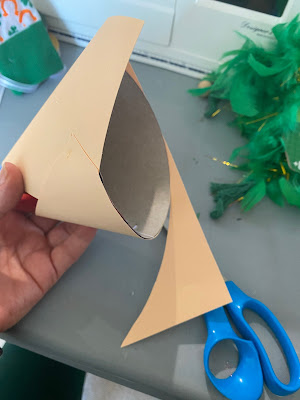
1. For the body I used a cone-shaped paper party hat and glued a piece of solid cardstock around it with hot glue. You don't need to cover the whole thing because the hat will cover the top portion. Trim the paper around the base so it sits flat. 

2. Cut the foot off the sock so you only have the tall straight part. Fit it over the top of the cone, pull it down as far as you want and glue the back in place.  

3. Cut a few pieces of the feather boa off the strand and stick them under the front of the hat/sock to form his beard, glue in place then glue the front of the hat over top. Glue a round wood ball on for his nose, push it under the sock a bit. Trim the feathers along the bottom if you want. 

4. The inspiration project tied the loose end of the sock with twine then glue on a decoration from the themed headband; I just scrunched and glued the end down and made my own decoration by cutting out a shamrock shape from green cardstock and glued on a ribbon and shiny penny.

I did basically the same thing to make a girl gnome - but did the feathers on the side to look like pigtails. 


3.3.21: red and green enchiladas

3.3.20: TT: copycat Old Bay seasoning 

3.3.19: ðŸ”¥week 9

3.3.18: host an Oscar party

3.3.17: Brooke decorates her phone charger

3.3.16: photo class - self portraits