Wednesday, July 20, 2022

Peach Cobbler

Claudette made peach cobbler and sent a couple pieces with LeDonna and Mark for Dave and I to try - we weren't home to eat it at dinner that night but I enjoyed it for breakfast the next morning. It's really good and a little different than I've made it and asked if she'd share the recipe. 

EASY PEACH COBBLER

  • 1/2 cup butter
  • 1 cup flour
  • 2 cups sugar, divided (that means you won't use it all at the same time)
  • 1 T. baking powder
  • 1 cup milk
  • 4 cups sliced peaches
  • 1 T. lemon juice
  • ground cinnamon or nutmeg
  1. Melt butter in a 9x13" baking dish.
  2. Combine flour, 1 cup sugar, and baking powder. Add milk, stirring until dry ingredients are moistened. Pour batter over butter (do not stir).
  3. Bring remaining 1 cup sugar, peach slices, lemon juice to a boil, stirring constantly. Pour over batter (do not stir). Sprinkle with cinnamon or nutmeg. 
  4. Bake at 375' 40-45 minutes.

LeDonna told me that Claudette wondered if I liked it, L told her that we were out for dinner but knowing me I'd eat it for breakfast hahahha, yep she knows me well! 

To my credit I did not eat it with ice cream or whipped cream for breakfast (and didn't miss it!). 


7.20.21: TT - silpat vs parchment paper

7.20.20: chocolate chip, banana, oatmeal muffins

7.20.19: grilled tuna pasta salad

7.20.18: kid craft: beach jars

7.20.17: how I organize my garden stuff

7.20.16: Budapest and Vienna


Tuesday, July 19, 2022

Tip-sy Tuesday: Cleaning a Cricut Cutting Mat

I've been cricut-ing a lot of things lately and noticed my cutting mat isn't sticky anymore; so before buying a new one I thought to Google for a solution or if I really did have to replace it. Sure enough, there's a fix.

I found this info and it works - easy and saved me some moolah:

Materials cut with Knife Blade will generate more dust or debris that will likely stick to the adhesive on your cutting mat. To help prolong the life of your StrongGrip mat, clean it as follows:

  • Remove large debris with tweezers
  • Avoid scraping the mat. Scraping will push material debris deeper into the adhesive.
  • Wash the mat as follows: 
    • Keep the mat flat supported by a firm surface, and place in the sink. 
    • Run lukewarm water over the mat. Use a plastic, hard-bristled brush to gently scrub in a circular motion until the entire surface of the mat had been cleaned. 
    • Pat dry with a paper towel.
    • Let mat air dry completely for stickiness to return. 


Monday, July 18, 2022

RV Organizing: the hold

We have one good outside storage compartment in our fifth wheel (aka: the cottage), we call it the 'hold' and it runs the width of the carriage and has big doors on either side for access. I put in a 3 shelf thing last year on the side closest to the front door but the other side was just a big hole and it'd gotten really junked up. I took everything out and re-organized, along with purchasing another 3 shelf stand. 


For the side that is farthest away I put all the stuff that doesn't get accessed all the time, like cleaning supplies, buckets, bleach, garden edging, etc. (side story - I also put  Dave's wetsuit over there, the one that he's only attempted to put on one time since he bought it - he didn't research tips to putting it on and I can even tell you how hard me and Ginny our camp neighbor laughed as he struggled. We both tried to zip him up as he's jumping up and down trying to wriggle into it LOL, still makes me laugh). Anyway...all the things that don't need to be quickly used is over there.


The closest side holds tools, garden stuff, bug remover, hooks and small hardware, blower, etc. And now we can see and get to everything in it's place. Ahhhhh....

I think my favorite thing is this little idea I thought of all by myself - I hung the paper work towel roll to the side of the wire shelf with a small bungie so we can easily tear off a sheet. I'm feeling very proud of my organizing self this morning hahahah. 


We have what's called the 'garage' that I also worked on but nothing I did out there is very inventive - it's the area in the front of a fifth wheel where the tongue is for towing. There's a canvas surround around the rv so it creates a covered holding area for bikes, chairs, floats, brooms/rakes/shovel, etc. I removed everything, cleaned out thee spiders, and arranged everything to be easier to get to. Other than hanging our life jackets on s hooks and finding a secret place for a hide-a-key, the rest is just standard organizing. 


7.18.21: 🔥 week 29
7.18.19: msih - mexican stuffed peppers
7.18.18: Cathy's strawberry pie (so good!!)
7.18.17: tip to keep off the shoulder tops off the shoulder!
7.18.16: Jen's tip for washing baseball hats


Sunday, July 17, 2022

🔥 Around the Campfire (week 29)

 Dear Campers ~

Well I forgot to post the weekly recap on Sunday, so now I'm doing it late just so it's on the blog! I'm just recapping what happened during the week in case you missed anything:

7/10: 🔥 week 28

7/11: window shadow box display

7/12: tip-sy tuesday: personalize a phone charger

7/13: chicken parm meatballs

7/14: creamy baked fettuccine

7/15: california roll wrap 

7/16: another phone case

Ok, now you're caught up!! More like I'm caught up hahaha. Bye!


Sincerely ~

Jill

camp counselor


7/17: Jen's deviled eggs


7.17.17: Deanna's pretty garden dish flowers

Saturday, July 16, 2022

Another Phone Case

Didn't want the new phone (click here for the story) but it was fun to make a cricut sticker for my new clear case! I've had the original owl drawing that Brooke made me for years in my phone cover but now that it's gone I'm free to change up cases (trying to find the positives here hahah), saw this design in the Cricut Design Space when I was personalizing my new phone charger, and whipped it out in a couple minutes. Cute, right? 

I put the sticker on the inside of the case so it won't peel off when I shove it in my back pocket, I suppose you could stick the sticker to the phone but I don't know how easily it'll peel back off when I want to change it. 


7.16.21: fun friend gift by Jenny


7.16.19: frosting tip


Friday, July 15, 2022

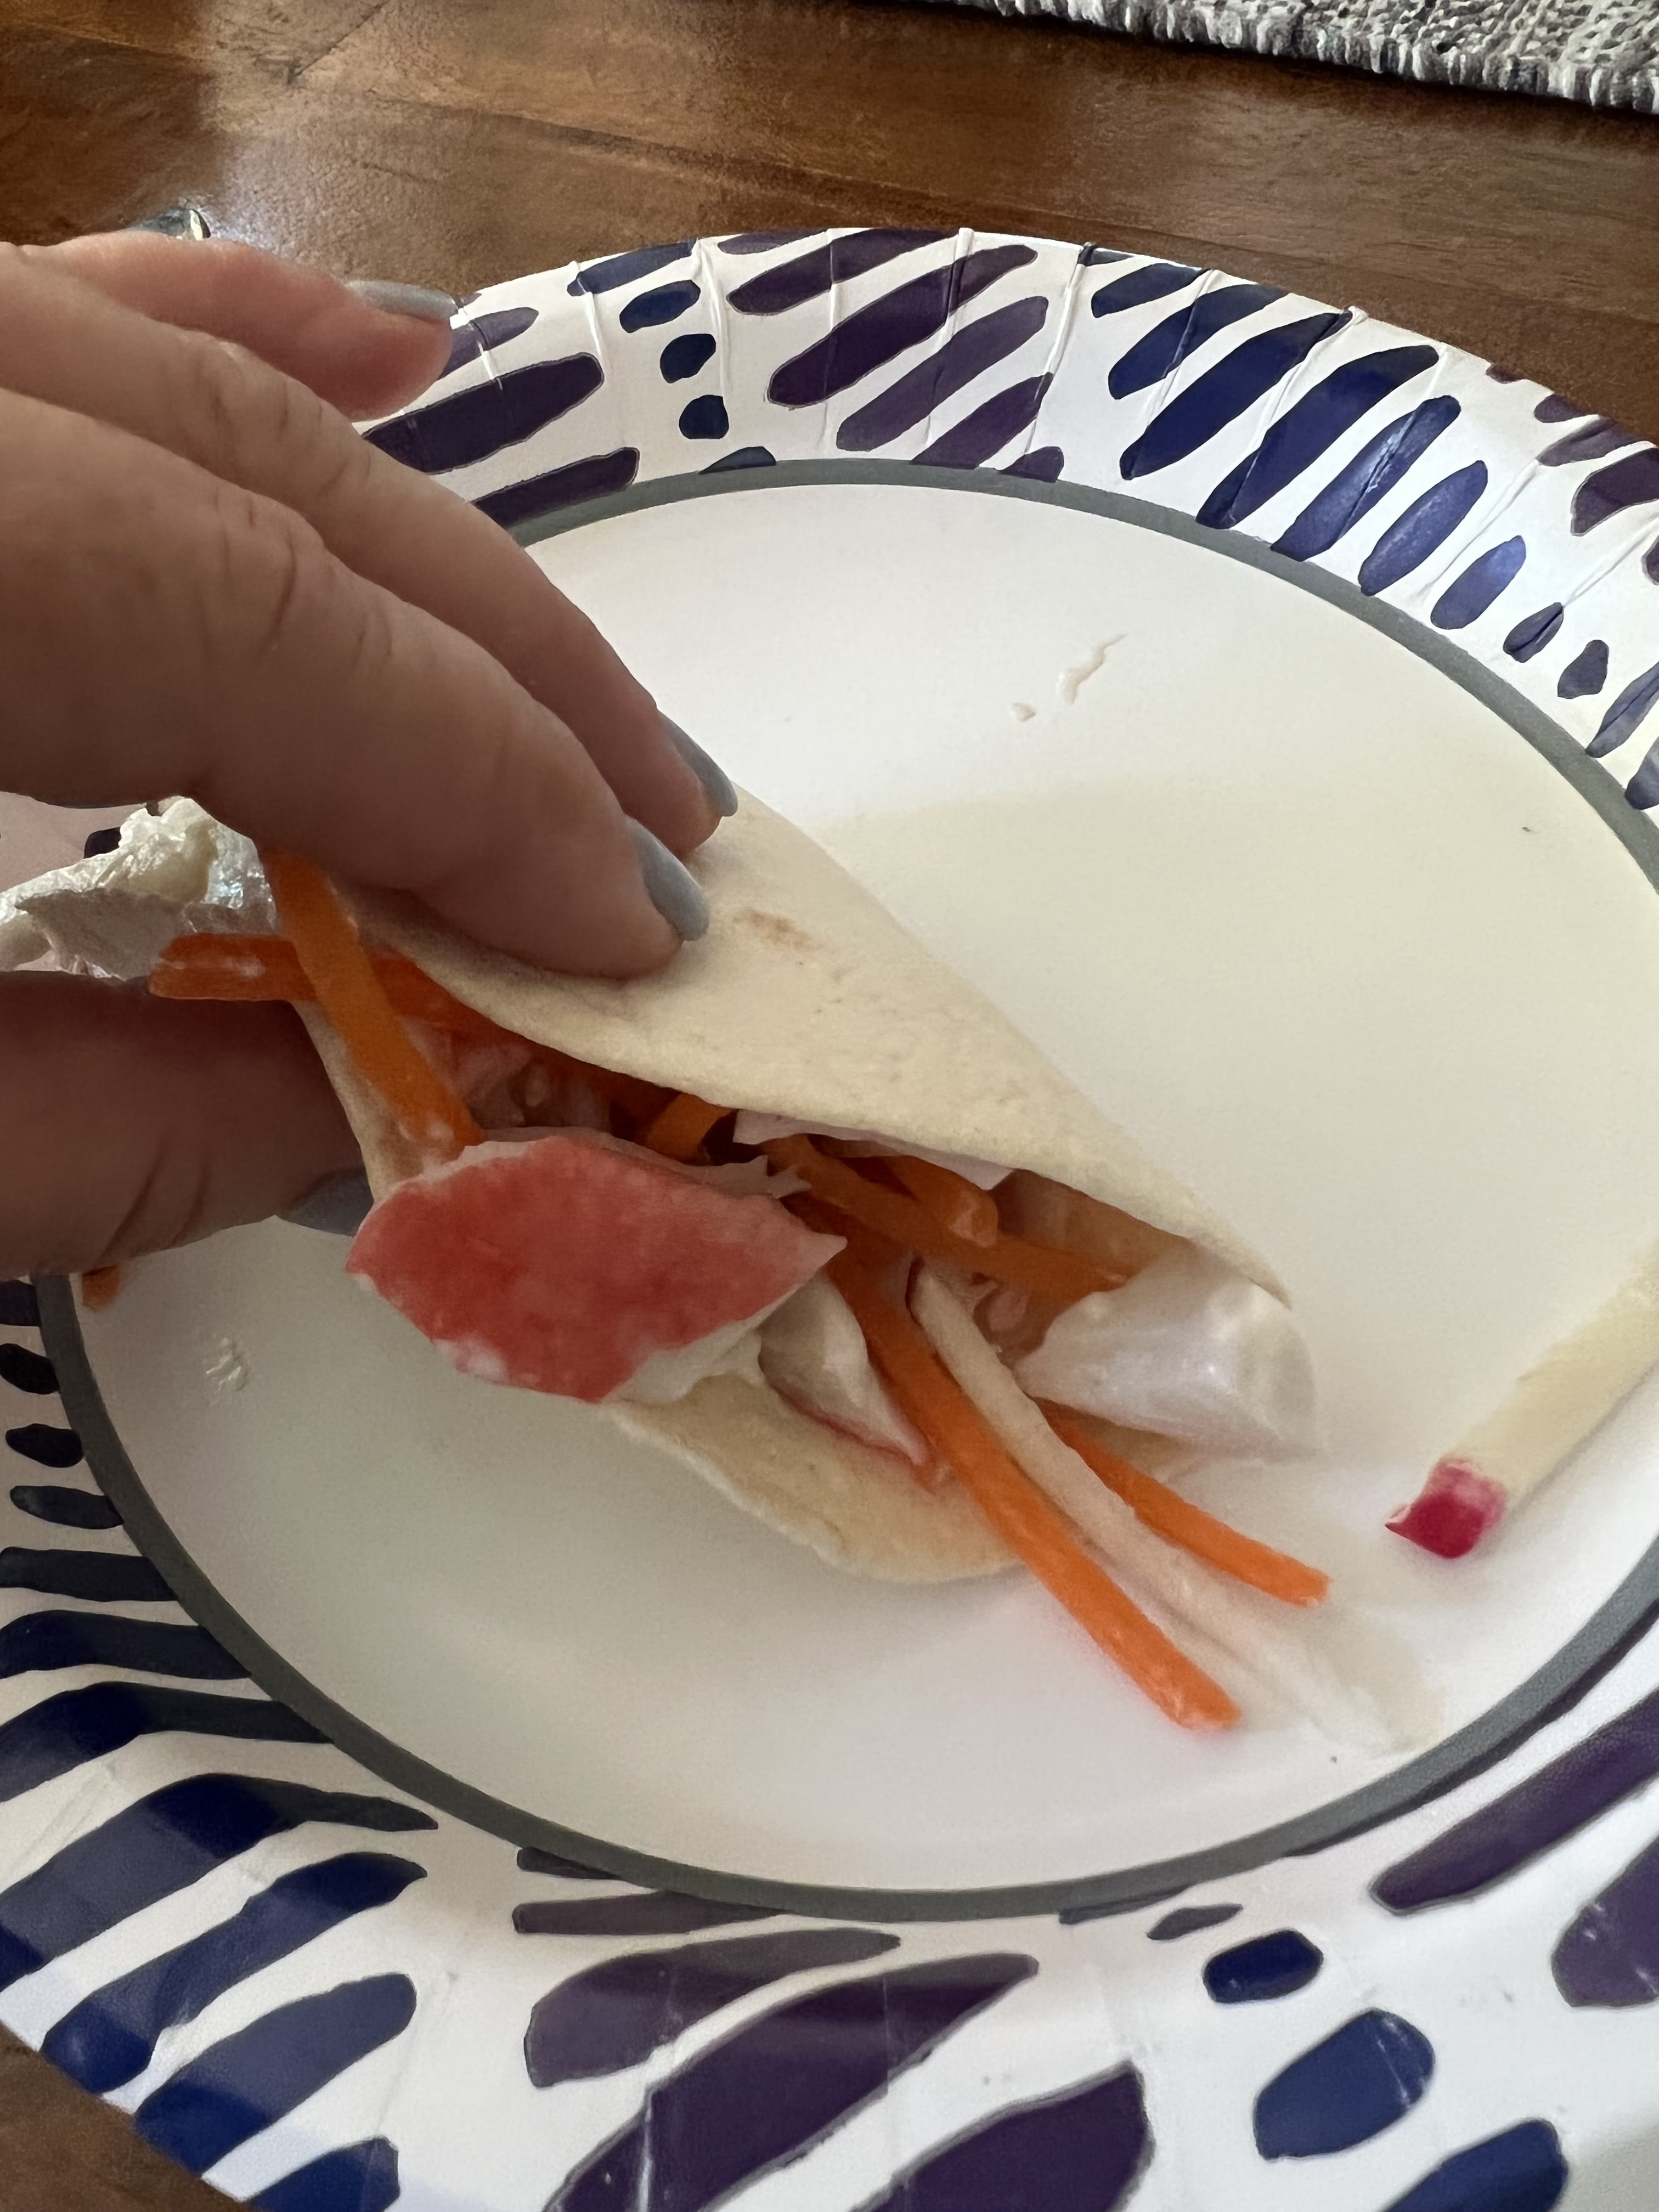
California Roll Wrap (or taco)

This is so weird - I posted this idea for a California roll wrap, got an email prompt that it was posted, but now it isn't on the blog! Where did it go? I have posted 2,491 times and have never lost or deleted a post! 

True story and I'm starting to worry about myself - 2 weeks ago I lost my pitching wedge, my sis loaned me one last week and I promptly lost it the same night (someone turned hers in thank goodness); I lost my phone in the grocery store (no one has turned it in yet); last weekend I lost an AirPod in the hardware store (it took 4 of us searching to find it); and now I've lost a blog post!!! I'm losing my mind!

Here's the post that I copied from the email, so at least it's back on the blog: 


California Roll Wrap

Posted: 15 Jul 2022 08:01 AM PDT

I saw an inspiration recipe that put California roll ingredients in a wrap and thought I’d try it - I only had small flour tortillas so ended up stuffing my wrap too full tho and it turned into a California roll taco haha! If you want a wrap instead of a taco I recommend using a large tortilla. For my wrap/taco I spread a little cream cheese and mayo on the tortilla, layered imitation crab, carrot strips, and radish strips - use whatever ingredients you like, cucumber, peppers, wasabi or spicy mayo…up to you!


7.15.21: organizing clutter by Jen


7.15.19: felt flowers

Thursday, July 14, 2022

Baked Fettuccini with Asiago

We served this creamy pasta along side the roast pork loin with fig port sauce I posted last week. I found both recipes at Giadzy.com and they are both delish!


INGREDIENTS:

  • 1 pound fettuccine pasta
  • 2 cups grated Asiago cheese, plus additional 1/4 to top casserole
  • 2 8-ounce containers creme fraiche
  • 1 cup grated Parmesan
  • 1 1/2 tablespoons fresh chopped thyme leaves
  • 1/2 teaspoon salt
  • 1/2 teaspoon freshly ground black pepper

INSTRUCTIONS:

  • Preheat the oven to 375 degrees F.
  • Bring a large pot of salted water to a boil over high heat. Add the pasta and cook until tender but still firm to the bite, stirring occasionally, about 8 to 10 minutes. Drain pasta reserving 1 cup of the pasta cooking liquid.
  • In a large bowl combine the 2 cups Aiago cheese, creme fraiche, Parmesan, thyme, salt, pepper, cooked pasta, and pasta cooking liquid. Gently toss until all the ingredients are combined and the pasta is coated. Place the pasta in a buttered baking dish and sprinkle with the remaining 1/4 cup asiago cheese. Bake until golden on top, about 25 minutes. Let sit for at least 5 minutes and serve.


    Note: If you can't find creme fraiche you can sub with sour cream but won't be quite as creamy. And you can use gruyere, fontina, pecorino, or more parmesan if you can't find or don't want asiago. 


Wednesday, July 13, 2022

Chicken Parm Meatballs

These meatballs are so good! Replacing the usual beef with chicken lightens them up a bit but they are still very flavorful - don't skip the lemon or fennel seeds, I think they jazz up the chicken meatballs and make them a little different. The recipe says it makes 20, I must have made them too large 'cuz I only got 10. We had them with stuffed mushrooms (trying to keep the carb count down but obviously these would be great with pasta!). 

  • 1 1/4 lb. ground chicken
  • 1/2 cup breadcrumbs
  • 2 T. chopped onion
  • 1 T. chopped parsley
  • 1/2 pecorino or parmesan cheese
  • salt and pepper to taste
  • 1 clove garlic, minced
  • 1 t. fennel seeds
  • 1 eggs, whisked
  • zest of half a lemon
  • 3 T. olive oil
  • 1 (14 oz) can pizza or marinara sauce
  • 4 oz. thinly sliced fresh mozzarella
Preheat oven to 400', with the rack in the upper third part of the oven. In a large bowl, gently mix together first 10 ingredients (everything but the olive oil, pizza sauce and mozzarella). Shape into equal sized balls, somewhere between golf and tennis ball size, and place a few inches from each other on a foil-lined baking sheet. In a small bowl mix one spoonful of your pizza sauce with olive oil. Brush some of this mixture on top of each meatball. Bake for 15 minutes. 

Remove meatballs from oven, spoon some sauce on top of each meatball, and cover each with a slice of cheese. Broil another 3 to 5 minutes until cheese is bubbly and golden. Heat remaining sauce in a small saucepan and serve with the meatballs. 


recipe found here

Tuesday, July 12, 2022

Tip-sy Tuesday: personalized phone charger

After getting my new phone last week (remember? I lost my old one - I'm still calling the grocery store every couple days to see if it's been miraculously found!) it came with a new charger and cord that is different than my other ones; I thought I'd put something on it so I'd remember it goes with the new phone.  I've been cricuting (hmmm is cricuting a word LOL?) a lot lately so had the idea to make a sticker to put on the charger. I searched in the Cricut design space for a simple image and found these paw prints - I am a sucker for paw prints hahaha. Sized it really small to fit, cut it out, stuck it on. Cute!


You could buy vinyl stickers/letters/shapes if you don't have a Cricut - or hit up a friend that does have a Cricut machine 😉

My camping neighbor Jen gave me a good tip for transferring the vinyl from the backing to whatever object you're putting it on - she uses clear contact paper and after trying it with a scrap piece she gave me I can tell you it's a good tip! I'm too cheap to buy transfer paper and have been using packing tape (which works but it's really sticky - the contact paper is strong enough to lift the vinyl off the backing but not as tough as packing tape). 


Monday, July 11, 2022

Window Shadow Box Display by Jenny

I outlined in a previous post how I used old farm windows to display 8X10’s.  It turned out perfect.  The last thing my daughter asked for was a shadow box of some kind to display her varsity letters, patches, medals, etc.  There were quite a lot and I checked prices of a large shadow box and found it so expensive!  I then remembered I had one extra old window - smaller than the others so I couldn’t use it for pictures but still large enough to hold the items she was looking to display. I started out laying it all out in a beautiful messy old school collage.  She deemed that WAY too messy and removed half of what I had overlapping on the board and laid it all out flat - in mostly straight lines. 

Next task was attaching the items.  For this one I didn’t attach to the back like I did with the pictures.  The newspapers and pictures were of course easy, for the medals and patches I tried various things and ended up having the best luck with blue tacky “gum”. Using that I was able to hang all the items to the board and then just hung the medals with the ribbons on them over the corners. 


That is the one window I didn’t take back apart after the party was over because it turned out so cool.  Hoping to find a place in the family room to possibly hang it?  If not then I guess it will just go into storage as is for now - because it is way too cool to take apart.


7.11.21: 🔥 week 28
7.11.19: mnih (my niece is hungry!): oslo pasta bake