Wednesday, February 9, 2022

Valentine Felt Gnome

This cutie project was inspired by a Christmas gnome I saw the directions for here at diycandy - I changed it a bit to come up with this Valentine version and am pretty sure that every holiday for the rest of the year is now getting a gnome! Just change the felt colors for whatever holiday - green hat with a shamrock for St. Patricks Day is so happening. 

To make a gnome like this you'll need:

  • paper maché cone, or make your own cone for the base (instructions follow)
  • 2 colors of felt - I used light gray for the body, hot pink for the hat
  • additional felt for decorating the hat if desired, I made a red heart
  • embroidery thread, yarn, or other materials to decorate the hat
  • white cotton batting/stuffing, or pulled apart cotton balls for the beard
  • round unpainted wood ball for the nose, mine is 3/4"
  • hot glue and scissors

I didn't have a paper maché cone for the base so I made one using thick cardstock. I rolled it into a cone shape and held it in place with a staple (it's getting covered with felt and hot glue so I didn't bother with a more serious way to hold the cone shape). The paper cone needed to be trimmed so it has a flat bottom, I did that by holding my ruler and measuring the same amount from the top all the way around making little marks so I'd know where to cut. My cone is 7 1/2" tall so I made marks at 7 1/2" around the base before trimming - I'm pretty sure if I tried to cut it by just eyeballing it would not have been flat and I'd have to keep trimming to even it up and I'd have ended up with a gnome/cone that's like 3" tall hahaha. 


Cover the bottom half of the cone with felt creating the 'body' - in order to make it lay smooth on the cone I laid the cone on the felt and rolled the cone marking on the felt where I'd need to trim it. I wasn't thinking and made the cone out of black cardstock so needed felt dark enough to not see the black thru the felt - this lightish gray worked just fine. Hot glue the band of felt in place. 


Next, wrap the felt you're using for the hat around the rest of the cone to see how much you need for the hat. I ended up with a big triangle that curved outward at the bottom (see photo). You can add a decorative stitch, or other trim to the bottom of the felt, if you want. Glitter, sequins, pompoms, ribbon - many things would look cute to decorate the hat. I did a blanket stitch following the inspiration gnome using embroidery thread and a big needle. 

to make a blanket stitch - insert the needle from back to front, before pulling the stitch tight
 put the needle thru the loop and then tighten. Repeat inserting the needle from the
back where you want the next stitch, put the needle thru the loop before pulling it tight. 

Hot glue one side of the hat to the back of the cone, wrap the felt around creating a hat shape and hot glue the other side to the back of the cone, overlapping slightly. Don't hot glue the bottom edge of the hat, leave it open so you can tuck the batting for the beard underneath. Hot glue the round wood ball on for the nose, I also put a little glue under the hat on top of the nose to help hold it in place (gluing only to the batting isn't going to hold it in place very good). 


Last, I cut a felt heart and glued it to the front (the only thing really making it 'Valentines' day, up until now it's just a cute generic gnome!). I thought the hat was a little tall so I folded it down and glued it in place - you can play around and see what you like. 


2.9.21: tip-sy tuesday: baking center organizing (see my sprinkle storage update here!)


Tuesday, February 8, 2022

Heart Treat Holder/Bookmark

I have no idea what to call this cute treat holder - slash - bookmark, that's not really a very catchy or descriptive name hahah. But it's cute, super easy to make (once you have the template, more on that in a sec), and just in time for Valentines day - although really a cute heart shaped treat holder - slash - bookmark is perfect for any time of the year!

I saw this idea at bhg (better homes and gardens), there's a big box that says to 'click here for free template' but of course I couldn't find a template. I'm pretty resourceful so spent the next 45 minutes googling to find it at a different source but nope. And I'm pretty crafty so I thought I would just figure out my own template. But I'm also pretty lazy and just sat at my computer continuing to locate one hahahah. I ended up having to log in on the bhg site (who knew I already had a log on, why would I? Hmmm...) and then they took me to the place where I found the template. I'm going to save you some work and give you the dimensions in case you want to make these and don't want to spend half your day looking for the template LOL. 


Like I said, this is a quick and easy project - I took lots of photos but really, it's quite simple and it took me longer to photograph and write this up then it did to make it hahahah!

The directions say to glue 2 pieces of paper together so when you open the heart it's a different color on the inside - I used double-sided scrapbook paper instead and saved that step. 

Start with an 8" x 5 3/4" piece of paper. Lay the template on top of the paper and cut around it. Fold in half along the dotted line. 


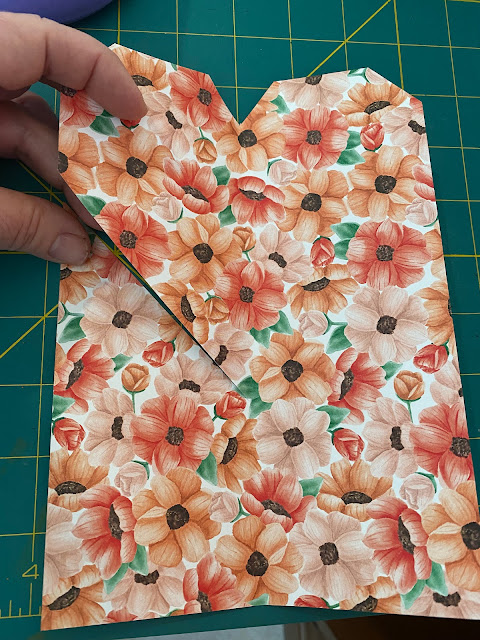
Open back up, lay the template back on top and cut the diagonal line so the heart can open up. See pics, it's way simpler than my description haha. 


Put adhesive along the side under the diagonal cut and halfway across the bottom to the fold. In the following picture I put tear tape along the edges to show you where to place the adhesive of your choice. Fold the card back in half, sticking the bottom and lower sides together creating a pouch. 


Using the template as a guide, punch a small hole on the side. 


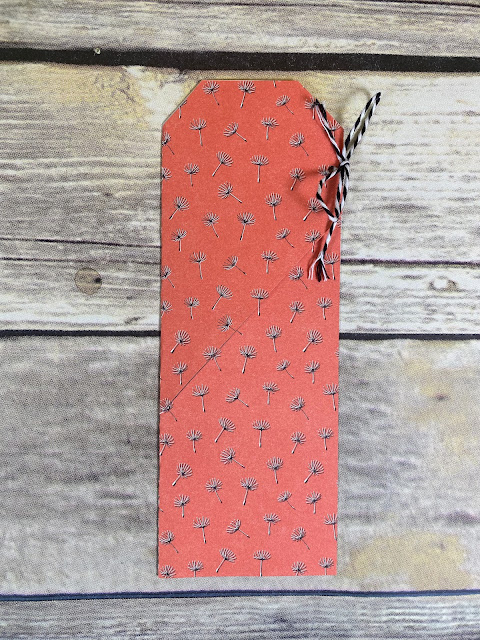
Fill the pouch with a little treat or gift.  I used candy that I have on hand, anything long and skinny works -  lollipops would be cute, lip gloss, pencils, etc. would also be good. Thread a piece of twine, ribbon, yarn, thread, whatever you want thru the holes to keep the heart closed and encase your gift. 


After they remove their goodie, tie the heart closed again and presto - now it's a bookmark :)


2.8.21: Valentine caterpillar by Brooke


Monday, February 7, 2022

Painted Wood Hearts

Another fun heart craft from Miss Lori (click here for last week's heart wreaths), so happy she sent this - I might not have a dance studio window to display them, but I'm inspired to paint some and will find a cute place for them in my house (or maybe little Valentine gifts? We'll see....)

From Lori: 

These little hearts are my latest craft-I haven’t painted in a long time, it was a nice change - I found it to be pretty relaxing actually! I used the studio colors so I could put them in the front window at the new studio.


Note: she found the unpainted hearts at Target

2.7.21: 🔥 week 6


Sunday, February 6, 2022

🔥 Around the Campfire (week 6)

Dear Campers ~

Happy first week of February! Hope you're staying warm and creative :) Here's a quick recap of what happened at camp last week in case you missed anything:

1/30: 🔥 week 5

1/31: Miss Lori's Valentine wreaths

2/1: tip-sy tuesday: how to make a heart-shaped cake

2/2: dry ranch seasoning

2/3: msih: slow-cooker crack chicken

2/4: sprinkle racks

2/5: wine and design (on a dollar store budget) by Mickey

What's cooking ~

  • taco stuffed shells (will post next week!), chopped salad with corn and avocado
  • baked crispy chicken and potatoes, steamed green beans
  • grilled pork chops, baked acorn squash 
  • slow cooker crack chicken, whole wheat fettuccini, wilted spinach
  • bbq ribs, chopped kale salad
Hope everyone had a great week and stayed safe and warm during that big ol' snow storm! See you next week with more projects, recipes, ideas, etc. Bye!

Sincerely ~

Jill
camp counselor


Saturday, February 5, 2022

Wine and Design (on a dollar store budget)

I love love love this idea for a fun, inexpensive, and I'm sure hilarious craft night - Mickey and her friends did "Wine and Design on a dollar store budget" and she sent me pics and this story:


It’s been pretty cold in NC the last few weeks, and we were looking for something fun to do on a Saturday night that didn’t cost a ton of money. My friend Meghan planned an at home Wine & Design, which ended up being a blast and only $10 a person! She got all of the materials at the Dollar Tree, which let me add is now $1.25, not $1. She bought: paints, paint brushes (various sizes), white canvas, apron, easels (normally used for displaying pictures) and paint pallets. She found a YouTube video for step by step paintings for beginners. There are a variety of options, so you may have to Google a bit to find the one you like. She selected the flamingo painting, and  we sipped and painted! Some turned out amazing… others should have sipped less and focused more on their portraits. Haha! Needless to say, it was a fun, easy activity to do with friends on a Saturday! 


2.5.21: valentines wreath by Brooke


2.5.20: baked pork chops

2.5.19: heart shaped cork trivet

2.5.18: paracord camera wrist strap

2.5.17: crock pot mac and cheese

2.5.16: valentine poppers


Friday, February 4, 2022

Sprinkle Racks

I'm pretty sure you know how much I love sprinkles, right? I have so so so many sprinkles and they're pretty organized in drawers inside my baking cabinet - the only problem with my current system is that I'm not tall enough to see inside the drawers so I have to pull the whole drawer out when I want to access them - and many times I don't even remember what all I have to choose from (that's how many I have!). 

A new idea popped into my head the other day and I'm happy to report my plan worked and I'm super excited - yep, I said I'm super excited about my new sprinkle system! I found spice racks on Amazon that can be installed with adhesive hooks instead of nails or screws - my cabinet doors are pretty thin and I don't want to risk attaching the racks by nails/screws, so the adhesive seemed like a solid plan - I now have a door full of sprinkles! Yay! No more searching, or forgetting, what I have to play with. Can't wait to make something with sprinkles and put my new system to work, in the meantime I just keep opening the cabinet just to look at them :) 


PS: this is not all the sprinkles I own, but I put my favorites in the racks and kept the seasonal ones in the drawers. 


2.4.20: tip-sy tuesday: messy lily pollen

2.4.19: man-day monday

2.4.18: last minute super bowl ideas

2.4.17: super bowl party games

2.4.16: super bowl party planner


Thursday, February 3, 2022

MSIH: Slow-Cooker Crack Chicken

I was feeling a little housebound last week and told my sis I'd make them food if she told me what she wants and sends a recipe ('cuz that's half the battle - thinking of what to make!); she sent a handful of recipes she's been saving - she says she was saving them because they seemed like recipes she could make but I'm wondering if she was really saving them waiting for me to ask hahahah. 

First up is 'slow-cooker crack chicken'. This is not a recipe that would have caught my eye, it just seems like dip to me but the blurb says to serve over potatoes, rice, pasta, rolls, etc. so it's meant to be dinner. Ok - nothing like dip on pasta for dinner but who am I to judge LOL.


Jen's review in her words:

Can’t remember what this was named- maybe Crack Chicken?  HAHAHAA.. that’s a name that sets up high expectations.

My sister told me this could be put over noodles, bread, in a tortilla, etc.

I thought that seemed weird and chose over pasta. (why on earth would I put chicken in a sauce on bread?).  After one bite I realized why.  It was thick enough to definitely be on bread or inside a tortilla. Maybe an enchilada/burrito.  It had great flavor, cheesy, with just the right amount of interesting tang.  I do have to say I think if putting over pasta it actually had too much chicken and not enough sauce.  The Chicken was very thick making a weird chicken/pasta ratio.  Good but thick.  As a filling for burrito or on a sub bun it would have been perfect.  


No idea what is in it but if it isn’t too complicated I would make it again. 


Love this. yum. 


  • 3 pounds boneless skinless chicken breasts
  • 2 packets dry ranch seasoning, or homemade ranch seasoning (click for recipe)
  • 2 (8 oz) blocks cream cheese
  • 6 slices bacon, cooked and crumbled
  • 1 cup shredded cheddar cheese
  • chopped green onions for garnish (note I omitted these, didn't have on hand)
Place the chicken in a slow cooker. Sprinkle with dry ranch seasoning. Top with cream cheese (cut into smaller pieces). Cover and cook on low 6-8 hours, or high for 4 hours. Do not overcook or the chicken might dry out. 

Once cooked, remove the chicken from the sauce in the crockpot and shred with 2 forks. Return to the crock pot, stir into the cream cheese sauce. Top with bacon and shredded cheese, cover until cheese is melted. 


recipe found here recipecritic


Jill here: I made extra of this and had it for dinner mixed with whole wheat fettuccini noodles. It's definitely a lot of chicken and not super saucy, think pulled chicken consistency - I thought about adding broth to loosen it up but I didn't, just tossed it with the pasta so the noodles were coated but not saucy. We liked it and I agree, I'd make it again - maybe not over pasta but in enchiladas or over rice I think I'd really like. 


2.3.21: valentine layered cookies 


2.3.20: doctored up brownies

2.3.19: 🔥week 5

2.3.18: football toss game

2.3.17: root beer bbq pulled pork

2.3.16: cookie bites


Wednesday, February 2, 2022

Dry Ranch Seasoning

I made a recipe that my sis found for 'slow-cooker crack chicken' the other day, it called for dry ranch seasoning packets which I didn't have on hand and didn't feel like going to the store - fortunately the recipe also included notes how to make your own dry ranch seasoning so I went with that. I wasn't sure if I had buttermilk powder so that led to my emptying my baking cabinet looking for some, sure enough I did! Not sure why but it came in handy for making this seasoning blend. You can find it in the baking aisle at the grocery store if you for some weird reason don't have this laying around hahahha. 


  • 1/2 cup buttermilk powder
  • 1T. dried chives
  • 1 T. dried parsley
  • 2 t. garlic powder
  • 2 t. onion powder
  • 1 t. dried dill
  • 1 t. salt
  • 1/2 t. pepper 
Whisk all ingredients together in a small mixing bowl. Store in an air-tight container for up to 3 months. Note some buttermilk powder formulas require refrigeration after opening, if that's the case for yours then (obviously) store this blend in the fridge. 

3 T. seasoning blend = one packet dry ranch mix. If you want to make ranch dressing using this seasoning, whisk it together 1/2 cup sour cream, 1/2 cup mayo, and 3/4 cup milk.

recipe found here 


2/2/21: tip-sy tuesday room temp butter tip 

2.2.20: ðŸ”¥week 5

2.2.19: groundhog day card or decoration

2.2.18: super bowl games

2.2.17: preserved lemons

2.2.16: organizing wrapping and tissue paper


    Tuesday, February 1, 2022

    Tip-sy Tuesday: how to make a heart-shaped cake

    This is not my photo or my idea, but it's such a simple way to make a heart-shaped cake for Valentine's day (or whenever you want to make a heart-shaped cake!). Simply bake a square and a round cake, cut the round one in half and place next to each other on either side of the square. Attach it with some frosting to  make the heart, then frost the entire cake - and of course add sprinkles as desired. Easy!

    Note - this is probably obvious and I'm not trying to insult your math skills, but the half circles will nicely fit along the square cake if you bake both layers in the same size/dimension pan. For instance - an 8" round and an 8" square, or both of them 9"...you get the picture. If you don't have the same size then I'm sure you can do a little cake surgery to make them fit together!