Saturday, December 4, 2021

Defrosting the Deep Chest Freezer

You might remember my posting about organizing the 'black hole of doom' last year when I showed you how much ice buildup we had in our chest freezer and how easy it was to defrost it - click here for that post -  well I concluded that post by saying I wouldn't let it get that bad again and guess what? 


Yep, I let it build up again. 
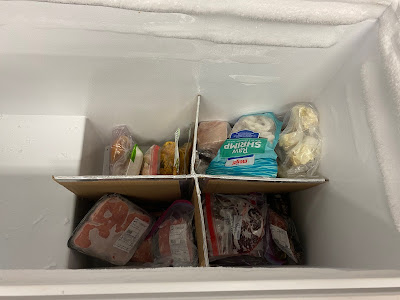
This time however it was even easier to defrost because it's still very organized so I only had to lift out the tubs, and then the meat in their sections underneath. I'm happy to say that a year later this system is still functioning very well! Even tho I posted about this in the past, let it be a reminder to go check if you have any ice buildup in your deep freezer! Also, last time I defrosted it was very hot and humid outside - this time is a little different, can't say December in Michigan is hot or humid hahahha. 


Read the first post for detailed instructions on how I defrosted, in a nutshell it's:
  • empty the contents into coolers 
  • unplug from the wall
  • open the drain, put a towel on the floor by the drain
  • wait a few minutes and scrape with a spatula or something with a flat bottom (do not use a knife or screwdriver!)
  • collect the ice pieces in a pail or tub or something
  • wipe out with a towel
  • close the drain
  • plug back in, wait a few minutes, put the frozen food back in place. 


12.4.20: how to make tiny bows using a fork

12.4.19: cranberry sauce hand pies

12.4.18: snowman wreath


12.4.17: wine cork Christmas trees


12.4.16: pasta with roasted tomatoes and sausage


12.4.15: contact paper dog house


Friday, December 3, 2021

Creamy Artichoke Dip

This is a recipe I found at allrecipes.com for cold artichoke dip - I have a great recipe for baked artichoke dip but I was feeling like a cold version. This is pretty similar to my baked dip, now I'm wondering if I could just follow my recipe and not bake it! Everyone liked this tho so we'll just stick with it hahaha!

Ingredients:

  • 1 (14 oz.) can artichoke hearts in water, drained
  • 1/2 cup grated parmesan cheese
  • 1/3 cup mayo
  • 1/3 cup sour cream
  • 1 clove garlic, minced (more to taste)
  • 1 squeeze fresh lemon juice
  • 1 pinch salt and ground black pepper
Directions:
Blend artichoke hearts, parmesan, mayo, sour cream, and garlic in a blender or food processor until smooth; stir in lemon juice, salt and pepper to taste. Transfer to a serving bowl. 

Not the first time I forgot to take a picture! 


Thursday, December 2, 2021

Fried Beets

Have you ever heard of frying beets? Have you ever made or tried fried beets? Well I've never heard or, made, or tried them so when Tesha mentioned it I immediately made them for lunch (I had fresh beets on hand for a butternut squash beet salad I was going to try but this served my instant gratification lunch better hahha). Clean, peel and thinly slice fresh (uncooked) beets - slice them like you would to make fried potatoes (thin slices that sort of look like potato chips).  Fry in butter or oil until they are cooked thru and tender. like you would fried potatoes. 


I'm almost slightly embarrassed to tell you how many of these I ate for lunch. They are terrific - if you like beets. If not, why are you still reading a post about beets? LOL. 


note: to clean the beets I used a vegetable peeler and a small paring knife to remove the outer skin. The raw beet juice stained my fingers so don't get it on your clothes! 


12.2.20: popsicle stick snowmen by B (I was so happy to open my Christmas stuff this year and find these cuties!)


12.2.19: poinsettia gift topper


12.2.18: ðŸ”¥ week 48
12.2.17: decorated the 'dog house'
12.2.16: kids Christmas party: gingerbread houses
12.2.15: DIY bell bottom jeans

Wednesday, December 1, 2021

Winter Porch Decor

I don't do a lot of outdoor decorating - a couple strands of lights around the back porch rail, a wreath or two that LeDonna hand makes (click here to read about how she does it, it's quite the system!), and the front porch. 

I've shown you how I decorate our front porch overhang for Halloween, but I don't think I've shared my winter version. On the underside of the overhang we have a few small nails so I can hang stuff - for Halloween or Fall it's colorful leaf garlands, mini pumpkins and rubber bats, for Winter/Christmas it's evergreen and pinecone garland, metal snowflakes, bells, and this year I added 3 large shatterproof balls. 


I've learned to hang the garland first and this year I struggled getting it to stay up, my usual twine and twist ties weren't cutting it - the neighbors must think I'm nuts watching me on the ladder trying to put it up and having it fall down then repeat, and repeat...it was snowing and cold while decorating over the weekend (I knew I should have put up the week before when it was SUNNY hahaha!) and that didn't help my frustration any, eventually I had to walk away from it and take a minute! While warming up (and eating hambone soup, recipe to follow soon) I had the thought that I should wire it up there with some thin craft wire and ah ha - I overcame my issue and nothing is coming down until I say it comes down.

the snow on the garland is not fake haha, it
 accumulated while I was hanging everything up!

After the garland was in place, I filled it with the snowflakes, bells, and balls. This has been my go-to winter porch plan for a while now and I still love love how it looks. If you don't have an overhang maybe this will inspire you to hang stuff around the doorway or columns or whatever you have! 


the underside of the overhang

12.1.20: TT: turkey stock

12.1.19: 🔥 week 48

12.1.18: pinecone snowman


12.1.17: wall pompom by B

12.1.16: quinoa salad 

12.1.15: make a snowman ornament


Tuesday, November 30, 2021

Tip-sy Tuesday: cutting board for rolling cookies

I posted this in '15, the post was about organizing cookie cutters and I threw in this little side tip that I think deserves it's own post because it's something I do all the time and you might have lost it in thee shuffle! When rolling sugar cookies (or any dough that I'm going to cut shapes out of) I use the back side of my big wood cutting board (I use the back side because the front side has a groove around the edge to catch juices from when we slice meat), lightly flour and roll out smaller balls of dough to keep on the board. This makes cleaning up the mess so much easier - when I flour the counter it ends up everywhere and this way it pretty much stays on the board. 

11.30.20: penne alla vodka 

11.30.19: margarita cupcakes

11.30.18: pinecone gnome


11.30.17: golf glove counter

11.30.16: pumpkin bread

11.30.15: pill box travel organizer

Monday, November 29, 2021

Man-day Monday: Stuffed Burgers

I haven't had a 'Man-day Monday' post in forever!! This could just be a regular recipe post but I love saying 'Man-day Monday' and Mark (the man of today's man-day hahaha) sent me this recipe so I'm combining the two!! This looks so good and I'll definitely be making it - possibly for lunch today since I have to go to the grocery store anyway and not sure I can wait to try it - I've stuffed burger with cheese (click here for that post) but never with veggies and I think it's a great idea. Thanks for sharing Mark! 

STUFFED BURGERS:

-1# Burger 
-Chopped onion  
-Chopped tomato 
-Grated cheese

Sauté onion first. Divide burger to 1/4# each and form into a boat. Add tomato to sauté until it cooks down. Spoon sautéed veggies along with grated cheese into burger boats then close them up. Cook to your desired temp then top with more grated cheese!


11.29.20: 🔥 week 48


11.29.17: smoothie bowl
11.29.16: make a pocket towel for the guest room
11.29.15: mini pineapple-upside-down cakes

Sunday, November 28, 2021

🔥 Around the Campfire (week 48)

 Dear Campers ~

Here's a recap of what happened at MMDC last week in case you missed anything:

11/21: 🔥 week 47

11/22: baked brie with fig preserves

11/23: tip-sy tuesday: egg shells

11/24: buffalo-less chicken dip

11/25: quickie plate stand

11/26: black friday

11/27: corn and tomato saute

What's Cooking ~

  • grilled lamb chops, wedge salad
  • marinated pork tenderloin, herbed rice, chopped salad
  • baked stuffed salmon, green beans
  • turkey, turkey, and more turkey
  • leftover turkey and fixings
  • baked chicken, basmati rice, roasted broccoli
That's it for this seemingly short week! Flew by didn't it? Hope you had a very happy Thanksgiving - now I'm off to put up some Christmas things :) Stop back next week for more crafts, recipes, whatever else I can think of to make at camp - bye!

Sincerely ~

Jill
camp counselor

11.28.18: Cathy's rolled oats cake

Saturday, November 27, 2021

Corn and Cherry Tomato Saute

I have 2 recipes in my book right next to each other for different corn dishes made in a skillet - I'll give you both of them. I couldn't decide which to make last night so I combined the two for one delicious and easy side dish! 

I love corn. Have I told you that before? hahahahah. 

CREAMY CORN SKILLET

  • 5 fresh ears of corn
  • 1/4 cup butter
  • 2 - 4 T. sugar
  • 1 T. cornmeal
  • salt and pepper to taste
Remove husks and silk from corn; cut kernels from cobs (you should have about 2 1/2 cups). In a large heavy skillet melt butter. Stir in corn, sugar, and cornmeal. Cover and cook over medium-low heat for 30 minutes, stirring occasionally. Season to taste with salt and pepper. Let stand 10 minutes. Makes 6 servings.
each serving: 152 cal, 9g fat, 19g carb, 2g fiber

CORN AND LITTLE TOMATO SAUTÉ
  • 2 t. each olive oil and butter
  • 3 ears fresh corn, kernels cut from cobs (about 1 1/2 cups)
  • 1 pint mixed little tomatoes (such as cherry, grape, and pear)
  • 1/3 cup chopped chives
  • 1/2 t. each salt and pepper
Heat oil and butter in large nonstick skillet over medium-high heat. Stir in corn and tomatoes and sauté 2 - 3 minutes or until tomatoes just begin to split. Remove from heat; stir in chives, salt and pepper. Makes 4 servings.
each serving: 100 cal, 5g fat, 14g carb, 3g fiber

*To combine the two recipes I melted 2 t. butter and 2 t. olive oil in a large skillet. Add 2 cups frozen corn kernels, sprinkle with approx. 1 T. sugar and 1 T. cornmeal (I didn't measure, just a big pinch of both), salt and pepper to taste. Cook over medium until the corn is hot and golden, stirring frequently - about 15 minutes. With a few minutes to go I added a big handful of cherry tomatoes. 

Friday, November 26, 2021

Black Friday '21

This post is from a couple years ago, it made me laugh all over again so I'm sharing in case you'd also like to laugh at my life hahahahah! Taking the day off from making anything, other than maybe making you laugh! Happy Black Friday (is that what I should be saying? Happy and black Friday might be an oxymoron)! See you tomorrow :)


Dave wanted me to run to Walmart this morning to get some blue stuff to put down the RV drain, I said 'no way - it's Black Friday. At Walmart. Do you not hear about the fights and riots at Walmart on Black Friday?'. He said 'no one will be in the RV section you'll be fine'.

Insert eye roll.

No, I did not go get blue stuff.

11.26.19: tip-sy tuesday: aluminum foil
1.26.18: Miss Lori's Christmas wreath


11.26.17: birds on a wire artwork


11.26.16: mulled cider

Thursday, November 25, 2021

Last Minute Plate Stand

This was originally posted in '15, but I came across it this morning and thought I'd share in case you need/want a last minute food stand for cookies or whatever! Super easy and you can put it together in seconds...Happy Thanksgiving!! 

Here's the post from 11/16/15:

For Thanksmas I made cookies - half shaped as turkeys, the other half I did Christmas shapes -  I'm going to have everyone frost their own (will they choose Thanksgiving or Christmas?).  I didn't have a stand to put them on so I stuck a plate and a plant container together to create a temporary one using craft putty/earthquake putty/museum putty (whatever you want to call it!), that way I can take them apart afterwards.


There are other ways to join the pieces together depending on how permanent you want it - you can hot glue them together and still get them apart later by placing the stand in the freezer for a half hour to shrink and harden the glue making it easier to peel off, or for a more permanent solution use craft adhesive. I probably wouldn't use my nice or sentimental dishes to make a stand just in case something went wrong with the hot glue or adhesive though! I got this plate at the craft store on sale and used an old plant container that was in the garage - I tied a bow around it so you can't see how stained the pot is :)
11.25.19: cork turkeys