Friday, November 10, 2023

Dilly Beans and Pickled Onions (re-run)

I don't have time to post something fresh today, Tesha and I are off on our annual Frankenmuth Shopping (and eating!) day and I'm scrambling to get around. I didn't remember that I still have dilly beans and pickled red onions until LeDonna found them in the basement - so we are now eating and loving them up! My favorite way to eat dilly beans is in bloody marys (I mostly do bloody mary mix and doctor it with all things pickled); and the onions are great on a salad, or just eat them as is. Yum. Now I need to make more! 

Here are both posts from 11/2020 ~

DILLY BEANS:


2 1/2 pounds fresh string beans
2 1/2 cups distilled white vinegar
2 cups water
1/4 cup salt
1/2 pound garlic cloves, peeled
1 bunch fresh dill weed
1 pound small spicy red peppers
3/4 teaspoon red pepper flakes, optional

Sterilize 6 half-pint jars with rings and lids and keep hot. Cut string beans to 1/4 inch shorter than your jars.

In a large saucepan, stir together the vinegar, water, and salt. Bring to a boil over high heat. In each jar, place 1 garlic clove, 1 sprig of dill, 2 red peppers, and 1/8 teaspoon of red pepper flakes. Pack string beans into the jars so the are standing on their ends.

Ladle the boiling brine into the jars, filling to within 1/4 inch of the tops. Wipe top rim of the jar so no moisture gets captured under the lid. Seal the jars with lids and rings. Place in a hot water bath so the jars are covered by 1 inch of water. Simmer but do not boil (approximately 180 degrees) for 10 minutes to process. Remove from the pot. Cool to room temperature. Tests jars for a good seal by pressing on the center of the lid. It should not move. When jars are cooled you should hear a "pop" to signal the lids are sealed. Refrigerate any jars that do not seal properly. Let pickles ferment for 2 to 3 weeks before eating.

notes: 
*I bought a 2 pound bag of beans and made the brine according to the directions and didn't have enough so had to make more. Because the original brine cooled down while making the additional, I dumped what liquid I had poured over the beans in the jars back into the pan so it would all be hot at the same time. 
*I couldn't find small spicy red peppers so omitted them. 
*I put 2 garlic cloves in each jar, along with the fresh dill, a pinch of mustard seeds, and the red pepper flakes. I read somewhere to lay the jars on their sides and lay the dill along one side before adding the beans - it looks pretty in the jar that way instead of laying at the bottom. 
*I got 3 (12 ounce) jars and 3 (8 ounce) jars from 2 pounds of beans.


original recipe from 'The Book of Doing' by Allison Arden

PICKLED RED ONIONS:

While on my pickling kick (along with cucumbers and green beans) I decided I'd like to try pickled red onions - very easy to do and I love them! You can add to sandwiches, chop up in chicken or tuna salad, put on salads or tacos, or just eat straight out of the jar hahahaha. Since I've never done it, and because Dave will not eat them, I didn't want to make too many jars for my first time - I found a small batch recipe and just made 2 small 8 ounce jars of them and I'm wishing I would have made more! Who cares if I have to eat them all by myself - I'm up for that challenge ;)


I changed the recipe a bit so am just going to tell you what I did:

  • 1 large red onion, thinly sliced 
  • 1/2 cup apple cider vinegar
  • 1/2 cup distilled white vinegar
  • 2/3 cup sugar
  • 1 T. pickling salt
  • 1 T. pickling spices (you can omit this, or add peppercorns or other spices)
                           

Follow standard canning methods, there is tons of info online for how to can - here's a couple basic things to know: 
*you want the jars sterilized and hot, either by running them in the dishwasher before starting to can (leave them in the hot dishwasher after the load has stopped so they stay warm) or immerse them in a large pot of boiling water for 5 minutes. I do this right in my big canning pot since you'll also need a hot water bath for processing the jars. 
*put the canning lids into a small saucepan with water and bring up to almost a boil. Turn off and leave covered so they are hot when time to seal the filled jars. 
*have a funnel, ladle, and a wet paper towel handy for filling the jars. 

1. Dissolve the vinegar, sugar and salt in a saucepan and bring to a simmer.
2. Add the onions and pickling spices or other spices if you're using to the saucepan and simmer on low for 5 minutes uncovered. Remove from heat. 
3. Using clean tongs, pack the onions into each jar. Add the spices from the pan if you're using.
4. Using a ladle, fill the space around the onions with the pickling brine, leaving about 1/2 inch head space.
5. Wipe the rim with a wet paper towel so it's clean, then add a lid from the hot water in the small saucepan. Screw in place with a ring.
6. Process for 10 minutes submerged in the large pot of hot water, make sure there's about an inch of water over top of the jars. Remove carefully with long tongs and set on the counter or a rack to cool - you'll know the jars have sealed when you hear my favorite canning sound, it's sort of a 'ping' or a popping sound. Cool completely.


11.10.22: msih buffalo chicken casserole

11.10.21: spinach salad with beets

11.10.20: TT storage wrap tip


11.10.16: baked egg cups

11.10.15: button earrings


Thursday, November 9, 2023

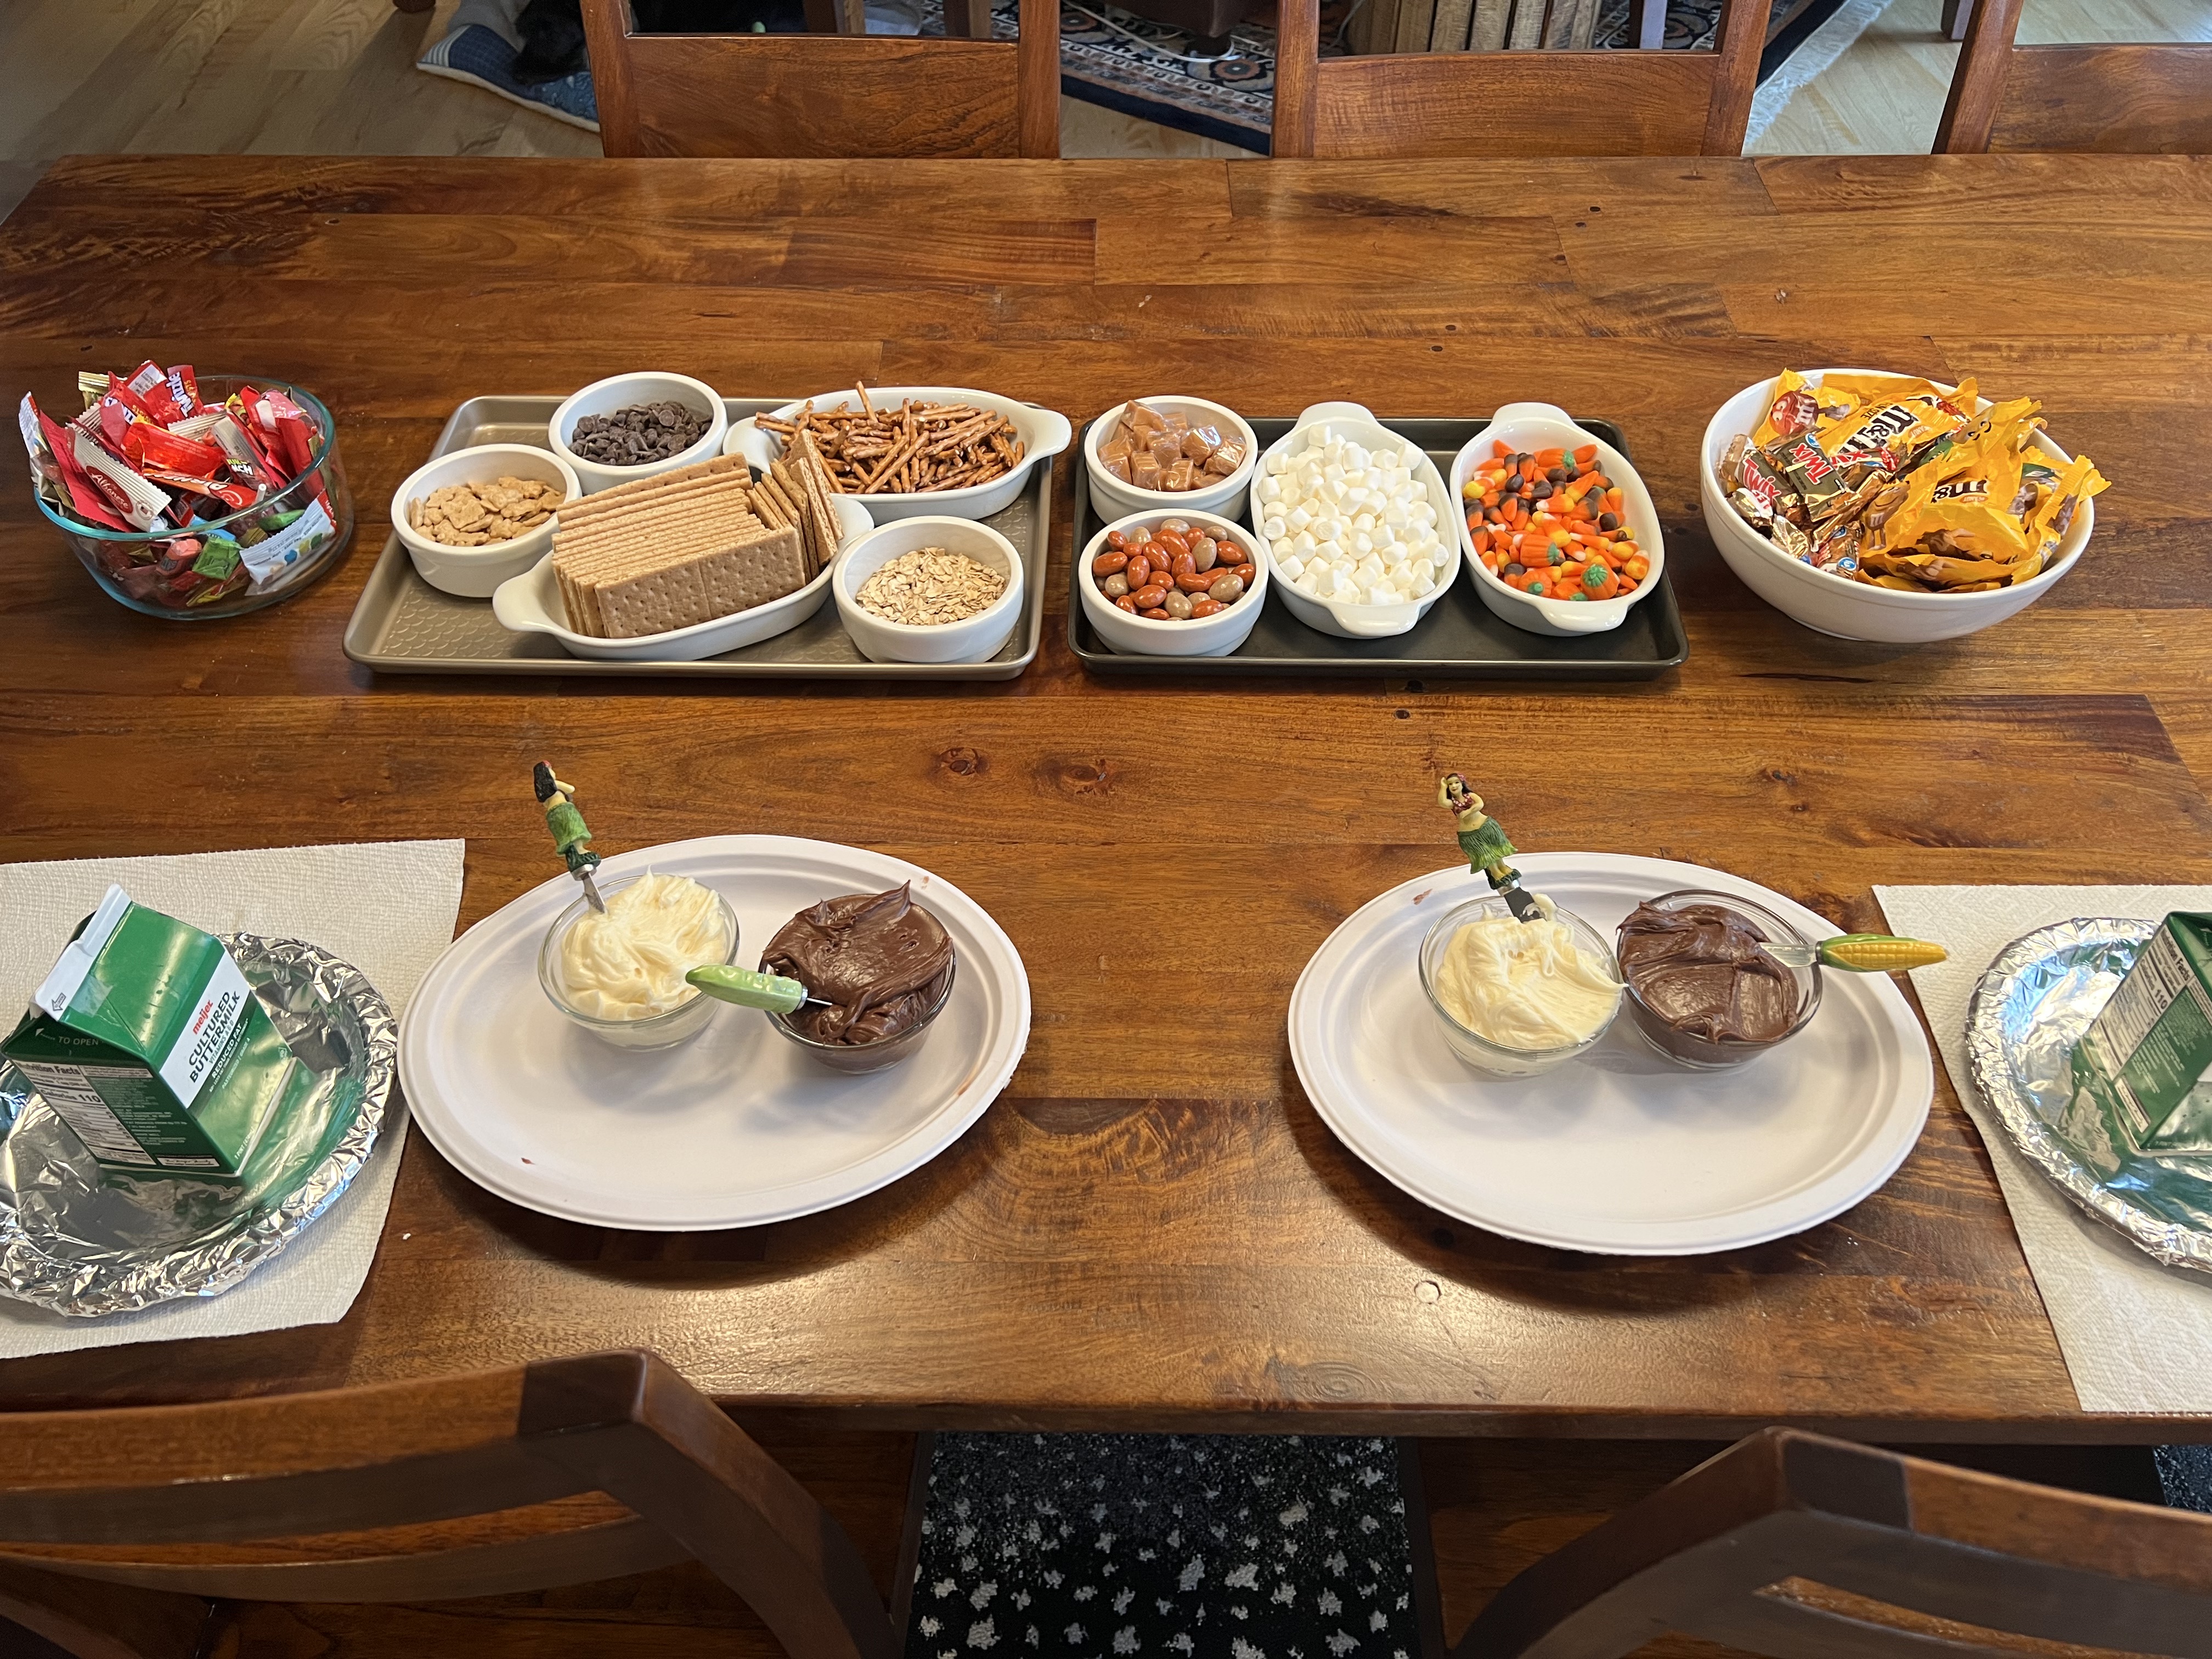
Thanksgiving Gingerbread Houses (part 2)

Here's the follow up pictures to yesterday's part 1 post about making gingerbread houses - the kids seemed to enjoy making them (Kade decorated his and then proceeded to eat all the decorations off of his house, even tho there were bowls of all of it in front of him LOL). 


Kade told me about a project they made at school building with toothpicks and marshmallows, he described how they did it and I attempted to build a simple rectangle - his directions were better than my execution hahahah. 


Wednesday, November 8, 2023

Thanksgiving Gingerbread Houses (part 1)

Oops, I forgot to schedule a post for today - so I'll share this (what I hope will be) fun project that I'm just setting up for Kayleigh and Kade to make this afternoon...Thanksgiving gingerbread houses. I emptied, rinsed, and dried 1 pint milk cartons and taped the flaps closed. I figure they can frost the cartons and stick on graham crackers for the house (or maybe they'll use pretzel sticks, or candied almonds or who knows what to make the houses). Then decorate with lots of candy and other goodies I have on hand like mini marshmallows, chocolate chips, teddy grahams, candy corn, candy pumpkins, and lots of leftover Halloween candy! Should be fun, right? And I'm assuming messy :)

I'll post pictures tomorrow and tell you how it goes! 


11.8.22: button storage

11.8.21: framed wedding keepsake

11.8.20: ðŸ”¥week 45

11.8.19: salmon 2 ways

11.8.18: green tomato muffins (don't be scared, they taste like zucchini bread!)

11.8.17: the school psychologist is in sign

11.8.16: dish washing tip

11.8.15: provencal summer vegetable bake


Tuesday, November 7, 2023

Tip-sy Tuesday: Halloween Candy Cookie Bars

Today's tip-sy Tuesday isn't really a tip, other than how to use up some leftover Halloween candy hahah. 
I haven't made these yet so I'll update after I do, but I wanted you to get this recipe before all of your Halloween candy is gone! I'm borrowing their picture and will add my own after I make them. 


  • 2 cup all-purpose flour
  • ½ teaspoon baking soda
  • ½ teaspoon salt
  • 1 cup butter, softened
  • 1 ½ cup packed light brown sugar
  • 2 eggs
  • 1 teaspoon vanilla
  • ½ teaspoon almond extract
  • 1 cup candy-coated milk chocolate and/or peanut butter pieces
  • 2 cup assorted Halloween candies, chopped if large

  1. Preheat oven to 350F. Line a 13x9x2-inch baking pan with foil, leaving about 1 inch of foil extending over the ends of pan. Coat foil with cooking spray, set aside.
  2. In a medium bowl combine flour, baking soda, and salt. Set aside.
  3. In a large bowl beat butter and sugar with an electric mixer on medium speed until light and fluffy. Add eggs, vanilla, and almond extract. Stir in dry ingredients and candy-coated pieces until combined.
  4. Pat dough into the bottom of the prepared pan. Lightly press remaining candy on top of the dough.
  5. Bake about 30 minutes or until edges are browned and center is set. Cool completely in pan on a wire rack. Use foil to lift uncut bars from pan. Remove foil and cut into bars. 

found here at bhg.com

PS: HAPPY BIRTHDAY MIMI!! 

11.7.22: mustard pretzel crusted chicken 

11.7.21: ðŸ”¥ week 45

11.7.20: pickled green beans

11.7.19: MSIH: pumpkin chili


Monday, November 6, 2023

Crockpot Beef Stew - v2

I made beef stew in the crockpot last week, when I looked for my recipe I found that I've posted 2 different versions so I decided to combine parts of each into what turned out to be fantastic stew! Figured I'd share since we liked it so much - this will now be my go-to recipe. 

Click on each of the links below to see the separate recipes, both are great on their own -  I'll give you what I did this time. 

crockpot beef stew

beef and beer stew 

Crockpot Beef Stew (version 2) 

  • 3 lbs bottom round, trimmed, cut into 6 large pieces
  • 1 cup flour
  • salt and pepper 
  • 1/3 cup olive oil
  • 1/2 onions, diced (add more if you like onion, Dave doesn't so I go easy with it)
  • 8 oz. mushrooms, sliced or quartered
  • 6 oz. can tomato paste
  • 1 (15 oz.) can diced tomatoes, don't drain
  • 1 cup red wine
  • 1 lb. potatoes, cut into 2" pieces
  • 1/2 lb. baby carrots
  • 1 T. brown sugar
  • 1 Tablespoon salt, or to taste
  • 1 teaspoon pepper, or to taste
  • 1 teaspoon thyme
  • 1 bay leaf
  • 1 cup frozen peas

Coat beef in flour. Season with salt and pepper. Heat oil over med-high, brown meat on all sides. Put in 4 to 6 quart crock pot. Add onions and mushrooms to skillet, cook a few minutes until onion is translucent and mushrooms are browned. Stir in tomato paste, diced tomatoes and wine until the tomato paste is fully incorporated, transfer to cooker. Stir in all remaining ingredients except peas; cover and cook on low heat 7 1/2 hours or high for 4 hours. Break the meat into smaller bite sized pieces if they are still in large chunks. Add peas and heat thru. Remove bay leaf before serving.


Sunday, November 5, 2023

🔥 Around the Campfire (week 45)

Dear Campers ~ 

Here's a quick recap in case you missed anything at camp last week:

Posts ~

10/29: 🔥 week 44

10/30: crockpot macaroni and cheese 

10/31: Happy Halloween 

11/1: Lucy's birthday

11/2: crockpot meatballs in mushroom sauce

11/3: MSTI: meatballs and mac n cheese

11/4: words

What's Cooking ~

That's it for this week! See you next week for more projects, crafts, recipes, whatever we can think of to make at camp - bye :)

Sincerely ~

Jill
camp counselor


Friday, November 3, 2023

My Sis Tried It: Mish-Mash?

This past week I've posted crockpot mac and cheese, and crockpot meatballs in mushroom sauce - today Jen wrote a 'My Sis Tried It' post regarding the 2 of them:

So this is another addition of “Sissy tried it“ but let me be clear that I did not think it was a good idea at all. Let me go back. We had a party last weekend so everyone could meet baby Georgie. As usual, everyone brings a dish to pass so we have an assortment of delicious goodness. My contribution as it was at my house had to be some form of main dish. This time I made Swedish meatballs in the crockpot. They were delicious if I do say so myself anyway, my sister made macaroni and cheese. (Which I’m sure the recipe is on this blog somewhere- and it was delicious). That should be the end of the post however, my sister let me know that her husband mixed these two delicious things together. My meatballs and her macaroni and cheese. The question I would ask would be why. Like, these are two delicious things on their own. Why would they need to be mixed? Anyway, I told my sister that I would give it a try and let her know what I thought. So, you would think mixing two delicious things together would make one even more delicious – but in this case that is not true. It did nothing to improve either of the two dishes and they were far far better individually. So- an entire post to let you know to try my meat balls and also to try my sisters Mac n cheese. But not together.


Jill here: I'm surprised this wasn't a winner, sounded good to me - seems like it'd taste sort of like cheesy stroganoff haha! 

11.3.20: TT: pumpkin spice cookies
11.3.18: Jane's candied bacon (yum!) 
11.3.17: make a button bouquet


11.3.2016: fall paper chain garland


11.3.2015: fall wreath


Thursday, November 2, 2023

Crockpot Meatballs in Mushroom Sauce

Jenny made crockpot meatballs for our Georgie party last week - I love anything mushroom and this sauce did not disappoint, it's so good! I forgot to take a picture since I was too busy eating them and fighting to hold the baby hahah! Picture meatballs in mushroom soup - actually that description doesn't do justice hahah, they looked good and tasted great! Here's what she did (in her words): 

Put frozen meatballs in a crockpot, top with one big can mush soup and one regular can. So however many ounces that is. Lol. Then added 8 oz of light sour cream. Cooked high for 4 hours then turned down to low for the last 2.

click here for another post titled 'Easy Swedish Meatballs'


11.2.22: yarn storage


Wednesday, November 1, 2023

Lucy's Birthday

Happy November! Gosh October flew by and I didn’t even realize today is November 1st which is Lucy’s 44th birthday - I totally forgot to get her a gift 🤦‍♀️ Lucky for me, she’s a parrot haha - and while she’s very smart she can’t read and doesn’t know the date lol. In honor of her b-day, here’s a re-run post of something I made her back in 2019:

Lucy is an aggressive newspaper ripper-upper. If there was a contest for shredding paper she'd win for sure - I always compliment her on what a fine mess she's made and what a good nest builder she'd be LOL. To try to get her to stop ripping the papers that line her cage (which makes a big mess of bird poop, fruit, veggies, and newspaper shreds! Disgusting...) I made her a hanging paper braid hoping that'd be more interesting. She loved it - Dave said I'm just encouraging her to shred paper but I think it's a good distraction and she enjoyed it... it still made a big mess of course  but at least it was a clean big mess!


Cut strips of newspaper, clip a few strips together at the top. Braid until about 6" to go and then add in additional paper strips - along the lines of french braiding your hair if you know how to do that. Braid until it's long enough to form into a circle then hold closed with a short cable tie (or twine). I made two circles and joined them together, then hung in her cage. Cheapest bird toy short of pepper tree sticks, q-tips, or any of my stuff that she grabs off the counter before I can stop her!