Sunday, March 31, 2019

Around the Campfire 🔥 (week 13)

Dear Campers ~

Here's a quick recap of what happened at camp this week in case you missed anything!

chocolate covered strawberry "carrots"
Posts ~  
3/24: around the campfire (week 12)
3/25: 3 strand morse code bracelet
3/26: Tip-sy Tuesday: the front tuck
3/27: pickle cupcakes
3/28: silverware pouches
3/29: how to add symbols and text to photos
3/30: easy brown rice mushroom risotto

No menu planning this week, I've been super busy with Tesha and Kayleigh visiting and haven't really cooked much!

Miscellaneous stuff keeping me busy (in addition to entertaining the kid!)  ~
  • read 2 old books by John Sandford (written under John Camp); read "The Husband's Secret" by Liane Moriarty and loved it!
  • took out everything from under the bed (we have long under bed storage bins holding scarfs, hats, big sweaters) and sorted/tidied it up. I know you aren't supposed to store stuff out of sight like that, but we are lacking closet space so under bed storage is super useful for us. 
Gotta run, Kayleigh wants to color :) Hope to see you this week at camp!


Sincerely ~


Jill
camp counselor and coloring fool

Saturday, March 30, 2019

Brown Rice Mushroom Risotto

I love risotto. Like love love it. If you don't like rice don't automatically think you won't like risotto because after wine, stock, butter, and cheese have slowly been stirred in it becomes something so not like plain old rice. It's thick, creamy, so flavorful, and the options for add-ins are endless. Having said that tho - if you've never made risotto I'm going to warn you that it isn't usually quick and hands-free...traditionally you stand at the stove and stir in about 1/4 cup of stock until it's incorporated, then another 1/4 cup of stock until it's incorporated, then repeat a whole bunch of times until a few cups of stock (or broth) have been absorbed. It's quite the labor of love and I don't have the time or patience to make it often. Until I saw this recipe for "easy" brown rice risotto; after reading the directions I thought if this works then we can have risotto waaaaay more often - and since it's made with brown rice it's a bit healthier which doesn't hurt!

You can find the original recipe here, I changed it just a bit and am giving you how I did it:

Ingredients:

  • 3 T. olive oil, divided (that means you don't use it all at once)
  • 1 small yellow onion, chopped
  • 1 teaspoon garlic, minced 
  • 4 cups chicken stock or broth, divided
  • 1 cup water
  • 1 1/2 cups brown arborio or short-grain brown rice (note: don't use long grain)
  • 16 oz. sliced Cremini (baby portobello) mushrooms
  • 1 cup grated parmesan cheese
  • 1/2 cup white wine
  • 3 T. unsalted butter, cut in small cubes
  • coarse salt
  • coarse ground black pepper
Directions:
  1. Preheat oven to 375' with a rack in the middle of the oven.
  2. Heat 1 T. olive oil in a medium Dutch oven over medium heat, add onions, garlic, and a pinch of salt. Cook, stirring occasionally, until the onions are translucent and browned.
  3. Add 3 cups chicken stock or broth and 1 cup water, cover and bring to a boil over medium-high heat. Remove from heat and stir in the rice. Cover the pot and bake until rice is tender and cooked through, about 65-70 minutes. Don't worry if it looks dry when you take the lid off, once you add the other ingredients it'll all work out. 
  4. Meanwhile, while the rice is baking, prepare the mushrooms. Warm 2 T. olive oil in a large skillet, add the clean sliced mushrooms to the pot with a dash of salt. Cook, stirring occasionally, until the mushrooms are darker in color and have soaked up most of their own juices, about 13 minutes. Add the frozen peas and let the veggies hang out until the rice is done.
  5. Once the rice is tender, remove the pot from the oven. Pour in the remaining cup of broth, the parmesan, wine, butter, salt and pepper to taste. Stir vigorously for 2 to 3 minutes, until the rice is thick and creamy. Stir in the mushroom and pea mixture, and any remaining juices. Season to taste with salt and pepper. If the mushrooms and peas have cooled off before you add them to the rice, pop the pot back onto the stove top and heat over medium until everything is hot again. 
  6. Divide into portions, add additional parmesan if desired. 
after 65 minutes the rice is cooked and removed from the oven, the
mushrooms and peas are cooked and standing by...
add the butter, remaining broth, parmesan, wine, salt and pepper...
add the veggies and stir to combine.


This would be a great meatless Monday meal if you use vegetable broth or water instead of chicken!


Happy moment ~ the few minutes you're awake before the 5 year old wakes up :)


Friday, March 29, 2019

Adding Symbols and Text to Photos

I just learned how to do this and I'm kicking myself for not figuring it out a long time ago - it's going to make my blog photos so much better! In the past if I wanted to point something out in a project or recipe I'm making I had to take pictures with one hand while pointing with the other, or made little videos if I needed both hands - now I can add arrows or text right on the pictures to help explain what I'm doing. Yay!

before...
...and after!

Here's how (at least here's how on my 2018 Mac laptop, not sure how to do it in other programs):

Drag the photo out of Photos and onto the desktop. Double click on it to open in Preview.

Click on Tools, scroll to annotate, scroll to symbol you want to insert - in my case it's an arrow. The arrow shows up in the middle of the screen with small dots on either end, use those to move and resize the arrow. You can change the color of the arrow by clicking the outlined square box in the tool bar.


To add text, click on the T in the tool bar (T for text) and a text box will appear. You can change the font and size of the font by clicking on the A in the tool bar. Then type whatever you want in the text box, move it to where you want it in the photo.


You can also freehand draw or sketch by clicking the pencil icons on the left side of the tool bar (that's where my smiley came from).

3.29.18: butternut bunny


3.29.17: Mark's cowboy casserole 


Happy moment ~ swinging with a 5 year old

Thursday, March 28, 2019

Silverware Pouches

Before I put away my sewing machine and ironing board that have been set up in the dining room for days and days, I looked around to see if there was anything else I wanted/needed to sew -  they don't make an appearance very often so now's the time! I have an extra set of silverware that I've been storing in plastic sandwich baggies and thought it'd be nice if they were in little pouches in the drawer instead of the ugly baggies, so whipped up a few fabric pockets to keep the extras in...very easy and looks so much better. 

Before.. the extra silverware is in the baggies to the left of the knives -
it actually looks neater in this picture than it does in person.

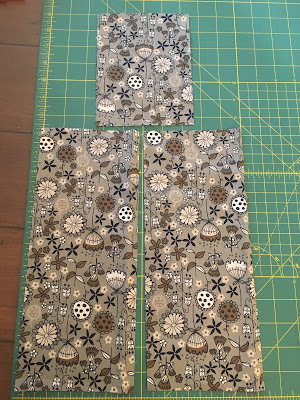
All I did was cut two long, narrow pieces of fabric and one shorter 
piece that is the same width as the two longer pieces.

Turn the top edge of the shorter piece under (making a hem) and sew to one of the longer pieces, similar to how I did the fabric wallet (click here for that post) only sewing around the three sides where the two pieces of fabric are joined together.

Put the two long pieces together, right sides touching, and sew them together leaving a gap for turning the pouch right side out. 

After turning them right side out and getting the corners as sharp as you can, top stitch around the entire pouch. I made different sizes for the different utensils - taller for knives, forks, and big spoons, and shorter for little forks and spoons.

After - this looks so much nicer!

3.28.18: spring flower upside down wreath
3.28.17: DIY mod podge
3.28.16: make a zipper bracelet

Wednesday, March 27, 2019

Pickle Cupcakes

Pickle...whaaaah? Cupcakes! Yes, I said pickle cupcakes. Cassandra sent me the recipe and of course my first thought was "well that's disgusting" but the recipe got really good reviews, only makes 12, and I had all the ingredients on hand so I made them...and they are most definitely not disgusting!


I asked everyone to guess what flavor they were tasting and no one got it - there were lots of people thinking some kind of fruit, or coconut, someone said aloe vera...after I said pickle it was decided that  you could actually taste the pickle and only one person said she hated them. Others were ok with them, and a few really liked them. So you decide if you want to surprise people with pickle cupcakes! Even if you don't, keep this frosting recipe on hand - it's unanimously a winner. In fact, the one person who hated the cupcakes kept sticking her fingers in the frosting, so she didn't in fact "hate" the whole cupcake hahaha! It's cream cheese buttercream with bourbon - delicious!


The recipe says to bake 20-25 minutes, I pulled mine out at 18 and wish I would have checked them sooner - they are a tiny bit on the dry side. They also turned out pretty dense and heavy, I like the flavor but not 100% sure about the texture - if I'm going to eat cake I like the fluffy whipped creamy melt in your mouth kind.

The recipe doesn't say if it's dill or sweet pickles, I went by the reviews and did dill but made sure mine didn't have garlic or other flavors - cuz that sounds bad. I also didn't garnish the frosting with a slice of pickle as recommended - cuz that also sounds bad.

Ingredients:

  • 1 1/2 cup flour
  • 1 1/2 teaspoon baking powder
  • 1/2 teaspoon salt
  • 1/2 cup unsalted butter, softened
  • 1/2 cup sugar
  • 1/2 cup sour cream
  • 2 eggs
  • 1/4 cup pickle juice
  • 1/4 cup chopped pickles

  • 1/2 cup butter, softened
  • 8 oz. cream cheese, softened
  • 2 cups powdered sugar (note: I added more to make it thicker)
  • 3 Tablespoons bourbon  (note: I added all of like the recipe said but it made the frosting too thin, add 2 Tablespoons and see if you need more)
  • pinch of salt
  • pickle slices, for garnish (optional)
Directions:
  1. Preheat oven to 350'. Put 12 cupcake liners in a regular sized cupcake pan. 
  2. In a medium bowl, whisk together flour, baking powder, and salt. In a large bowl, cream together butter and sugar. Add the eggs and beat until combined. Add sour cream and pickle juice, and beat until evenly mixed. Then stir in the flour mixture and chopped pickles until just combined.

3. Divide the batter between the 12 cupcake liners, about 1/4 cup each. Bake until a toothpick inserted into the middle of the cupcake comes out clean, about 20 to 25 minutes (note: that was too long - I did 18 minutes and even that was a couple minutes too long). Let cool completely.


4.Meanwhile, make the frosting: in a large bowl, beat together butter and cream cheese until light and fluffy. Add the powdered sugar, bourbon and salt, beat until smooth. 
5. Spread or pipe frosting onto each cupcake, garnish with a pickle slice if you want.


Makes 12 cupcakes - click here for original source of recipe


3.27.17: K-cup blue birds


3.27.16: 2 Easter/spring flower arrangement ideas


Happy moment ~ see my helper under the drawers? 


Tuesday, March 26, 2019

Tip-sy Tuesday: The Front Tuck

I'm sure you guys already know this little trick - but I was wearing this lazy-girl outfit the other day and thought I'd show you how I made a very long sweater a little more flattering by simply tucking the front in a bit. I usually do it a little off-center and just tuck a bit of the hem into the top of my waistband. This way you can see a little more shape under what is a very big loose sweater - I'm short and lots of times these big shirts make me look like I'm wearing a muumuu.  I did not invent this trick but I do it all the time!

I call it my lazy-girl outfit because all day long I wore these gray jeans which are actually stretchy pants made to look like jeans so they are super duper comfortable. I've even worn them to tap class they are so stretchy! We were going out for dinner and I was too lazy to change so just added knee-high boots, a big ol' sweater, and silver hoops. Looks like I tried but really I didn't.


Monday, March 25, 2019

3-Strand Beaded Bracelet

Here's a different morse code bracelet - you didn't think I stopped making these, did ya? Cuz I still love them - love making them, love wearing them, love giving them, and love the secret messages!


I've never made a bracelet using these multi strand connector bar spacer things - the only hard part was getting the three strands the exact same length so they lay evenly between the two ends.

To make this 3-strand bracelet I cut a length of beading string long enough for the bracelet plus a few inches for tying off. Tie the thread to one of the loops on a connector, add a bit of glue and then put a crimp bead over the knot and carefully smash the bead. I cut the thread a couple of times smashing the crimp bead too hard, it pinched the thread right off - so even tho it's an oxymoron you need to gently smash the crimp bead. Add the beads in the order you want and connect to the other connector at the other end of the bracelet. Run the loose tails back thru a few beads to hide it. Repeat with the other 2 strands; attach a clasp to one connector and a jump ring to the other to close.


3.25.18: glazed baked ham and pineapple stuffing

Happy moment ~ sun rays (aka: Jesus rays) 


Sunday, March 24, 2019

Around the Campfire 🔥 (week 12)

put a small glass vase of flowers in a large glass vase and fill the space between with jelly beans, candy grass, and peeps for a fun Easter flower arrangement. make my day camp Jill Pasant
put a small vase of flowers in a large
glass vase; put jelly beans, candy
grass, and peeps in the space between
the two vases. 
Dear Campers ~

Here's a quick recap of what happened at camp this week in case you missed anything:

Posts ~

3/17: around the campfire (week 11)
3/18: hanging jewelry holder
3/19: tip-sy Tuesday: sewing on vinyl 
3/20: peanut blossom cookies
3/21: Hello Fresh update...by Jen
3/22: home workout plan
3/23: herb-crusted baked chicken

What's cooking ~
  • corned beef and cabbage dinner (why do we only eat corned beef at St. Patrick's Day? It turned out SO good we ate all of it and didn't have any leftovers for the next day - next year I'll make more!)
  • grilled chicken, my standard black bean/corn/tomato/avocado in olive oil with southwest seasoning salad
  • grilled steak, caesar salad, sautéed mushrooms
  • grilled ahi tuna, steamed rice, roasted broccoli
  • pork tenderloin, roasted white beans with tomatoes and feta, shredded kale salad
Miscellaneous stuff keeping me busy ~
  • read Homebody by Joanna Gaines (mostly for the pictures!),  and Big Little Lies (I never saw the show but loved the book - have you read it?)
  • made another small fabric wallet, this time in more subtle colors and a little heavier weight fabric, I've been using the bright colorful one I made and love it. It's so lightweight and small that I can fit it in my pocket, my grocery store tote, and it's helping to keep my purse lighter which is always a plus.
Hope everyone had a great week! Check back often to see more fun projects, recipes, whatever I think up to keep myself busy.

Sincerely ~


Jill
camp counselor who is sore from starting that 12 week workout plan

Saturday, March 23, 2019

Herb-Crusted Buttermilk Baked Chicken

I don't have an actual "recipe" for this, I just winged it (hmmm - it's chicken and I winged it...) and it turned out so good and easy I thought I'd share. Perfect for a quick weeknight meal, if you plan ahead more than I did you could soak the chicken in the buttermilk anywhere from 30 minutes to a few hours and that would make the chicken even moister - but even without marinading it turned out moist, crunchy, and flavorful. Almost like having fried chicken without all the extra calories. 

                     marinating and dipping chicken in buttermilk before covering with panko crumbs and baking makes for juicy flavorful tender chicken.

Simple: all I did was dip boneless chicken breasts in buttermilk seasoned with coarse pepper and a little tabasco sauce, then dredged in panko breadcrumbs mixed with grated parmesan and thyme. 

Line a baking sheet with foil to catch any drippings, then put a browning pan (or any pan that has holes in it, I used the one that came with my toaster oven) on the baking sheet and spray with non-stick cooking spray; lay the chicken breasts on the top pan. My thought is the second tray with the holes helped the crumbs not get quite as mushy as laying them straight down on the foil. It'll work just fine tho if you don't do the second pan thing! 

Bake at 400' until the chicken is cooked thru and the crumbs are browned and crispy. The bake time will change depending on how thick your chicken is, if you have a meat thermometer you want the chicken cooked thru to 165'. 


note: this would (obviously) cook faster and more evenly if I'da pounded the breasts to flatten them out...but I didn't. And it was all good!


3.23.18: perler bead Easter eggs
3.23.17: a laugh
3.23.16: Easter side dishes - pineapple stuffing, creamed new potatoes, roasted carrots


Happy moment ~ finished a time consuming task, feels so good!

Friday, March 22, 2019

12 week Home Workout Plan

Guys. Summer is coming. I'm realistic enough to know I probably won't follow this workout plan exactly, but will give it a go. 12 weeks is just about long enough before it's time to put a swimsuit on (I'm making Jaws scary movie sound track sounds right now - duunnn dunnn...duuuunnnn duun...dun dun dun dun dun dun dun dun dun dunnnnnnnn dunnnnn....), I'm not wearing a suit like the one in this picture (yikes) but just the thought of my plain old one-piece is making me nervous...saw this plan online, it's a little hard to read so I'll type it out for you in case you want to join in.


Monday:                                                
20 squats                                                
15 second plank                                     
25 crunches                                            
35 jumping jacks                                   
15 lunges                                               
25 second wall sit                                  
10 sit ups                                                
10 butt kicks                                           
5 push ups   

Tuesday:
10 squats
30 second plank
25 crunches
10 jumping jacks
25 lunges
45 second wall sit
35 sit ups
20 butt kicks
10 push ups

Wednesday
15 squats
40 second plank
30 crunches
50 jumping jacks
25 lunges
35 second wall sit
30 sit ups 
25 butt kicks
10 push ups

Thursday:                                              
35 squats                                               
30 second plank                                    
20 crunches                                           
25 jumping jacks                                   
15 lunges                                               
60 second wall sit                                 
55 sit ups                                               
35 butt kicks                                          
20 push ups   

Friday:
25 squats
60 second plank
30 crunches
55 jumping jacks
60 lunges
45 second wall sit
40 sit ups
50 butt kicks
30 push ups   

Saturday and Sunday: REST! (yay)                                    


They have sprint/jogging intervals for weekly cardio listed at the bottom of this plan which I'm not going to do. I'll get my cardio by power walking, biking, and tap classes.

PS: it should go without saying, but I'll say it anyway - don't do any of these exercises if they hurt or you shouldn't be doing them for some reason! I'm just sharing what I'm hoping to do, you do what you need and are capable of - listen to your body.


3.22.18: how to cook spaghetti squash
3.22.17: creating a gallery wall
3.22.16: fold napkins into bunny ears


Happy moment ~ thinking ahead to Saturday and Sunday rest days!


Thursday, March 21, 2019

Hello Update...by Jen

Hello Update! Hope everyone is feeling FRESH!  (hear what I did there?)

Just wanted to give a quick update for my Hello Fresh review. 

I made the other 2 meals this week (first meal was in my initial review - Garlic Herb Tortellini).
Meal 2 was Beef Bulgogi Bowl and 3 was So Delizioso Chicken Cutlets.

So I can't pronounce the beef one but I picked it because the Hello Fresh site said it was in their “Hall of Fame”.  I can see why, because this one was delicious.  Instructions were far easier for me to follow and the beef was fantastic.  So good. Still took longer than they said it would but didn’t have as many steps, nothing I had to google and/or hit up my sisters blogs to find out how to do.


Last meal was So Delizioso Chicken Cutlet.  How can you go wrong when a form of the word “Delicious” is in the name?  Oh also it came with cheesy mashed potatoes.  What’s not to like?   Let me answer my own question.  What’s not to like? Boiling and mashing potatoes on a Wednesday night after a long day of work.  Who has that kind of time?  Marinating Chicken? Boiling Potatoes, Making a sauce?  Uggggggg..  Exactly what I didn’t like about day one.  A lot of steps for a random week night.  But was it Delizioso?  It was good.  Was it worth it after a long day of work? No.


So that said - I’m going to take my free trial and run, still not signing up. I still think this is a bit pricey (and no leftovers all week) and a lot of steps for a non-cooking sister like me (especially after working all day). 

All in all it was a fun experience, the food did taste delicious, and it was nice to eat something different every night. I did discover though there is a reason I hate cooking besides that I am bad at it; the reason is because I hate it. 

From now on I’ll just continue what is working for me so far- which is begging my sister to cook for me.


3.21.18: coffee and cookie brownies
3.21.17: watch Mark from Paul's Photo talk about framing your photos and prints
3.21.16: 2 different bunny cakes for Easter and Spring


Wednesday, March 20, 2019

Peanut Blossom Cookies

I haven't been baking many sweets lately because we don't want them in the house - I don't have much of a sweet tooth but I do love cookies! Dave annoyed me by flaking on his "man-day Monday" segment so I told him I'm making cookies with nuts in them on purpose so he can't eat them (allergies) as his "punishment" hahahah. Just kidding, that'd just be mean and he will do his video for next Monday so all good. Really I just felt like making peanut butter cookies and have this old recipe in my files that I cut out of an ad in some magazine...


8 oz. Hershey's Kisses
1/2 cup shortening
3/4 cup peanut butter, creamy or chunky
1/3 cup granulated sugar
1/3 cup brown sugar
1 egg
2 Tablespoons milk
1 teaspoon vanilla extract
1 1/3 cups flour
1 teaspoon baking soda
1/2 teaspoon salt
granulated sugar for rolling

1. Heat oven to 375'. Remove wrappers from Kisses.
2. Beat shortening and peanut butter in large bowl until well blended. Add 1/3 cup granulated sugar and brown sugar; beat until fluffy. Add egg, milk, and vanilla; beat well. Stir together flour, baking soda, and salt; gradually beat into peanut butter mixture.
3. Shape dough into 1-inch balls. Roll in granulated sugar; place on ungreased cookie sheet.
4. Bake 8 to 10 minutes or until lightly browned. Immediately press a Kiss into center of each cookie; cookie will crack around edges. Remove from cookie sheet to wire rack. Cool completely. Makes about 4 dozen cookies.


my notes: I used almond kisses, smooth peanut butter., and coarse salt. The dough is a little crumbly but holds together when you shape it into balls. I used a small cookie scoop and experimented with (a) just releasing the dough from the scoop right into the sugar (it has a flat bottom that way) or (b) rolling the dough in my palms to form smooth balls. Both ways resulted in round cookies. The cookies are pretty crumbly when baked but the flavor is good, not dry. I liked the combination of the crunch from the almond Kiss and the smooth cookie texture - I don't think I'd like the nuts in the Kiss with chunky peanut butter in the cookies. My batch yielded 45 cookies.

left =  balls I rolled in my palms,
right=  dropped from the cookie scoop into the sugar...

outcome is the pretty much the same. 


3.20.18: Dottie F. Bunny (Mary knitted it for me!)
3.20.17: how to hinge mat your photos or artwork
3.20.16: boneless coq au vin

Happy moment ~ a heart shaped rock


Tuesday, March 19, 2019

Tip-sy Tuesday: Sewing On Vinyl

I've been sewing quite a bit lately and this tip really came in handy when I made my sketchy jewelry hanger (click here for that post). Vinyl tends to stick when going thru the needle - to help things run smoother just put tape on the underside of the presser foot and on the needle plate (the metal parts where the vinyl might stick), leaving an opening where the needle goes up and down thru the material.

above photo - I have taped left and right of the needle on the plate...
and am removing the presser foot by unscrewing it with the little
screwdriver that came with my machine
after removing the foot...
...turn it over and put tape on the bottom of the foot, leave a
space for the needle to go thru the material without having
 to go thru tape  Reattach the foot and tighten with the screwdriver. 

click here for the original source of this idea

3.19.19: crocheted bunny


3.19.18: zucchini and quinoa cakes
3.19.17: vodka gimlet

Happy moment ~ every bit of the laundry done and put away


Monday, March 18, 2019

Hanging Jewelry Holder

Funny how an inspiration or idea sets the wheels in motion, but then the project completely changes and takes on a life of it's own - this time it happened because of my laziness I decided to take a few shortcuts! I initially was going to make the hanging jewelry holder inspired by this project - I didn't end up making the jewelry holder at all like she did, but I did use her guideline how to make the little pleats so the pockets are fuller instead of being flat against the fabric like an envelope.


Yes this is a somewhat gerry-rigged jewelry holder but guess what? It's for the RV and no one (except you guys that is) will see it - and I don't care if it is a little crafty-homemade, it totally works for what I need it to do...which is hold all the little bits of jewelry and odds and ends that were starting to pile up in the very small drawer beside the bed...and I could not care less that I didn't make it all super professional and fancy looking - I saved loads of time and got the same outcome.

If you can't tell by this first photo, I basically sewed some vinyl strips to a hand towel and clipped it to a pant/skirt hanger. This sounds really lame now that I'm saying it out loud...oh well!

I'm betting no one will be making my hanging towel/slash/jewelry holder but on the off chance you do - here's what I did:


First, figure out how many rows of pockets you want, and what size. I did 2 rows of shorter 3" pockets for smaller things like earrings, and 1 deeper 5" row for bigger bracelets, etc. and I folded the bottom of the towel up about 5" to create 3 bigger pockets that you can't see thru (I can hide things in there I don't want to be visible!). Then cut strips of clear vinyl the width of the towel plus a few inches for making the pleats. Sew bias tape to the edges of each strip.


Fold up the bottom edge of the towel about 5" and pin in place. Lay the vinyl strips on the towel and figure out how many pockets you want in each row and how far apart you want to space each row. For the deeper pockets I only did 3, the smaller pockets have 4 in each row. Pin both edges of a strip to the edges of the towel, then pin in the pocket pleats along the bottom edge of the strip - see the above link if you want to see lots more photos. I just winged this part after seeing what she did. Basically just make little folds on either side of each pocket and pin in place, once you have all the pleats pinned sew down the sides and across the entire bottom edge of the vinyl strip. Then sew a straight line between each pocket. I'm sorry I didn't take more photos of this step! 


Finish attaching the other vinyl strips and making the pockets. Sew the bottom folded portion in place and straight lines down thru the pouch to create the bottom pouches.


Voilá - one perfectly acceptable and useful travel jewelry holder now hangs in my RV closet - I've also organized other things with Command hooks for hats and little purses; a 3 drawer plastic dresser thing for sweatshirts, shoes, and bathing suits; and 1/2 of a hanging shoe holder I'm using for other things like sunglasses, knit hats, etc. 


3.18.18: corned beef and cabbage soup (use those leftovers!)
3.18.17: wine bottle storage using ABS drain tiles or PVC pipe
3.18.16: duct tape pencil holder (kid craft)


Happy moment ~ butterflies in our neighborhood. like millions of butterflies. they're everywhere  - google butterfly migration in Southern California, it's a real thing - I've never seen anything like it!