Thursday, March 2, 2023

Starch Madness: French Bread Pizza

I saw a recipe for 'The Best French Bread Pizza' at seriouseats.com (coincidentally the home of 'starch madness') and was intrigued by the preparation; as I had a loaf on hand (I bought to make sandwiches but didn't end up using) I figured what the heck let's try it. French bread pizza has never been a favorite of mine, I prefer thin crust and don't usually like how thick French bread is - but I have to say, this turned out great and Dave and I both loved it. 

I changed the recipe from the original one but followed the technique of squishing the bread down and pre-baking it - pre-baking really helped to keep the bread crunchier once topped with sauce. Normally I'd just use jarred pizza sauce but in the original recipe he used a can of doctored crushed tomatoes, I went with tomato sauce instead because my store didn't have small cans of crushed (and I have tomato sauce in the pantry). The original recipe calls for making garlic butter to brush on the bread, I went easier and spread some butter/olive oil/sea salt combination (Land O'Lakes) then sprinkled with garlic powder. 

The first half of the listed ingredients below don't have amounts because I just used however much it needed to spread butter on the bread and then sprinkled with thee spices, and salt to taste. Same thing with making the sauce - I just added a little olive oil, Italian seasoning and salt until it tasted good. 

One last thing - the original is just cheese, I added diced ham and canned mushrooms to boost it a bit for dinner.

See the original recipe for more notes and how it was 'meant' to be made!

  • butter, softened (or the above butter combination mixed with olive oil and salt)
  • garlic powder
  • red pepper flakes
  • dried oregano 
  • Italian seasoning blend
  • salt 
  • 1 loaf French or Italian bread, about 18" long and 4" wide
  • 1 can tomato sauce
  • 8 oz. shredded mozzarella
  • 1/4 cup grated parmesan
  • 1/4 cup finely chopped Italian parsley leaves
1. Adjust the oven rack to the upper part and preheat oven to 425'.

2. Slice the loaf lengthwise and then in half, for a total of 4 pieces. Place cut-side up on a clean work surface, lay a rimmed baking sheet across all 4 pieces and press down evenly until the bread is compressed to about 2/3rds of its original height. Place the squished bread on the baking sheet and spread the cut-sides with butter. Sprinkle with garlic powder, red pepper flakes, dried oregano, and salt to taste.

3. Top the bread with 1/4 of the shredded cheese evenly over the surface, bake until the cheese is barely melted, about 6-8 minutes. Remove from the oven and set aside. 

4. Put the tomato sauce in a small bowl and drizzle with a little olive oil and some Italian seasoning, stir well to combine. Add salt to taste.

5. Spread sauce evenly over bread, then spread remaining cheese on top. Bake until the cheese is melted and just starting to brown, about 10 minutes. Remove from oven and immediately sprinkle with parmesan, drizzle with a little olive oil, sprinkle chopped parsley on top. 

Makes 3-4 servings


3.2.21: TT no stick foil tip

3.2.20: breaded baked eggplant

3.2.19: arugula with pancetta salad

3.2.18: Gracie's watercolor mermaid

3.2.17: two bean salad with mustard vinaigrette  (recipe includes a couple starches)


Wednesday, March 1, 2023

Starch Madness: Starchy Foods

I saw on serious eats they've done 'Starch Madness' for the past couple of years, coming up with a whole bracket system to vote on the top 64 of whatever category they did - pasta 2 years and potatoes last year. That got me to thinking that I could easily come up with 31 starches, 1 for every day of March, but I have no desire to make 64 and pit them against each other! I'm even questioning if I want to eat and post 31 different starches in a row - might be fun, might be fattening, might be boring... LOL.

I'll just do this Monday thru Friday, that's only 23 starchy things to come up with haha - let's see how far I get with 'starch madness'. To start off the month here's some info on starchy foods:

I combed a few websites for lists of starchy foods - I mean everyone probably knows what the basic starches are like potatoes, pasta, bread, canned beans - but what about ones you might not think of like tortillas, water chestnuts, quinoa? Popcorn? I guess popcorn might be obvious but I didn't think of it.  Here's some info I found if you're curious for a list of starches, and remember - starchy foods do not mean 'bad' foods, complex carbohydrates are important for our body and health. I'm not a nutritionist obviously and if you're doing Atkins or another low-carb diet don't yell at me for sharing this info haha, I'm just passing on what others are sharing. 


Starchy foods often need to be limited if you're following a low-carb diet. However, the U.S. Department of Agriculture recommends you fill one-fourth of your plate with these foods at each meal since they provide essential nutrients. Starchy foods, sometimes called complex carbohydrates, include grains, beans and legumes and starchy vegetables.


*BREAD AND GRAINS


Foods in this group include pasta, breads, popcorn, crackers, tortillas, cereals, rice, oatmeal, barley, wheat, millet and other grains like buckwheat, farro, and quinoa.


Breads and grains provide you with fiber, B vitamins, iron, selenium and magnesium, especially if you choose the healthier whole-grain versions of these foods, which may lower your risk for heart disease and constipation and help you manage your weight.


*STARCHY VEGETABLES


Starchy vegetables include peas, corn, cassava, taro, water chestnuts, plantains, green bananas, lima beans, butternut squash, acorn squash, pumpkin, potatoes and other root vegetables such as parsnips, turnips, beets


While they shouldn't be the only vegetables you eat, these vegetables can help you meet your recommended nutrient intake for a number of nutrients, including fiber, potassium and vitamins A and C, potentially lowering your risk for high blood pressure and high cholesterol.


*BEANS AND OTHER LEGUMES


Beans and other legumes have the distinction of counting as both starchy foods and protein foods. These include lentils, kidney beans, black-eyed peas, chickpeas, black beans, white beans, pinto beans and any other types of dried beans. 


Eating these foods will help you increase your protein, fiber, zinc, iron, potassium and folate intake.


*HOW MUCH STARCH SHOULD YOU EAT?


Your daily starch intake will likely come from a range of foods from different groups in the dietary guidelines. Adults need 5 to 8 ounces per day from the breads and grains group, depending on their age and activity level, at least half of which should come from whole grains.


A slice of bread, one-half cup of oatmeal or rice, a mini bagel, a cup of dry cereal and 3 cups of popcorn are all equivalent to 1 ounce. They should also consume 4 to 6 cups of starchy vegetables and 1 to 2 cups of beans each week as a part of their daily recommended intake of 2 to 3 cups of vegetables.


most of this info came from here, I added a couple examples to the lists. 


3.1.22: TT microwave baked potatoes (here's a first starch madness recipe for you to try!)


Tuesday, February 28, 2023

Tip-sy Tuesday: Snickerdoodle White Chocolate Chip Cookies

I'm calling this is 'tip' because I literally made cookies from a mix for the neighbor who had surgery a couple days ago and the tip is I added a big handful of white chocolate chips to the batter (along with a pinch of coarse salt) making them a little bit more 'custom-made'. 

Dave went to the store for me looking for a double-chocolate-chunk mix, which I know from past experience make great cookies (click here and here for examples), but couldn't find it. He told me what was available and I said snickerdoodles sound good but I couldn't really change the mix and I don't like not being able to add ingredients in - he suggested chocolate chips and I thought white chocolate might be good! 

He said he wanted credit if they turned out, but to not tell anyone if adding chocolate to snickerdoodles ended up not being good - I said nope, doesn't work like that. I've spent over 7 years coming up with posts that might be good or might be flops, he just has to put his ideas out there no matter the outcome LOL. So he gets the credit for the idea, and fortunately they turned out very good!

I guess my only tiny criticism is that the snickerdoodle mix is quite sweet and adding white chocolate makes it even sweeter - but hey, it's a cookie coated in sugar so adding more sugar really isn't a big deal. 


2.28.20: make your own dryer sponges


2.28.17: tip for how to clean the oven window glass


Monday, February 27, 2023

Paper Stationery Folder #2

This is the second folder I made (click here for number 1), I called it a 'stationery folder' because it's a fun way to give someone a gift of homemade note cards they can use, or store-bought cards, or whatever - but really it's just a cute paper folder for any use that you can think of. 


This folder is 6" square, with no cutting, only folding. Super easy.  I attached a couple pieces of ribbon to tie it closed, the folds make it a little thick to close it flat. I also played with putting a ribbon around the whole folder which also works. 

Start with a 12" piece of scrapbook paper printed on both sides (or if it's only printed on one side then the inside of your folder will just be white, which is fine!). Fold it in half, open it up and fold it in half the other way, open it up again. The paper has been folded into creating 4 (6") squares (no cutting, just folds).

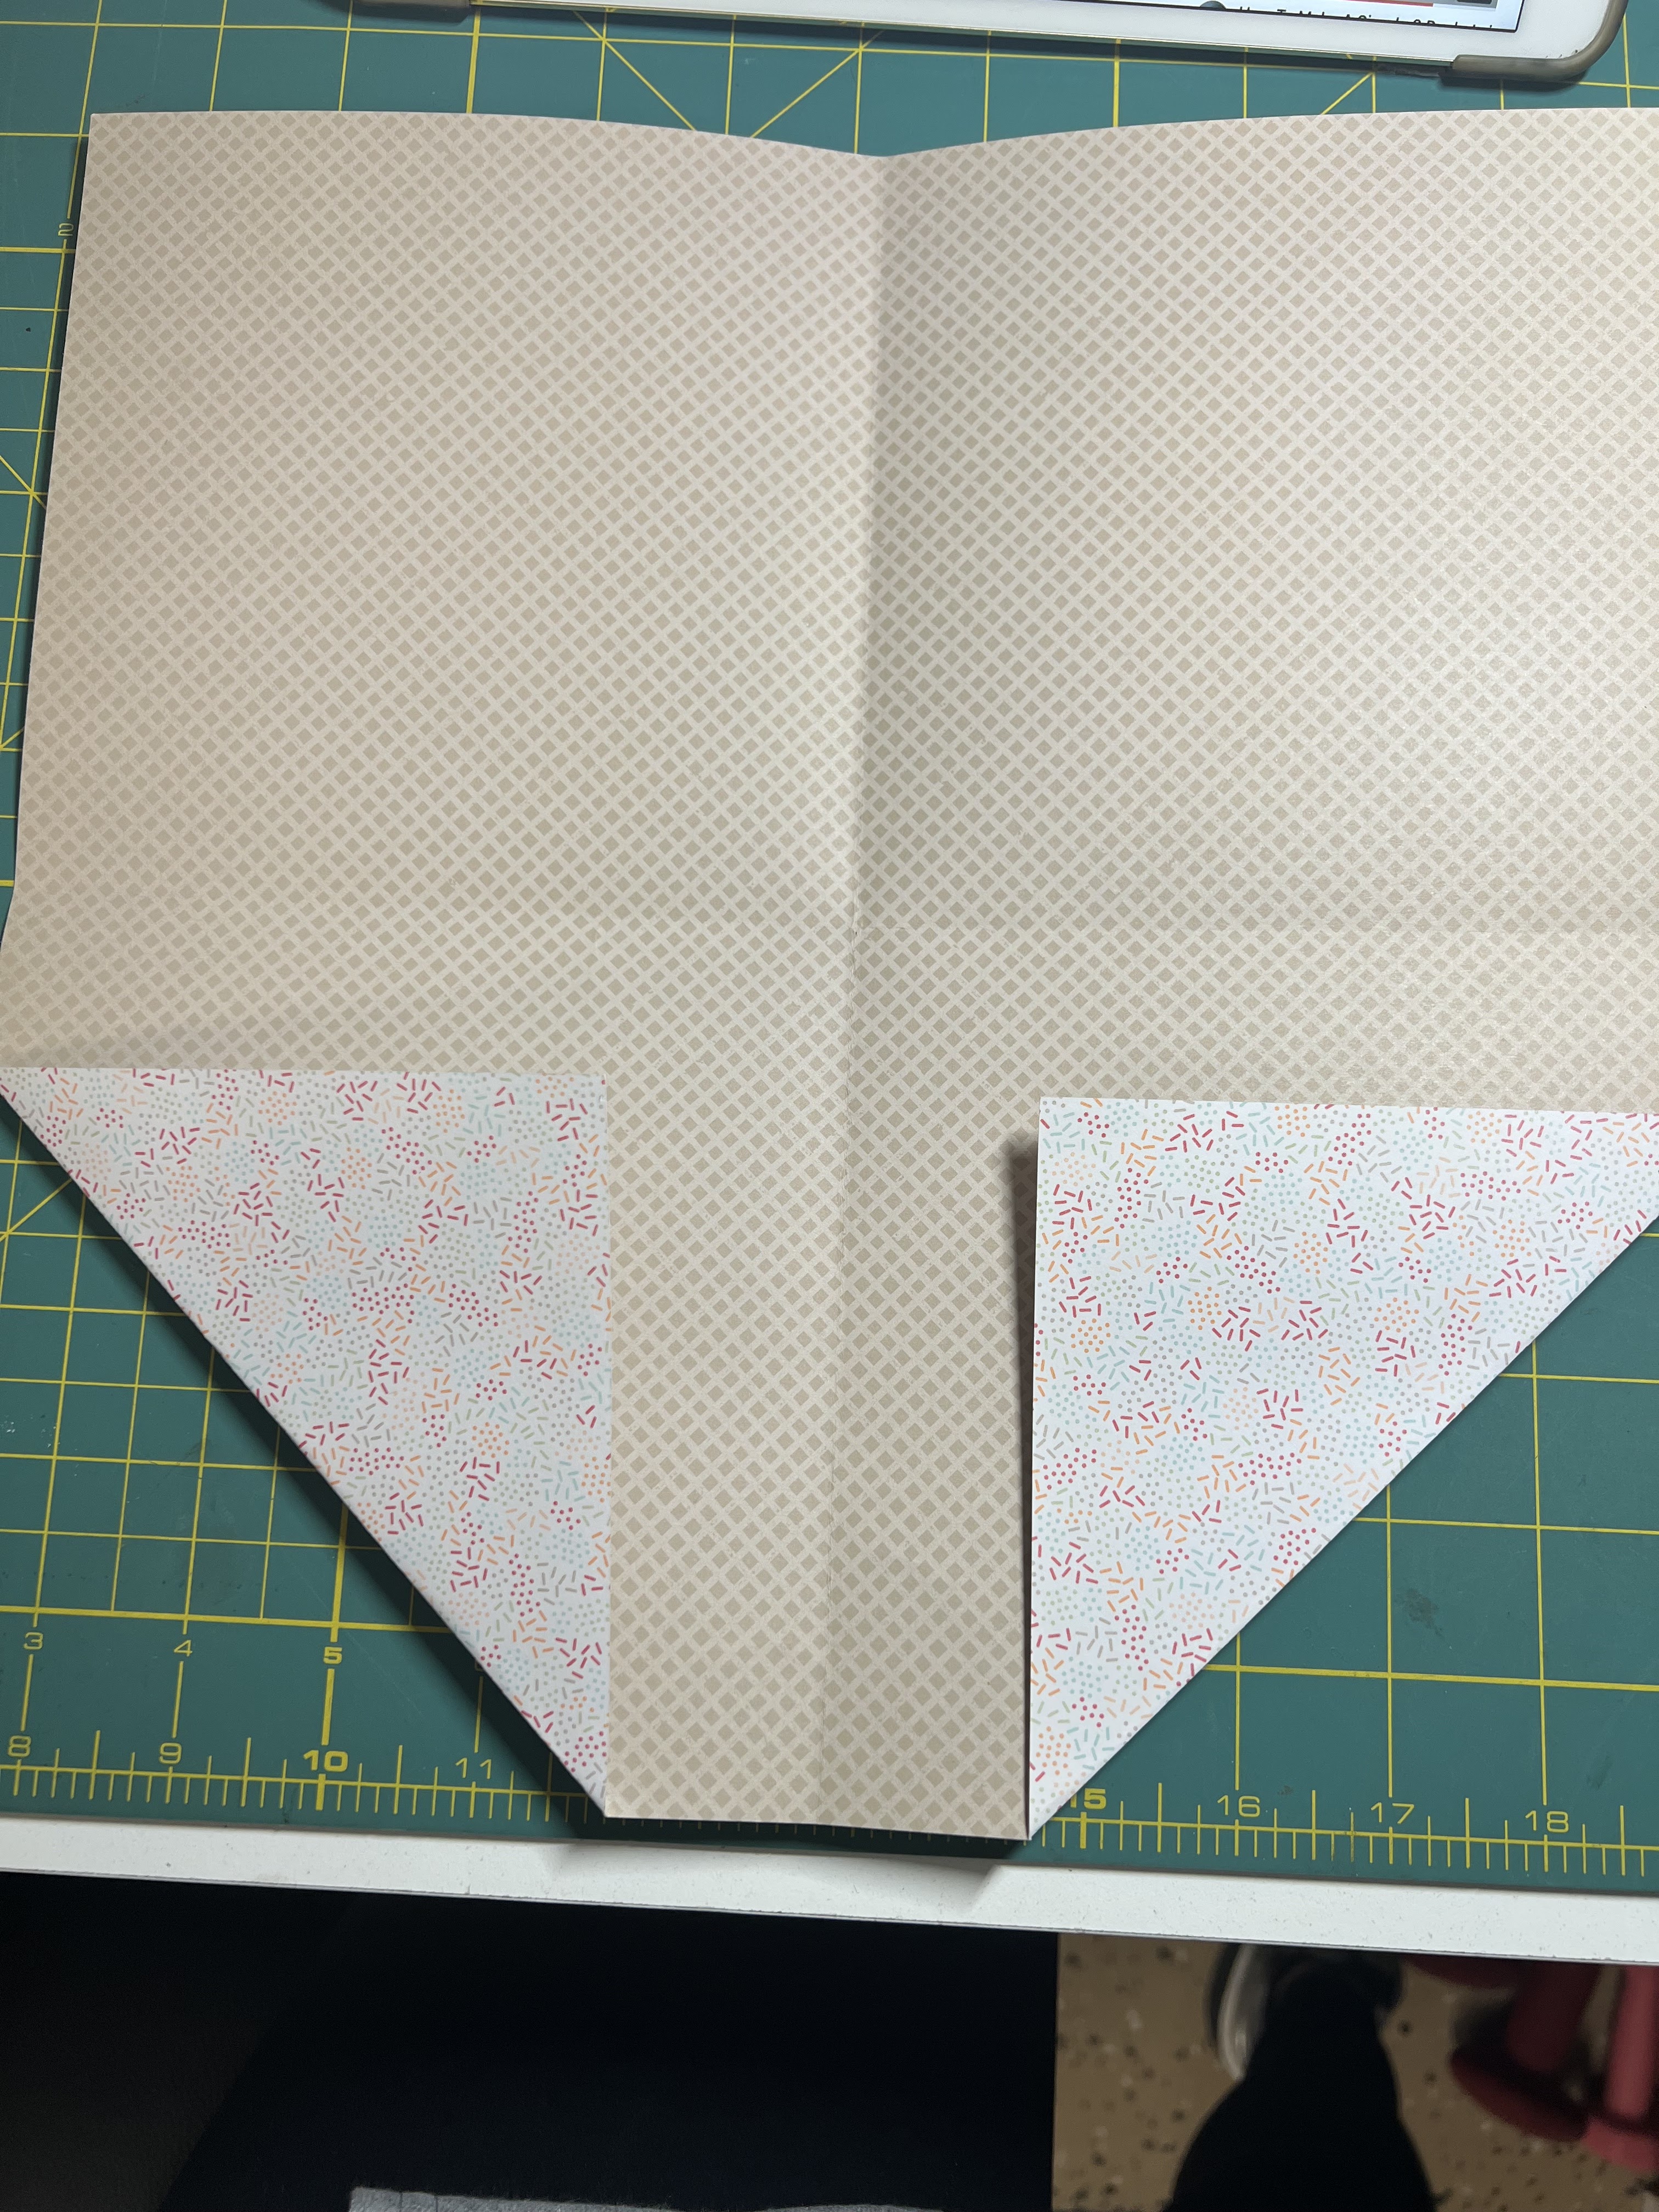
Fold the bottom two corners in towards the center of the paper, about an inch or so from the centre fold lines. See photo:

Fold the bottom center up over the triangles you formed in the last step, meeting the bottom straight edge to the center fold line:

Fold again at the center line which creates a pouch across the width of the paper. Fold in half and you have the folder with a pouch on each side. 


Glue pieces of ribbon to each side under the pouch so you can tie it closed. 


2.27.22: ðŸ”¥ week 9 

2.27.21: irish coffee

2.27.20: goldenrod


2.27.18: quinoa salad

2.27.17:  make a beaded bauble ring


Sunday, February 26, 2023

🔥 Around the Campfire (week 9)

Dear Campers ~

Here's a quick recap in case you missed anything at camp last week:

Posts ~

2/19: 🔥 week 8

2/20: stationery folder #1

2/21: TT how long are eggs good for

2/22: carrot cake

2/23: orange blossom dressing

2/24: vegetable dip

2/25: Mary's Manhattan cocktails 

What's Cooking ~

  • grilled steak, potato salad, wedge salad
  • grilled thin chicken breasts, vegetable parmigiana, caesar salad
  • swordfish tacos (grilled with lemon butter, serve with corn tortillas and cole slaw)
  • chicken marsala pasta, green salad
  • beef and bean enchiladas
  • artichoke and cheesy chicken, roasted carrots

Miscellaneous stuff keeping me busy ~

  • read 'One Month of You' by Suzanne Ewart. I've been waiting for books from the library and haven't read much lately - I picked this one in the meantime just to have something to read and should have known better. It's a sappy, sad, emotional, romantic novel and sappy, sad, emotional, romantic novels are just about my least favorite. I won't even rate it because that wouldn't be fair, if you like this genre then maybe it's a good read hahaha. 
isn't this salad pretty? Rows of shredded carrots, sliced
cucumber, halved cherry tomatoes, crumbled goat cheese
and diced avocado on top of mixed greens. 

That's it for this week - see you next week for more projects, recipes, crafts, whatever I think of to make at camp! 

Sincerely ~

Jill

camp counselor 


2.26.22: oops I missed a day!


Saturday, February 25, 2023

Large-Batch Manhattan Cocktails

Mary sent me a bottle of Manhattan cocktails she made loosely following this recipe she found at the NY Times - I don't think I've ever had a Manhattan before and really enjoyed this gift (fun idea, she re-packaged the drink in a used Makers Mark bottle - that's the one that has the top dipped in red wax to seal). I was slowly babying the bottle but then Mary came to visit and we sat outside by the fire pit a couple nights and somehow the bottle is now empty and I'm going to have to make some more! 


She added a hanging tag saying "Mary's Manhattan Cocktails" and to serve over ice with an orange twist and a luxardo cherry (she thoughtfully included a bottle of the cherries and they are amazing). The recipe says a lemon twist or a cherry, but I served mine with an orange slice and a cherry and loved it. 

Mary's notes - she didn't add absinthe, used Makers Mark for the whiskey (and that way she had the bottle to package the Manhattans in), didn't exactly follow the amounts, and that a 'real' Manhattan is served in a pretty martini glass. You can also shake the mixture with ice and strain into the glass. 

Yield: 10 to 12 cocktails

  • 2 2/3 cups 100-proof rye whiskey
  • 1 1/3 cups red Italian vermouth
  • 1 T. plus 1 t. angostura bitters 
  • 1 1/4 t. absinthe, optional
  • lemon twists or brandied cherries, for serving 

1. In a clean, sealable 1-liter glass bottle, combine the whiskey, vermouth, bitters and absinthe, if using. 

2. To serve, stir 3 ounces (about 1/3 cup) per cocktail with ice and strain into chilled cocktail glasses. Garnish each glass with either a twist (hold lemon peel over glass and twist it to extract the aromatic oils), or with a cherry. 

picture accompanying the NY Times recipe


Mary snapped this from her time in San Antonio


Friday, February 24, 2023

Vegetable Dip

I made this dip the other night for a last-minute appetizer veggie tray, I had all of these ingredients on hand and it came together quickly. I read another recipe where they grated the shallot instead of mincing it and thought I'd try it since Dave hates onion so I try to disguise it where I can; I did it on my micro-planer and it didn't really grate it, more like made a paste - which worked adding a little flavor without seeing the minced shallot in the dip but am not sure it's necessary. Next time I'll just mince it as finely as possible. This has really good flavor, adjust the seasonings to your taste (I didn't measure, just kept tweaking til I liked it!).

I forgot to take a picture, it basically looks like mayo with little flecks in it! I served it with a platter of halved mini sweet peppers, radishes, cherry tomatoes, sliced cucumbers, broccoli, cauliflower, and baby carrots. 

  • Sour cream
  • Mayo
  • Lemon juice
  • Dry ranch seasonings packet
  • Seasoned salt
  • Grated shallot
  • Minced dill and parsley
In a small bowl stir together equal parts sour cream and mayo; add about 1/2 a dry ranch seasoning packet,  about 1 t. seasoned salt (I use Lawry's), minced or grated shallot, minced fresh dill and parsley to taste. Thin it with fresh lemon juice as needed. Chill for a couple hours before serving if possible. 


Thursday, February 23, 2023

Orange Blossom Dressing

I shared how to make salad bundles with you a couple weeks ago - I got the idea from a dinner held for a drivers event in April of 2019 and filed it away as a recipe for 'someday'. I just came across my post draft/idea from back then and thought I'd do a follow-up post on the bundles. 
Their salad consisted of field greens wrapped in zucchini ribbons, topped with toasted almonds, bleu cheese chunks, and dried cranberries, served with orange blossom honey dressing. 
The store-bought dressing I served the bundles with was really good, but if I could have found orange blossom honey at my little store I would have made this homemade honey-mustard recipe: (note - maybe orange blossom versus clover honey wouldn't have made much difference? I just remember the orange blossom dressing was delish): 
  • 2 tablespoons orange blossom honey
  • 1/4 cup canola or grape seed oil
  • 1 tablespoon apple cider vinegar
  • 1 teaspoon Dijon mustard
  • 2 tsp finely chopped basil (optional)
  • Salt and pepper, to taste
Another note - the drivers event was part of the Long Beach Grand Prix weekend, David Hobbs was the speaker and we really enjoyed listening to him. It was a black-tie event, unfortunately I wore new super-high heeled shoes and could barely walk to the car afterwards - I kid you not, took the shoes off in the parking lot and left them for some poor unsuspecting person to have haha and walked the rest of the way to our car barefoot in my fancy dress. While driving home barefoot I just kept thinking how bad it would be if I got pulled over - I was driving and had not been drinking but I had visions of being asked to walk in a straight line on the side of the highway barefoot, that's not tacky at all LOL 

Wednesday, February 22, 2023

Carrot Cake

I made this for Ray's birthday last August and am just now remembering to blog it - I doctored a cake mix and it turned out so good. Dave doesn't usually get to eat carrot cake because it usually has nuts but I made this one without and he said 'I don't know what it's supposed to taste like, but this is great'. I don't like regular raisins so (selfishly) added golden! I didn't take good pictures, in real life this looked very pretty and more carrot-cake like - it wasn't as drab as these photos...


Mix together in a big bowl and bake according to package directions for (2) 9-inch cake pans:

  • carrot cake mix
  • 4 eggs
  • 1/2 cup vegetable oil
  • 1/4 cup whole milk
  • 8 oz. crushed pineapple with juice
  • 1/2 cup shredded coconut
  • 1/2 cup golden raisins
  • 3/4 cup grated carrots
  • 1 t. vanilla
  • pinch of coarse salt

cream cheese frosting:

  • 8 oz. softened cream cheese
  • 1 stick softened unsalted butter
  • pinch of salt
  • 1 t. vanilla
  • 3 cups powdered sugar

In a mixer beat together softened cream cheese, softened unsalted butter, a pinch of salt, 1 teaspoon of vanilla and 3 cups of powdered sugar until smooth and spreadable - if it's too soft add additional sugar to firm it up.

Note: don't add salt if you are using salted butter. To soften butter in the microwave I cut in pieces and put in microwave safe bowl, microwave at 50% power for 1 minute. You don't want to melt the butter though so watch it - the size of your microwave might change the time it takes to soften.


To assemble: put a dab of frosting on a cake board to keep the cake from moving around while you're frosting it. Place one layer on the board, frost the top of it, add the second layer and frost the entire cake. You could split the 2 layers in half and make a total of 4 layers, but go easy with the frosting in between the layers if you do that - it'll be very sweet and you might need to make extra to fill all the layers. 


Tuesday, February 21, 2023

Tip-sy Tuesday: Eggs

Not sure why I started looking up how long uncooked eggs last in the fridge but I've found lots of interesting info and I figured I'd share:

1. the 'sell-by' or 'exp' date is the same thing. It's the date the store should sell them and you have another 3 to 5 weeks after that date to use them; you'll want to inspect the eggs and make sure they haven't gone bad by checking them for odor, cracks, or do a float test - if it floats in a glass of water it's bad (sinks to the bottom on it's side means it's still ok)

2. another thing I learned is that eggs are good 4 to 5 weeks beyond the "Julien date' printed on the carton. It's a 3 digit code that tells you the day of the year they were washed and packed - starting with January 1 as 001, thru December 31 as 365. 

in the example below from the eggs in my fridge: the eggs were packed on January 30th (030), it's ok to purchase them thru 2/28, and then I have weeks after that to use them (if I've properly stored them in their carton in the colder part of the fridge, not the door). We eat a lot of eggs tho so I most likely won't have them around long enough for weeks after the Julien date to worry about it. But with eggs being expensive it's good to know if you don't use them by the 'sell-by' date you're still good for quite a long time. 

030 is the day of the year the eggs were washed and packed
P1644 is the plant code where they were processed 

found here: Always purchase eggs before the "Sell-By" or "EXP'" date on the carton. After the eggs reach home, refrigerate the eggs in their original carton and place them in the coldest part of the refrigerator, not in the door. For best quality, use eggs within 3 to 5 weeks of the date you purchase them. The 'sell-by' date will usually expire during that length of time, but the eggs are perfectly safe to use.

2.21.22: mardi gras masks

2.21.21: ðŸ”¥ week 8


2.21.18: snickerdoodles