Thursday, January 31, 2019

Restringing the Scottie


It's been a while ago but by chance do you remember the scottie topiary thing I "planted" which was a total fail? Click here to see the post. Well - I have a scottie thing here that has pre-strung lights on it that burned out, and I just wrapped another strand around it which of course has also burned out. So I decided to take the whole thing apart, remove the old lights and restring it. While doing that I realized that this is the same exact scottie wire form - I have one in Michigan that was filled with moss when I received it, and one here in CA that came with lights...and I'm just now realizing they're the same! When I get back to MI I'm taking the moss out and replacing it with lights - so much cuter.


After removing the old lights I saw that the wire form was getting rusty, and the cable ties holding the front and back together were brittle and breaking - so I removed the old ties and replaced with new ones, and spray painted the entire thing with black rustoleum. We live in a condo and there isn't a great place to spray paint anything - and I'm pretty sure if I spray in the common driveway area the neighbors aren't going to be too happy...so I got a bunch of cardboard and set up a cardboard painting station by laying down a big piece and propping sides and a backsplash of cardboard up to protect the driveway and walls and painted into the makeshift boxed area. I don't think I left any evidence, and I wore gloves but still ended up with a black trigger finger - if there is over-spray paint I'm not aware of and anyone goes door-to-door looking for the spray painting culprit and sees my black finger I'm so busted 😉 If the object you are painting is small you can just set it in a box turned up on it's side and spray into the box (click here for the last project I did like that), I didn't have a big enough box for this scottie to fit in.


I put a piece of duct tape over the female plug end to keep water out of the light strand,
then put the end into one of the feet before winding the lights all over the scottie form. 
I didn't take a picture of it out on the balcony lit up at night because you cannot tell what it is, just looks like a bundle of lights.


1.31.18: Tesha's Texas Caviar
1.31.17: hair bump trick
1.31.16: pretzel hugs


Happy moment ~ being with a friend that can make me laugh so hard I'm crying

Wednesday, January 30, 2019

Chocolate-Mint Crackles

This recipe has been in my folder for years, it's from a Martha Stewart magazine date unknown. I was home yesterday getting caught up on house work and thought I'd make a quick cookie for Monday Supper (Sunday supper postponed a day!), these looked easy - although I didn't read all the way thru the instructions and realized too late the dough needed to be chilled for 3 hours, so not exactly a "quick" cookie! I got around that issue by throwing the dough in the freezer for about a half hour until the dough was chilled (but not frozen). These got mixed reviews: if you like a soft brownie-like cookie and mint then I think you'll like them, if you like thin crunchy non-minty cookies they might not be your favorite! I think they taste like Andes Mints, yum.

2 oz. bittersweet chocolate, finely chopped
1 cup all-purpose flour
1 teaspoon baking powder
1/4 cup unsweetened cocoa powder
1 cup granulated sugar
2 large eggs
4 tablespoons unsalted butter, melted
3/4 teaspoon mint extract (note: I only put in 1/2 teaspoon and they're quite minty)
1/2 cup confectioners' sugar

  • Melt chocolate in a heatproof bowl set over a pan of simmering water, stirring until melted. (Note: I melted mine in a glass measuring cup in the microwave, follow package directions).
  • In a small bowl, whisk together flour, baking powder, and cocoa.
  • In a larger bowl, whisk together granulated sugar, egg, and melted butter. Gradually whisk in melted chocolate and mint extract until smooth. Stir in flour mixture (note: I wasn't paying attention and tried to whisk in the flour but that was messy and sticky - switch to a spoon to incorporate the flour mixture). Refrigerate until firm, at least 3 hours.
  • Preheat oven to 325'. Roll tagl3espoons of dough into balls using your palms, then roll in confectioners' sugar to coat. Transfer to parchment-lined baking sheets, spacing each 1 inch apart. Bake until slightly firm in the center, about 15 minutes. (note: mine took between 13 and 14 minutes)
  • Let cool slightly on sheets set on wire racks. Transfer cookies to racks, and let cool completely. 

Makes 30 cookies. Dough can be refrigerated for up to 3 days or rolled into balls and frozen for up to 2 weeks. Roll in confectioners' sugar just before baking. 

Store cookies at room temperature for up to 3 days. 


1.30.18: baked ham and cheese sliders
1.30.17: heart cork wreath and trivet
1.30.16: sweet sunrise mocktail


Happy moment ~ no brainer, the smell of cookies baking in the oven


Tuesday, January 29, 2019

Curly Willow Branches

Patty gave me a pretty floral arrangement that had a piece of curly willow in it - when it was time to toss the flowers I had a flashback to a flower class I took years ago and remembered that if you put the branch in water it will eventually grow roots and you can plant it. So that's what I did - although instead of putting it in a glass of water I bent it and put it in my indoor water fountain that I have by my kitchen sink; and sure enough, both ends have roots now and little leaves are shooting off the branch (it was a bare branch when it came in the floral arrangement). How fun is this - maybe I'll grow my own curly willow tree...except for now it looks super cute in the water fountain so I'm not going to plant it just yet.


Happy moment -  listening to my indoor water fountain

Monday, January 28, 2019

DIY: Glass Cleaner

Saw this recipe for glass cleaner on the Doterra essential oil website (click here) and it' so easy that I whipped it up in a few seconds. I only made a small batch in case it didn't work, but it does!


3/4 cup white vinegar
1/4 cup distilled water
8 drops citrus essential oil (I did lime and grapefruit)

Mix all together in an 8 oz spray bottle.


Next I need to come up with cuter labels - between the body wash last week and this glass cleaner taping a piece of paper on isn't quite cutting it hahahah! But whatever, no one sees it but me ;)


1.28.18: salsa verde pork enchilada casserole
1.28.17: wedding day mimosa
1.28.16: getting ready for guests


Happy moment ~ finding the lost sock


Sunday, January 27, 2019

Around the Campfire (week 4)

Dear Campers ~


Quick recap in case you missed anything ~

1/20: around the campfire (week 3)
1/21: making plarn
1/22: kale salad
1/23: buttermilk drop biscuits
1/24: DIY: body wash
1/25: Ron's mom's dinner
1/26: spirit gloves


What's cooking ~
  • grilled tuna steaks seasoned with Montreal steak seasoning, greek salad with roasted garbanzo beans
  • grilled steak, potato salad, kale coleslaw, sautéed onions and mushrooms
  • grilled chicken, mushroom ravioli with basil pesto, green beans
  • grilled ruebens, potato salad, guacamole and frito chips
  • baked paprika shrimp, cauliflower rice, green salad

garage floor before (r) and after (l)
Miscellaneous stuff keeping me busy but doesn't need it's own post ~
  • finished reading "Guernsey Literary and Potato Peel Pie Society" in time before it had to be returned to the online library - so good!! two thumbs up. 
  • finished dusting the entire garage/craft room after having work done (new cabinets added, floor painted and sealed - super dusty!)...and put everything back. Rearranged the stuff hanging on the wall sized peg board. Putting the garage back together took most of the week! 
  • getting ready for Al and Cathy to visit for a few days (yay); made pumpkin muffins with cranberry and chocolate chips, I'll share the recipe soon.
Have a great week, stop by often to see what's happening at day camp :)

Sincerely,


Jill, your camp counselor and chaos wrangler

Saturday, January 26, 2019

Ron's Mom's Dinner

Janis told me she was making "Ron's Mom's Dinner" and even tho I had no idea what that meant, the name is so great that it doesn't even matter what it is haha - I asked for the recipe and it sounds delicious! It's tomato-meat sauce over rice, I've never put tomato sauce over rice, only pasta or polenta, and I'm going to try this next time.

She said she always uses okra instead of beans, but doesn't like telling people it has okra in it because so many don't like it (me included, I almost stopped listening to her when she said the family calls it "the okra dish"); but her family loves it, even the little kids, so I'd be willing to try it - but she said just use green beans! Hahaha, well that is a bit safer so that's probably what I'll do. Also, regarding the okra - because fresh okra is iffy to buy (I have no idea, I've never bought it - apparently it can look good but not be good) she uses frozen okra in this recipe. Thanks for sharing, Janis!


RON’S MOM’S RECIPE 

Serves 6

1 large onion chopped
2 Tablespoons olive oil
1 lb ground beef
1 28 oz canned chopped or diced tomatoes
1 14 oz canned whole tomatoes
1 14 oz canned tomato sauce
1 14 oz package frozen green beans or frozen okra
salt
pepper

In a sauté pan over medium heat, heat the olive oil and add onion.  Cook until onion begins to caramelize or brown.  Add ground beef and cook until fully done.  Add canned tomatoes, tomato sauce, salt and pepper to taste.  Cook for 20 minutes stirring often.  Add frozen green beans or okra.  Cook for another 20 minutes.  Serve over rice.  


RICE


2 cups rice
1 Tablespoon butter or olive oil
¼ cup vermicelli (optional), broken into little pieces
salt

Rinse rice and drain. In a saucepan, melt butter and add vermicelli.  Stirring constantly until vermicelli begins to turn toasty brown.  Add 3 ¾ water and some salt, bring to boil.  Add rice and cook for 15 minutes.  Fluff with fork.


1.26.18: Brooke makes gemstone soap


Happy moment ~ first scoop into a new jar of peanut butter (with or without using my finger)


Friday, January 25, 2019

Spirit Gloves


These are so fun for cheering on your team if (a) it's outside and cold, (b) inside and cold, or (c) you just like to wear pompoms (I personally choose this one haha). I made easy pompoms in my niece's school colors by winding yarn around something stiff that is the size of the pompom you want (I used a credit card), carefully pull the yarn off the card and wrap a long piece of yarn around the middle holding the loops closed - leave a long tail to attach the pompoms to the gloves; then snip the loops so they open up into a pompom. You can easily find more info online if you need it to make yarn pompoms, I didn't take pictures so can't give more description - sorry. The more times you wind the yarn around the card the fuller your pompom will be. Trim the pompom into a symmetrical ball, then using the long tail from tying off the middle, sew the pompoms onto the tip of each finger of knit gloves. I didn't make one for the thumbs, not sure why - do however many you want!


1.25.18: make an anniversary card 


Happy moment ~ listening to Lucy (the parrot) mutter something under her breath and then laugh at herself, like she told herself a funny joke. 


Thursday, January 24, 2019

DIY: Body Wash

I've got a confession. My name is Jill, and I'm a body and bath product-holic . Brooke and I (and PJ before her) love to go into Bath and Body Works and sample all the different scented lotions, etc. until we walk out of the store smelling like a fruit salad and/or tropical vacation. I love the stuff. So when I recently saw the instructions for how to make my own body wash I thought to myself "why have I never thought to do this?" because, duh, it's super easy and I can control the scent I want based on what essential oils I feel like. This is now a no-brainer and I'm a convert - not saying I won't still go in the bath stores and come out smelling like every kind of flower, tropical drink, hawaiian sunset I can find in a bottle LOL - but I will also continue making my own from now on.

for every 8 oz of body wash you need:

  • 8 oz or larger pump bottle (I have a 16oz. bottle in this pic; look for pump bottles that have a straw long enough to touch the bottom of the bottle, drives me crazy when they stop short!)
  • 1/2 cup unscented liquid Castile soap (I ordered from Amazon, but then found it in my little grocery store)
  • 4 Tablespoons vegetable glycerin (thick syrupy oil that is good for moisturizing)
  • 3 Tablespoons fractionated coconut oil (made from coconut oil but stays liquid, it's a good carrier for essential oils)
  • 10 drops of essential oil(s)
Directions:
  1. Combine the soap, glycerin, and coconut oil in the bottle (I used a funnel to keep the job clean - clean, see what I did there?). Shake to combine.

2. Add the essential oil(s) of your choice - for this batch I combined lavender, lime, and tangerine (note I didn't add very much lavender, went heavier on the lime and tangerine)

3. Shake the bottle to combine. You'll need to shake it before every use because the ingredients will separate. 


not sure why I took these last pics - proving the soap I just made is actually soap? 

original source found here 

1.24.18: change up a too-modern side table
1.24.17: avocado toast with basted eggs 
1.24.16: lamb stew


Happy Moment ~ writing this post and remembering being with my niece sampling all the different scented lotions; "mmm, smell this one", "mmm, smell my arm", and  "ewwww, this one is gross" :)

Wednesday, January 23, 2019

Buttermilk Drop Biscuits

Saw this recipe at Mels Kitchen Cafe and the reviews are so good I decided to make them as a side dish for dinner - we don't eat very many biscuits (not because we don't love biscuits, just try not to eat bread and rolls for dinner very often!) but we had Sunday Supper (unstuffed chicken cordon bleu, click here for that post) and these are a natural to serve with it (or anything! They're biscuits, can't go wrong serving biscuits!) along with roasted green beans - every once in a while ya just gotta go for it :).

These are very easy and quick to make - the only thing I changed is to sprinkle with "everything bagel seasoning" before baking. They are crispy on the outside, fluffy and moist inside, and the seasoning on top was so flavorful - mmmmm....

Now, I will say that when I asked Dave how he liked them his answer was "why can't anyone make biscuits like my mom?" which you'll be very proud of me to know that I was very calm and didn't throw the leftover biscuits at him LOL, I just rolled my eyes and walked away. These are really really good and everyone loved them!!

Ingredients:
  • 2 cups all-purpose flour
  • 2 teaspoons baking powder
  • 1/2 teaspoon baking soda
  • 1 teaspoon sugar
  • 3/4 teaspoon salt
  • 1 cup buttermilk, chilled (*see note)
  • 8 tablespoons butter, melted and slightly cooled; plus more for brushing after the biscuits are baked. 
Directions:
  1. Heat oven to 475. Line a rimmed baking sheet with parchment paper
  2. In a large bowl, whisk together the dry ingredients. In a 2-cup liquid measure, stir together the chilled buttermilk and melted butter until the butter forms small clumps. Stir the buttermilk mixture into the flour mixture just until the ingredients are incorporated and themixtsure slightly pulls away from the edges of the bowl.
  3. Using a greased 1/4-cup measure, scoop out mounds of the dough and drop them onto the prepared baking sheet, spacing about 1/1/2 inches apart. are until the tops are golden brown and crisp, 12 to 14 minutes Remove from the oven, brush with additional melted butter. Serve warm. 
*Note: if you don't have buttermilk you can very easily make it yourself - just add a tablespoon of white vinegar to one cup of milk. Let it stand for a few minutes before adding it to your recipe.

click here for original source

1.23.18: weekly planning
1.23.17: string art heart (and scottie dog)
1.23.16: Dave's Cosmos

Happy moment ~ warm towels right out of the dryer

Tuesday, January 22, 2019

Kale Salad

Today it's a little kale tip:

Dave hates kale because he "can never get it on his fork", um ok...I think he means it's too leafy and big and tough to spear...I think...or it could be that he eats so fast he hates when it takes too long to finish something hahaha...but I made kale salad the other night and we both loved it. I think the key this time is that about 1/2 hour before serving the salad I mixed the bowl of fresh kale (remove the hard stems and rip into little 1"-ish pieces) with a drizzle of olive oil and coarse salt and let it set on the counter; that helped to soften the kale and took a little bit of the fresh crunchy kale texture away.

To serve the salad I simply tossed it with store-bought honey-ginger dressing, coarse pepper, a touch more salt, and toasted sesame seeds. This turned out so good it'll definitely be a repeat, and I heard nary a word about it being hard to eat ;).

1.22.18: skillet chicken and veggie pot pie
1.22.17: DIY reserved signs

Happy moment ~ remembering my sissy's wedding 2 years ago today 


Monday, January 21, 2019

Making Plarn

When California first banned plastic bags I panicked! I have no problem with using my own recyclable bags (other than remembering to take them into the store with me 🤦‍♀️ can't tell you how many times Thelma here has to go back to the car for them!), but I use those grocery store plastic bags for lots of things - picking up dog poo, lining small trash cans, filling for mailing packages - and now we wouldn't get any more of them? Ughhhhh. So I did what anyone who panics at the thought of not getting their hands on some discontinued thing would do - started hoarding them, of course.

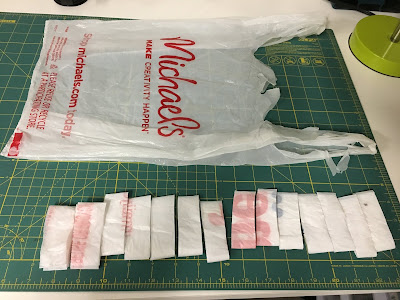
Believe it or not it didn't take me long to amass a large collection of plastic bags and it occurred to me that hoarding bags takes up a lot of room and a crafty person should start making things out of them - first up, plarn. Plarn is essentially plastic yarn and super easy (albeit time consuming) to make. Flatten out a bag (or stack them up to save time), fold in half lengthwise, cut off the handles and the bottom edge. Then fold it in half again and cut into strips; I was able to get about 14 1" strips from one bag. Unfold the strips and they are loops that you then quickly tie together, roll them up into a ball and you've got plarn that you use in lots of different ways (just like regular yarn).

Every bag (14-15 loops) makes about 21 feet of plarn (that's how much I got anyway, if you cut the strips thicker or thinner this number will change). I haven't made anything with the plarn yet so I'm not sure how much I'll need to make a project - I'm deciding between a placemat to put under Sarge's bowls, or a crocheted rug. I'll post what I come up with as soon as I know!

I took pictures of the steps but then thought a quick video would be simpler - here's both...


flatten the bag, fold in half, cut off handles and bottom edge.

fold in half again and cut 1" strips, when unfolded they become loops

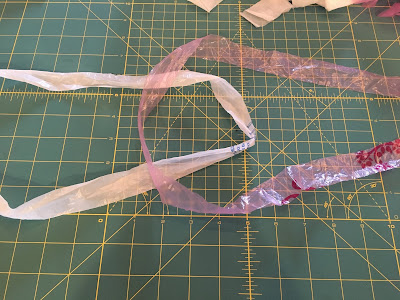
lay two loops on your work surface with the loops crossing in the center

put your hand thru the middle of the two loops - hand goes over the
top loop (in this photo it's the pink loop), under the bottom loop (white). 

reach thru the center space and grasp the far edge of the top loop  (pink)

pull the pink loop that you just grasped and pull thru the space where you put your hand

gently pull to tighten - if you pull too tight the plastic might rip (guess how I know?)


roll the connected loop "plarn" into a ball so it' doesn't get
tangled and is easier to work with. 


1.21.18: greek pork, lemon rice pilar, tzatziki sauce
1.21.17: Jen's stuffed spaghetti squash
1.21.16: painting a side table


Happy moment ~ watching a little brown bird try to figure out how to eat from a hummingbird feeder, while a hummingbird looks on.


Sunday, January 20, 2019

Around the Campfire (week 3)

Dear Campers ~

Here's a quick recap of the happenings at camp this week:

Posts in case you missed any ~

1/13: around the campfire (week 2)
1/14: epsom salt bath cakes
1/15: worlds ugliest cookies
1/16: hanging removable wallpaper
1/17: how to clean a fan
1/18: meat lovers pasta sauce (aka Christmas Pasta)
1/19: tri-color vegetable saute

What's Cooking ~

  • pork tenderloin, tri-color vegetable saute, cornbread
  • baked salmon, cauliflower rice, kale salad
  • pierogi with mushrooms and peas, grilled chicken sausages
  • bbq ribs, roasted mini potatoes
Short one for today, I'm in a hurry because I have to finish reading the "Guernsey Literary and Potato Peel Society" book that gets returned to the online library today and I still have 50 pages to go! Great book and I have to finish it before it disappears! Have a good week, check back often :)

Sincerely ~


Jill, camp counselor and garage construction-dust-collector

Saturday, January 19, 2019

Tri-Color Vegetable Sauté


This has been in my recipe binder to try since January 2010 - guess it's time to either make it or throw the magazine page away! Actually I made it because it's pouring rain out and I didn't want to go to the grocery store so scrounged for something I could make with what is already in the house, and came across this recipe. I'm really wishing it didn't take me 9 years to discover how good this dish is - it's so good that I turned around and made it again for lunch the next day!

note: I substituted dried minced onion, garlic powder, and dried basil for fresh - and it was delicious.

Ingredients:
  • 1 T. olive oil
  • 1 onion, diced
  • 2 garlic cloves, minced
  • 1 cup frozen soybeans (edamame), shelled
  • 2 cups corn kernels, frozen or fresh
  • 1 pint grape tomatoes, halved
  • 3 T. finely chopped sun-dried tomatoes
  • 1/3 cup lightly packed fresh basil leaves, cut in ribbons
  • 1 T. lime juice
Directions:
Heat oil in large skillet over medium-high heat. Add onion and cook until softened about 3 minutes. Add the garlic and cook 30 seconds more. Add the edamame. Cook, stirring occasionally, until warmed through, about 3 minutes. Add the corn and cook until warmed through, another 3 minutes. Stir in grape tomatoes and sun-dried tomatoes and cook for 5 minutes more, until tomatoes are softened but still retain their shape. Stir in basil and lime juice. Season with salt and pepper. 

Makes 4 servings. Each serving 176 cal, 6g fat, 0mg chol, 209mg sodium, 29g carb, 5g fiber, 7g pro.

Original source of recipe: Better Homes and Gardens magazine

Happy moment ~ the smell of freshly popped popcorn 

Friday, January 18, 2019

Meat Lovers Pasta Sauce

I made this Rachel Ray recipe which she calls "Christmas Pasta", which is a fantastic dish but not sure why it's named that...so I'm changing it LOL. Sorry Rachel. It has loads of meat in the sauce so I feel like it should be called "meat lovers" and made all year round instead of just at Christmas. I don't know why I didn't take a picture of this terrific meal - but it looks like chunky thick red pasta sauce mixed with penne!

Here's a picture of Lucy eating parsley leaves instead ;)


Ingredients:

2 T. extra-virgin olive oil
4 cloves garlic, crushed
1 bay leaf
1/4 pound pancetta, thick cut, chopped into small bits (Italian cured pork)
1/2 pound bulk hot Italian sausage
1 pound combined ground beef, pork, and veal (see note)
1 medium carrot, peeled and finely chopped
1 rib celery, chopped
1 medium onion, chopped
1 cup good quality dry red wine
1 cup beef stock
2 (32 oz) cans chunky style crushed tomatoes
a handful of chopped flat leaf parsley leaves
1/4 teaspoon allspice or cinnamon
coarse salt and black pepper
2 pounds penne rigate, cooked to al dente
grated pecorino romano or parmesan

Directions:

  1. Heat a deep pot over medium high heat. Add oil, garlic, bay, and pancetta bits and brown for 1 minute. Add meats and brown and crumble them for 5 minutes.
  2. Chop carrot, celery, and onions near the stove and add to the pot as you work. Cook vegetables with meat 5 minutes and add wine. Cook for 1 minute; add stock and tomatoes to the pot.
  3. Stir in parsley, allspice, or cinnamon and season sauce with salt and pepper, to taste. Bring sauce to a boil, reduce heat to medium low, and cook 10 to 15 minutes minimum before serving. Reheated sauce only improves.
  4. Toss pasta (cook off only as much pasta as you need at the time: half a pound for every 3 people) with a couple of ladles of sauce to coat, then top bowl with extra sauce. Top pasta with lots of cheese and pass bread at the table.


(pancetta)
Notes: I don't eat veal so did a combination of beef, pork, and lamb (that's my standard meatloaf mix - I bought one pound of each knowing I'll make meatloaf or something with the remainder); was worried the hot Italian sausage would be too spicy so did a combination of 1/4 pound hot and 1/4 pound mild; and I cut the carrot and celery into very small pieces. The photo that accompanies her recipe shows the veggies in pretty big pieces - I didn't want to see the veggie pieces. I started the dish a little differently (based on reviews I read) by sautéing the pancetta and garlic in the oil for one minute and then adding the carrot, celery, and onion for 5 minutes before adding the rest of the ground meats. I don't like hunks of ground meat so made sure to really break the crumbles up into small pieces. Because the recipe states that reheating the sauce only improves it, I made this in the morning and let it cool, refrigerated it until about an hour before serving and then reheated. SO good! 


click here for original source found on the Food Network

Happy moment ~ how good it feels to change into dry clothes after walking in the pouring rain


Thursday, January 17, 2019

Cleaning a Fan

Quick tip for today - I told you I've been stuck doing projects in the house while the garage/craft room is being worked on, this is what happens when I've arranged and organized everything I can...I notice random things that I've overlooked or ignored because really, who has time to take the fan apart to clean it? Apparently now I do.

I've never done this before, you guys all probably have, but it's what I just figured out and I'm sharing!

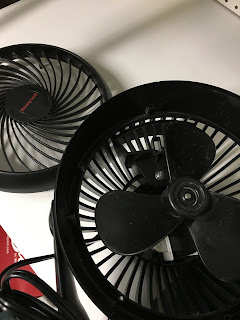
Usually I just wipe the outside of the fan down, maybe sticking a rag in the open slots to dust inside or maybe not. The amount of dust that was in this fan tho required me taking it apart to clean it - it was disgusting. There are tiny screws on the back of the fan that I removed (not knowing what the outcome would be) and sure enough, the cover of the fan came off, enabling me to be able to clean it all. Done.

Now I gotta go find what else needs taken apart....bye!


1.17.17: tuna-egg salad
1.17.16: the best meatballs


Happy moment ~ listening to the rain, especially in usually sunny California

Wednesday, January 16, 2019

Removable Wallpaper


I haven't been able to work in my craft area (aka: the garage) for the last few days so getting lots of in-the-house projects done; I've emptied closets and drawers to sort/purge/organize, lined shelves, cleaned the pantry...not being able to make fun crafts is probably a good thing for me once in a while! I ordered this removable wallpaper from Amazon - and hung it in the pantry (only on the wall that you can see from outside the pantry tho, I didn't go crazy and do the whole closet). I was worried it would be hard to hang by myself - the reviews said it's better with 2 people - but this was quite easy actually and I love, love how it turned out.

The paper is about 21 inches wide x 16 feet long, and has a repeating pattern - which means if you are going to put two pieces of paper together and you want the pattern to match, you might need to buy extra paper because chances are you'll have some waste when lining up the pattern. Usually the paper will say how many inches there are to the pattern before it repeats, in my case the paper repeated every 20 inches. I'll attempt some simple math: the wall I wanted to cover is 46" wide x 92" high. The paper is 21" x 192" - I'll need three sections of paper to go across the wall (2 pieces 21 inches wide, 1 is 4 inch piece for the remainder of the wall) that are each 92" long. The paper is 192" long so I would get 2 pieces 92" and have 8" left over for the third piece. Even without a repeating pattern I wouldn't have enough paper long enough for the third piece. So I had to buy two rolls of paper. Make sense?


Removable and repositionable wallpaper is like a giant roll of Contact paper, you can stick it down and pull it back up as many times as you want (until it get's all stretched out of shape, which eventually it will so don't pull it too hard). Starting with the top left corner of the wall, fold back a couple inches of the paper backing so the sticky part is exposed. Place it where you want in the corner of the wall and press so it stays in place. Then slowly peel off a few inches of paper at a time, smoothing the paper down with something hard and flat (credit card, etc. I used a shower squeegee and it worked perfect) to remove the bubbles. If you find it's not hanging straight or it's got bubbles, just gently pull the paper up and do it again (and again, and again) until it's right. Continue to the bottom of the wall, I left a couple inches and cut the paper from the roll - you could measure the paper out and cut it before hanging it but I was worried my measurement would be off so I just cut it after it was on the wall.


Now for the second piece you'll want to find where the repeat is to match up to the first piece you already hung, that's where the waste might come in - I could either have started the top of the second piece down a few inches from the ceiling where the pattern lined up and then piece in the top (which is what I chose to do) or find the repeat in the paper that matched the top of the first piece and cut off the paper to match it at the ceiling. I found I was wasting more paper by cutting off the amount that I would have needed to get the pattern to match at the top, by piecing it there wasn't so much waste.

In person you don't see the seam at all! 


Repeat for the third piece and you're done.


Today's happy moment ~ not being able to park in the garage, but finding a parking spot right in front of the house


Tuesday, January 15, 2019

Chocolate Chip and Mini Marshmallow Cookies (aka: Gnarly Cookies)

The title of these cookies sounds waaaaaay better than they look. In fact, Mickey called them "gnarly" and asked if I was drunk when I made them. I wish, at least then there would be an excuse. But nope - stone cold sober (I needed a drink afterwards tho!). These are truly the ugliest cookies I've ever baked. It's a little embarrassing actually - but I'm sharing so you know that not everything I make turns out! LOL!! I'm not living the perfect Facebook-only-share-the-good-stuff-so-everyone-feels-bad-about-their-own-lives life, sometimes there are "fails" hahahahaha.

On the bright side - these do taste good. So if you need a cookie that looks awful but tastes good for some obscure reason, here ya' go. You're welcome. Maybe you'll win the "ugliest cookie contest" or something...

Ingredients:
  • 1/2 cup unsalted butter
  • 1/2 cup packed light brown sugar
  • 1/2 cup granulated sugar
  • 1 large egg, room temperature
  • 1 t. vanilla
  • 1 1/4 cup all purpose flour
  • 1 tablespoon corn starch
  • 1/2 t. baking soda
  • 1/2 t. salt
  • 3/4 cup chocolate chips
  • 3/4 cup mini marshmallows
Directions:
  1. Cream the butter and sugars until fully mixed and fluffy. Beat in the egg and vanilla.
  2. In a separate bowl, sift together the flour, corn starch, baking soda and salt, add to the butter mixture until combined.
  3. Stir in the chips and marshmallows. 
  4. Shape the dough into heaping tablespoon sized balls, chill for at least 30 minutes.
  5. Preheat the oven to 325'. Arrange the balls on a parchment-lined cookie sheet, leaving at least 3 inches between cookies. Bake 15 minutes until browned on edges but still soft in center. Let cool on cookie sheet. click here for original source of the recipe. 
I've never made a more un-appealing batch of cookies, except maybe these that I burned LOL:


One tiny thing that made me feel better - I gave these to the guy working on my garage and said "these are the ugliest cookies I've ever made" and he goes "I don't care, they're cookies". In fact, that's my happy moment of the day ~ when you make ugly cookies but someone still appreciates them. 


Monday, January 14, 2019

Epsom Salt Bath Cakes

I posted last month that I was going to make shower melts (click here for bath salt ornaments) for gifts but then I didn't follow up with how they turned out...because they didn't turn out! They do smell good, and the benefits are still there - they just didn't harden into the little cubes I was expecting. Never fear, they are still useful...just not very pretty gifts haha, and I can't really set one in the shower for the steam to melt it like I planned. So I put all the mushy cubes in a clear container and now just scoop out a bit and add to my bath water. I scented them with Doterra "breathe" respiratory blend which seems perfect this time of germy-cold year - click here to see how to make them and let me know if you have better luck getting them to stay in cubes! I will probably make these again and just not bother making them into cubes, I like just adding a scoop to the bath.

Having said all that, I did make a different bath salt thing that totally worked and I'm loving - these bath salt cakes. I found the recipe at epsomsaltcouncil.org and didn't change anything (shocker, I know.) - I have been using these cakes for a couple weeks now, I will definitely be making more of these in the future and want to experiment with "frosting" them...I'll let you know how that works out. For now, here's how to make these easy epsom salt cakes (I'll tell you how I did it, if you want additional instruction or info check out the epsom salt site):


Combine 4 cups of Epsom salt with 3 tablespoons of water. Mix in 1 teaspoon of olive oil; add 10-15 drops of essential oil (I combined lavender and grapefruit) depending on how strong you like your fragrance. Add food coloring until desired shade is achieved. Note: when you bake the salts, some of the fragrance and color will evaporate so you might want to go a little heavier with both. Mine turned more white around the edges after baking, but are still a light pretty blue and smell great.

Coat the inside of a 12-count muffin mold with a little olive oil. Divide mixture evenly among the muffin cups. Firmly pack the mixture - I tamped the mixture down as hard as I could using the bottom of a small glass -  and bake at 150' for one hour.


Note: their directions say to avoid hotter temperature because they could melt the salts, but my oven doesn't go lower than 170' and that worked just fine.


Let cool fo 20-30 minutes, turn pan upside down and gently ease the cakes out of the mold. Place the bath salts in a glass jar to store - I gave a few as gifts, stacked on top of each other and put in a clear treat bag, tied with a label and bow. Super cute.