

7.29.22: golf banquet
7.29.21: how to make a tie blanket
7.29.20: smashed baby red potatoes
7.29.19: steering wheel cover
7.29.17: wonder woman keychain
7.29.16: Brooke makes a tie blanket
7.29.22: golf banquet
7.29.21: how to make a tie blanket
7.29.20: smashed baby red potatoes
7.29.19: steering wheel cover
7.29.17: wonder woman keychain
7.29.16: Brooke makes a tie blanket
I have been trying to cut down on my night time snacking but its very hard to do when the husband and his ridiculous metabolism is eating a bag of sour cream and onion chips beside me. Now in all honestly chips wouldn't be my thing - it would be ice cream for sure. I was discussing life and its unfairness with Brooke and she told me something she saw on Tik Tok that I should try. Yes I'm aware that teens (and others) get recipes from Tik Tok however that's not usually my favorite go to for that sort of thing.
This time though I was willing to give it a try.
Maybe everyone knew this was a thing except me but here it is:


7.28.22: MNIH: chicken stuffed crescent rolls
7.28.21: old fashioned ham salad
7.28.20: tt - float anchor
7.28.19: 🔥 week 30
7.28.18: blue cheese stuffed olives
7.28.17: jilly's jam - strawberry peach freezer jam
7.28.16: framed words
GF Chinese Chicken Corn & Bean Soup (So yum)!!

1. Add one can of corn with the liquid to 1 cup of the stock and blend it up with an immersion blender until no kernels are left. You can also do it with a standing blender or food processor.
2. Then add the remaining stock and the other can of corn to the crockpot
3. Mix the flour and water together and stir into the crockpot. Then I add in 2 whisked eggs into the crockpot, this makes the soup have like ribbons in it… it’s delicious, trust me.
4. Make sure to rinse first, then I add white beans and chopped green onions. Then add seasonings (you can dress this soup up down however you prefer to season but I usually just stick to salt and pepper and occasionally add ground black pepper and chili flakes if I want something more spicy). Add soy sauce to taste.
5. I allow this soup to cook for an hour before I add the shredded chicken. (Remember, I’m using chicken from the whole chicken I made on Sunday, so I’m just shredding pieces of cooked chicken and putting them into the pot right before it’s done so that it doesn’t overcook the meat!)
6. I usually top this with green onion, but today I was very low on green onion so instead (for looks) I threw a little fresh parsley. It was delicious.
7.27.22: zucchini brownies version 2
7.27.21: travel medication tip
7.27.20: gourmet s'mores
7.27.19: penne alla vecchia bettola
7.27.18: Japanese string gardening
7.27.17: crochet a mug cozy

7.27.16: travel trip for medications
I used to make a certain dip all the time - you probably did too since it was a standard 'classic' back in the day haha - put a block of cream cheese on a serving plate, cover it with orange marmalade and top with black pepper. Served with Ritz of course! Yum, it's actually quite good even if it is old-school. The other day I wanted to make dip for a dinner party and almost made the one above, but decided to fancy it up a bit.
I whipped 1/2 container ricotta, the block of softened cream cheese and a little milk together until smooth, seasoned with coarse salt and pepper. Spread in a small serving dish, spooned orange marmalade overtop and sprinkled on black pepper. Simple and delicious.
I served it with an assortment of crackers, including Ritz :)

 |
| in addition to other crackers, it's really good on these raincoast crisps |
7.26.22: apple strudel
7.26.19: kid craft - Lego cord holder
7.26.18: chickpea cucumber salad
7.26.17: granola bites
This tip isn't really a tip, more like a 'hey have you seen this?' find...maybe this is only new or news to me but I was very excited (I know, I know, it doesn't take much - yes I can feel you rolling your eyes at me).
Pillsbury has come out with corn dog wraps - find it in a tube where their crescent rolls are.
The instructions are to wrap hot dogs and bake but I took it one step farther and rolled the corn dog wraps around turkey better cheddar smoked sausage links and YUM!!! I'm so happy right now.
Side story for why I don't have a picture to show you - I made these for lunch when Mark and LeDonna were over and after we demolished them someone asked if I was going to blog it. I said no, because all it is is a store-bought piece of dough wrapped around a hot dog and I had no creative input at all LOL so what is there to blog? But then after discussing I agreed that even if I didn't make it up I should still be sharing this amazing find with everyone :)
YUM.


Store-bought sponges are wasteful, and can often be an eyesore in your kitchen. If you're looking for an excuse to toss your bright yellow scrubbing tools, consider their environmental impact: The microplastics used to manufacture typical kitchen sponges actually come out each time you use the sponge—meaning they go straight down your drain and into the ocean, where they sit forever.
Luckily, there's an alternative that works just as well. We'll show you how to make your own no-waste kitchen sponges. It's an easy sewing project you can finish in an afternoon, and the best part is that the sponges use printed cotton fabric, so you can choose any color or pattern you like.
Follow these simple how-to instructions to make your own no-waste kitchen scrubbers. You should be able to make one in under an hour.
Before you can start sewing, prepare the materials: Everything used in this project is plastic-free, so you can rest easy knowing you're not washing any microplastics down the drain. And since the pieces needed are relatively small, this is a great time to use up some fabric scraps from past projects. You'll need a 5x7-inch piece of printed cotton ($13 per yard, Rifle Paper Co.) terrycloth, and mesh. If you can't find terrycloth fabric, try using an inexpensive hand towel. You'll also need to cut a 3x5-inch piece of 1/2-inch thick mildew-resistant poly batting ($32 for 5 yards, Sailrite).
To assemble the sponge, layer the mesh piece between the cotton and terrycloth pieces, right sides together. Use sewing pins ($4, Joann) to secure the layers together, then stitch around the perimeter with a 1/2-inch seam allowance. Leave a 3-inch opening at one end of the sponge. Clip the corners, then turn the fabric right-side out.
To give the sponge a similar texture to the store-bought version, insert the mildew-resistant poly batting through the 3-inch opening you left in the fabric. This will also give your sponge some absorbency. Once you've added the batting, fold the opening inward and topstitch it closed. To finish the sponge, topstitch around the perimeter with a 1/2-inch seam allowance—when you're done, the sponge is ready to use! Be sure to rinse off the sponge and squeeze all the water out after each use to keep the sponge looking and smelling fresh. To clean your reusable kitchen sponge, wash it in your washing machine with detergent and dry completely.
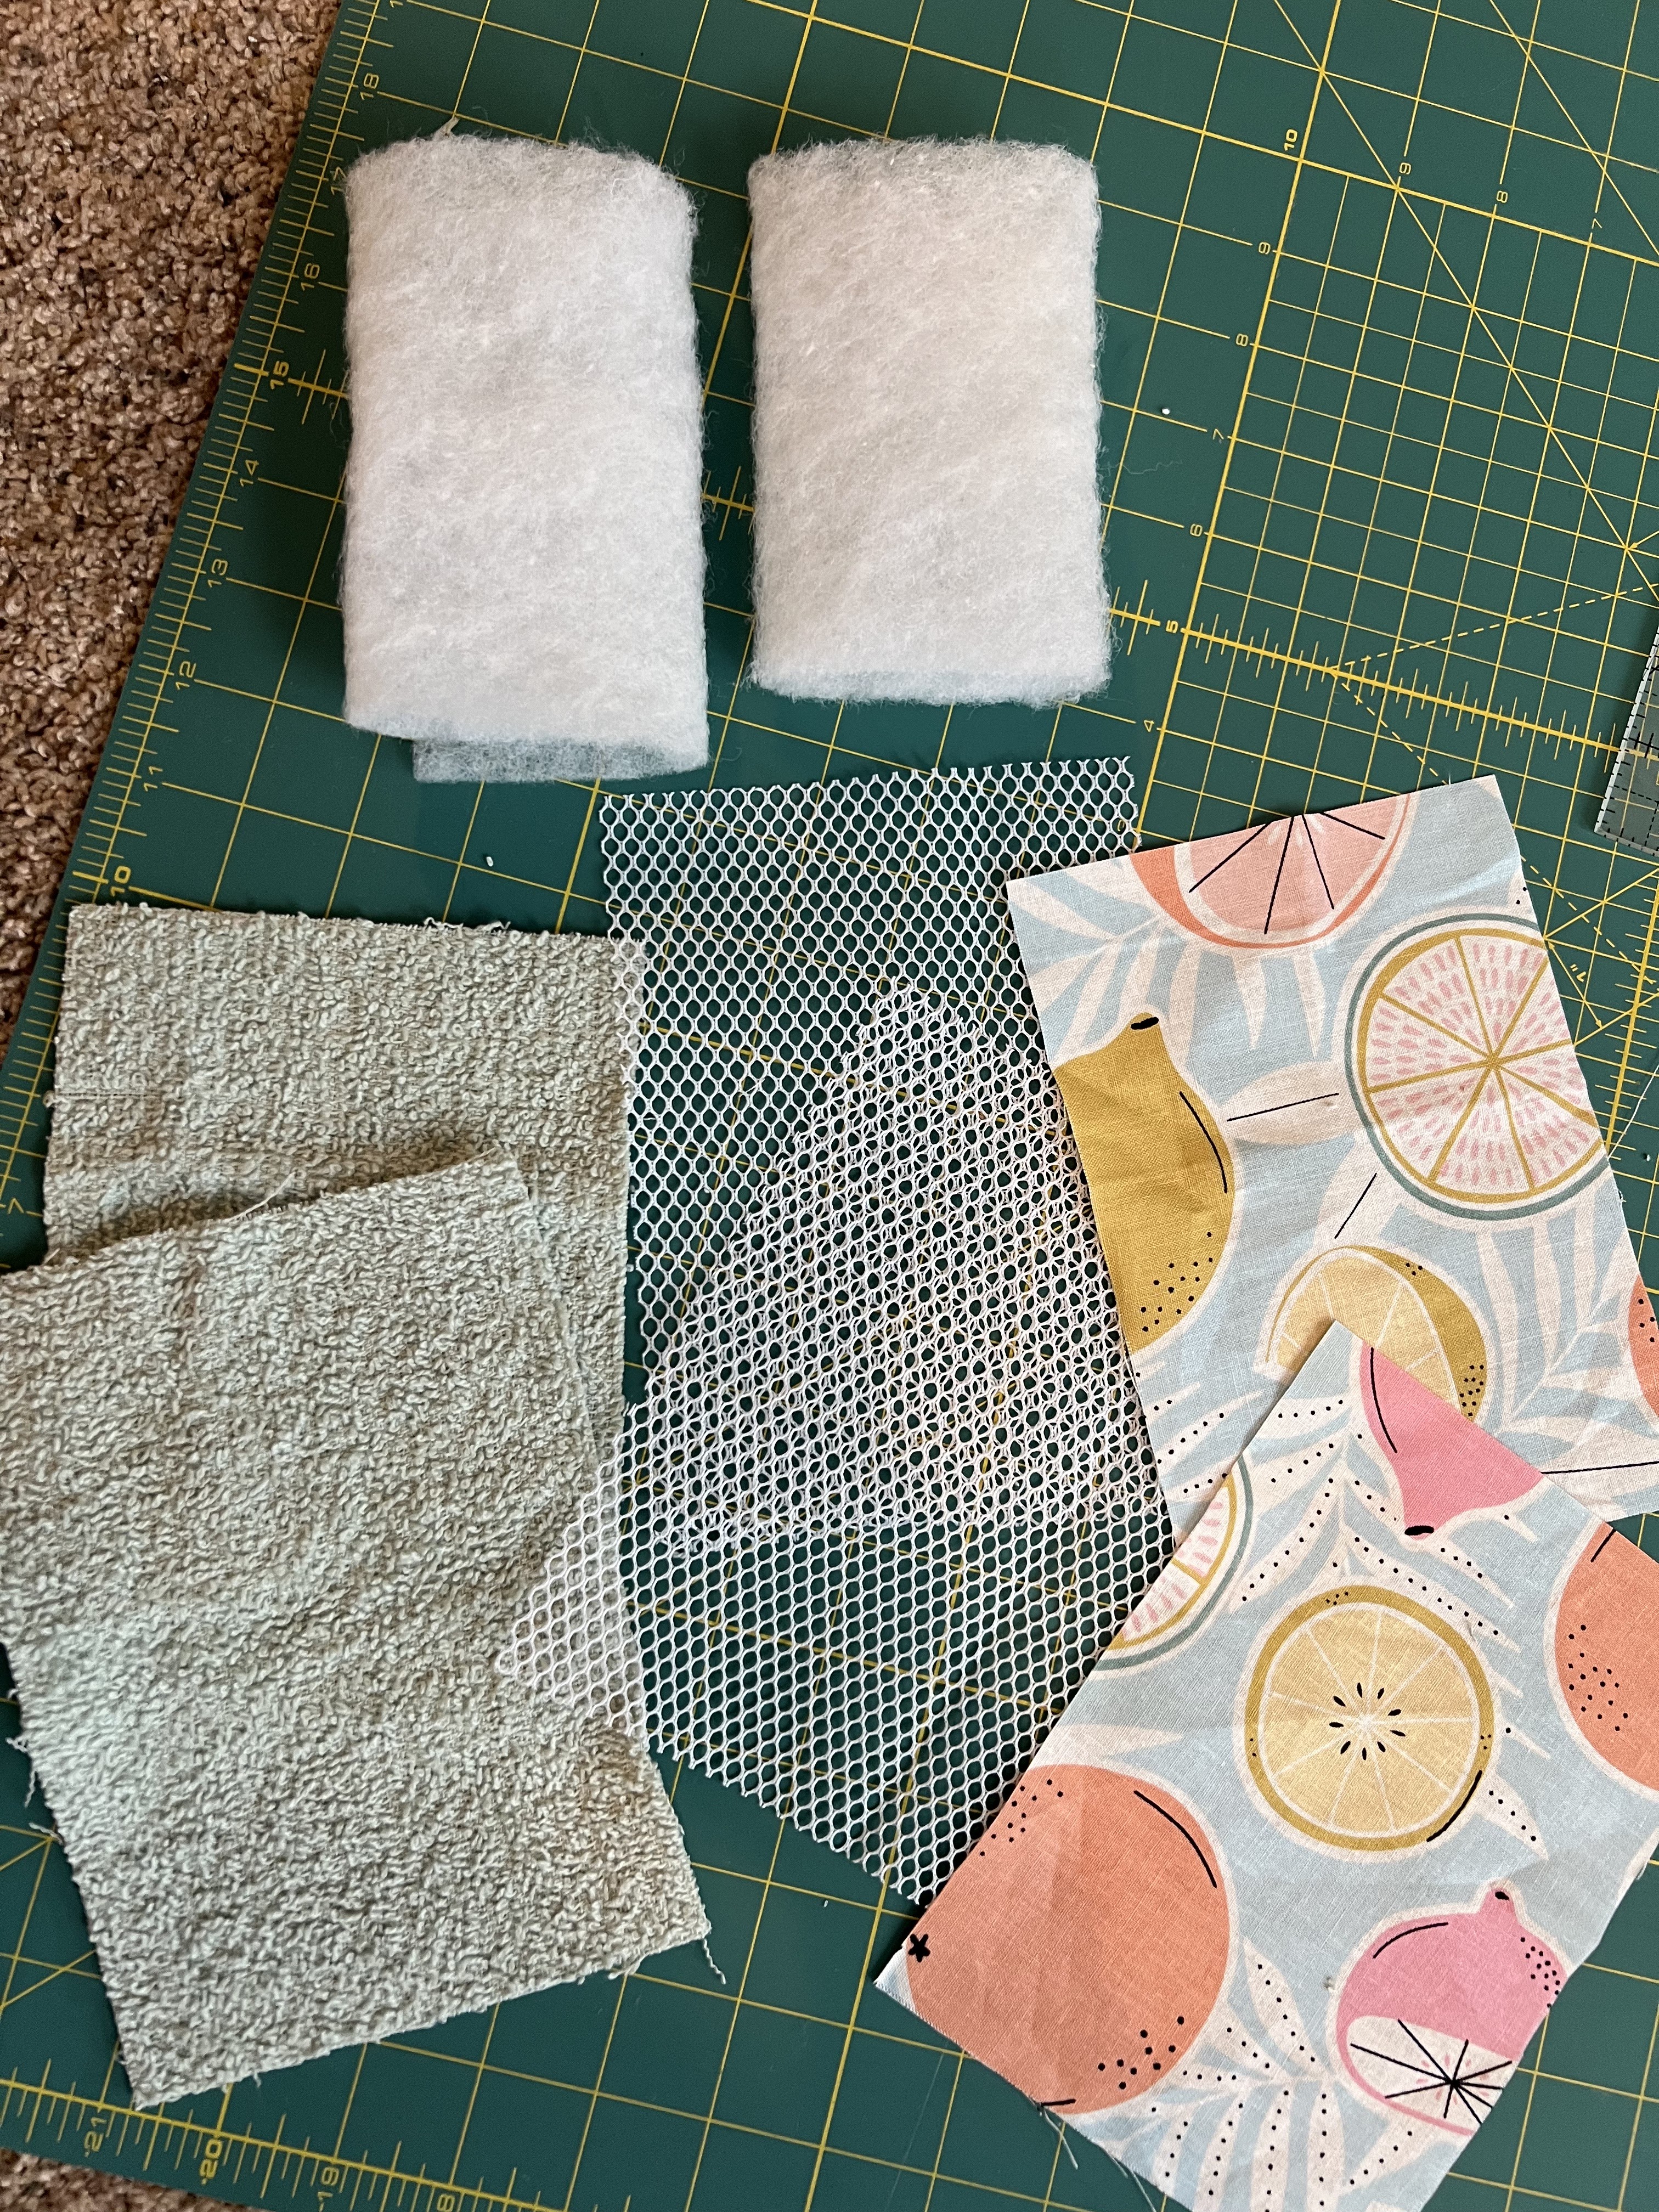 |
| terry cloth, mesh, cotton fabric, batting |
 |
| sew right sides together, leave a gap to turn it right side out |
 |
| turn it so the fabric and mesh is on one side, the terry cloth is the back side |
 |
| add the batting |
 |
| sew the opening closed |
 |
| sew all around the finished sponge |

Found here at bhg
7.24.22: 🔥 week 30
7.24.21: Cathy's peach cobbler
7.24.20: tuna cauliflower salad
Dear Campers ~
Here's a quick recap of what happened at camp last week in case you missed anything:
Posts ~
7/16: 🔥 week 29
7/17: pearl stretchy bracelets
7/18: TT lemon juice ice cubes
7/19: MSIH: chicken cobbler
7/20: Macey's scrambled eggs
7/21: MSTI: towel hanger
7/22: words
What's Cooking ~
7.23.21: baked spicy shrimp
7.23.20: tuna with zucchini noodles
7.23.19: tt - plumping dried fruits
7.23.18: it's a real treat paper gift holder
7.23.17: zucchini pie
7.23.16: travel log - Regensburg


7.22.22: loaded tater tots
7.22.20: kid craft - grass seed jars
7.22.19: man-day Monday
7.22.18: summer squash spiral gratins

7.22.17: pitcher mojitos
7.22.16: passau, germany


7.21.20: tip-sy tuesday: cilantro
7.21.19: 🔥week 29
7.21.18: organizing the motorhome
7.21.17: everything cheeseball
7.21.16: austria to passau
Want to know the secret to the best scrambled eggs? It’s sour cream!
On Saturdays when I have more time to cook in the kitchen, I will cut potatoes into little baby squares and fry them in a cast iron skillet. I add parsley, thyme, fresh, basil, olive oil, salt, and pepper.
When making my eggs, I add one dollop of sour cream for every egg. Whisk this thoroughly, so there are no clumps of sour cream, butter the pan before you put the eggs into the pan, and flip them just as it starts to bubble! (Think… light and fluffy eggs, not “fried!”)
The eggs with sour cream are great by themselves, however I like to add cheese. For this specific meal, I added some mozzarella cheese into the eggs just as they were done cooking so the cheese is still melty.
I topped this with a dollop of sour cream, some salsa and fresh avocado! 😊 SO GOOD! (Definitely a bigger breakfast than normal but 🤷🏼♀️ 🐖) 😂

7.20.22: peach cobbler
7.20.21: TT - silpat vs parchment paper
7.20.20: chocolate chip, banana, oatmeal muffins
7.20.19: grilled tuna pasta salad
7.20.18: kid craft: beach jars
7.20.17: how I organize my garden stuff
7.20.16: Budapest and Vienna
