Saturday, February 19, 2022

Shrimp Étouffée

I made this recipe for Paula Dean's shrimp étouffée 2 years ago for Fat Tuesday. At the time I started to blog it I couldn't find the photos so figured I'd just hold onto it until I could make it again and remember to take pictures. Guess what I just found when going thru photos on my computer? The photos! Sweet. Love when that happens. 

Fat Tuesday is 3/1/22 this year if you want to make the fantastic dish for Mardi Gras - yes it's been 2 years since I made it but I still remember how much we loved this!
 

  • 1/2 stick butter 
  • 2 lbs small or medium peeled and deveined (recommended: (31/35 size count) shrimp 
  • salt to taste
  • 1 (14.5-oz) can diced tomatoes 
  • 1 (8-oz) can clam juice 
  • 2 to 3 dashes Paula Deen Hot Sauce 
  • 1/2 cup minced fresh parsley 
  • 1/2 cup minced, plus extra for garnish, green onions 
  • 1 teaspoon Cajun seasoning 
  • 1/2 teaspoon black pepper 
  • 1/2 teaspoon white pepper 
  • 1/2 teaspoon more if desired cayenne pepper 
  • 3 cloves finely minced garlic 
  • 1 cup chopped celery 
  • 1/2 cup chopped green bell pepper 
  • 1 cup chopped yellow onion 
  • 1/2 cup plus extra flour, optional all purpose flour 
  • 1/2 cup oil 
  • optional rice 

Make the roux: melt the butter in a large heavy saucepan over low heat. Whisk flour into the butter to form a paste. Continue cooking over low heat and whisk continuously, until the mixture turns a caramel color and gives off a nutty aroma, about 15 to 20 minutes. To the roux, add the onion, green pepper, celery, and garlic and cook over low heat about 5 minutes, until the vegetables are limp. Add the black pepper, white pepper, cayenne pepper, Cajun seasoning, green onions, parsley, and hot sauce to taste. Add 1 can clam juice and the tomatoes with their juice, stir to blend. Add the salt, starting with 1 teaspoon then add more if needed. 

Bring the mixture to a boil, reduce the heat to low and simmer for 10 to 15 minutes. Add shrimp and stir. It will take about 3 minutes for shrimp to cook, don’t overcook. Remove from heat. Add the butter and stir; the heat from the dish will melt the butter. Transfer the etouffee to a tureen, serving bowl, or if you prefer, over rice. Garnish with the green onions. 


making the roux (flour and butter)

my helper

my other helper and some of the ingredients 


my notes: I added chopped andouille sausage; used a can of fire roasted diced tomatoes, and bought a container of pre-cut mixed bell peppers. I originally found this recipe on the Food Network but it's no longer there,  it's on her website and now it says to make the roux with oil instead of butter but the butter turned out great, just make sure to watch that it doesn't burn. I don't cook it for 15 minutes, maybe that's the directions for if you use oil instead. I just cook the flour and butter for a couple minutes to cook off some of the flour flavor. Also, I cut back on the spicy spices figuring everyone could add hot sauce if they wanted more heat; and I skipped the green onion garnish. 


2.19.19: tt: deviled egg cover 
2.19.18: macrame wall hanging (and Sarge "helping me")
2.19.16: kid craft - decorate notebooks

Friday, February 18, 2022

MSIH: Morning Glory Muffins

Made muffins the other day after cleaning out my baking supplies and finding a half empty bag of whole wheat flour - muffins seem like a good use hahahah. They seem fairly healthy chock full of carrots, apples, coconut, cranberries, and sunflower seeds - other than the oil hahaha. Gave them to my sis cuz she's usually hungry - didn't tell her what all is in them and she made a couple good guesses, here's her review:


My sister delivered me muffins today.  YAY ME!  So, I love muffins.  Not much you could do to it that I wouldn’t like.

That said, I asked my sister what kind these were before I tried them (so I could know what I was getting into) and she didn’t write back right away and patience isnt my thing so I went ahead...


Veggies. It seems like veggies.  I didn’t eat it for breakfast but seemed like a breakfast muffin.  (vs. a chocolate banana one that I would eat all day..) lol.

I LOVED this.  it made me feel better about my muffin choice.  Might not be healthy at all but I could at least pretend I am.


They had a nice moist consistency, didn’t taste like bran but had a definitely wheaty (is that a word?  Wheat-ish?) anyway.  Def wheat flavor.  Also think I’m tasting carrots maybe?  Almost felt like a carrot cake in a muffin form.  But yet back to the fact I could feel good about my choice at breakfast. (not like the guilt I would have if I ate carrot cake for breakfast). 


All in all – these were delish.  Love them.  Would be a great fast breakfast for the kid on the way out the door.


  • 1/2 cup raisins
  • 2 cups whole wheat flour
  • 1 cup brown sugar
  • 2  t. baking soda
  • 2 t. cinnamon
  • 1/2 t. g round ginger
  • 1/2 t. salt
  • 2 cups peeled and grated carrots
  • 1 large tart apple, peeled, cored, and grated
  • 1/2 cup shredded coconut
  • 1/2 cup chopped walnuts
  • 1/3 cup sunflower seeds or wheat germ, optional
  • 3 large eggs
  • 2/3 cup vegetable oil
  • 2 t. vanilla
  • 1/4 cup orange juice
1. Preheat the oven to 375'. Lightly grease a 12-cup muffin tin, or line it  with paper liners and spray the insides of the papers.
2. Cover the raisins with hot water, and set them aside to soak while you assemble the rest of the recipe. 
3. In a large bowl, whisk together the flour, sugar, baking soda, spices, and salt. Stir in the carrots,  apple, coconut,  nuts, and sunflower seeds or wheat germ.
4. In a separate bow, beat  together the eggs, oil, vanilla, and orange juice. Add to the flour mixture, and stir until evenly moistened. Drain the raisins and stir them in.
5. Divide the batter amount the wells of the  prepared pan.
6. Bake the muffins for 25-28 minutes, until they're nicely domed and a cake tester inserted in the center of one of the inner muffins comes out clean.
7. Remove from the oven, let cool for 5 minutes in their pan on a rack, then turn out of  pans to finish cooling. 

Yield: 12 muffins

This recipe is on the back of a bag of King Arthur flour I was trying to use up - it says it makes 12 so I doubled the amounts to make 24 and I'm not sure how they got 12...I made 24 plus had enough batter to also make an entire loaf of bread. Haven't heard of morning glory bread but I was tired of making muffins so scooped the rest of the batter into a greased loaf pan and it's great. I thought the muffins might be dry because it's 100% whole wheat flour but nope, I guess the oil and apples help keep it pretty moist. I followed the recipe other than I substituted dried cranberries for the raisins (raisins = blech), and omitted the nuts so Dave can eat them. 


2.18.21: kid mask leash

2.18.20: tip-sy tuesday: sewing machine needle

2.18.19: Cathy updates a fireplace

2.18.18: pastitsio

2.18.17: paint samples


Thursday, February 17, 2022

Random Acts of Kindness Day

Today is national 'Random Acts of Kindness Day', not as delicious sounding as my favorite 'national donut day' but still, it's a nice thing to keep in mind today (and every day, duh). I've seen a few sites listing some ideas for how to randomly surprise or brighten up someone's day, I've come up with a list of my own that is basically taking their lists and making another list that I thought I'd share. 

What are we making today at camp? We are making nice hahaha. 

How about:

  • making a grocery run for a neighbor, friend, shut-in, or anyone you know that maybe can't get out right now (or your sister who just doesn't like to go to the store)
  • here in Michigan we've been getting quite a bit of snow lately - I'm sure you have people who could use help shoveling; wouldn't that be a nice surprise to get all bundled up to go shovel only to find it's already been done by the mystery shoveling angel?
  • walking or playing with someone's dog. This is a better act of kindness if it's a dog you know and not some stranger that thinks you're dog-knapping their pet. 
  • complimenting a stranger is always nice and usually unexpected. And I don't mean that whole 'bless your heart' back-handed compliment which is really not usually meant as a compliment. Also don't be fake and compliment a strangers' crazy leggings because 'well look at you and your snazzy outfit' doesn't always come across as genuine...talking to you, lady at the dollar store last week. 
  • paying for the person behind you in line at fast-food or coffee drive-thru. This actually happened to me once and it totally made my day! If only I'da known she was going to do that maybe I'da splurged on the apple pie ;). kidding, kidding. 
  • make dinner for a friend, neighbor, or family member who is exceptionally busy right now and should be packing for a road trip but instead plays on her computer way too long and then is super behind and scrambling and would love if someone cooked for her. This one just got away from me and somehow turned into a plea for my sister to make me dinner. 
  • I like to make goodies and randomly drop off at neighbors or give to my UPS man, Paul. I think it's fun to surprise people like that, and it helps me to not eat all of the goodies myself. 
  • donate to a local shelter or charity. 'Cause goodness knows most of us can stand to sort out a few things. 
  • clean out art and office supplies and donate to a teacher. They always need art and office supplies! 
  • same for books and donating to the library
  • I took a picture a couple years ago in my neighborhood of someone crocheting around street signs, tree trunks, and benches. It made me happy just to come across that random act. Whether it's considered an act of kindness or vandalism I won't argue. 


That's just a small list of possible acts for you to think about. And if you choose to do random acts on days other than February 17 even better - thumbs up to you, kind person! 


2.17.21: banana pudding tart 

2.17.20: make a paper gift box

2.17.19: ðŸ”¥ week 7

2.17.18: nail art

2.17.17: coincidentally, it's how to do ombre nail art!

2.17.16: making paper crowns


Wednesday, February 16, 2022

Baked Crispy Chicken and Potatoes

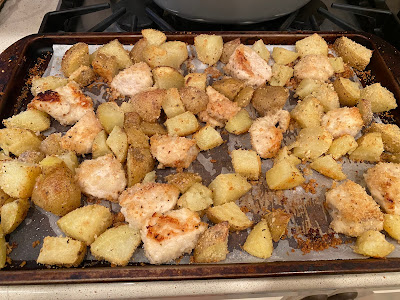
This is an easy, one sheet-pan meal that comes together quickly and is surprisingly good. I say surprisingly because the picture online doesn't look that great (it appears to be all one color and super breaded) and the pictures that I took don't look that great (it appears to be all one color but not breaded very much), but the flavor and texture is a winner. Don't think 'chicken nuggets' for dinner  - even though it looks like it hahah - like Dave did when I told him what I was making, he's all 'chicken nuggets?' like it's a bad thing hahaha. We don't tend to eat nuggets for dinner (however, chicken fingers are my go to fast-food lunch!). This is really good, trust me!


I didn't have plain breadcrumbs on hand so I substituted panko, I also substituted grated parm from the jar, and didn't serve with lemon wedges. 
  • 1 pound boneless skinless chicken breasts, cut into 1 1/2 inch pieces
  • Kosher salt to taste
  • 1/4 cup olive oil, plus more to drizzle 
  • 1 1/2 cups plain breadcrumbs
  • 1/2 cup freshly grated parmesan cheese
  • 1/4 teaspoon black pepper
  • 1/4 teaspoon garlic powder
  • 1/2 teaspoon dried oregano
  • 4 small russet potatoes or 4 yukon gold potatoes peeled and cut into 1 inch pieces
  • Lemon wedges, to serve
  • Preheat the oven to 375 degrees F. Line a rimmed baking sheet with parchment paper and set aside.
  • To a small bowl, add the chicken, a good pinch of salt and a drizzle of olive oil, just enough to moisten the chicken. Toss well to coat and combine.
  • To a large bowl add the breadcrumbs, parmesan cheese, black pepper, garlic powder, oregano and a good pinch of salt. Mix well to combine. Add the seasoned chicken to the breadcrumb mixture and toss well to coat the chicken in the breadcrumbs. Remove the coated chicken from the breadcrumbs, leaving any remaining breadcrumbs in the bowl. Spread the chicken evenly on the prepared pan. Add the diced potatoes to the remaining breadcrumb mixture and toss well to coat the potatoes in the remaining breadcrumbs. Nestle the potatoes in between the chicken on the prepared tray. Drizzle the chicken and potatoes with the olive oil and bake for 35 minutes or until golden brown, the chicken is cooked through and the potatoes are tender. Serve warm with lemon wedges if desired.
    recipe found a giadzy.com


2.16.21: tip-sy tuesday: cast iron broccoli

2.16.20: ðŸ”¥week 7

2.16.19: walking taco bowl

2.16.18: flower centerpiece by Brooke

2.16.17: zucchini tots 

2.16.16: Sheryl's lemon cake


Tuesday, February 15, 2022

Tip-sy Tuesday: storing felt

I'm a very thrifty girl and hate to waste materials - if I'm scrapbooking or making card projects I'll figure how to cut, stamp, or punch squeezing out as many as I can from a sheet, same for sewing projects, same for anything using felt. The point for this post is that I save bits of felt in case I need a little bit in the future - you know, little scraps are needed for small things like eyes, ears, flowers, etc...

I used to have all the sheets and scraps in a big box and would dig thru looking for what I needed, but one day I got the idea to store the felt the same way I store sheets of decorative paper (a trick I learned from helping Ronda at her studio). I sorted the felt by color and grouped them in file folders, sheets and scraps together. Now I can easily find a tiny bit of pink, or a whole sheet of green - nicely stored flat in their folders. This also makes the felt not all wrinkled and jammed up in the box which is helpful!


Note: I posted about storing paper and scraps here; in a nutshell you keep the same color scheme or patterns together with scraps in plastic page protectors and stored flat on a shelf - such a simple, organized tip that makes paper-crafting so much easier. 

Here's a few MMDC projects using felt:

gift card holder

troll costume

Gracie's stitch dolls

onesie gift holder

poinsettia napkin rings

mitten gift clip

cork turkeys

Miss Lori's felt flowers

Christmas trees

shamrocks

candy cane mice

pinecone owls

feather hair clips

I'm sure there are more posts using felt but that'll get you started hahahha!! I do love me some felt 😉


2.15.21: air fryer chicken legs by Jen

2.15.20: tuna artichoke salad

2.15.19: self-tanning tips

2.15.18: clary sage bath salts 

2.15.17: glazed lemon cookies

2.15.16: enjoy the little things  paper project


Monday, February 14, 2022

Red Velvet Cookies

Unless you read this post early this morning and have the ingredients on hand, it might be a little late for you to make for today - Valentine's Day! But other than being red they are totally not only for Valentines or Christmas, they are easy to make and easier to eat hahah. I didn't think I like red velvet flavors but guess what, I'm wrong. These are a new 'keeper' recipe in my book! 

My sis asked if I wanted to make cookies for Senior Night at basketball last week - of course I do - and she came up with the idea to do red velvet representing one of the school colors (Laingsburg colors are red and black); I responded 'no, it takes a LOT of red dye and no one wants that'. She begged to differ, said the amount in one cookie isn't very much and it'd be fine, and that it's a cute 'theme' cookie. 

So I googled for recipes - I've never made red velvet cookies before - and found a few that looked good. Don't know why I settled on this one I found at tasteofhome.com but I'm super glad I did, some reviews weren't great but they are wrong hahahah. There isn't anything I'd change about this recipe. 

Because I can't keep it simple I decided to make 3 different kinds of cookies - double chocolate with a hershey hug, s'more, and these:

  • 1/2 cup butter, softened
  • 1/2 cup sugar
  • 1/2 cup packed brown sugar
  • 1 large egg
  • 1 T. milk
  • 2 t. red food coloring
  • 1 t. vanilla
  • 1 1/2 cups flour
  • 1/3 cup baking cocoa
  • 1 t. baking soda
  • 1/4 t. salt
  • 3/4 cup white baking chips (plus additional for presentation, see my note below)

1. Preheat oven to 350'. In a large bowl, cream butter and sugars until light and fluffy. Beat in egg, milk, food coloring, and vanilla. In another bowl, whisk flour, cocoa, baking soda, and salt; gradually beat into creamed mixture. Stir in baking chips.

2. Drop dough by tablespoonfuls, 2 inches apart onto parchment lined baking sheets. Bake until set, 6-8 minutes. Cool on pans 2 minutes. Remove to wire racks to cool.

Oh wait, I lied - I did change a couple things! I doubled the food color to 1 Tablespoon to get the dough redder - start with 2 t. and see what you think before adding more.  I used coarse salt, measured with my medium cookie scoop and it took about 10 minutes to bake them. Also, after dropping them onto the cookie sheet and before baking them,  I studded more white chips on top because I didn't like how you couldn't see the chips that were baked into the dough.

2.14.21: 🔥week 7


2.14.17: flower heart by Julie

2.14.16: tuna over nice (basically a Nicoise salad)

Sunday, February 13, 2022

🔥 Around the Campfire (week 7)

Dear Campers ~

Here's a quick recap of what happened at camp last week in case you missed anything:

Posts ~

2/6: 🔥 week 6

2/7: Miss Lori's painted hearts

2/8: heart treat holder

2/9: valentine felt gnome

2/10: MSIH: taco stuffed shells

2/11: wine cork x and o

2/12: pinwheel icebox cookies

What's Cooking ~

  • olive garden chicken (recipe to follow!), green beans
  • stuffed salmon, wilted spinach
  • chicken parmesan meatballs, zoodles in red sauce, mozzarella stuffed portobellos
  • grilled lamb chops, potato salad, wilted spinach 
  • alice springs chicken, crockpot risotto (both of those recipes to follow)

Hope everyone had a great week! Stop back often to see more projects, ideas, recipes, whatever else I can think of (or get someone else to make for me) at camp next week! I haven't done a book review in forever, I haven't given up on them but all I've read for the past month are books in the 'In Death' series by JD Robbs - there are like 50 and I'm on something like number 17. They are kind of all the same so haven't bothered reviewing them hahaha! I'll catch you up when I've read something new. Bye!

Sincerely ~


Jill

camp counselor 

2.13.21: valentine bubble tree 

2.13.20: hot dog heart

2.13.19: asian style meatballs with sweet chili sauce

2.13.18: shrimp cocktail in a wine glass

2.13.17: heart suncatcher

2.13.16: wine label for Valentine's day gifts


Saturday, February 12, 2022

Pinwheel Icebox Cookies

I've been under the weather for a few days, not so sick I need to lay in bed but don't feel like doing much of anything or going anywhere - so I've busied myself with cleaning and organizing a few cabinets in the meantime; I found an old 'McCall's Cookie Collection" dated 1965 in the very top of my recipe cabinet, it's in a plastic page protector and has been very well used judging by all the drops and dough smudges in the pages! I can't remember but I'm assuming this is a book I used as a kid and either my mom gave to me or I stole it when I moved out hahahha. So in addition to sorting recipe books I also decided to make 'pinwheel icebox cookies', a recipe on the 2nd page of the book that caught my eye...


The pinwheel is made by stacking a chocolate layer on top of a colored vanilla layer, rolling them into a log, and slicing into disks. I added pink food coloring to the vanilla layer thinking that sounded kinda Valentine-y, you can leave it just vanilla color or add whatever food color you want - the cookbook suggests green or red so I assume they mean this to be a Christmas cookie? 

An 'icebox' cookie is also known as refrigerator cookies, which just means the stiff dough needs to be chilled in the fridge until firm. I ended up taking 3 days to make these but you can certainly do it faster! First day I made the dough and chilled it, second day I rolled it into the log and chilled, third day I baked them. I didn't get as many cookies as the recipe said, and my log was 2.5" instead of 1.5", but they turned out good - crunchy and soft at the same time which I enjoy. The end cookies are ugly because of the way the dough rolled, but the center cut ones are a nice pretty spiral. Note, if I would have thought about it and paid more attention it makes sense why you'd roll the dough into a square as directed - I rolled into sort of a round pie crust shape and that's why the ends didn't turn out pretty!

  • 2 cups flour
  • 1 1/2 t. baking powder
  • 1/2 t. salt
  • 2/3 cup soft butter
  • 1 cup sugar
  • 1 egg
  • 1 t. vanilla
  • 2 squares unsweetened chocolate, melted
  • 3 or 4 drops green or red food color
  • 1/2 t. mint extract (optional - my note: I didn't add the mint extract)
1. Sift together the flour, baking powder, and salt; set aside. In a large bowl, beat the butter until light. Gradually beat in sugar. Add egg and vanilla; continue beating until very light and fluffy. 
2. At low speed, beat in half the flour mixture; mix in rest to form a stiff dough. Divide evenly into two bowls. Add chocolate to one, mixing well. Add food color and mint extract to other, blending well. Refrigerate 1 hour. 
3. Roll each part between two sheets of waxed paper, to a 7" square. Peel off top sheets of waxed  paper, invert chocolate layer onto colored layer; peel off top sheet of waxed paper. 
4. With rolling pin or hands, gently press layers together. Roll up, jelly-roll fashion. Roll will be 1 1/2" in diameter. 
5. Wrap  in waxed paper or foil, seam side  down; refrigerate until firm - several hours or overnight - before baking.
6. Preheat oven to 375'. With sharp knife, cut as many 1/8" slices as desired for baking at one time. Rewrap rest of roll and refrigerate until you desire to bake more. Place slices 2 inches apart, on ungreased cookie sheets. Bake 8 to 10 minutes, or until lightly browned. Transfer from cookie sheets to wire racks to cool completely. 
Makes about 4 dozen.  (my note - I got 30 good looking cookies and about 8 ugly end ones that still taste good they just don't have the pretty swirl)


2.12.21: triple berry muffins

2.12.20: yarn heart


2.12.17: goat cheese tart

2.12.16: Brooke and Sydney make 'cootie catchers'


Friday, February 11, 2022

Wine Cork X and O

I may or may not have been creeping on my neighbor Missy's FB post showing her in the kitchen cooking with a friend when I saw a wine cork x and o on her countertop hahahah. Can you even guess how many seconds it took me to go get my cork stash and hot glue gun and whip these out?!!! 


The front of hers are painted red and white, obviously perfect for Valentines Day - but I didn't want to totally just flat out copy so I picked out red wine stained corks for the 'x' and left the corks for the 'o' in their natural state of cork-colored. I'm sure cork-colored is an actual term, right? You know what I mean - don't do anything to them hahaha. 

See how lazy I am underneath it all? Instead of painting the corks I went with their 'natural state'. 

I LOVE this sooooooo much! Such a fun, simple decoration. 


in case I couldn't make a perfect cork circle once I started gluing them together, 
I traced a circle on a piece of paper to use as a guideline. 

For the record, I did ask Missy if she cared if I blog her cute corks since I flat out stole the idea hahahah - she said her friend made them for her and it's fine to share. Here's my inspiration photo:


2.11.21: pasta sauce with meat and eggs

2.11.20: how to make an origami heart

2.11.19: make an ear crawler

2.11.18: confetti heart picks

2.11.17: blueberry jilly's jam

2.11.16: valentine nail art


Thursday, February 10, 2022

MSIH: Taco Stuffed Shells

I've had time on my hands lately so made my sis another dinner for her 'my sis is hungry' review - this time it's this fantastic 'taco stuffed shells'. She sent me the recipe she found here, and I followed it pretty closely. I doubled the recipe so we could try them too, I was skeptical about this one (pasta baked with salsa?) but we ended up loving it. I made ours with mild salsa, and hers with medium knowing they like things spicier - I don't know if taco sauce comes in different heat degrees, Dave went to the store for me and bought mild (smart man, I don't like spicy food hahaha). I don't think there's anything I'd change about this recipe, that's unusual right?

Her review, in her own words, and the recipe follows:

Yeah no idea what this one is. I'm calling it 'Taco What Not' cuz its partly tacos (who doesn’t like a Taco ðŸ˜‰), partly enchiladas, partly a pasta dish. 


This one has been by far the husbands favorite in all the years we have been getting delish meals from my sister.  He LOVED it. I also liked it - he said I “ruined it” by putting lettuce, sour cream and jalapeños on the top.  I didn’t “ruin it” - it was fantastic that way.  Actually high praise from the husband is that he didn’t put taco sauce on the top of it- he puts that stuff on everything. HAHAHA. 


Basically it was enchiladas to me but with big pasta shells instead of tortillas. This gave it a different but fantastic flavor.  Each shell was stuffed with burger and covered in cheese - seemed like something that might be in my wheel house but I’ll need to check the recipe. My sister told me she used ground turkey which he had no idea and didn’t change the flavor at all. I wish she had told me before I ate it though cuz I would have definitely went back for thirds… Wait.. should I be pretending I didn’t have seconds anyway? HAHAHA


I will absolutely be making this one again… since he loved it so much and I won't be able to get my sister to make me the same thing twice, I will be on my own to make it again. Fingers crossed she didn’t make this sauce from scratch or something equally crazy. 


2 thumbs up for this one!! 


Jill here - side note, I got a cute text from my b-i-l with a funny meme that said 'get in my belly' and he wrote 'yummy, yummy, yummy' hahaha. 


  • 1 lb. ground beef or turkey 
  • 1 packet low-sodium taco seasoning 
  • 4 oz. cream cheese (1/2 block), cut into pieces
  • 14-16 pasta shells (about half a large box)
  • 1 1/2 cups salsa
  • 1 cup taco sauce (smooth, I used Ortega brand in a bottle)
  • 1 cup shredded cheddar cheese
  • 1 cup shredded monterey jack cheese
  • sour cream or other toppings if desired
Brown meat until cooked thru, add taco seasoning packet and cook according to directions. Stir in cream cheese, cover until it's melted. Blend well; set aside and let cool completely. 

Cook the pasta shell according to package directions, drain and rinse with cold water to stop the cooking process. Lay shells out individually on a clean towel so they'll dry and not stick together. 

Pour salsa in the bottom of a 13x9 baking dish. Stuff the shells with the meat mixture, arrange with seam side up on top of the salsa. Top with taco sauce, cover and bake for 30 minutes. Remove cover, add the cheeses and bake an additional 10-15 minutes. 

Serve with your choice of condiments - sour cream, green onions, black olives, etc. 


oops, this is a very messy plate - I guess I was too
excited to eat and wasn't paying attention hahaha! 

2.10.21: dessert (football) cheeseball (shoutout to Meghan and Mickey!)


2.10.20: fabric flower pins

2.10.19: ðŸ”¥week 6 (and there's a cute Valentine bookmark idea)

2.10.18: organizing food containers

2.10.17: two toned swirly frosting

2.10.16: layered jello parfait perfect for Valentine's day