Sunday, December 31, 2023

🔥 Around the Campfire (week 53)

Dear Campers ~ 

Here's a quick recap in case you missed anything at camp last week:

Posts ~

12/24: 🔥 week 52

12/25: Merry Christmas

12/26: TT rum cake

12/27: crocheted coasters

12/28: meatball chili

12/29: white elephant tricky gift wrap idea

12/30: words

What's Cooking ~

  • burnt ends (costco - don't recommend!), mashed potatoes, steamed broccoli
  • grilled chicken, mozzarella stuffed portobellos, caesar salad
  • baked salmon, coconut rice, mixed veggies
  • chicken sausage, orzo with roasted veggies

Fun fact ~ When typing up this week's recap I had a moment of 'wait, this is week 53? I thought there are 52 weeks in a year...' and then felt a little lame Googling it (as if there is a person judging me for searching random dumb questions on the internet). Turns out there are occasionally 53-week years, and this is one of them! 

That's it for this week! See you next week (or should I have said 'see you next year'? haha) for more projects, crafts, recipes, whatever we can think of to make at camp - bye :)


Sincerely ~

Jill
camp counselor

12.31.22: thru the years


Friday, December 29, 2023

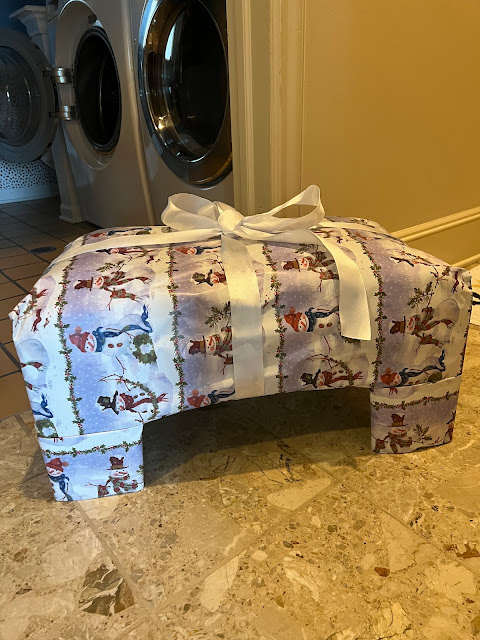
White Elephant Gift Wrap Idea

We had a white elephant gift exchange last weekend - guidelines were around $50 and unisex. Dave went with bourbon hoping no one would want it and he could take it back home LOL (that didn't work for him, it was one of the more fought-over gifts!). I bought a 12 pound weighted throw but wanted to think of a fun way to wrap it because it seemed boring as is (no, no one would have cared if my square blanket was wrapped in a plain ol' way). Maybe camouflage it in some way...

After coming home from Costco I was going to throw out the carry box I used but then it occurred to me that it sort of looked like a footstool the way the box was formed -  hmmm, I could make my blanket look and feel like a stool! 

I completely wrapped the box in paper, even the underside in case anyone looked and saw that it was just cardboard, folded the blanket to fit exactly on top of the box so it would feel like the stool was cushioned, and then wrapped paper over the blanket and taped it all around to the side of the box. The box was very sturdy, and with the added blanket weight it felt like a padded wood stool. No one guessed that it was a blanket  - and I got to amuse myself by being 'tricky'. Cute, right? 


12.29.22: thru the years

12.29.21: wreath making (funny)

12.29.20: recycled card projects (rerun)

12.29.19: ðŸ”¥week 52

12.29.17: christmas bark

12.29.16: gold fish

12.29.15: christmas card crafts

Thursday, December 28, 2023

Meatball Chili

I saw this recipe  here at bhg for Southwest Meatball Chili and wondered why I never thought to add meatballs to chili in place of ground or diced meat (I usually use diced turkey or leftover pork roast for my go-to West Coast Chili recipe). Great idea - I had 1/2 a bag of cooked turkey meatballs in the freezer and figured I'd give it a try. It's so good, a new favorite way to make chili and for sure I'll be making this again. 

I changed the original recipe so it's not exactly 'Southwest' now, click the above link if you want to make it 'Southwestern', here's how I made my version:

  • 1 pound fully cooked frozen turkey meatballs
  • 2 cans chili beans
  • 1 (28oz) can tomato puree
  • 1 (14.5) can diced tomatoes
  • 1 1/2 cups frozen corn
  • 1 cup red wine
  • 2 T. tomato paste
  • 2 t. chili powder
  • 2 t. coriander
  • 1/2 t. cumin
  • 1/2 t. red chili flakes
  • salt to taste
Combine all ingredients, check the seasonings and adjust if needed. Cook, covered, over medium-low heat for at least 30 minutes or until the meatballs are heated thru. 

Note: I like to make chili in the morning and then reheat it for dinner so all the flavors have time to meld together. We had this over white rice, topped with shredded cheese and sour cream.

Click here for a funny chili story :) 


Wednesday, December 27, 2023

Crocheted Coasters

Look how cute these funny little coasters are 😂 I was sitting at my desk yesterday when I came across the patterns and made them right then with yarn I have on hand - they didn't take very long at all. I might back them with thin cork, mostly because the underside isn't cute after I sewed on the details and I want to cover it up!


I only have 2 of these done, and I'm going to start the icicle one over because it's bigger than the first 2 - but I'm sharing this now anyway in case you need a quick little winter gift (I say winter because I started writing this post before Christmas and then didn't post it! But the snowman and icicle are still appropriate for a winter gift LOL or save this post for next year...).  If you already know how to crochet it's a quick project, and if you're learning how it's a pretty easy pattern to follow - Google or Youtube if you have any crochet questions (or leave me a note and I'll try to help). 

The pattern for the snowman and santa belt coasters is from Annie's Craft Store, the icicle one I found here at reginapdesigns.com. The snowman and belt are the same exact size, the icicle one is larger so I will remake it using a smaller crochet hook so it matches the others.

Here's the directions for the snowman and santa belt:

Christmas Coasters

Desians by Sarah Zimmerman

These are a great scrap project and can be so much more than coasters-hang them from your tree or use them as fridge magnets, appliqués on blankets or totes or as gift toppers-the possibilities are endless!


SKILL LEVEL - easy


FINISHED MEASUREMENT - 4 inches in diameter


MATERIALS

  • Medium worsted weight cotton/acrylic yarn:

                    5 yds each white, black, gray, red, green, brown, and a little yellow and orange

  • Size H/8/5mm crochet or size needed to obtain gauge
  • Tapestry needle

GAUGE:  6 rnds = 4 inches in diameter


PATTERN NOTES:

    Surface slip stitch (surface sl st):

    Insert hook in indicated sp, yo, pull loop to RS and through loop on hook


BASIC COASTER

Round 1 (RS): make a slip ring, ch 1, work 10 sc in ring, join in first sc (10 sc). Pull starting tail to tighten.

Round 2: ch 1, 2 sc in each st around, join in beg sc (20 sc)

Round 3: ch 1, (2 sc in first st, sc in next st) around, join in beg sc (30 sc)

Round 4: ch 1, sc in each st around, join in beg sc

Round 5: ch 1, (2 sc in first st, sc in each of next 2 sts) around, join in beg sc (40 sc)

Round 6: ch 1, sc in each st around, join in beg sc. Fasten off.


SNOWMAN COASTER

Make basic coaster in white.


EAR MUFF

Trim: with blue, work surface sl st (see pattern notes) around half of outer edge.


Muff - make 2: with blue, make slip ring, ch 1, 10 sc in ring, join in beg sc, fasten off. Pull starting tail to tighten.


ASSEMBLY

Referring to photo for placement, sew at ends of surface sl. st.


FINISHING

Referring to photo for placement and with black, embroider mouth with running stitches and eyes with French knots. With orange using straight stitches and starting in center of coaster, make a triangle with a long line down the center for nose. 


SANTA COASTER

make basic coaster in red.


FINISHING

With black, work surface sl st across center of coaster.


Referring to photo for placement, with yellow and using long straight stitches, embroider a square over center of black surface sl st for buckle. 


12.27.22: thru the years

12.27.21: bbq chicken sliders


Tuesday, December 26, 2023

Tip-sy Tuesday: Rum Cake

I made a rum cake for dinner last night, just your basic rum cake that you can find a million recipes for online (here's one that is the same as my old standby recipe, but really all the online ones seem to be the same recipe!) but I read a tip that I think is a rum cake game-changer - and I've been making rum cakes for years and years so when I tell you this is a good tip it really is! :)

Make the glaze a few minutes before the cake is done baking. Once you pull it out of the oven immediately poke the bottom (top, which will be the bottom once you invert it) with a long skewer in multiple places, pour some of the glaze over top and let it sit still in the pan on a cooling rack for 10 minutes. Once you can handle it without getting burned, invert the cake onto a plate and poke holes all over the cake including the sides. You can poke it with a skewer or a fork, be gentle so you don't damage the pretty cake. Pour glaze into the empty pan and re-insert the cake, then pour any remaining glaze over the bottom once again. Cover the cake in the pan and let it sit until all of the glaze is absorbed - I left mine overnight and when I inverted it onto a serving plate the next day it was perfect.

To finish, I melted some hot fudge and drizzled it over the cake, then drizzled a white icing made from confectioners' sugar and milk; add sprinkles if desired. I had rave reviews of how amazing the cake was! 

As usual I forgot to take a picture!

In case I lose the above link for a rum cake I better give you the actual recipe! Looking at old posts I'm finding a lot of the links don't work anymore.

  • 1 cup chopped walnuts
  • 1 (15.25 ounce) package yellow cake mix
  • 1 (3.4 ounce) package instant vanilla pudding mix
  • 4 large eggs
  • 1 cup dark rum, divided
  • ¾ cup water, divided
  • ½ cup vegetable oil
  • 1 cup white sugar
  • ½ cup butter

  1. Gather all ingredients and preheat the oven to 325 degrees F (165 degrees C).

  2. Grease and flour a 10-inch Bundt pan. Sprinkle chopped walnuts evenly over the bottom of the pan.

  3. Combine cake mix and pudding mix in a large bowl. Mix in eggs, 1/2 cup rum, 1/2 cup water, and oil until well-blended. Pour batter over chopped nuts in the pan.

  4. Bake in the preheated oven until a toothpick inserted into cake comes out clean, about 1 hour.

  5. Meanwhile, make the glaze: Combine sugar, butter, and remaining 1/4 cup water in a saucepan. Bring to a boil over medium heat; cook, stirring constantly, until it thickens and slightly darkens, about 5 minutes. Remove from heat and stir in remaining 1/2 cup rum.

  6. Let baked cake sit in the pan for 10 minutes, then invert onto a serving plate. Brush glaze over top and sides. Allow cake to absorb glaze and repeat until all glaze is used.

  7. Serve and enjoy!


12.26.22: boxing day

12.26.19: naughty gingerbread man

12.26.18: boxing day

12.26.17: chex mix

12.26.16: melting snowman cookies


12.26.15: Janis's crunchy fruity granola


Monday, December 25, 2023

Sunday, December 24, 2023

🔥 Around the Campfire (week 52)

Dear Campers ~ 

Here's a quick recap in case you missed anything at camp last week:

Posts ~

12/17: 🔥 week 51

12/18: crochet and bead bracelets (re-run)

12/19: Christmas cookies and pumpkin bread

12/20: wreath ornaments

12/21: russian teacakes

12/22: snowman vegetable tray

12/23: words

What's Cooking ~

  • roasted eggplant parmesan, pasta with olive oil, roasted asparagus
  • meatball chili
  • chicken pot pies, green salad
  • grilled swordfish, corn tortillas, coleslaw
  • lasagna, salad, garlic toast

MERRY CHRISTMAS EVE!!! 

came across this from last year and laughed all over again :)


Sincerely ~

Jill
camp counselor


Friday, December 22, 2023

Snowman Vegetable Tray

Jenny sent me this super cute and easy idea for a snowman veggie tray in case you need another idea right now hahaha!! I can't tell what the eyes and buttons are made of - maybe peppercorns? Or black gel frosting dots? Otherwise this is pretty self-explanatory. Love it!


Thursday, December 21, 2023

Russian Teacakes

Cathy made a few different Christmas cookies and gave me a plate of them - they are all great (one is Cherry Chews which I shared last year, love), I think my favorite might be these Russian Tea Cakes. 

I'm typing the recipe as written, so when you see '2 cups flour' along with '2 T. flour' that is what the original recipe states - but the instructions don't say what to do with the 2 Tablespoons. I'd either omit that, or if the dough seems to soft maybe it needs a little bit more? 

1 cup unsalted butter, room temperature
1/3 cup packed confectioners' sugar
1 cup finely chopped toasted walnuts
1/8 t. salt
1 t. vanilla extract
2 cups all-purpose flour
2 T. all-purpose flour
1 cup confectioners' sugar for dusting, or more as needed

1. Preheat oven to 350',. Arrange rack in center position of oven.
2. Place butter, 1/3 cup powdered sugar, walnuts, salt, and vanilla in a bowl. Top with the flour. Mix with your clean hands until the dough starts to clump up. Keep mixing by hand until all the flour and clumps of butter are evenly mixed into the dough and it can be easily formed into balls. 
3. Scoop out dough and roll by hand into uniformly round balls, just slightly larger than 1 inch. Place on a rimmedbaking sheet lined with a silicone baking mat about 2 inches apart. 
4. Bake until lightly golden, 15 to 25 minutes depending on the size of the cookies. 
5. Let cool exactly 5 minutes, then roll in a shallow bowl full of confectioners' sugar. Let cookies cool completely and toss them again in the confectioners' sugar. 

At the top of the recipe it says "As the old joke goes, these Russian tea cakes might not be Russian, but at least they're not cakes." HA! 


12.21.22: crispy chicken piccata

12.21.21: rudolph gift bags

12.21.20: tube gift wrapper by B


12.21.19: santa baby gift enclosure


12.21.18: chocolate fudge wreath


12.21.17: Nat's Christmas sugar cookies


12.21.16: focaccia bread tiles


12.21.15: framed wifi password


Wednesday, December 20, 2023

Wreath Ornaments

I'm looking for a fun easy craft to do at family Christmas this weekend, I have lots of ideas but just came across this at BHG.com and think we might do these. I'll get 4" natural brown wreaths at the dollar store along with some little trees and whatever fun things I can still find (if not at the dollar store I'll hit a craft store, I know I get all this stuff cheap). We'll paint the wreaths, after they dry just hot glue on the decorations, add a ribbon or twine as a hanger, and attach a bow at the top. Easy, different, seems fun!


 These would be fun gift tags too, either color coordinated to their wrapping paper or add a name tag. 


12.20.22: TT gift wrapping idea

12.20.21: felt gift card holder

12.20.19: caprese bites

12.20.18: cheeseball wreath


12.20.17: chocolate peppermint crinkle cookies 


12.20.16: tiger fudge (although I think it should be called Buckeye Bars!)

12.20.15: corn bread with jalapeños and cheese mini muffins


Tuesday, December 19, 2023

Christmas Cookies

Made cookies and pumpkin bread yesterday to give to neighbors, friends, UPS Paul, the groomer, etc. I kept it pretty simple but I'm happy with how everything turned out. 

  • Candied Cherries and Chocolate Chip - chopped up red and green candied cherries, tossed with a little bit of flour so they wouldn't stick together as much, folded them into my standard chocolate chip dough. 
  • Caramel Apple - I doctored a Betty Crocker Salted Caramel cookie mix by adding a pinch of coarse salt and a teaspoon of vanilla. Stuffed with half of a soft caramel (seasonal flavor 'caramel apple'). I've done this before with chocolate cookies, click here to see the post and how to stuff the cookies. 
  • Double Chocolate Chunk ~ doctored a Betty Crocker cookie mix with a pinch of coarse salt and a teaspoon of vanilla. After they cooled I pressed their top into powdered sugar. 

To finish - I designed a double-sided label using avery.com (free) and printed them out on index cards (avery #5388). 


I made pumpkin bread using my (very old tried-and-true) recipe. Click here for that post.