- 1/2 cup butter, room temperature
- 1 cup packed brown sugar
- 1 egg
- 1/2 cup sour cream or buttermilk
- 1 1/2 cups flour
- 3/4 t. cinnamon
- 1/2 t. cloves
- 1/4 t. baking soda
- 1/2 cup chopped raisins, dates, figs, dried apricots (note I used dried cranberries)
- 1/4 cup chopped nuts (note I used coconut instead)
Welcome to day camp - it's either a place for you to get inspired and want to make stuff, or a place where I can show off the cute things I've made since my family is tired of my texting them pictures every day! Just like camp I do all kinds of fun projects - crafts, DIY, bake, cook, garden and more - and can't wait to share them with anyone looking for ideas.
Wednesday, June 30, 2021
Hermits
Tuesday, June 29, 2021
Tip-sy Tuesday: sewing tip
I made a different kind of mask yesterday - even tho most of our mask mandates are over, I have lots of material and thought I'd try something different from my standard - and favorite - pleated one. I will still be wearing a mask in certain situations, and it's fun to have choices when it comes to masks. Anyway - I learned a little trick to help feed the corners of fabric under the sewing machine needle and thought I'd share.
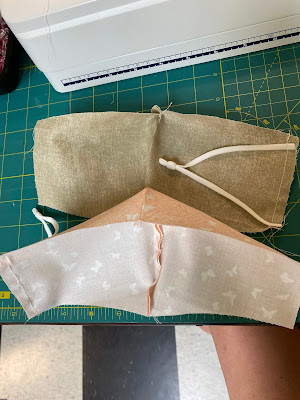
Very often when I'm feeding a piece of material into the machine, the edge won't catch and ends up balling up under the needle - ugh. So annoying. When watching a video on how to make this new mask she had a 'leader' piece of fabric that guides the fabric you want to sew under the needle so much easier.
Just fold a small piece of scrap fabric into a small rectangle or square, maybe 3 or 4 layers, and sew over it - before cutting it off, feed your project fabric under the needle and the 'leader' scrap makes it so the project fabric doesn't get caught. I'm making this sound much more complicated than it is so I took some pictures!
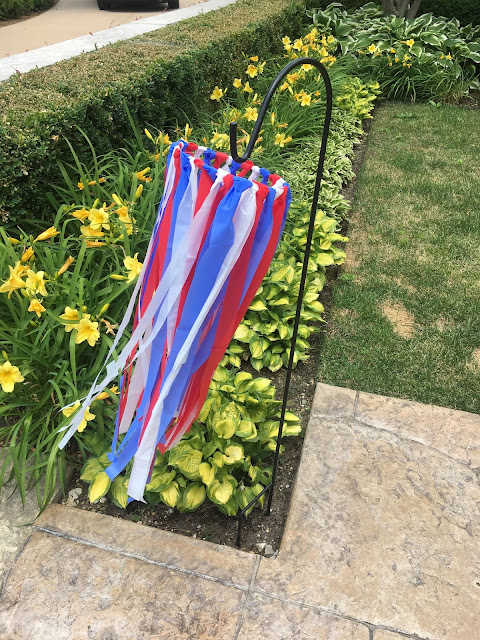
6.29.17: make a red, white, and blue windsock
6.29.16: patriotic potato salad
Monday, June 28, 2021
Another Mask!
Don't know how I stumbled on this new mask pattern, probably that darn Pinterest hahahah - my favorite masks are my pleated ones, I find them comfortable and about as breathable as you can get while wearing fabric over your face! But I have lots of material and mask-making supplies and some time to play, so thought I'd give this new style a shot. Quite honestly it isn't better than the pleated ones I can make with my eyes closed, and (for me anyway) not as comfortable. But I'm sharing because lots of people do like this style, and it's the favorite of the woman who shared the pattern so who am I to say it's not great hahah.
Yes, most of our mask mandates have been lifted and things are getting back to 'normal' but I will still be wearing a mask in some situations and it's fun to have options of what mask to wear. If you still anticipate wearing a mask now and then, maybe you'd like to make one of this style and see if you like it. Tell me if you do!
I'm not going to do step by step instructions - click here (or search for 'sewcanshe' online) to go to the original site where I found the pattern and watch her video, she does a good job of walking you thru how to make this mask. I don't need to reinvent the wheel when she already does it so well hahaha. She also has a free pattern on her website with different sizes.
I took some pictures while making the mask and will give you a general overlook:
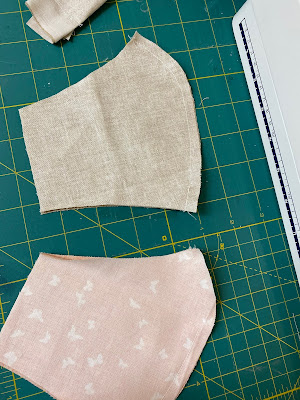 |
| cut 4 pieces of material following her pattern |
 |
| sew them together creating the front and back of the mask |
 |
| add ear loops - she has a cool trick that didn't make sense to me until I tried it |
 |
| with right sides together sew the front and back together leaving a small opening to turn it right side out |
 |
| I made mine reversible, use whatever fabrics and patterns you like |
6.28.20: 🔥week 26
6.28.18: painted mason jar with paper pinwheels
6.28.17: healthy berry trifle
6.28.16: travel - Goodwood
Sunday, June 27, 2021
🔥 Around the Campfire (week 26)
Dear Campers ~
Here's a quick recap in case you missed anything at camp last week:
Posts ~
6/20: 🔥week 25
6/21: patriotic windsock (re-run)
6/22: tip-sy tuesday: air fryer hasselback potatoes
6/23: fourth of July cake idea
6/24: red, white, blueberry salad
6/25: spaghetti tacos by B
6/26: mozzarella stuffed portobellos
What's cooking ~
- steak, air-fryer hasselback potatoes, wedge salad platter
- bbq ribs, chopped salad
- grilled mahi-mahi, tortillas, coleslaw
- marinaded, grilled pork tenderloin, orzo salad, roasted green beans
- baked salmon with crab and spinach topping, couscous, roasted asparagus
- grilled chicken, cheesy loaded potatoes (crockpot), roasted broccoli
Saturday, June 26, 2021
Mozzarella Stuffed Portobellos
- 12 large portobello mushrooms, stemmed and gills removed
- 6 T. balsamic vinegar
- 1/2 cup olive oil, divided
- sea salt and ground pepper
- 1 cup fresh bread crumbs
- 1 cup grated parmesan
- 4 T. freshly chopped parsley leaves
- 4 T. freshly chopped basil leaves
- 12 (1/2") slices fresh mozzarella
Friday, June 25, 2021
Spaghetti Tacos by Brooke
Yep, you read that title correctly - spaghetti tacos! My first thought was 'well that's gross' but second thought was 'maybe adding some crunch to spaghetti wouldn't be half bad'. I had a bite and while it wasn't bad it was just strange enough that I'm probably never going to make these LOL. Here's what she has to say:
Hey guys! today my friend and i tried a recipe from a Nickelodeon show we watched growing up called ICarly! its called spaghetti tacos! just your basic speghetti recipe in a hard taco shell! it was very interesing and worth the try!
I love that as a teenager she is still watching ICarly - man we watched that show so much when she was little 😊
6.25.20: veggie cobb salad
6.25.19: tip-sy tuesday: gardening tip
6.25.18: spaghetti squash shrimp scampi
6.25.17: week of dinner menus
Thursday, June 24, 2021
Red, White, and Blueberry Salad (re-run)
I posted this in 2018 and forgot all about it - I have all the ingredients on hand and am going to make it for dinner tonight! It's a repeat but too good to not share again:
Wednesday, June 23, 2021
Fourth of July Cake Idea
Tuesday, June 22, 2021
Tip-sy Tuesday: air-fryer hasselback potatoes
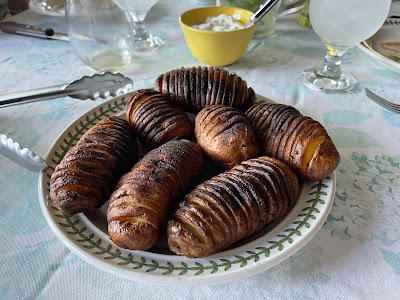
It's been really hot here and I didn't want to turn the oven on long enough to roast the hasselback potatoes I wanted to make for dinner, so I thought I'd try them in my toaster oven/air fryer combo oven to shorten the bake time. I looked up a bunch of recipes and most said to bake in a preheated oven for about 30 minutes total, but mine were not done in 30 mins so I turned up the temp for a few more minutes which caused them to get very brown and crispy. Next time I will leave the temp alone and just plan to increase the baking time. Or buy smaller potatoes.
Whether you do these in the air-fryer or just traditional oven this preparation is good (click here for another recipe I really like). Mix together in a bowl: 1/2 cup melted butter, 2 T. olive oil, 1-2 teaspoons fresh herbs (parsley, thyme, and rosemary - if you don't have fresh it's ok to substitute dried but use smaller amounts), 1/2 t. garlic powder, salt and pepper to taste. Preheat the air-fryer or oven to 350; bake for 15 minutes, remove from the oven and brush with more of the melted butter mixture making sure to get some of it in between the slices. Bake for another 15 minutes or until the potatoes are tender. Serve with sour cream if desired.
To slice the potatoes: you make cuts all along the potato being careful to not cut all the way thru. An easy tip to do this it to place 2 wooden spoons on either side of thee potato, then slice - the spoons will keep your knife from going all the way thru:
6.22.20: watermelon windsock
6.22.19: Karen's layered taco dip
6.22.18: blog business cards
6.22.17: hair idea - top braid
6.22.16: travel - Goodwood Festival
Monday, June 21, 2021
Patriotic Windsock (re-run)
I made this back in 2017 - with the Fourth right around the corner I thought I'd share it again in case you want to make one; it's, quick, cheap, easy and so pretty flying in the breeze!
Here's the original post:
Browsing the internet (aka: wasting time instead of doing something productive) and saw this idea for an easy quick craft - since I have the supplies on hand I just now went and made one (aka: got off my behind and did something)...took me maybe 15 minutes tops and it's really cute. Great kid craft!
For each strip: fold in half, put the center loop under the ring, bring the ends up over the ring and thru the loop, pull tight. Repeat until the ring is as full as you want it. Tie on some fishing line (or thread, or light wire...) to hang.
 |
| this is all you need (or use scissors to cut the strips), plus pliers to bend the wire. |
 |
| 29 strips to go... |
 |
| tie on something to hang it - I used fishing line. |
Found the idea here.
Sunday, June 20, 2021
🔥Around the Campfire (week 25)
Dear Campers ~
Happy first day of summer! Here's a quick recap in case you missed anything at camp last week:
Posts ~
6/13: 🔥week 24
6/14: sweet and simple gift box
6/15: tip-sy tuesday: slicing tomatoes hack (and fail)
6/16: minty dream cookies
6/17: pierogi
6/18: mint chip brownie ice cream squares
6/19: charcuterie platter
What's Cooking ~
- lemon-rosemary rotisserie chicken, roasted baby potatoes, green beans
- grilled ahi tuna, greek salad
- steak, caesar salad, sautéed mushrooms
- grilled chicken sausage, white beans in Italian red sauce, roasted asparagus
- grilled marinated chicken, linguini with red sauce, roasted broccoli
- blt's, potato salad, wedge salad
Saturday, June 19, 2021
Charcuterie Platter
When did 'charcuterie boards' become such a 'new thing'? (Probably those bougie millennials LOLOL!!). We've been making charcuterie boards since the beginning of entertaining time, except we called them 'meat and cheese plates' hahahahaha. Making myself laugh. Anywho...I made a charcuterie plate and it was delish.
Best addition to the platter is balls of burrata cheese - I love, underline the love because it's amazing and I love it. Have you had it? Fresh mozzarella balls filled with soft mozzarella and cream, so when you cut into the ball the inside is soft and creamy. Serve burrata at room temperature to make sure the inside will be soft. I drizzle it with a bit of olive oil, sprinkle on coarse salt and pepper. YUM.
In addition to the burrata, my platter has prosciutto, salami, pear slices, grapes, hummus, carrots, celery, and cheese curds. I put three different kinds of crackers in a separate bowl because I was afraid once we cut into the burrata the cream would make the crackers soggy.
Friday, June 18, 2021
Mint Chip Brownie Ice Cream Squares
Cathy made this fantastic dessert a couple months ago and I totally forgot to post it before now - going thru computer pictures as usual and I came across it...and it's WAY too good not to share! Perfect summer dessert - layers of brownie, mint ice cream, chocolate and whipped cream. I mean c'mon, sounds amazing right?!!
- 18 oz. brownie box mix (the size that fits in a 9x9 pan)
- 1.5 quarts mint chocolate chip ice cream
- 3/4 cup heavy whipping cream
- 1 cup semi-sweet chocolate chips - or- 1 to 1 1/2 good quality hot fudge sauce
- 8 oz. tub of cool whip (or make your own whipped cream, see below for instructions), thawed
- chopped Andes Mints, chocolate chips, etc. to garnish
- Line a 9x13" baking pan with parchment paper. Note: you use a brownie mix meant for a 9x9 pan but prepare it in a 9x13 cake pan so the brownie layer is a thinner base.
- Prepare brownies according to package directions, spread in pan. Bake for 20-25 minutes until the center is set (a few crumbs cling to a toothpick when inserted in the center). Cool.
- Let the carton of ice cream sit out at room temperature about 20 minutes until soft enough to spread over the cooled brownies.
- Place the entire pan back in the freezer until the ice cream re-freezes.
- Heat the cream in the microwave for 1-2 minutes until hot (watch that it doesn't boil). Add the chocolate chips and set aside undisturbed for 3 minutes or enough time for the chips to melt. After a few minutes stir to mix the cream and chocolate together.
- Let cool to room temperature, then pour over the ice cream layer and spread evenly. (Or heat the hot fudge sauce until just warm even to spread and pour over ice cream layer).
- Spread the thawed Cool Whip over the chocolate layer. Or make your own whipped cream by beating 1 cup heavy whipping cream, 1/4 cup powdered sugar, and 1 t. vanilla in a mixer until fluffy and spread over the chocolate layer.
- Garnish the top of whipped cream layer with chopped andes mints (or whatever you like).
Thursday, June 17, 2021
Pierogi
Wednesday, June 16, 2021
Minty Dream Cookies
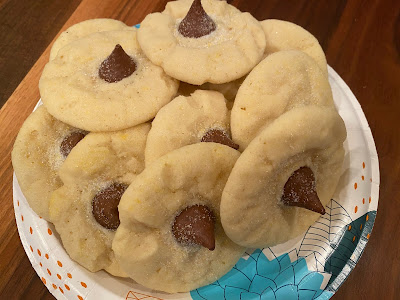
Dave asked if I would make cupcakes or cookies for his ukulele meeting and since I've been making so many cupcakes lately I went with cookies! I've had this recipe in my file for a while from the book 'Christmas Cake Murder' by Joanne Fluke (a series of murder mystery - slash- recipe books) and had all the ingredients on hand so whipped them out. The only thing I changed is probably a big thing - substituted vanilla for the peppermint extract so the ones I made are technically not 'minty dream cookies' but I'm sticking with the name in case you want to make them minty. I added yellow decorating sugar to white sugar (see recipe) but you can't see the yellow at all...these remind me of shortbread (which I love!), crunchy and chewy at the same time. Not the best looking cookie but the taste makes up for it!
- 1 cup melted butter (2 sticks)
- 1 cup powdered sugar
- 1/2 cup white sugar
- 1 large egg
- 1 t. peppermint extract
- 1/2 t. baking soda
- 1/2 t. cream of tartar
- 1/2 t. salt
- 2 cups plus 2 T. flour
- 1/2 cup white sugar for coating dough balls
- 6 T. colored decorating sugar, optional (she did 1/2 red, 1/2 green at Christmastime)
- approx. 5 dozen Hershey's Kisses, unwrapped
- Melt the butter in a microwave-safe bowl, add the cup of powdered sugar and 1/2 cup of white sugar and mix thoroughly. Let the mixture cool to room temperature.
- Mix in the egg and extract. Add the baking soda, cream of tartar, and salt; mix until well combined. Add the flour in 2 increments, mixing after each addition. Cover the bowl with plastic wrap and chill for at least one hour (or overnight).
- When ready to bake, preheat oven to 325' with the rack in the middle position. Spray cookie sheets with non-stick spray or line them with parchment paper.
- Add colored decorator sugar to the 1/2 cup white sugar if you want the cookies to be colored. If using more than one color of decorating sugar just divide the 1/2 cup white sugar into small bowls and mix different colors in.
- Roll dough into walnut-size balls. Roll the balls in the sugar (or sugar mixed with colored sugar). Place on your prepared cookie sheets. Press an unwrapped Kiss in the center. Bake for 10 to 15 minutes until light brown. Cook on the cookie sheet for 2 minutes, then transfer to wire racks to finish cooling.
Tuesday, June 15, 2021
Tip-sy Tuesday: Slicing Tomatoes Hack
I'll start by saying this is a fail. Didn't want you to read the entire way thru and get all excited about how great of a tip this is only to find it doesn't work and then cuss me out. LOL. It didn't work for me, maybe you'll try it anyway and have better luck. Let me know if that happens!
I've seen this hack a few places that like to share handy tips, and since I eat and chop ALOT of tomatoes I thought 'aha, genius!'.
Place the tomatoes between two plates, press down on the top plate and run your knife in between the plates thereby cutting the tomatoes in half. Are you also thinking 'aha, genius'? Seems like it should work right? Maybe my knife just wasn't sharp enough or something but nothing happened other than the tomatoes being pushed off the bottom plate hahahah.
So whatcha think - game to give it a go?
6.15.20: painted sticks
6.15.19: Jen's new 'mantra'
6.15.18: diy duvet cover
6.15.17: chopping herbs
6.15.16: mini fruit pies


